


By continuing to use the website or clicking Accept you consent to our cookies and personal data policy and confirm that you are at least 18 year old. For details please see Privacy Policy and Terms
Accept
Likes
Comments
Share


@ukterpdoc
Follow
Sorry for late update friends been in Jamaica for 10 days 😀
So plants look amaizin gonna flip them tomorrow i think its time any opinions guys.

Likes
241
Share


@Tropicannibis_Todd
Follow
💩Holy Crap We Are Back At It And Loving It💩 👉WE R ALMOST AT THE FINISH LINE👈
Growmies we are at DAY 63 and there just killing💀it👌
👉We are in full on flowering , gotta say the pink to redish hairs have gone away which is a bummer 😕 but the frost 🍦 is strong 💪
So Shit , I gave them just a tad to much nutes on the first few feeding 👈 But I have since fixed it
So I'm still doing some low stress training 🙃 and some defolation 😳
Lights being readjusted and chart updated .........👍rain water to be used entire growth👈
👉I used NutriNPK for nutrients for my grows and welcome anyone to give them a try .👈
👉 www.nutrinpk.com 👈
NutriNPK Cal MAG 14-0-14
NutriNPK Grow 28-14-14
NutriNPK Bloom 8-20-30
NutriNPK Bloom Booster 0-52-34
I GOT MULTIPLE DIARIES ON THE GO 😱 please check them out 😎
👉THANKS FOR TAKING THE TIME TO GO OVER MY DIARIES 👈

Likes
20
Share


@Comfrey
Follow
Dutch Passions Shaman
Die zwei Schamaninnen entwickeln sich sehr schön. Sie sind auf 75 Zentimeter gewachsen. Ich habe mich gegen das Umtopfen entschieden. Zum Einen, weil ich die beiden mobil halten will und zum Anderen um sie nicht zu stressen. Ich werde die beiden gut beobachten und in den nächsten Tagen mit Kompost, frischem Mulch und Beinwell Jauche nach düngen.

Likes
17
Share


@m0use
Follow
This was a fun project that was a few years in the making and a year later to see if they would last a season for this upload to happen. Before any of this I would bike aorund town grabbing up all the old Ikea solid pine bed slats that I could find and storing them in the basement. I have a lot of wood down there, any size worked as long as I have enough of them. The hot days to find them were the first and last of the months because that's when people where moving in/out. I also kept an eye on the free section on local online classifieds as well. The entire purpose of this was to recycle as much off the streets as I could before buying anything to finalize the project. In the end I only bought sealer, screws and some takeaway/beers. All the wood was 100% free and salvaged off the streets of Toronto saving it from the dumpster bin.
After collecting all the slats for about 2 years I was playing aorund with them on how I wanted to make this work. I had previously done a little project like this before but I messed it up and the boxes where crap. did not last longer then 2 seasons, they where thin and shallow as well could not grow much of anything in them. I Was talking to my friend who is renovating their house and we brainstormed some ideas on the boxes, I found some designs I liked online and said lets make something like this out of what I have here. We tossed out a few of the design features when looking at them as it would have been wasted wood and extra work not needed. If I had more wood them maybe it could have been an option but simple was the name of the game. They taught me what I needed to know like how the miter saw and sander worked, plus all the other tools I was using. They did help out with a table saw and creating the triangle support joints in the corners, They used some pine left overs they had while making a staircase indoors. I did not feel up to the task of using a table saw given all the relatives I know who have lost a finger to them.
In the end we decided the design would be three boards high and take an alternating pattern on corners. layer one short, layer 2 long, layer 3 short. Went with a galvanized and painted deck screw so it can take the weathering. Ran into some problems like making everything level as some of the boards were warped and other ones had undesired aspects like knots and tacky sticker goo I could not remove. So I used them for the base that will not been seen so much. Clamped everything down and called it a day.
Once it was all done and over with, I then brought them back home from my buddies work garage and started to seal them. I went with a boiled linseed oil as its a food safe option should the wood degrade into the soil I will plant in them. I will need to reapply it to the boxes year after year but the main coat is the most important one and I put it on 3 layers with a good dry in between coats. the inside of the boxes that where coated did not degrade at all as the sun did not hit them so it will not need a new coat just the outside. Overall the end result was very impressive for myself, I've never taken a woodworking class ever and It was a near perfect outcome for me. Heavy Duty Planter Boxes for all my gardening needs. I made a last min decision to add in a plastic liner to preserve the wood even longer and stapled that into the frame. it has held up quite well and may need replacing end of 2nd or 3rd year out in the sun. Used a thick moisture wrap plastic with UV protectors in its formula.
Lets see what I can grow in them this year!
m0use's haus of projects - garden box edition


Likes
13
Share


@PatMcCrotch
Follow
I had to get a bigger tent as these girls were pushing themselves out of my other tent. I also added another COB to the tent at the same time. The plants are doing well and are liking their new home it seems. I need to defoliate the biggest one though, too many leaves covering bud sites. Might do that after work tonight as well as water. Back ina week.

Likes
10
Share


@Wynh1
Follow
Plants growing lovely getting big took well to topping, slight yellowing on bottom leaves so will have to up the grow slightly

Likes
34
Share


@marihoochi
Follow
Today October 25th is the First day of Week 6 In Flower.
Received the Refractometer and got right to pressing. First I tried a mortar and pestle to extract the sap -- this worked ok but took a lot of time and force. Then I tried 2 spoons held together and squeezed with vice grips (didn't work for me). 2 Pieces of MDF board squeezed together with vice grips didn't work either. I guess I'm not strong enough.
Tried a blender, a hand blender...neither of these worked!
Then the vice, it was faster and took less force to extract the sap. Works great!
Took leaves from top to bottom of each individual plant. (16 plants) Rolled a few leaves up, put in a numbered piece of parchment and pressed.....voila...sap😃 Refractometer was already calibrated and ready to go.
Placed sap on meter, held up to light and there it is! My first BRIX reading😮 using $28 Refractometer.
Going to change base nutrients to a "hard water" formula. So impressed with Harley Smith that I've ordered some NPK RAW products. Like the idea of micro dosing. I sent Harley an email and he replied the same day! Not a canned response either. So cool. Thanks Harley! AND he took a look at GrowDiaries and this grow✊😃 What a kind gentleman. 😇
Hope I didn't go overboard but I watered again today with amino acids and cal mend to try to fix this Calcium def. Will Brix leaves tomorrow and see if this makes a difference. The brix line yesterday was very clear and very easy to read indicating a calcium def. Maybe locked out from too much phosphorous or hard water?
Watered Oct 29 & 30 Temp 20 PH 6.4 EC 1.9
Runoff EC 1.9 to 2.3 after at least 2-3 Gallons of water put thru each pot. Some pots Runoff were way off the charts😵EC 3.6! . Put water thru until EC hit 2.3 on 2 pots others were EC 1.9 to 2.1. Put 56 Gallons or 220L thru plants over a 2 day period until I reached a better EC.

Likes
11
Share


@Mr_nugs_lover_David
Follow
She's looking very healthy and happy and strong, she has developed perfectly during this last 3 weeks since she was planted and I cannot wait to transplant this lady and start giving her the bushy discreet shape that I need! Let's get to work! 💚❤️💛

Likes
6
Share


@SecretC8keSociety
Follow
Today will be Day 64. Getting close to Harvest Day. Let me tell you. The smell was unexpected stink up the place and outside the grow tent as I come home. I also clean the bottom up little more and removed the dead 🍁. I use Cha Ching on Week 9 and on Week 10 will be the flushing week. Stay tune!
Likes
9
Share


@Smokey_J26
Follow
Defoliation again, as you will see, gave the girls plenty of room for air to circulate.


Likes
8
Share


@skaterblasted
Follow
Lamp Brightness: 100% @ 16" - estimated 914 PAR
(experimented with angling the light slightly to achieve roughly 16" distance on both sides)
Feeding schedule once-a-week, all other waterings strictly water-only
Day after feeding, soil is given a sst + fresh organic kefir whey 4oz+ per gallon
(kefir grains grown in local organic grass-fed milk)
IPM 1oz per gal EM5 solution foliar spray + applied directly to mulch/cover crop (before lights-out) - once a week
Note: had to move a couple pots around this week due to watering restrictions
GMO 2 is now back left - GMO 1 moved ahead to front left
stem rubs: GMO 1 - strong/gas
GMO 2 - mild/faint/gas
GMO 3 - strong/citrus/floral/gas
Likes
23
Share


@Zuppler
Follow
Grow Report by Zuppler - Week 3 Veg Phase
Ayy, what it do fam? Zuppler back on the check-in with that week 3 veg report, live from the capital. Yo, these girls ain’t playin’ no more – they really startin’ to stack up, lookin' thick in the canopy like they preppin' for somethin’ big. We still runnin’ that Advanced Nutrients like clockwork, straight through that RO water, keepin’ it pure as a Miami night breeze.
The nodes are gettin’ tight, leaves spreadin’ out nice and wide, takin’ all that light. I hit ‘em with a little scrog, just a lil’ bend here and there, makin’ sure that light hit every corner of the canopy. You already know I’m tryin’ to maximize that potential. Stems got that thick structure, and no signs of nute burn or nothin’. We’re talkin’ flawless execution, fam.
At this point, it’s just watchin’ ‘em fill out, keepin’ the environment dialed in and lettin’ ‘em do their thing. We’re settin’ the stage for a strong finish when we flip ‘em to flower.
Zuppler out, stay blessed.
Likes
158
Share


@Ezzjaybruh
Follow
Doggo update
Couple vids sprinkled in here.
Love doing slo-mo with frisbee throws and treats catching in their mouth.
Slo Mo vids didn’t upload slo mo so I had to go thru and edit them and screen record it just to get them in slow mo on the site but they’re worth it
Dukes ear has been bugging him and so he pins it down sometimes with the other ear straight up and he looks goofy as hell.


Likes
15
Share


@mrbigbong
Follow
the flush started, 2-3 weeks of flush .... a plant is almost mature, but having had two phenotypes that are somewhat different at the genetic level, one or the other will mature slightly more (in view of sativa prevalence) it will be harvested when fully ripe. very sweet and fruity smells, really good and strong ...
Likes
75
Share


@Dedon
Follow
Happy New Year everyone !
Flo + 58
i'll start flushing this week end and cut them around 12/13 january, there is a strong smell inside the box ^^ it's so pleasant, i'm so impatient to chop them 😁
See you next week !
Likes
23
Share


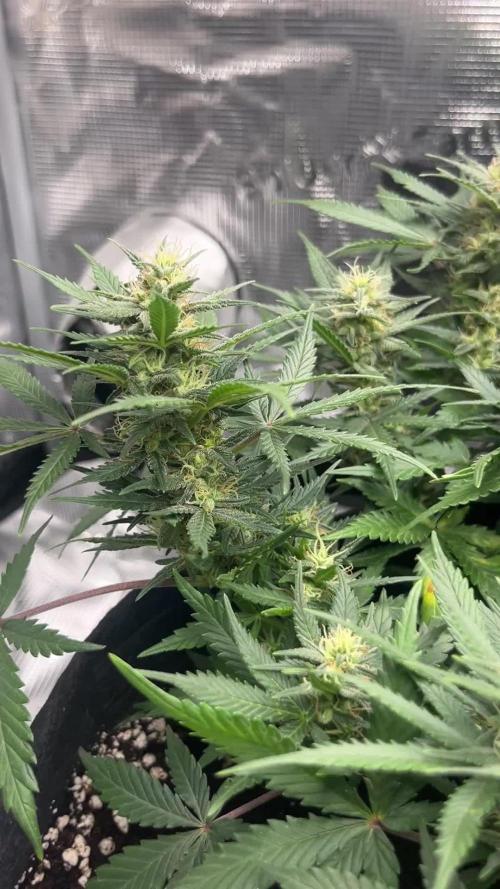
@Firepharmer
Follow
She’s getting frosty and dank
👃🍪🍊🍓🍰🍌🍒🍇🍭👃
Day 29 almost half way , happy with all the phenos so far all frosty so many terps
.. started feed the canna nutrients plants canna pk1314 ..
2 flush’s Got the remo plants all most on the proper Ec again


Likes
18
Share


@ReefermanGenetics
Follow
This is week 4 we are about to flip them to flower. 8 strains being test grown new strains.
