By continuing to use the website or clicking Accept you consent to our cookies and personal data policy and confirm that you are at least 18 year old. For details please see Privacy Policy and Terms
Accept
Likes
Comments
Share

@Qutro
Follow
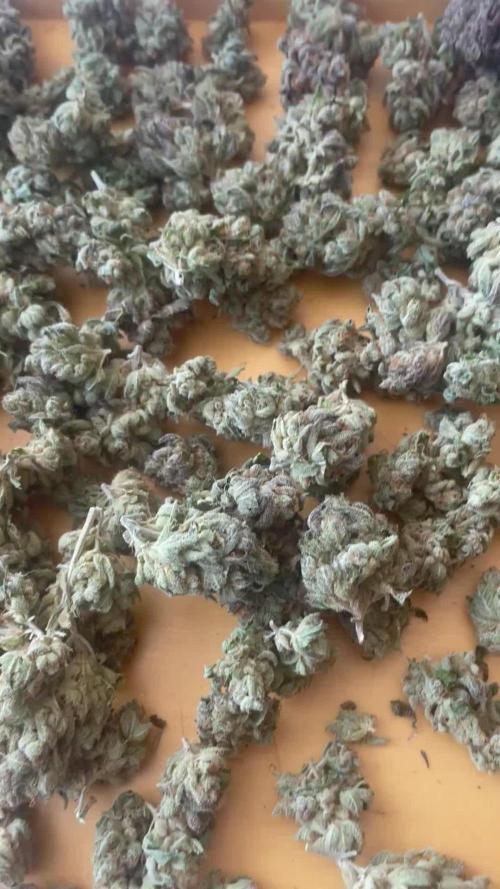
Ran 2 seed from both, all popped easy. Veg stage was smooth—Candy Store RBX with medium long internal soacing, Marshmallow OG compact and sturdy. Topped, LST’d, ScrOG’d, both responded like champs.
Flowering hit week 4: Candy Store kept those fluffy buds, sweet berry/candy smell blasting. Marshmallow stretched like crazy until week 4. Had to lift the Candy to keep the canopy even. Marshmallow OG went full compact, colas dense, straight gassy with a heavy chemical punch— diesel vibes in the mix. Trichomes frosted early, looked insane by week 6.
Harvest week 9: Candy Store RBX gave frosty, a bit fluffy buds, pure candy/berry flavor, uplifting and social. Marshmallow OG delivered tight, dense nugs, straight gas, chemical-heavy flavor, relaxing body buzz creeping in. Both fire, but totally different vibes. Candy = fruit bomb, Marshmallow = full on gassy chem punch.
Visually and flavor-wise, the two perfectly complement each other. I’m super happy with this round. Both turned out purple at the end of flowering.👌


Likes
32
Share


@AsNoriu
Follow
Day 82. First one from Mimosas is ready ! Mini of all mini trim jail's ;))))))
Day 89. First in jars !
Day 92. Trim jail .... One will be great producer, other waste of time a bit ...
Day 102. All job done with them.
Happy Growing !!!

Likes
37
Share


@DogDoctorOfficial
Follow
🌱 Germination Journey with Terpyz Mutant Mentha de Croco 🌱
Hey Grow Fam! Today kicks off an exciting adventure with Terpyz Mutant Mentha de Croco genetics. I’ve got 10 regular seeds ready to sprout, and I’m looking forward to discovering some beautiful female phenotypes—and maybe even a standout male for potential future breeding. It’s been a while since I’ve worked with regular seeds, so I’m thrilled to dive in!
Germination Process Overview:
Here’s a step-by-step rundown of the germination setup and process, with a special focus on the equipment and nutrients that are helping these seeds thrive right from the start.
Step 1: TheCannaKan Germination Pod 🌱
For germination, I rely on TheCannaKan—a device I’ve come to love and trust. It’s designed to create the perfect microclimate for seed germination, and within just 24 hours, the seeds started showing signs of life. By the 32-hour mark, they were all ready to be transferred to the next stage! I can’t recommend this gadget enough for anyone serious about getting strong, early growth from their seeds.
• Why TheCannaKan?
• Humidity Control: Ensures seeds stay hydrated without oversaturation.
• Stable Temperature: Maintains an even temperature around the seeds, so there’s no shock or stalling.
• Enhanced Oxygenation: Keeps fresh air circulating, helping prevent mold and ensuring seeds don’t suffocate.
Step 2: Transfer to Root Riots & Aptus Holland Supplements 💧
Once the seeds were sprouted, I transferred them into Root Riots, known for their excellent water retention and structure that encourages strong root growth. Root Riots also have a pH-balanced, spongy texture that makes it easy for roots to penetrate, promoting sturdy, healthy root systems.
At this stage, I started using Aptus Holland’s Regulator and Startbooster at 1ml/L each. Here’s why I chose these products for early growth:
• Aptus Regulator (1ml/L): Helps strengthen the plants against environmental stresses by supporting cell wall structure. It’s a fantastic choice for giving young seedlings an early boost in resilience.
• Aptus Startbooster (1ml/L): This product provides essential microbes and nutrients that stimulate root growth and early plant vigor. Especially for regular seeds, the early root development makes a noticeable difference in later growth stages.
Step 3: Lighting with Future of Grow (FOG) LED at 200 PPFD 💡
For lighting, I’m using a Future of Grow (FOG) 600W LED. For the germination stage, I’ve dimmed it to around 200 PPFD (photosynthetic photon flux density), which provides just enough light for healthy, strong seedling growth without overwhelming them.
• Why Low Intensity?
• 200 PPFD ensures that young plants aren’t exposed to too much light, which could cause stress or stunting. This level of intensity is perfect for encouraging healthy development without risking “stretching.”
• The FOG LED provides a balanced spectrum tailored to plant growth, setting up these young sprouts for success as they grow.
Step 4: Environmental Control with TrolMaster Tent X Controller 📲
For monitoring and control, I’m using the TrolMaster Tent X Controller, which lets me dial in every aspect of the environment to make sure these little ones have the perfect conditions for germination and early growth.
• TrolMaster Benefits:
• Precision Control: Adjust temperature, humidity, and lighting all in one place.
• Notifications: Sends updates in real-time to my device, so I can make adjustments as needed without being physically present.
• Consistency: Maintains stable conditions around the clock, reducing stress on seedlings and ensuring they’re thriving.
Grow Tips & Reflections:
Germination is one of the most crucial stages in a plant’s lifecycle. Starting with strong genetics like Terpyz Mutant Mentha de Croco, combined with a solid germination setup and the right nutrients, creates the foundation for a successful grow.
💡 Quick Tips for Fellow Growers:
• Hydration Balance: Don’t oversaturate! Moisture levels should be high enough for the seeds to sprout but not so wet that they drown.
• Light Management: A low PPFD for young seedlings prevents stretch and keeps nodes tight, preparing them for a healthy vegetative phase.
• Environment Consistency: Use a reliable controller like the TrolMaster Tent X to manage your settings, and consider monitoring tools for real-time adjustments.
Shout Outs to the Community:
Big thanks to Terpyz Genetics for these incredible seeds, Aptus Holland for their top-notch nutrients, Future of Grow for the stellar LED lights, and TrolMaster for the amazing controller. Also, shout out to all of you in the growing community—you make this journey exciting and filled with endless learning. Let’s keep growing and sharing together!
That’s it for the germination update! Next up, I’ll be monitoring growth closely to identify strong females (and maybe a standout male for breeding). Stay tuned for updates on our Mutant Mentha de Croco adventure—this is just the beginning!
Genetics - Mentha De Croco
https://terpyz.eu/products/menta-de-croco-fern-type?_pos=1&_sid=e9237cbcb&_ss=r
DogDoctorOfficial Discount Codes @ terpyz.eu - DOCTOR 15% off
Nutrition - @aptusholland
https://aptus-holland.com/
Led Power @ F.O.G. Future Of Grow
https://www.thefuturofgrow.com/en/online-store/BLACK-SERIES-600-p489093171
Controls @ TrolMaster
https://www.trolmaster.eu/tent-x
As always thank you all for stopping by, for the love and for it all , this journey of mine wold just not be the same without you guys, the love and support is very much appreciloved and i fell honored with you all in my life
With true love comes happiness Always believe in your self and always do things expecting nothing and with an open heart , be a giver and the universe will give back to you in ways you could not even imagine so
Growers Love To you All 💚

Likes
1
Share


@Dumbo42069
Follow
Just gonna stick to water only from here on out assuming there’s only a few weeks left , seen some other diaries end week 9 or 10 ..
Will continue to post a picture for the group each day and like a close look at each one individually at the end of the week
The smallest one is now 14 inches tall lol I have no idea... update 17 inches now
Day 53 trimmed up the interior of front left because it was just a tangled mess of stacked leaves but got some space and light now
Day 54 made a ghetto dry box so I could dry a couple if they need to be cut earlier than others


Likes
19
Share


@sneakymexican712
Follow
I’ve been dealing with fungus gnats. Sounds like a common problem I layer the ground with perlite and heavily put diatomaceous on top let it sit for two days vacuum the top layer off and repeat. Twice got all of them I can see and back to a regular feeding schedule daily. I have yellow fly traps I’m gonna put on the soil to help keep them down. I’m going to get a drip system. So there isn’t much saturated soil on the top for them to breed . To prevent this next grow


Likes
13
Share


@NO_DRAMA
Follow
If we look closer we can see bored leaves , i think we have little stress, but this plant is Perfect !!! Bravo Inseedious 💪


Likes
2
Share


@brown_tattooz
Follow
Week 4 plants have made alot growth with dark rich green leaves.. have not had any nutrient deficiency pop up, these plants are amazing Im impressed with the resilience of it… defoliated 2x once at the start of week 4 an end of week 4 they quickly had new growth… I accidentally snapped a stem while lst barely holding on on one side an within 24hrs it had completely healed with a small scar.. probably gonna veg for one week … excited for this progress!!!
Likes
9
Share


@GoldenWeedGrower
Follow
22/08/22 - W04 - D22-28 : the girls are responding good to the training. So far so good. Made tranfer to another reservoir. In the last day D28 I see first sign of SOG


Processing
Likes
6
Share


@Growers4life
Follow
Mites are still a problem ive come to terms with the fact im not going to fully be rid of them so im maintaing them with lady bugs. I will be flipping bery soon watch for the next update!! They are looking beutifull!! Ive decided to take clomes of in house indica as well as cheese. Ive also begun the beginning stages of germination for another @greenpointseeds purple chem seed so be tuned for that. Will also be doing an @greenpoint seeds purplecake diary so make sure to stay tuned, stay lifted and keep growing😎😎😎 make sure to go follow my instagram @grow_ers4life


Likes
158
Share


@Ezzjaybruh
Follow
Doggo update
Couple vids sprinkled in here.
Love doing slo-mo with frisbee throws and treats catching in their mouth.
Slo Mo vids didn’t upload slo mo so I had to go thru and edit them and screen record it just to get them in slow mo on the site but they’re worth it
Dukes ear has been bugging him and so he pins it down sometimes with the other ear straight up and he looks goofy as hell.

Likes
3
Share


@Earthsower
Follow
No water for her for the last week and I have pruned the soil earlier today. I will be feeding her pure ph’d water in the next few days as her cup feels almost dry!

Likes
2
Share


@Enki_Weed
Follow
Tag 14
Die erste Woche der Keimung war… sagen wir mal, eine echte Herausforderung. Und auch in die zweite Woche starten wir mit einigen Schwierigkeiten. Der pH-Wert im Gießwasser tanzt immer noch Tango und will sich einfach nicht stabilisieren lassen. Alle sechs Stunden muss ich ran und nachjustieren – ganz schön zeitaufwendig!
Auch die Temperaturen sind noch ein Thema. 27 Grad sind einfach zu hoch, und da die kleinen Pflänzchen noch keine schattenspendenden Blätter haben, heizt es ordentlich auf. Ich habe mir aber mit Kühlpacks beholfen und das Gießwasser auf angenehme 22 Grad runtergekühlt. Hoffentlich mögen das die Wurzeln! Immerhin: Die Wurzelbildung scheint gut voranzugehen, jede Pflanze hat jetzt schon ein kleines Wurzelnetz entwickelt.
Um jeder Pflanze die besten Startbedingungen zu geben, habe ich ihnen jetzt jeweils ein eigenes Licht spendiert. So kann ich die optimalen Werte für jede einzelne einstellen. Ob das alles so klappt, wie ich es mir vorstelle, wird sich in den nächsten Wochen zeigen. Aber wir starten optimistisch in Tag 14!
Was steht heute auf dem Plan? Ich werde die pH-Werte im Auge behalten und schauen, ob die Kühlpacks die Wassertemperatur stabil halten können. Außerdem werde ich die kleinen Pflanzen genau beobachten, ob es ihnen gut geht.
Bis die Tage


Likes
59
Share


@Insaniac_0
Follow
Week 8 Day 49 to harvest
P1 harvest was flower day 53 - total wet weight was 24oz and the stem base accounted for 8.0oz, so about 16oz set to dry.
I fed P1 half nute flush water again this week. Feed this week was 1.25 gallons 1 time. I used 400ppm Bloom concentrate mix (recipe week 5). However, I also added .5ml/gal of CaliMagic (General Hydroponics 1-0-0) and 7ml of Roots Organics HP2 (Aurora Innovations 0-4-0). PH balance this week was 6.3. And then cut her down 4 days later.
P2 harvest was flower day 49 - total wet weight was 16.3oz and the stem base accounted for 6.4oz so about 9.9oz set to dry. (reminder that P2 was the test plant where I broke the main stem and later another later topping from an off branch already topped.) The test resulted in smaller colas in the later topping and the first topping break recovered surprisingly well with colas equal to the biggest. However the later break after the last topping resulted in the smallest cola. This tells me that any damage survived early can see a full recovery but later ones may cost yield.
Since P2 looked mostly ready to harvest I decided to dry out after the first feed this week.
I will update with cure and smoke details later.
Likes
13
Share


@GrandmasBoy2021
Follow
Week 14,
Week 14 was the last week before Harvest/Havrest! I flushed the plant and trimmed her a bit before harvest. I hope you all enjoy the videos and the pics!


Likes
13
Share


@HIAZ_urbanbudfarmer
Follow
Hi gromies Ive missed updates over the last few weeks phone problem! But the girls are going great!👍 I'm at the end of week 5 of flower. I'm pretty happy with it for my first scrog grow, could have been better, was in rush to get something into flower, started flowering as soon as they started to grow through net. Should have veged them & trained through the net longer to completely fill net. Pheno 3 was half the size of the other 2. Have started some clones from flowering cuttings, Monster cropping , it works great for increasing yield & saves me from having to keep motherplants. Amazing progress, the roots you see were developed in 8 days! Will start to veg them in the 2nd tent & start the perpetual harvest process. Have continued to grow this strain as I don't have any other seeds at the moment, though it is a nice strain! Definitely time for a change, hint, hint original sensible seeds! Or any other seed companies 👍
