By continuing to use the website or clicking Accept you consent to our cookies and personal data policy and confirm that you are at least 18 year old. For details please see Privacy Policy and Terms
Accept
Likes
Comments
Share


@Hawkbo
Follow
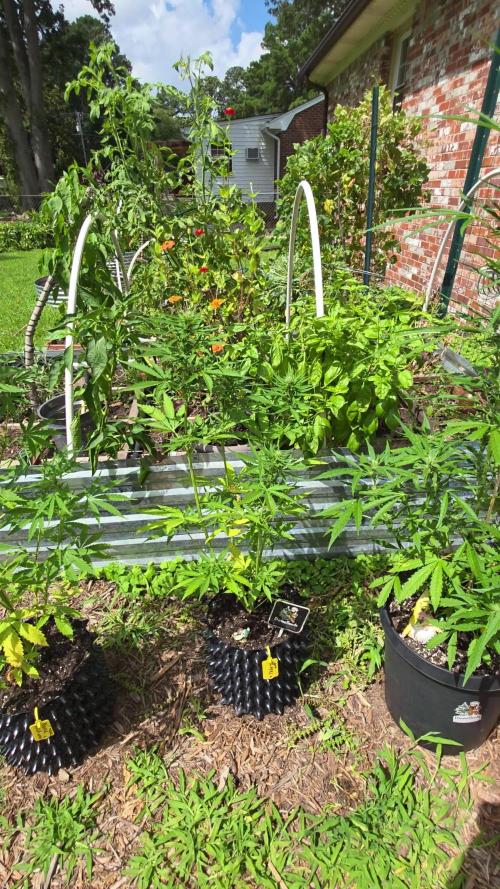
Some strains/cuts just need to be grown back to back, so far all 3 of these qualify. This strain is on track to run a little longer than most of the crop with the flush atleast a week away but I can already tell it will be worth the extra time. 2 and 3 are on the left and 1 is the tall one on the front right. They have a pungent creamy vanilla frosting like nose on them. All are very consistent in bud structure they are just put together very nicely. From this crop and my last crop only I think I could fill a 4x8 with fire using one of each plant in 3 gallon bags. This is the main reason why I prefer photoperiods these days other than the fact they are generally easier to grow, I like being able to run the same plant back again when they are at this level you cant go wrong. I had a wisdom tooth taken out today so I'm gonna have some time to take some good pics I think which is over due if anyone wants to check back in when the cover photo changes. Rain science grow bags are far and away the best bags I've used and if you want to try them they are inexpensive and you get 10% with the code bangdang.
Took the pics on Saturday with my 40mm free hand without any extra lighting just the flash


Likes
27
Share


@Prototype0181
Follow
Week 3, check
Had to battle fungusgnats again:( thought i had em all. So did a h202 3% 33/66 mix with water and flushed again-_- I also added a 1000 predatory Mites in the ballpark and nematodes. I also picked 2 new toys up microscope videorecorder 50/500x and a IR temp reader. Chasing the perfect VPD
Rock on Growmies


Likes
8
Share


@SouthStinson
Follow
Si bien la semana pasada puse que iba a hacer solo riego con agua como lavado de raices, note que no iba a ser suficiente, asi que hice un lavado de raices completo. Planta en la bañera y agua + agua +agua. Semana próxima cosecha!
Excelentes resultados
Likes
75
Share


@Theia
Follow
Hello friends. I've not done anything really to her this week. She asked for nothing really.. maybe the odd bedtime story but otherwise she is just resting and recovering from last week's toppings. She has pushed new growth that has supposed me. I need to cut off the next set of nodes but I think I may wait a few days and do the final topping all in one hit. I can't get her into flowering room for another 6-8 weeks so I have some good time to shape her into a sixteen cola mega beast..(I hope).
If I do the copy chop cho later this week ishall update some pics of the torture..
...update.....
Did the final topping for 16. She has some interesting variations in growth rates at each node.. I think all the twisting has an effect on how the next node grows. I think I see a way by twisting the branch through a full rotation between nodes you can affect how the next branch set grows... It's just an observation ATM but I will maybe experiment with another plant to test this.
She seems okay after the torture. I will leave her to grow out for a few weeks now I guess🤔
Thanks for looking.
Stay safe😷😷
Keep growing and stay happy.🌱🌿😜🤪👍


Likes
170
Share


@Master_weeda
Follow
Bonjour à tous les padawans et maîtres jedis jour84 arrosage avec 25 centilitres d'eau ph6.3
Jour87 arrosage avec 30 centilitres d'eau ph6.3
Jour88 pratique de la techniques du tronc fendu (videos explicatives) et arrosage avec 20 centilitres d'eau ph6.3
COMMENT FENDRE LES TIGES DE VOTRE PLANT DE CANNABIS
Pour fendre les tiges de votre plant de cannabis, il vous faudra :
Une lame propre et aiguisée (une lame de cutter fonctionne bien)
Un mètre ruban
Une ficelle ou un adhésif pour marquer les coupures que vous ferez le long de la tige
Un crayon, une baguette ou une brochette pour séparer la tige une fois fendue
1. Tout d'abord, commencez par mesurer la partie de la tige que vous allez fendre. Il faut faire une incision d'environ 10–20 cm juste sous la branche la plus basse de votre plant. Utilisez un ruban adhésif ou de la ficelle pour marquer le début et la fin de l'incision.
2. Ensuite, prenez votre lame et faites une incision en travers de la tige, en commençant par le haut. Attention à faire une coupe propre, jusqu'au centre de la tige.
3. Utilisez votre lame pour tailler en descendant vers le bas, jusqu'à la marque inférieure de la mesure que vous avez prise auparavant. Essayez de tailler aussi droit que possible. Une fois que vous avez atteint votre marque du bas, laissez la lame au centre de la tige, puis utilisez un crayon/baguette/brochette pour ouvrir la partie coupée, puis sortez votre lame.
QUEL EST LE MEILLEUR MOMENT POUR FENDRE LES TIGES ?
Il existe de nombreuses théories sur le meilleur moment pour passer votre tige au couteau, mais la plupart des cultivateurs suggèrent de le faire à la dernière semaine de floraison. Même si certains cultivateurs recommandent de le faire dans les 3 derniers jours avant la récolte, nous recommandons de le faire un peu plus tôt (7–10 jours avant la récolte).
QUELS SONT LES RISQUES À FENDRE LES TIGES ?
Fendre les tiges est une technique à stress élevé très agressive que nous ne recommandons qu'aux cultivateurs expérimentés. Nous ne recommandons également pas de fendre les tiges sur les variétés à autofloraison, car cela peut être bien trop intense pour elles.
FENDRE LES TIGES, ÇA MARCHE VRAIMENT ?
Il existe un solide ensemble de cultivateurs expérimentés qui déclarent que le fait de fendre les tiges peut produire de bons résultats. Malheureusement, peu de données qualitatives le prouvent. Cependant, il semble que la fente des tiges soit originaire des Pays-Bas, où elle est pratiquée par des cultivateurs néerlandais experts depuis les années 1970.

Likes
8
Share


@Black_Widow
Follow
Привет садоводы
началась новая неделя и сегодня я приготовил новый компот по максимальным значениям таблицы кормления на preflowering

Likes
16
Share


@DniceWJ
Follow
Day 1 I’m looking forward to more days.😍
LSD journey September 14, 2021 day one of germination temperature is 71°
My germination technique is to put the seed into the soil And keep the little pot warm and wet, light schedule is 18 hours of light. I’m using a MARS HYDRO Grow Tent Kit Complete TS 600W LED Grow Light 2x2ft Full Spectrum Indoor Grow Tent Kit 24"x24"x55" Hydroponics Grow Tent 1680D Canvas with 4” Ventilation Kit for Grow Setup Kit Tent Kit (Amazon) , General hydroponics power grower Kit (Amazon). The grow light is 8” from the pot keeping my little girl warm. Starting today I will be following the recommended feeding schedule for week one floral micro 2.5 mL a gallon floral Gro 2.5 mL a gallon floral bloom 2.5 mL a gallon, I will be doing this once a week increasing the amount of nutrients as needed. I will be Change your nutrients every 7 to 10 days and topping off with fresh water between nutrient changes on September 21, 2021 I will be topping off with freshwater and adding nutrients on September 22, 2021

Likes
15
Share


@jayizrollin
Follow
First grow finally done! .
I battled a lot of inconsistencies with my environment and watering schedule.
Despite this, and my big top gun growing pollen sacs, I had a great grow, and seedless buds!
Top Gun 1 Gal harvested 25 grams dry
Top Gun 5 Gal harvested 60 grams dry
I really enjoyed the 1 gallon a lot more, easier to manage and rooted up the whole pot, going to try 3 gals next grow.

Likes
6
Share


@MichaelMan
Follow
Switched to 24h light cycle for faster grow.
Added one 25€ 6500k 100w light for better veg. Took the warmer light bulbs away for lower electricity costs.
Started to low stress training few days ago. Thinking about defoliation.
Got the funny humidifier from my granny😆 It doesn’t work that well. Getting the right one soon.You can see it in the video.
I ordered some things: Co2 bag, larger textile pots, clip fan and 50L light soil mix.
I know that pots are getting tight for them and it seems that I have to buy larger pots from the local store bc shipping takes too long.
Likes
106
Share


@FoTwenny
Follow
••••••••••••••••••••••••••
Oct. 15 - Oct. 21
••••••••••••••••••••••••••
Fat Banana: Harvested 10/21
Pineapple Express: Flushing
Zkittlez Auto: Stacking up Quick!
••••••••••••••••••••••••••••••••••••••••••••••••••••
🙋♀️ Fo' Twenny here! 🙋♀️
Back with another update on the viewer selected multi-strain auto-flower booster crop! For the sake of time and my sanity, I will defer to individual diaries for more information.
Enjoy the photos and check out individual strain diaries for all the details!
••••••••••••••••••••••••••••••••••••••••••••••••••••••••••••
Want to see more cultivars I have growing❓
Please, be sure to check out my other diaries & give me a follow! 👍👍
🙏Thank you for stopping by my garden!🙏
Peace, ☮️✌️
Love, 💚🤟
& Frosty Nugs! ❄️🌲
Happy farmin' my friends! ☺️🌱
- Fo' Twenny 👩🌾🏻


Processing
Likes
88
Share


@Fergie
Follow
hey guys so we are getting very close now . i collect my new aircon unit tomo morning im going to throw straight in tent and drop down to 18 for last few weeks . I started flush begining of week on both girl looking so nice a d smell is just amazing . Til next week only a few more to go 😀


Likes
8
Share


@Aleks555
Follow
Tester FBA2502 – 42 Fast Buds | Day 72
This autoflower has exceeded all expectations!
The plant is compact yet very productive — the side branches almost rival the main one. The buds are dense, heavily coated in resin, and fully covered with trichomes. Flowering finished right around day 72, and trichomes are about 15% amber.
The aroma is incredibly strong and intense, with a sharp, chemical-like punch — powerful and penetrating.
Grow details:
• Nutrients: Xpert Nutrients
• Light: Mars Hydro FC-3000 EVO
• Pot size: 11 L
• CO₂: used during veg and for 4 weeks of flowering
• Strain: Tester FBA2502 by Fast Buds (autoflower, exact genetics not revealed yet)
Harvest and trichome check coming soon!
Processing
Likes
21
Share


@LittleBigTrees
Follow
Gave water at 6.5ph will feed on week 3.
I think I've had the light to close. On day 10 pictures you can see the leaves look like there burnt 🤔 or that's what I'm guessing it is. I've raised the light to 1meter it's only at around half power at the moment and showing 21000 lux.
Likes
58
Share


@MadeInGermany
Follow
Info:
Unfortunately, I had to find out that my account is used for fake pages in social media.
I am only active here on growdiaries.
I am not on facebook instagram twitter etc All accounts except this one are fake.
Hi everyone :-) .
The seedling has developed well so far :-)
Nice thick leaves like the last phenotype of the banana.
I trained her for the first time this week (topping).
It was poured twice this week with 1l each (for nutrients, see nutrient table).
The tent was cleaned and the lady's health was checked.
Have fun with the update.
Let it grow.
You can buy this Nutrients at :
https://greenbuzzliquids.com/en/shop/
With the discount code: Made_in_Germany you get a discount of 15% on all products from an order value of 100 euros.
You can buy this Strain at :
www.Zamnesia.com
Type:
Banana
☝️🏼
Genetics:
OG Kush x unkown
👍
Vega lamp:
2 x Todogrow Led
Quantum Board 100 W
💡
Bloom Lamp :
2 x Todogrow Led
Cxb 3590 COB 3500 K 205W
💡💡☝️🏼
Soil :
Canna Coco Professional +
☝️🏼
Nutrients :
Green Buzz Liquids :
Organic Grow Liquid
Organic Bloom Liquid
Organic more PK
More Roots
Fast Buds
Humic Acid Plus
Growzyme Big Fruits
Clean Fruits
Cal / Mag
Organic Ph - Pulver
☝️🏼🌱
Water:
Osmosis water mixed with normal water (24 hours stale that the chlorine evaporates) to 0.2 EC. Add Cal / Mag to 0.4 Ec Ph with Organic Ph - to 5.5 - 5.8 .


Processing
Likes
4
Share


@Barcelona_Farmers710
Follow
Booommm! Llegó la hora tan esperada Farmers nuestras flores llenas de resina acabandose de formar, la verdad que estas genéticas ayudan mucho al desarollo del cultivo espero que os guste!! Salut y força al canut!!!