By continuing to use the website or clicking Accept you consent to our cookies and personal data policy and confirm that you are at least 18 year old. For details please see Privacy Policy and Terms
Accept
Likes
Comments
Share


@MonsieurDeLaRuche
Follow
D97 F50: what a week!!! I can't believe it, the plants are more and more fragrant, the flowers are bigger and bigger... I expected less than that!
I started the flush with simple osmosis water, corrected with a PH of 6.1! I managed to increase the EC from 2.1 to 1.3, with about 4 liters per plant!! I was able to remove the excess water in the tank using a pump! I'm aiming for an EC between 0.1 and 0.5 for half of week 9, before letting them dry on the foot.
In any case, there are fewer seeds in my flowers than I thought, I tried to remove a few seeds with tweezers, it worked for a few plants but the code red #1 didn't like it... some pieces of flowers dried a little and some trichromes matured faster!! I'm not touching anything anymore
smells:
Papaya Bang Bang #1: smells of exotic fruit candies, especially papaya, very deep and addictive!! a banger
LA Vanilla cake #2: smell of gas with ripe fruits, very cali gelato
Papaya bang bang #2: smell of exotic fruits on a very earthy background, a little og, it's not really what I was looking for but it looks interesting! I think it will be round in the mouth
cherry gar see ya #4: smell of exotic fruit compotes on a very fresh background!!
white runtz x Hollywood: a banger!! a very resinous runtz smell, almost rosin, with smells of lemongrass, ginger... I've never smelled that in my life!!
code red #2: smell of tangy strawberry, simple, not so many smells in the background, almost a little citrus
Code red #1: a banger too! a smell of strawberry syrup, cream, sugar, I can't take my nose off when I smell it
B-45: smell of citrus, grapefruit, with a bug background that I love
LA Vanilla Cake #1: very cali, gas, good gelato too, but without fruits
no TCO for the last two weeks, or very light! I'll give you the recipe anyway
in my flowering TCO, I put:
- kelp hydrolysate
- epsom salt
- bat guano
- mealworm guana
- castor bean shell ash
- palm ash
- vermicompost
- blackstrap molasses
- elycitor
-Yeasts Saccharomyces Cerevisiae
Bottom right: LA vanilla cake #2
Bottom middle: Code red #2
Bottom left: Papaya bang bang #1
middle right: cherry gar see ya #4 clone
middle: white runtz x Hollywood
middle left: Papaya Bang Bang #2
Top right: Code red #1
Top middle: LA vanilla cake #1
Top left: B-45


Likes
2
Share


@Marihumama
Follow
Finaly some more sunshine &she is looking delicious 😛making my mouth water when I smell her 😋Sweet Girl 😍
Lots of work in the rest of my garden but not with this girl ☺️
Sweet &Easy

Processing
Likes
25
Share


@PrairieFrostGrow
Follow
******** Week 7 - January 21 to 27/20 (Days 43 to 49 from seed popping)
Well this girl has sure kept one guessing as to when the heck the outcome is going to be. She was slow getting going but she has kept a constant pace of growth and has been getting bigger and developing more every week👍 She set her buds in this week and has started focusing more on buds and seems to be less on growing stems😁 Her stems have strengthened more over the last couple of weeks and are getting pretty stiff......yes! Shouldn’t have to get out too many eye-poking bamboo stakes ahead.
Bud diameter is good now and not as tiny. They are starting to grow up as well, swelling. Top cola is filling in as well. How much will she fill in....time will tell. Not sure just how big her root mass is but don’t expect its huge and bound, sides of pot give when some pressure applied down lower. Have noticed other pots with a good amount of roots are firm when squeeze the bottom.
Missed some of the purpling of the stems and saw more of it at the end of the week. Will be giving her some Epsom Salt next week. Also, brown spotting on tops of leaves seem to be starting. Suspect the pH may have gotten out a bit or something locking out the P uptake????
Next week, just keep her happy and ensure the medium has the correct pH. Expect more bud swelling to come😶
Slow but steady..........
Little more detail:
Jan 21/20 - Day 43
- looked hungry in the morning and then again in the afternoon.
- AM feed - 1L with just Dual Fuel A and B at 1.5ml/L with a 725ppm and 5.85pH.
- PM feed - 2L with Mass & Terp @ 3ml, Rhino & Rezin & LW8 & DF @ 1.5ml, CalMag @ 0.5ml = 1300ppm. added 1L water to drop to 1000ppm with a 5.9pH.
- runoff water - 500ppm with 5.8pH.
- leaves are dark but she is happy. She is eating:) Raise the pH though.
Jan 22/20 - Day 44
- Feed in PM: 2L - Mass & Terp @ 3ml, Rezin & LW8 & DF @ 1.5ml, CalMag @ 0.5ml = 1300ppm with 5.9pH.
- They are perky today….further down the plants as well. Standing up and happy. Liked the water yesterday.
- SW1 is now the talest girl in the tent. The Kush is coming out with long narrow branches.
- This was a heavy feed today. Everyone is perky and happy so lets push it a bit!
Jan 23/20 - Day 45
- Light feeding today. Supplementals only.
- 2L with Sensyzime @ 2ml, LW8 & Rezin @ 1.5ml = 80ppm 6.1pH
- everyone happy so keep it light....got a good one in yesterday.
- the double bud on her was noticed today!!! Little reward for screwing with me so far😛😝
Jan 24/20 - Day 46
- AM feeding: Massive @ 2ml, DF & LW8 & Rezin @ 1.5ml = 925ppm 6.2pH
- everything happy in PM. She seems to have taken the heavier feed well.
- There might be some tip burn forming but not obvious yet.
Jan 25/20 - Day 47
- AM feeding. 2.5L 0f full strength as listed above = 1275ppm with 6.1pH.
- added a little more water to bring the ppm down to 1,100......brought her down just a bit.
- runoff water 530ppm with 5.6pH.
- pH is a little low......got to bring her up some more.
- cola swelling last night, taller for sure as well.
- Looking nice actually. Will have to support her.
- She is now 32” tall and 28” across.
Jan 26/20 - Day 48
- She is happy this morning. Didn't see big growth overnight but everyone happy this AM.
- AM Feed: Mass@ 5ml, Terp@ 4ml, Vitathrive&Rezin&LW8@ 2ml, Rhino&DF@ 1ml = 1150ppm with 6.1pH.
- Didn’t go to sleep before lights out today.....first time so far.
- Decided to downsize other Skywalker into 1 gal pot to compare against this 3 gal pot grow.
- SW1 is showing signs of P burn!! Brown random spots, and some larger. On new growth right now at tops.
Jan 27/20 - Day 49
- have had good luck so far with the other girls and a quick 2 gallon flush. All seemed to be pushed a bit from Wednesdays feeding.
- SW1: 2L - Sensyzime @ 2ml, LW8 @ 1.5ml = 45ppm 6.0pH @ 11:00am
- Runoff not tested
- SW1 was supplemental feeding. She is showing brown spots on leaves. High Potassium?? Lots with supplementals maybe pushing this too high.
- First time running Terpinator. Have used Bud Factor X in past.
Well fellow growers.......that wraps up another week......damn they do go fast when you look back.....always seems long looking forward though!!
Grow em big n fat🙏💪

Likes
28
Share


@Bread_n_Buds
Follow
Here we are again ready to start again, always under the sign of Zamnesia, we make our fantastic plants and we show you what we are capable of. We have 5 autoflowering strains and 5 photoperiodic ones and now we present them to you.
This time we are faced with an absolute novelty from Zamnesia, a plant from the latest generation of an immense series that Zamnesia is bringing out, ready to try them all. Here we have excellent parents, the primette result is great, let's also try the Karen Kush. I was amazed by the perfect branding for this strain and so let it be Karen.
To explain my germination method which is a combination of experiences acquired in the field and readings of the right advisors, I have chosen to divide it into phases so whoever wants can follow them and understand better step by step.
- Preparatory Phase ---- Check the average temperature in the room, humidity status to understand if it is the case to start or wait, I decided for the end of August because the temperatures start to drop towards the 22-25 degrees recommended for germination.
Then another thing more or less credible depending on the sensitivity is the control of the lunar phases. I believe in it a lot, it is a method that ancient farmers used to understand when it was best to plant depending on the attraction of the moon. To make my life easier I use a simple app that advises you on the right time to plant, harvest and put in the jar (depending on the lunar phases).
- Phase 1 --- Soaking in water. There are many authoritative friends who advise against this method due to the risk of drowning, but I have always been fine and I follow the rule if it opens in water the seed is almost certainly healthy and will come out of the ground 90% normally.
- Phase 2 --- Opening the seed in water. As soon as the seed opens and the root comes out a little, you have to be very very careful not to leave the seed in the water open for too long. This is why there is a risk of drowning. So as soon as the root comes out, it must be planted. Do not wait for it to stretch out a lot, you can wait a little longer in the absorbent paper, but not in water.
- Phase 3 --- In the meantime, while I soaked the seeds, I prepared my pots: I use small biodegradable pots (choose the ones with holes underneath for drainage). A few hours before working with the opened seeds, I moistened the soil with water adjusted to the right pH (5.8 - 6.2) and Plagron Power Roots. The small root is now open and we can make a little hole with a toothpick, widen it and insert the seed. Not too deep with the root facing downwards. From Serious Seeds we learned the dome technique: if you put a small dome of soil on the seed the water will settle on the sides avoiding overwatering problems.
- Phase 4 --- The plant emerges from the soil. So far I have not put the light, now I turn it on at minimum after half a day of soil to give direction to the seedlings. The first week the light will be gradually brought from 40% to 60% to go to 70% - 75% in the remaining weeks of veg. During the first week maximum, I keep the cycle of 24 hours to avoid stretching. Be careful not to exceed the first week at least with photoperiodic plants.
- Germination % --- In water 20/20 seeds have opened for good luck I'm waiting to talk when they come out of the ground but it seems that we are going towards an excellent percentage of germination..."Not too bad"...
- Soil and Food --- The soil used is entirely organic in every part and is the Plagron Promix that will be used with the 100% organic pack provided by Zamnesia complete with all the main fertilizers for your plant buy it at the link --
https://www.zamnesia.io/it/11457-plagron-easy-pack-natural.html
// Strain Description // Formidable genetics: These seeds contain the genes of Monster Bud Kush and White Widow. High THC content: With 24%, the effects are pronounced and intense. Fast flowering: This indica-dominant hybrid needs just 8–9 weeks to reach harvest. Excellent yield potential: This plant is very generous, if grown in the right way!
- Get a seed of this fantastic strain --- https://www.zamnesia.io/it/10780-zamnesia-seeds-karen-kush.html
- Soil and Fertilizers entirely organic --- https://plagron.com/en
- Growbox --- https://www.secretjardin.com/
- Music and sound --- I made my girls listen to 432hz frequencies and music from www.radionula.com
- Z --- You can find these seeds, much more from the world of cannabis, mushrooms and an incredible series of accessories and gadgets on the reference site not only mine but of many growers ---- https://www.zamnesia.io

Likes
11
Share


@Kirsten
Follow
19.1.25:
I have watered all plants with 300ml of dechlorinated water PH'd to 6.3, with 1/3 jar of black strap molasses with Ecothrive Biosys-1g.
I am looking to increase the sugars for microbial life and plant processes.
It'll also add some extra Calcium, Magnesium and trace elements.
I also, watered all plants with Bloom nutrients.
Using dechlorinated water PH'd to 6.3 with the following nutrients: (ml/l) ;-
♡ 2ml Cal-Mag
♡ 2ml Ecothrive Flourish
♡ 2ml Xpert Nutrients Bloom Booster
♡ 2ml Biobizz Bloom
♡ 2ml Biobizz Top Max
♡ 1g of Ecothrive Biosys
I watered around 1-3 litres per plant. Depending on size and requirements.
I'm still spilling water containing the nutrient solution. 🙄
I am using this to rub into the leaves. I think a nice foliar massage won't do any harm, make the most of the situation.
The plants have become very hungry and thirsty. Increased the water by double.
I ran out of my TNC cal-mag. I decided to order the Xpert Nutrients brand, as I like their products. It isn't organic as far as I can tell, but I don't think it matters too much to me, to be honest.
I also want to top dress this week, so I bought some Green Leaf PK bud Booster dry amendment from Amazon, too.
I'll mix it with canna coco, perlite, worm castings, and Ecothrive Life Cycle.
24.1.25:
I went ahead and top dressed all the plants with 4.5 gallons of my supersoil custom mix.
This consists of the following substrate and dry amendments:
♡ 60% Canna coco
♡ 20% Worm castings
♡ 15 % Perlite
The remaining 5% consists of the following dry amendments;-
♡ 10g Ecothrive Biosys
♡ 1 Tsp RHS Mycorrhizal Fungi granules
♡ 3 Tsp Vitalink Bat guano
♡ 4 Tsp Diatomaceous earth
♡ 8 Tsp Ground Cinnamon
♡ 10g Green Leaf Bud Booster PK booster.
♡ 3 Tsp Ecothrive Life Cycle.
•Worm castings for some all round nutrition.
•Cinnamon for mildew and bug repellent.
•Canna coco base substrate.
•Perlite for adding oxygen to the root and soil system.
•Green Leaf Bud Booster PK Booster for blooming. Building strong big buds.
•Vitalink bat guano again for Bloom.
•RHS Mycorrhizal Fungi granules, to boost beneficial microbes.
•Ecothrive Life Cycle for lots of great benefits.
•Diatomaceous earth for Silica.
•Ecothrive Biosys, for an extra microbial boost.
24.1.25:
Gorilla Cookies is absolutely healthy and strong! I'm very pleased with this plant.
I was looking into topping autoflowers and had wanted to top her. Anyway I read some things, as a result of which I decided, last night, I wasn't going to do it.
So today came around, and I topped it. Totally forgot I wasn't going to do it 😅
I was really excited to experiment with topping in addition to LST. Now I guess we're all in! 🤞
Thanks for checking out my diary 🍃 ✌️

Likes
39
Share


@Sammy23
Follow
Bonne semaine dans l'ensemble, les 2 plus grandes plantes qui avaient des tuteurs mesurent maintenant 30 cm, je vais passer en floraison. J'ai trouvé le moyen de baisser la température en ouvrant la porte de la box... C' est pas très discret. J'ai baissé un peu le chauffage aussi. Je n'ai pas arrosé beaucoup mais les plantes ne semblent pas souffrir, tous les trois jours à peu près. Les noeuds sont éloignés les uns des autres, ont voit clairement l'influence sativa, à part peut être sur un ou deux phénotypes...


Likes
54
Share


@420DeepGrow
Follow
Gracias al equipo de Anesia Seeds, XpertNutrients y MarshHydro, sin ellos esto no seria posible.
💐 🍁: Dankberry es nuestra nueva variedad premium con la inconfundible fuerza y singularidad de Anesia Seeds. Esta variedad de cannabis te ofrece un subidón excepcionalmente fuerte e impresionante y un delicioso sabor a bayas maduras y nueces - igual que un desierto extraordinario.
Tras mucho tiempo de duro trabajo de cría, presentamos con orgullo esta variedad feminizada que volverá a establecer nuevos estándares en el mercado del cannabis. Se originó a partir de un cruce y selección de Little Devil y Skunkberry, dos cepas únicas que establecieron puntos de referencia para la producción de cannabinoides.
Dankberry tiene 2 fenotipos ligeramente diferentes en cuanto a crecimiento y tiempo de floración. El tiempo de floración de la variante más achaparrada y de crecimiento más oscuro es de unos 60 días, mientras que el fenotipo más brillante y de crecimiento más alto necesita entre 5 y 10 días más. Alcanza cosechas por encima de la media de hasta 550g por m2 en interior.
🌻 🚀 Consigue aquí tus semillas:
https://anesiaseeds.com/product/dankberry/
💡 Mars Hydro TS 3000, como la lámpara de cultivo LED más grande de la serie TS, ofrece suficiente cobertura para un área de 4 × 4 pies con un precio asequible y rendimientos de calidad; a cambio, se puede aplicar tanto al cultivo doméstico como al cultivo comercial.
Potencia - 450w
Cobertura Vegetal – 5×5 pies
Cobertura de flores - 4 × 4 pies
La opción abrumadora para la mayoría de los productores que la aplican en tiendas de campaña.
Consigue aqui tu lámpara:
https://marshydro.eu/products/mars-hydro-ts-3000-led-grow-light/
📆 Semana 7:
Última semana de crecimiento, esta semana pasada se han mudado a la nueva carpa de Marshydro 1.50x1.50x1.80 y necesito algo mas de tiempo para cubrir el espacio vacio.
Practico poda apical para equilibrar el tamaño con las mas pequeñas.
Aplicación de jabón potasico via foliar para prevenir plagas.
Aplico 1/4 de la dosis de nutrientes recomendada por el fabricante, todo va bien.

Likes
2
Share


@Aleks555
Follow
Our beauty is now 1 week old, and she’s already nearly 10 cm tall. Growing steadily, showing great potential. We’ve decided to experiment and switched the light schedule to 12/12 to see how she responds to these conditions.
The daytime temperature is steady at 28°C, and nighttime at 21°C, with humidity maintained at 65%. At this stage, we’re starting to feed the plant with fertilizers from Xpert Nutrients to ensure it gets all the essential nutrients for active growth.
A huge thank you to Xpert Nutrients for their quality products, helping our plants reach their full potential!

Likes
22
Share


@burnout
Follow
Week 8 of flower. Trichs still mostly cloudy, seeing a couple of amber colors here and there on the bracts.
Likes
4
Share


@LoganatorDude
Follow
I did her second tie-down on day 22 actually.
Day 24- I’m okay with the fan leaf laying on the surface for *now.* Just because I live in a high, dry desert with a consistent RH at around 20-25%. And also, because the top quarter inch of soil is dry. However I will probably be propping it up with something tomorrow morning.
Day 25- finally I decided to fold down the rim of the pot for more light!

Processing
Likes
7
Share


@x_grower
Follow
Last week I neglected the fertigation beyond the low humidity all that delayed the first topping and leaf burned the most thirsty girls, by the end of the week I had already recovered them and succed topping, they are looking very healthy.
Likes
5
Share


@FourVentiFarms
Follow
Week from 10/07 to 16/07
Going smoothly, plant already feeling great in the new pot.
I used sticks to make a star cross frame at the base so I can pull branches in every direction
Now it’s a matter of letting everything grow and adjust the branches until around the 20th of August when it will start flowering


Likes
8
Share


@sunshinegroww
Follow
Just starting to form some nice buds very little stretch on this ine but looking good and healt
Likes
15
Share


@RellestPlant3r
Follow
I’m getting closer to harvest when it comes to Blu dream! I think I’ll wait till about a week and a half maybe 2 weeks before I do so😎. Northern Lights needs a bit more time but she’s doing great as well. She’s a monster! Banana purple punch has a cartoon like structure and I’m excited to see her in full bloom in the next couple of weeks. I’m glad I saved my tops and cloned them, I mean why throw them away right 🤷♂️🏾! Happy planting peeps 😎😁!
Processing
Likes
6
Share


@dank604
Follow
She's starting to smell very nice! Already much stronger smell than my last grow which is welcomed! I moved the lights down 4 inches in hopes to 'light train' it and prevent the main cola from gaining more height so it can concentrate on the budsites, hopefully it pays off. Live and learn!
Happy growing y'all!
Likes
46
Share


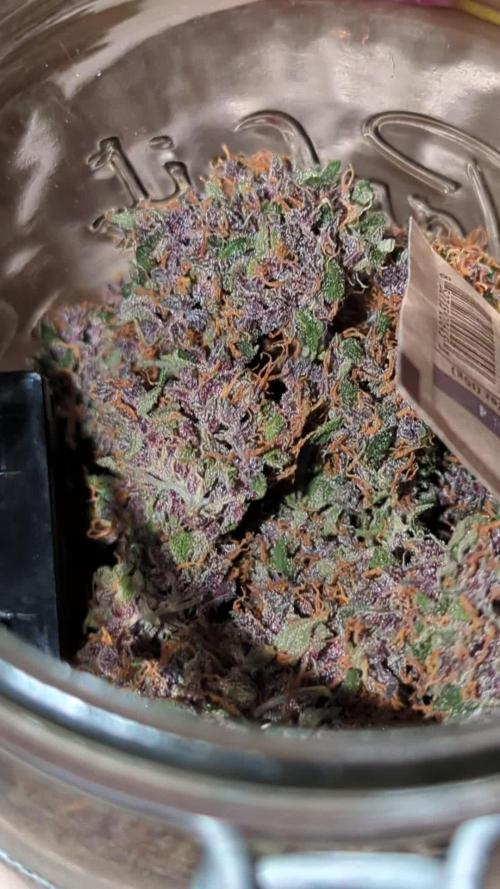
@pifflestikkz
Follow
This plant was an absolute dream to. Grow, no issues at all with health of plant, just struggled to tame her as she was a a thick strong climber 💪💪.
I'm so impressed with how this turned out, I could have flushed for another 3 days to make it 12days but I needed the space.
After The 2 days of dark I was recommended I can definitely say it has vastly boosted her trichomes and the smell when I opened the tent blew my head away 😍😋
Aiming for a 10-14 day hang dry,
The 10-12 weeks curing in jars with humidity packs.
I will update with a dry bud weight and smoke test 👌
Bud wet weight is just 500g+
Final bud dry weight is 298g.
Of juicy resinous purple and orange buds 😍 smells like sherbert and hang dry smoke test revealed a candy sherbert, no banana yet but hoping like the grow it matures with cure process now.
Hits eyes straight away, sandy bottom kids, giggles, munchies, fun time with Mrs, bed. Full cycle with this one very happy over here 😉😁💚
FAT BANANA AUTO FROM ROYAL QUEEN SEEDS, big thank you to the team, and the breaders. What a pheno I received. I appreciate you all
Likes
69
Share


@GMSgrows
Follow
First off. I DO NOT USE TERRA AQUATICA NUTRIENTS. I USE FLORANOVA GROW AND FLORANOVA BLOOM
Breakup Cake is still growing strong and healthy. Did a little defoliation on her, with more to come.
She is a strong resistance plant. Tall and slim this one. Flowering time will happen soon. Once the the daylight hours hit 14 hours, these girls will start rockin.
Thanks for the looks and likes my friends.
Aug.14th
Close inspection of the bakers product, this Breakup Cake is in full on flower. Button sized buds have formed in the last couple days. Not even at 14 hours light yet...Nice. Thanks @Kannabia. Early flowering girls are always welcome here.


