By continuing to use the website or clicking Accept you consent to our cookies and personal data policy and confirm that you are at least 18 year old. For details please see Privacy Policy and Terms
Accept
Likes
Comments
Share


@FinalElk10
Follow
Gg is about ready to harvest looking to harvest sometime this weekend (5/7-5/10). Everything else still has a few more weeks at least.

Likes
15
Share


@Lazuli
Follow
Tangie 1 is flowering
Tangie 2 starts flowering
Blue dream is still in pre flower

Likes
34
Share


@Herbz_Unkraut
Follow
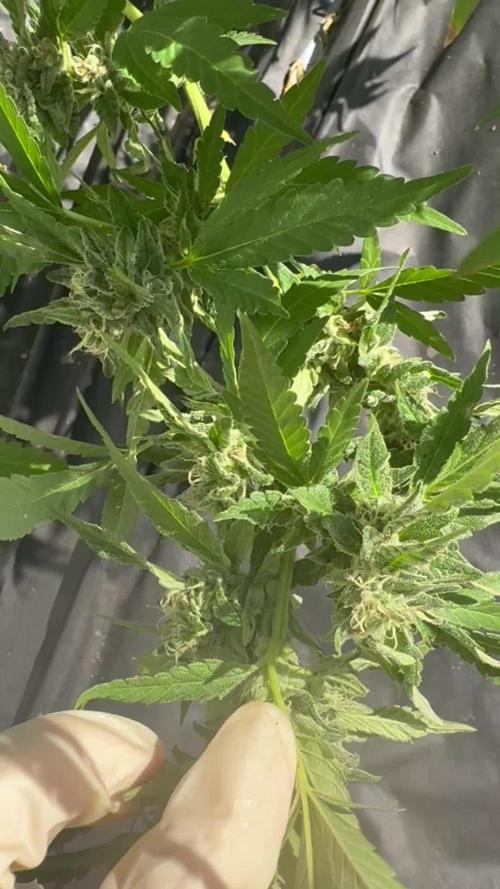
I'm having a Thrips infection...fighting it with Lacewing larvae...
Defoiled all leaves that put shade on bud sites


Likes
76
Share


@Roberts
Follow
Purple Ryder is growing great under the Medic Grow Mini Sun-2. She loves the Agrogardens nutrition as well. She has been eating and drinking a lot. She is due for a solution change very soon. Everything is looking really good at the moment. Just waiting on the bulking to begin. Thank you Doctors Choice, Medic Grow, and Agrogardens. 🤜🏻🤛🏻🌱💪🏼🌱
Thank you grow diaries community for the 👇likes👇, follows, comments, and subscriptions on my YouTube channel👇. ❄️🌱🍻
Happy Growing 🌱🌱🌱
https://youtube.com/channel/UCAhN7yRzWLpcaRHhMIQ7X4g

Likes
2
Share


@XoticGROW666
Follow
Lost footage of wk 6/7 on the wedding cake x frosty gelato pheno 2 tall n bushy 🎂🍦🍪🥜

Likes
13
Share


@Lfuego22
Follow
During this week I will did some fan leaf removal, at the end of the week I will do a full system flush
Flushing in 2 day when RO comes
Good week. Flushed and added full tilt to the system @ 3tsp a gallon total 15 tsp
Likes
21
Share


@CanadianFillmore
Follow
Welcome growfessors to another episode of growfessor theatre! 👽🌳💚
Tonight from the 4x4 the ladies move into week 7 and they get a change in nutrients. Out with Big Bud coco & sensizym, in with Overdrive.
Removed dead & dying leaves from each lady, added a support stake in Mandarin dreams & LSD, they was leaning hard!
Thanks for stopping by growfessors 👽🌳💚


Likes
34
Share

@Roberts
Follow
FBT2308 is doing good. She is growing great under the Medic grow mini Sun-2, in the Agrogardens nutrition. She is starting to form her cola sites , and will continue to stretch as she stacks. She may really explode in growth this next week. Everything is looking great. Thank you Fast buds. Medic grow. And Agrogardens nutrition. 🤜🏻🤛🏻💪🏻❄️🌱
Thank you grow diaries community for the 👇likes👇, follows, comments, and subscriptions on my YouTube channel👇. ❄️🌱🍻
Happy Growing 🌱🌱🌱
https://youtube.com/channel/UCAhN7yRzWLpcaRHhMIQ7X4g


Likes
2
Share


@Bncgrower
Follow
A new week begins, I believe this will be the last week of vegetative growth, I noticed a bit of excess in CALiMAGic, the plants seemed to bend their leaves upwards, as if they had an excess of fertilizer.
On the 6th, I decided to wash the soil and now wait a few more days to change the light period.
Likes
8
Share


@Mo_Powers
Follow
the weather in germany is still totally changeable. temperatures from 10 degrees at night to 30 degrees during the day. and lots of rain. she is doing really well and you can see that she is made for this weather. 💪😎. i stopped the LST and let it grow as it likes. 😋

Likes
10
Share


@HerrnLubitz98
Follow
Just a couple days to finish.. will update with dry bud pics and weights then. Stay tuned!


Likes
24
Share


@el_cultivito
Follow
Blue Dream 1 started showing lots of rust spots and yellowing on leaves so I added more CalMag+ Iron to the reservoir believing the symptoms to be a deficiency in CalMag.
Blue Dream 3 also still showing signs of CalMag deficiency.

Likes
48
Share


@Northern_Ent
Follow
Aug 24: cool and rainy lately but will warm up again in a couple days. Gorilla Cookies looks really good and is flowering nicely. Very nice strain. Added some soluble seaweed to the water mostly for the K.
Don’t take flash pics of photoperiods unless you’re immediately using a 730 nm light to put them into dark mode.
Using the far red light like this is known as phyto-forcing and it’s like getting an extra two hours of darkness making a 26 h day. This far north I think it moves flowering up by 3-4 weeks so obviously a huge trick. Easy and cheap if you have daily access at dusk.
Aug 26: it’s been a couple of weeks but I figured it was time for a lazy compost tea. I watered with it slightly diluted and the plants look almost immediately greener and more vigorous…amazing actually. 👍👍
Aug 27: this is definitely the fastest flowering of the four. Hopefully it stays sunny for a few more weeks. Thinned out the understory a bit as there were some small branches and bud sites that were not going to do anything.
Check out the birds sounds on the first video. The magpies thought I was too close to their nest in the tree or something…they’re usually not quite that annoying.
Aug 29: this is a great strain, and the manifold is working its magic.
Likes
1
Share

@MalicetoDream
Follow
9/11/25-9/21/25
I have been cleaning them out slowly. Probably took too long to really lollipop them all. They almost all have that nice look with tops everywhere. Clean out the insides and all water leaves to make sure light and air penetrate.
At this point as you go through you really need to be separating your buds from the stems to help avoid mold build up, check for bugs or any older fallen leaf pieces that may be stuck to a bud.
This step is pertinent for both inside and outside growers. Also you don't have to be overly gentile doing this. Obviously no need to be extra rough but plants can take being handled.
I try to complete this process every couple days especially as we get closer and closer to the end game.
Watering every day and using Bud Candy and Bembe x 2 weekly. Will move to the flush process by 9/28.
Going to start flushing the Sunset Sherbet and Gorilla Skittlz this week.
Weather has been great 85F and dry, 55-60f at night. Rain is expected to move in this week and I will be pulling a few plants soon as they are a little more dense.
Any questions just ask, super ready for the end. May she always shine on your garden.


Likes
11
Share


@GorillaZativus
Follow
👑Actualización Jardin 30-33 días . 6 macetas de 18 , 4 genéticas .
⌛️Videos , en este orden :
Primer Video
🎥 🎥🎥🎥🌬️🌬️
🌱Slurricane x Tropicanna Cookies F2
@crisol_seeds
🌱Og Strawberry Starkiller x Tropicanna Punch F3
@secretfile.cl
🌱Gorilla Glue 4 @bsfseeds @bsfseeds.usa
Segundo Video
🎥 🎥🎥🎥🌬️🌬️
🌱 Gorilla Glue 4 @bsfseeds @bsfseeds.usa
🌱 Skywalker Haze @dutchpassion.official
🌱 Skywalker Haze @dutchpassion.official
📸
Fotos :
📸Todas
📸Gorilla Glue 4
📸 Og Strawberry Starkiller x Tropicanna Punch F3
📸 Slurricane x Tropicanna Cookies F2
🌱Hoy foleo a sustrato : King Crab 👑
0,5 ml en 1 litro .
Ec : 0,5
Ph: 6,2
🌱metimos más amarres al y full lst ,
y podas .
🌱 @baconlinecl @bac_online_nl

Likes
6
Share


@SecretC8keSociety
Follow
This week I had to refill 5 gallons water to make sure I’ll constantly give em water every day, but not heavy just when the soil looking dry.
Before putting on the net trellis. I did a little LST . I hold ‘em down first before putting the net trellis on. Slide the net trellis down and then cut off the string that holding the plants down for LST. After cut the canopy shoot up into the square hole. Then from there I reorganized tucked the big fans leave under so other can get lighten . When going into flower which is next week that when I’m going to clean the bottom .
Good morning Growmies and hope y’all stay green and positive . Feeling good today 🎶 Larry June. Off to work I go :)
Likes
41
Share


@Basementganja
Follow
I (pre-moistened) worked in 2.5 gallons of de-chlorinated tap water, with my fingers into this high-porosity soilless growing medium. This variant is very dry, and seems to reject water, until moistened(3cu ft compressed, Agro a5-hp from local nursery).
Even after the 2.5 gallons of water was worked in (with no runoff), there was still a dry patch at the bottom of the pot.. I figured it would start to absorb from the wet medium on top, over time.
It is now Day 10, and the moistened medium never needed to be watered since day 1. The medium is almost dry enough to be watered (see final picture). Maybe one or two more days. I will poke/scratch the soil daily, to ensure that I wait long enough, to not over-water.
Likes
18
Share
@Northern_Ent
Follow
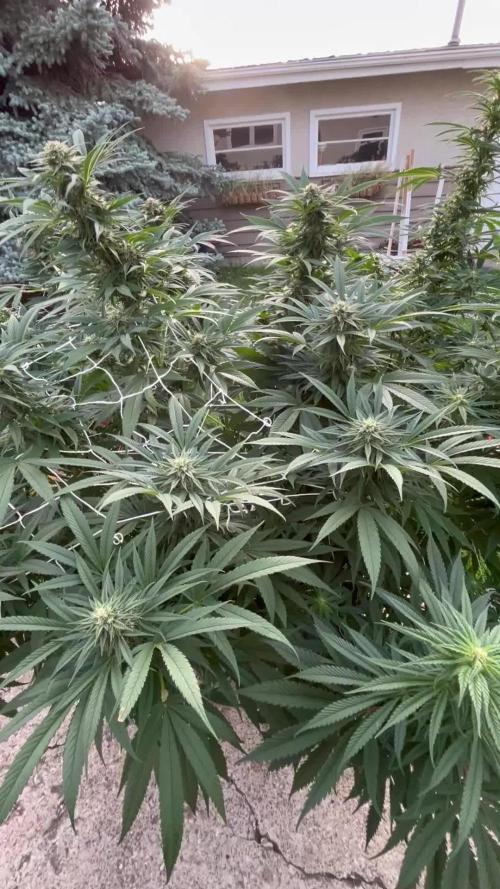
Aug 16: Sunday Punch EV is a strong plant and it will likely be my biggest yielder this year.
Have the UV lights going again today and the buds are looking great. Natural UV drops really fast here after mid-August so the UV lights should help them finish strong with higher potency.

Likes
4
Share


@pampa1989
Follow
Looking good, tswitch her in flowering stage. Looking forward to seeing that flowers start growing.