


By continuing to use the website or clicking Accept you consent to our cookies and personal data policy and confirm that you are at least 18 year old. For details please see Privacy Policy and Terms
Accept


Likes
2
Share


@Sators
Follow
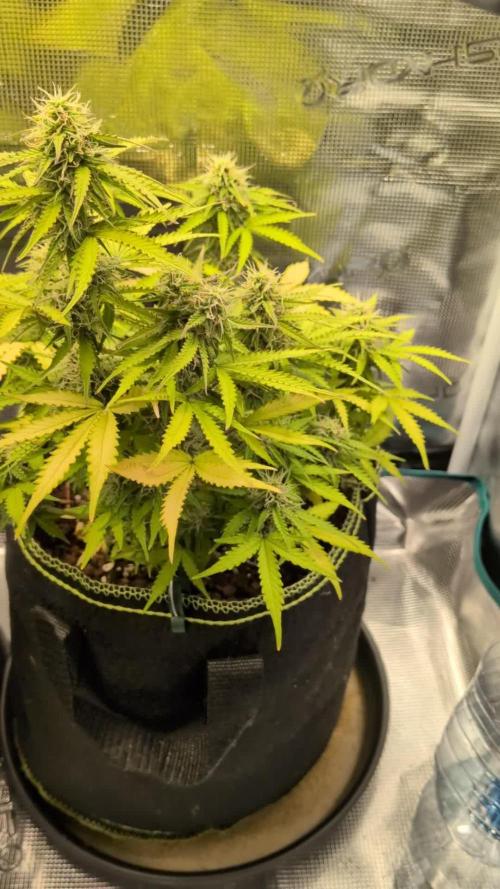
Day 16 – Strengthening Outdoors Begins
Today marks the 16th day for my CBD Auto 20:1 from the 420 Fast Buds collection.
The little warrior is continuing to show good progress!
After a few days of gradual hardening off, I started taking the plant outdoors twice a day – once in the morning and once again in the afternoon – to introduce it to real sunlight and gentle outdoor conditions.
Each session lasted around 30–40 minutes, depending on the temperature and light intensity.
The weather has been quite typical for spring in Ramsgate: a mix of cloud cover with bursts of sun, with light intensity varying between 600–1100 μmol/m²/s.
The plant seems to be adapting well – no visible signs of shock or stress so far!
At the moment, I’m still cautious about leaving it out all day, as nights are still a bit too cold for such a young seedling.
But I can already tell: the stems are starting to strengthen, the leaves are becoming slightly thicker, and the plant is gaining confidence facing the outdoor elements.
This is a special project for me – a true budget-friendly outdoor grow, where I’m letting the natural light and environment shape the plant’s journey. No artificial supplementation – just patience, observation, and care.
Looking ahead:
In the coming days, if the temperatures stay kind (especially the mornings), I plan to gradually increase the time outside, and soon transition the plant to full outdoor life. Step by step, no rush.
Overall feeling:
Happy with the plant’s spirit and the direction this grow is taking. The bond between grower
and plant grows stronger with every little sun session!
Day 19 – Full Sun Adventure and Hydration
Today marks a big milestone for my CBD Auto 20:1 plant – its very first extended outdoor session!
The weather has been absolutely perfect, with bright, strong sunshine all day long, delivering a consistent light intensity above 1400 μmol/m²/s.
Feeling confident after a successful hardening-off phase, I kept the plant outside from the afternoon well into the evening, enjoying the natural elements.
To support the plant through this sun-filled day, I provided a generous watering with 1L of clean, pH-balanced tap water.
I continue to carefully oxygenate the water before use, promoting healthier root development and stronger overall growth.
The plant is responding beautifully:
Leaves are vibrant and standing tall.
Stem is gaining thickness and resilience.
Overall growth structure looks compact, healthy, and well-adapted to natural light.
I’m very pleased with the progress.
If temperatures remain favourable tomorrow, the plan is to move the plant outside from early morning and allow it to enjoy the full day’s cycle under natural light – another important step towards full adaptation to outdoor life.
One day at a time – and the journey continues!
Day 20 – First Full Outdoor Day!
Another big step forward for my CBD Auto 20:1 plant!
Today, for the first time, I moved the plant outdoors for the full day to enjoy the natural sun and fresh air.
The morning started strong, with a bright clear sky and an impressive light intensity of 1600 μmol/m²/s.
The air temperature was a perfect 22°C, giving the plant ideal conditions to embrace the full outdoor environment.
Observations:
Leaves are standing tall and reaching toward the sun, showing excellent energy and adaptation.
The stem is gradually thickening and strengthening, becoming more resilient with each day.
No signs of stress or drooping, even under intense midday light.
Environmental Conditions:
Full sun exposure throughout the day.
Light breeze, but nothing too strong – just enough to naturally strengthen the stem.
This is a major milestone, and the plant looks truly happy and energetic!
From here, the focus will be on gradually adapting it to full day-night outdoor conditions, allowing it to thrive naturally under the UK summer sun.
The outdoor adventure has officially begun – and Sators is back in the race stronger than ever!
Day 21 – Surviving the Heatwave, Growing Stronger
Another exciting day for my CBD Auto 20:1 grow!
The weather gave us a real test of strength yesterday, and my little warrior is showing amazing resilience.
Conditions:
Peak sunlight intensity: around 2000 μmol/m²/s – incredibly bright and intense!
Temperature in direct sunlight: reached up to 35°C during the day.
Nighttime temperatures still remain low, so for safety and steady development, the plant continues to be brought indoors overnight.
Despite the daytime heat spike, the plant handled it impressively well:
Leaves are vibrant and wide open, reaching confidently towards the light.
Stem has gained more thickness, showing clear signs of strengthening after the outdoor sessions.
No visible stress such as leaf curl, wilting or discoloration.
Observations:
The combination of intense sunlight and warm temperatures has definitely accelerated photosynthesis and growth rate.
At the same time, careful night protection ensures no shock from the colder UK nights.
Balancing between the power of the sun and the comfort of indoor shelter is paying off!
It’s fascinating to watch the plant adapt to real outdoor forces day by day – it’s growing not just bigger, but stronger, smarter, and more resilient.
The outdoor training continues… and so does the journey of “Sators” in this race!

Likes
4
Share


@ChrisFunk
Follow
Week 3 of Flower for the FX3 #1 and Lucky 13, the FX3 #2 and Sergeant Sherbert have just started flowering this week after moving from the Veg Tent Into the new 150x150 tent.
The Greenhouse food has been amazing completly stress free and the plants look amazing especially in combination with the Autopots! Gonna do a good defoliation and clean up the lower a bit. Stay tuned family and happy growing!!!


Likes
5
Share


@Sr_popof
Follow
Ya están más recuperas tiene más follaje ya empiezan a verse las apices se dejará una semana más para que crezcan y se ocupe la maya scrog serán 8 semanas de vegetación

Likes
14
Share


@Momgrowsthechronic
Follow
Welcome to Week 6, Day 42 for the Sweet Seeds Gorilla Girl XL Autoflowering grow. All four of these lovely ladies are now fully into flower and the tent has filled up considerably. Even though this grow cycle is not going to produce the XL plants I was originally hoping for, this strain seems to have a lot of bud sites compared to other autos I have grown previously. Had these plants reached their full potential- I truly believe that this could/would have been a massive harvest. I fertilized them again in Week 6 with their final dose of a Grow based formula at 2 mls/gallon. They will be switched over a Bloom based fertilizer in Week 7 at a rate of 2.5 mls/gallon. I am still watering every 4th day and all four plants are receiving 3 litres each or 0.75 of a litre per plant per day. There is something killing off the foliage from the bottom up on the plant in the front of the tent on the left hand side. Not sure what the problem is so I am simply removing the dead/dying foliage as needed and hoping that she’ll have enough leaves to make it through to harvest.
Mom’s Tip for Week #6- When it comes to Fertilizer- $Less$ = More… For me, successfully growing Cannabis indoors means trying to mimic what nature normally provides for free. Sun, fresh air, water and nutrient rich soil are all essential for healthy, happy plants. At some point during the grow (usually 4-6 weeks in) the plant has used up all of the nutrients originally present in the soil thus requiring the grower to have to supplement with some type of fertilizer. I see many growers photographing and showing off their huge displays of colourful bottles and I gasp when I read their long lists of 10-15 different fertilizers and supplements being added to every single batch of water. Not only is this unbelievably expensive and overwhelming but time consuming and completely unnecessary for a successful grow. For those seeking an Organic path there are options such as homemade compost tea or powdered formulas consisting of bat guano, glacial rock dust, bone meal, alfalfa meal, etc. I often use a Canadian made brand called “Gaia Green Organics", mixed in at the start to create my own super soil thus carrying the plants through their first 4-6 weeks of life needing nothing more than PH’d water. The organic fertilizers are usually more expensive and often have a slower uptake by the plants themselves as they tend to feed the soil first which in turn feeds the plants. For novice/newbie growers and those with fast flowering strains such as Autos- a non organic, liquid, water soluble fertilizer is often the way to go. They are generally cheap, easy to use and quickly taken up by the plants when they need it most. My ride or die brand is "Flora Nova” by General Hydroponics and it comes in a 1 part nutrient grow and bloom formula catering to my plants’ needs from start to finish. This company has many options available including all kinds of additional supplements to be used in conjunction with their standard grow/bloom formulas but I’ve never found these products all that necessary or beneficial. Using them in the past has led to over fertilization resulting in burnt foliage, stunted bud development and harsh flavours when smoking/vaping the final product. Not only does $Less is More$ apply to how many fertilizers you are giving your plants but it also applies to how much. Most photosensitive strains can easily tolerate a full dose (as per the manufacturer’s recommendations) and thrive with being fed every time you water. But Autoflowers and some smaller photosensitive strains seem to respond differently to a slight tweak- keeping in mind that if you start small, you can always add more but if you start big, you can’t take back what’s already been given. I will generally only fertilize at half of what the manufacturer recommends for a photosensitive strain- every other or every second watering. Starting out at a quarter dose for the initial feeding which can sometimes be as low as 1.25 mls per gallon and working my way up from there. It doesn’t seem like much but within hours I can see my plants responding positively with increased/sustained turgor, greening up a little and increased resin production which equals "smell/scent". For me, I can smell when I’ve just fertilized my plants- it’s a stronger smell than the normal scent that they give off with a plain watering. If you’re lucky, you’ll end up growing a greedy Autoflowering strain that seems to want more than what you’re giving it. Rather than increasing to a higher dose in a single feeding, try feeding more often at the same dose- so if you’re feeding every other or every second watering, try feeding every watering at the same dose (trying not to increase above half of the manufacturer’s recommendation for the photo strains). Occasionally I will increase beyond the halfway dose to accommodate for the plants’ needs in late flower as most fertilizer companies list an increase to adequately feed during late flower anyhow. I guess the main message for this week is to keep it simple as nature intended. Learn to read your plants and supplement the small amount of nutrients that your plants don’t already have in the high quality soil you initially provided. Cannabis cultivation can be overwhelming at first but the $Less is More$ approach will save you time, money and the realization that you’ve accidentally fried your plants!
Likes
10
Share


@Pozzy67
Follow
3/21/22
Switched from Bonnie to Clyde, added bud booster as well. Turned on air domes and added a trellis net too! This run is going very well.
Likes
43
Share


@UnorthadoxDude
Follow
Day 98: Fertigated 10l
Hello growmies and welcome to week 15 for Nesia - this superb Amnesia Haze Auto from Fast Buds. Nesia continues to amaze me as by far my largest plant.
If you have been following my grow series you will know that I recently harvested Karen, who was dwarfed by Nesia, and Karen has yielded 160g dry. So I am properly excited to see if Nesia can set me a new yield record! I think she can and will!
Day 100: So I can no longer move her out of the tent to photograph, she is just too big and too heavy with bud. It is recipe for disaster. So for the rest of the grow I will be doing my best to get good photographs in the tent. I hope that's okay, because I don't have a choice really. Anyway she is a photogenic girl to say the least so I am not too concerned. I am really enjoying this new camera, I need to explore the limits! Anyway you should expect another update tomorrow or soon! :D
Day 104: Fertigated 10l I very nearly cut Nesia today, I even announced on Twitter that I would in the end I decided to let her go a bit longer I want to see some serious amber! I think I am starting to get the hang of the lighting and new cam... practice practice!
Likes
12
Share


@NearlyDeadGrows
Follow
Week no.13
The Ice Cream Cake auto grows good.
She build her Buds day for day...
Bigger and Bigger.
She is already so sticky , i never had any Strain what whas so sticky like she is actually.
I am sure it is because i use the "Supplement" Lights ( I give more per Day )
And because i give her more P-K and the Nutrients from @xpertnutrients.
Lets see when she will be finaly finish
18.11.2024: Is it time to chop?
17.11:
Die Lady wächst immer noch.. Baut ihre Buds immer dichter und breiter!
Ist deutlich mehr "sticky" geworden. Der Duft ist wie eine Sinfonie von einer verbotenen Liebe

Likes
1
Share

@therealgrowmie
Follow
We’re in the midst of the bulking phase now, with a few buds stacking up nicely.
Unfortunately, the plant on the left has sparser bud distribution. Compared to other auto genetics, these three plants also show a broad variety in growth structure and phenological traits.
Also, overall plant health isn’t entirely satisfying, with high temperatures being the Main cause. The leaves are showing several stress-related issues like mild tip burn, nitrogen deficiency, and some cal-mag problems. But hey—we’re here to grow buds, not leaves! 😄
That said, the fade is to be expected as the plants start to cannibalize themselves for nutrients. The stretch is also in its final phase, so we’re likely 3 to 4 weeks away from harvest.
---
Quick rundown on everything else:
Watering: 1500ml every third day
Fertilizer: According to the BioBizz schedule
Light intensity: ~1000 PPFD
VPD: ~1.62 kPa
Temperature: ~28°C
Relative humidity: ~55%

Likes
21
Share


@Excalibur
Follow
02 October 2018 -
Day 99
3rd day of flush and we see her begin to grow nicely.
Day 100 -
Happy lady as she gets densier and begins to really smell.
Day 101 -
She is maturing lovely.
Day 102 -
Orange pistols curl. She is on her way.
Day 103 -
Mature and ready. has thickened up significantly.
Day 104 -
Water topped up and pH balanced 5.4
Day 105 -
Trimmed after the video.


Likes
9
Share


@DaddyPrime2
Follow
10/20/24
#1 mainling is going good. plan to transplant to final 3 gallon pot soon.
#5 seems the most hardy and lives anything thrown at her. dry environments. humid environment. shes happy all the time.
i dont remember which number off the top of my head but it wouldve been the tallest plant. the only one that ive topped so far because she was stretching more than the rest. she has a strong pungent dank stank smell coming off of her already in veg. so thats something to note and i will definitely be keeping an eye on that.
#4 has been transplanted into a 5 gal fab pot and placed into my flowerring tent. im probably going to start a separate diary for each pheno through flower because they will all probably be flowered at separate times. they may overlap but they will all be on different time tables because i have my plants on a cycling through the flower tent. not necessarily a planned out perpetual grow yet but similiar in the sense of plants being pulled down and new ones ready to go.
10/22 transplanted #1 into her final 3 gal pot. training is set now she just needs to grow bigger before 12/12
10/25 transplanted #5 into a 5 gal fabric pot. also she is already showing purpling on her leafs

Likes
35
Share


@Zengrower
Follow
I'm still feeling like a lazy grower with the Minigrow One doing all the LST 😅. The growlights make sure the plant stays naturally short and bushy. There's not much work to do but make sure she's hydrated. I may have to defoliate one of these days but that's about it. No buds showing just yet, let's see if they develop in the coming days!

Likes
3
Share


@AestheticGenetics
Follow
3/27/25 massive amounts of roots shooting out the bottom from doing bottom watering.
3/30/25 these ladies are starting to find their roots and getting a little vigor finally.
they allhave a healthy growth of lower nodes. She may not need any topping or if she does then it will be a nice even canopy very easily.
Theyre still under a simple 32 watt light and doing fairly
4/1/25 alot of growth has happened this week as you can see from the begining of the week pictures to the end of the week pictures
Likes
3
Share


@CaliJ
Follow
beginning of the 6th week, I add pk 13/14. everything is going well😎. 12/07: too hot, installation of an air conditioner
Processing
Likes
14
Share


@ParadiseGrower
Follow
*BIG SORRY for the photo, hps light do that.)
🎄AND THESE IS CHRISTMAS, and an happy new years for you... plant is blooming very wel nice hollidays 😌🎄
Processing
Likes
12
Share


@DudeGrowsWeed
Follow
Welcome to week 1 of my CBD Medi Kush Diary!
I have 2 - CBD Medi Kush by Spliff Seeds going in the same tent with 14 other plants (full details on all of the other plants can be found on my "Dude's New Diary to Rule Them All" diary, check it out). But with the CBD Medi Kush I'm also growing 3 - DinaMed CBD+ by DinaFem, 1 - Critical+ by DinaFem, 3 - Cream & Cheese CBD by Seedsman and 7 - Cherry Blossom CBD Hemp by Elevator Supply Co.
The 2 CBD Medi Kush plants and 2 of the DinaMed CBD+'s were all started from seed at the same time (all other plants are clones). Once all surviving clones/seedlings were healthy enough I transplanted from dixie cups to small pots (I guess around 1 litre). They were transplanted into soil I had been composting and turning for 3-4 weeks. They really responded well to the transplanting and the new soil. Noticeable growth in 48 hours. The pictures in week 1 were taken right after transplanting (check week 2 and you will see a very noticeable change all around).
My plan this grow is to go organic (or as organic as possible). While the soil was composting I added old fan leaves to the mix as well as Recharge, Mr B's Green Trees 'Growth', and Jobe's Organic granular fertilizer. I know, I know, everyone says don't use time release nutes with cannabis. BUT, The Rev said it was fine in his "True Living Organics" book. He actually recommends putting spikes in the flowering pots prior to transplant (I'm planning on trying that too). Recharge and Mr B's Green Trees don't claim to be organic specifically for whatever reason, but the ingredients include pretty much everything The Rev recommends adding to composting soil. Plus I love Recharge, that stuff is great! Organic or not I'll be using Recharge along the way.
Here's the setup... First of all, I'll let you know my grow area is in my attic. The previous owners finished the attic with walls lights and even carpeting, but for some reason kept the folding attic stairs. Its pretty a pretty good space, we divide the attic in half. One side for my plants, they other for attic type storage. I have 2 2x4 tents and a larger flowering area (10x12'ish). One of the tents I use for drying only, the other is where I have these babies growing. The babies are currently under a single Viparspectra V300 300W LED. I'm having really good results with Viparspectra LED's. Bang for the buck, Viparspectra is hard to beat. I have a 2nd 300W Viparspectra which is a R300 (more reds) which is better for flowering. I may stick the R300 in the tent as well at some point, but for now the single V300 is doing a great job.
In the flowering area I'm running 1000W HPS. The HPS has been kicking ass with the plants in flower now and I'm expecting more of the same with these girls when they are ready for the big time.
Side note: I'm running a separate diary for all of these girls. In this diary I'm just going to focus on the CBD Medi Kush specifically. But I did start the CBD Medi Kush and DinaMed CBD+ seeds at exactly the same time. So, in the other diary I will do some comparisons and contrasts between the 2 strains as they grow. So far the DinaMed is taller, but the CBD Medi Kush has beautifully stacked node structure. This looks like its going to be a win-win.
Please follow and comment away!!! Any tips/tricks regarding organic gardening would be appreciated! 👍


Likes
14
Share


@BushDoctor740
Follow
Almost to the finish line for most of these girls.Everytime I get near the tent it just smells so great and wow are they building up some trichomes.The buds are chunky and super dense now and finishing up in the coming days except for one plant that has been lagging along the whole grow.It is smaller with a massive center cola so I’ll let her grow as long as needed.
Day 66 placing two of the Papaya cookies in the dark in another tent for 24-48 hours before I cut and hang them.
Likes
6
Share


@Chino8
Follow
Decided to start dark period(24-48hrs) day 85 mostly milky not much amber maybe some amber on the sugar leaves. I wanted to go 90+days with this auto but I needed the space in the tent for my photos and she looks almost ready, would’ve liked to see a little more amber but nevertheless I haven’t grown much at all so don’t have too much preference yet on trichomes. I’ll chop in a day or two and dry in my smaller tent and hopefully it goes well, my first harvest I dried too fast in low humidity and wasn’t that pleased with the end result. This time I’m planning on lowering exhaust speed and to not be so scared of 50+humidity in drying area and raise it to around 60humidity after a few days. Can’t think of anything else to write, but I’ll update after the chop and dry and 🙏 hopefully all goes well.


