By continuing to use the website or clicking Accept you consent to our cookies and personal data policy and confirm that you are at least 18 year old. For details please see Privacy Policy and Terms
Accept


Likes
23
Share


@NordicCropz
Follow
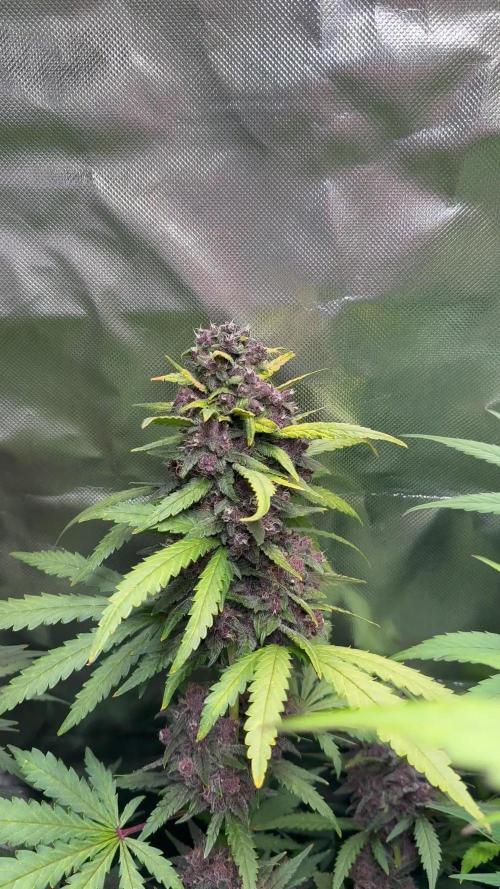
Long time. Day 106 from seed, flowering into eternity because of silly feeding mistakes. But at least I now have a bit of some incredible weed, harvested one plant day 101. Even though I'm sure it would have been even better with a perfect life cycle. 40 grams, trimmed to their bare bones. Was I expecting more? Yes, but given my mistakes, and the fact that it must be at least top 3 in my 8 year long cannabis career, I am nothing but thrilled with the outcome.
The one thats gonna be my biggest yielder is also the slowest one, by far. Guessing around 3 more weeks.. If it doesn't die on me, it has a coverage of yellow leaves which makes me slightly nervous.

Processing
Likes
6
Share


@Jabberwolky
Follow
The Ladies are going great so far this week the buds are comming in really nice. the smell is wonderfull
Kind soil as a base media and roots organic on the top.
only di water
Its really nice not having to worry about the ppms and ph of water and this n that ...
so far this grow is just want i need
nite time temp dropped below 58 a clp times on me .. i hope it done hurt the outcome to much


Likes
4
Share


@HeitorLeao
Follow
On day 11 of flowering.
I spent a few days without being able to see them, and the people that take care for me gave them just water, so they are a little hungry. Gonna rise the feeding and do another micronutrients + potassium silicate + fungicide + aminoacids + neem oil foliar spray.
I put and old scrog on top of the 2 big ones to open them more and give support.


Likes
101
Share


@Ferenc
Follow
Day 73, 25th of November 2020:
Hi! Well they are getting nice maturing buds getting bigger and all good.
I love the red colour of the Red Hot Cookies. Unfortunately, Tropicanna Poison and Red Mandarnine does not show any signs of purple or red colour.
Kalini Asia neither albeit, the bonsai version gets purple.
Gelato is little beauty. So yes, basically not much to say.
Fertilization is still the same every second day with the ratio and mixture above stated.
The lamp is on 11.15 min and off 12.45 min.
Last week was 15 min longer light cycle....
So every week 15 min shorter light cycle until the 5th week. So far -45 min. It switches on at 6 am and off at 17.15 pm.

Likes
6
Share


@Headies
Follow
First I soaked the seed for16 hours. Then I put them in a moist paper towel until they sprouted a tail and I placed them in rockwool. Day three I put them in rockwool. I shot for 50 ppm and put a drop of unsulfured molasses in the water for germination.
Likes
24
Share


@weedacouple
Follow
Easiest harvest we ever did (in our short career lol), the plant lost many leaves by herself. she has a strong flavour and we literally cant wait to smoke her.
Likes
107
Share


@Afterglow
Follow
Начинаю растить новый сорт моим собственным методом. Я его называю корона, хотя больше подходит название Multiple Symmetric Lollipopping. Это что-то среднее между Main Lining, Low Stress Training и SoG. Суть заключается в том, что мы делаем Topping выше 4-го этажа и затем все 8 основных веток разводим по сторонам. Четыре нижние ветки по диагонали, четыре верхние крест-накрест. В итоге получается эдакий равномерный круг веток, растущих на одной высоте, так как мы легко можем контролировать высоту каждой ветки. Принципиально можно и 10 и 12 веток делать, но мне хватает 8. Желательно иметь широкий горшок, чтобы было куда разводить ветки. Надеюсь когда-нибудь появится новый метод MSL с моим авторством.
Итак, взял две семечки, а победитель по росту переедет в большой горшок.
Гроубокс у меня самодельный. Две лампы HLG 100, но по факту обе работают по 50ватт. Встроено два фильтра и два канальных вентилятора. Один работает постоянно, второй включается автоматически при превышении верхнего порога температуры. Дверки на защелках, проклеены уплотнителем чтобы не пробивался свет и запах. Внутррение габариты от лампы ШДВ - 67х48х68 сантиметров. Помещается два куста, но я предпочитаю растить только 1.
Как проращиваю семена?
1. Они всегда хранятся в холодильнике. При попадании в теплую и влажную среду семена получают сигнал к росту и быстрее всего прорастают, буквально за 14-16 часов.
2. Берем нужные семена и кладем в теплую воду (18-22 градуса Цельсия) на 3-4 часа. Это нужно, чтобы скорлупа размягчилась, а семечко согрелось и получила достаточно влаги.
3. Слегка маникюрными щипчиками расщепляем скорлупу. Делается специально, чтобы как можно раньше корешок начал получать воздух. Чем быстрее раскрывается скорлупа, тем быстрее начинает прорастать корень и уменьшается риск загнивания.
4. Садим в таблетку или сразу в готовый субстрат. Обычно я сажу сразу в готовый субстрат, но в этот раз решил попробовать в торфяной таблетке, чтобы выбрать победителя по активности роста.
Как я готовлю кокосовый субстрат?
1. Я никогда не использую старый субстрат. Во-первых, я применяю микоризу и множество других грибков и бактерий, которые для маленьких ростков будут слишком концентрированными и могут навредить. Во-вторых, в старом кокосе очень много старых корней, которые обязательно будут гнить. С одной стороны это хорошо, но по факту это приводит к загниванию субстрата и образованию плесени.
2. Беру половину брикета, развожу в воде, промываю в проточной воде (попеременно горячей и холодной) пока не вымоется вся морская соль и затем размешиваю с вермикулитом и перлитом.
3. Заливаю полученный субстрат на 15-20 минут удобрением Cal-Mag (1000 PPM), чтобы субстрат набрал катионов кальция и магния, иначе первую неделю полива кокос будет забирать эти вещества из полива, а растение будет голодать. Если измерить PPM воды после внесения Cal-Mag и через 20 минут, то увидите, что PPM упадет до 600-700 единиц. Это кокос вобрал в себя соли.
4. Заливаю удобрением, в случае трех-компонентного Grow-Micro-Bloom в соотношении 3-2-1, PPM 1000. Также оставляю на 15-20 минут. Нужно это затем, чтобы кокос теперь равномерно вобрал в себя другие катионы (железо, цинк, медь, калий, ну и азотистые соединения, как то мочевина и аммоний). То есть мы целенаправленно вымываем излишки кальция и магния.
5. Затем, уже поливаем нашим удобрением с PPM 600-700 чтобы чуток снизить концентрацию.
6. В этот готовый буферизированный субстрат потом и попадет пророщенное семечко.
Как я поливаю?
В течение первых трех недель я поливаю через день. И не важно, высох субстрат или не высох. Кокосовый субстрат это позволяет. Далее приходится поливать каждый день, потому что развитая корневая система осушивает весь субстрат за сутки под чистую. Никогда не поливаю чистой водой - это только нарушает PH внутри субстрата и приводит к стрессу растения. Если нужно промыть субстрат, то готовится несколько поливов с нужным удобрением. Вспомните про то как после промывки падает PPM. Вот тоже самое происходит и при поливе чистой водой: питательные элементы вымываются с кокоса и когда вы начинаете "кормить" растение, оно голодает, потому что кокос все отбирает, чтобы делиться "потом", когда "насытится".
PH на веге всегда около 5.6-5.8, на цветении 5.8-6.1. PPM стараюсь держать на уровне 700. На цветении 1200-1400. Если вы дочитали до этого момента и увидели страшную цифру в 700 PPM, то на самом деле ничего страшного в этом нет. Если вы возьмете обычную землю, разведете водой и померяете PPM, то он там будет куда более высокие показатели. На самом деле растение способно жить даже при PPM в 5000 единиц. Поливать растение с PPM 300 - это слишком бедная смесь. Как правило, все руководства ориентируются на земляной грунт, а производители страхуются и дают заниженные нормы, чтобы покупатели случайно не сожгли свои растения. Но если если у вас есть PH и TDS измерительные приборы, то вы смело можете щедро кормить свое растение, а оно вам ответит буйным ростом и плотными шишками.
Всегда руководствуюсь золотым правилом проверки дренажа:
PPM растет PH падает: у растения несварение и что-то оно не может усвоить.
PPM падает PH растет: растение голодает, либо нарушен ионно-катионный баланс.
PPM стоит PH растет: все идет хорошо.
В каждом случае нужно понимать что было сделано ранее и корректировать действия.
Итак:
19.01.2021, в 12:00 замочил семечки в воде
19.01.2021, в 16:00 расколол аккуратно семечки и посадил в торфяную таблетку
19.01.2021, в 23:00 уже одна семка начала вылезать из торфа, хотя утапливал. И это всего лишь прошло 7 часов. Чувствую кандидат на пересадку уже показал себя.
20.01.2021, в 16:00 эта же семечка уже отрастила корешок и полностью показалась из торфа.
21.01.2021, в 10:00 выскочило из торфа и готова расправить листики. Вторая семечка пока сохраняет молчание.
21.01.2021, в 17:00 росток вот вот начнет разрывать скорлупку чтобы выпустить первые семядоли. Перенес в гроубокс под лампу.
23.01.2021, в 10:00 умер... так и не увидев свет. А вот её младшая сестра неожиданно вылеза из торфа и вытянулась за ночь на 2 сантиметра, пока были отключены лампы. Пришлось ей вручную снимать скорлупу.
23.01.2021, в 15:00 младшая сестра уже показала хвостик корня с другой стороны торфяной таблетки. Завтра надо будет пересаживать уже в нормальный горшок
24.02.2021, в 14:00 девочка переехала в новый дом. Первые листики стали размером с семядолями. Поздравления принимаются, мы проросли.
Likes
23
Share


@Mr2toke
Follow
Day 70 - 23/11/23
Fat Banana progressing nicely!
Trichomes are 30% clear, 60% cloudy with some amber heads scattered here and there.
I think im gonna flush her today.
it's a waiting game now ⏳⌛️

Likes
65
Share


@Dendegrow
Follow
Week 4 of the flowering phase has arrived, and last week flew by 🌬️🌱. The ladies are thriving, and the buds are now clearly visible! ✨ The flowers are starting to turn darker, which is an exciting sign 🍒.
The first trichomes are already forming, hinting at a very potent strain 💎🔥. While the cherry aroma hasn’t come through yet, removing some leaves revealed an intense, waxy scent – very intriguing! 🌿👃
I’ll keep you updated with daily posts. Drop a like and stay tuned to see how the ladies develop 🌺📸. See you next week!
Woche 4 der Blütephase ist da, und die letzte Woche ist wirklich wie im Flug vergangen 🌬️🌱. Die Ladies haben sich prächtig entwickelt, und jetzt kann man die Buds schon richtig gut erkennen! ✨ Die Blüten beginnen langsam, sich dunkel zu verfärben – ein vielversprechendes Zeichen 🍒.
Auch die ersten Trichome sind schon sichtbar, was definitiv auf einen sehr potenten Strain hindeutet 💎🔥. Das Kirscharoma ist zwar noch nicht zu erkennen, aber beim Entfernen der Blätter wurde ein intensiver, wachsähnlicher Duft wahrgenommen – super spannend! 🌿👃
Ich halte euch weiterhin mit täglichen Updates auf dem Laufenden. Lasst ein Like da und bleibt dran, um zu sehen, wie sich die Mädels entwickeln 🌺📸. Bis nächste Woche!


Likes
24
Share


@Dirty_Hippy
Follow
Week 8:
Nothing but water and wait for the rest of her time.
She's beginning her flush so I figure a couple weeks and she'll be good to harvest 😎
This girl smells like Chem, Cherries and cream and she has really been putting on some weight here at the end. Her buds are deceptively dense and spear shaped.
As the calyxes swell so do the trichs.
Really interested to see what she smokes like.

Processing
Likes
2
Share


@Kushpot
Follow
Transplanted too 12 Gallon pots, With help of
some LST they are devolping into perfect Bushy kush plants.
Likes
4
Share

@Nocone_Purple
Follow
This week the Blackberry shows a solid progression into the late flowering stage. Buds are already dense with a nice resin coverage and the aroma is becoming more intense. From now on I’m stopping Big Bud and switching to Overdrive for the next two weeks. The reason for this is that Big Bud is mainly focused on building bud size and structure during mid-flower, while Overdrive is formulated for the final phase, helping the plant push out extra weight, density, resin and terpenes before the flush. This way the Blackberry can fully focus on ripening and maximizing quality in the last stretch.
Likes
100
Share


@m0use
Follow
The time is finally here to post the harvest. I waited till it was all done and dry before updating the dairy so will add in the dry weights next on the 2nd half of the harvest entry.
I enjoyed this plant a lot, its grew well and loved how it was shorter and fatter. I wonder if it was at the dame distance from the plant if It could have done even more. Had some issues with the yellowing that was happening on the other plant in this tent. I should have treated this faster with a flush but was super reluctant and it may have hurt the yields a bit. The top best looking buds looked and smelled amazing even the lower buds where doing well not so larfy like the other plant.
There was crazy strong smells with this plant, sour berries and hints of lemon, it was a best smelling plant I have grown to date. This would be a great plant to grow for beginners, cant take a lot of stress and still produces quite well and even on lower wattage leds it was good. It was not the most crystally looking plant, not like the maltezerz but still had some finger hash buildup but a small amount. I feel this plant would be a winner for a rosin press.
I don't plan on growing this strain out again despite me liking a lot of qualities about it. I'm only trying to grow cbd dominate plants is the main reason. If my friends really like this I have some clones so can always give them some. Speaking of clones they are doing well outside, greened up a lot and showing signs of revegging.
Took some photos of the weed hang drying on day 1 in the tent and a week later to show how much they shrink.
Only some of the lower growth is larfy, will make good edibles or hash, that will be a fun project to do and may include that in my projects diary.
That's about all I can think of if you have any questions just ask.
m0use
Disclaimers:
1. I have divided the total watts of light in half, 300w(150w) for this diary. It will accurately reflect the g/w ratio as the two plants growing in this tent are listed in two separate diaries.
2. I include any shake/trim in my gross totals as I use them to make edibles.
3. I did not follow any proper ways of listing my nutrients. Some are ml/l of total solution watered, others ml/l of total medium and some are just the total amounts I added, not as a ratio.
If you have any questions let me know!
+++++++++++++++++++++++++++++++++++++++++++++++++++++++++++++
Cost + Time Analysis Of Growing Cannabis. m0use’s Breakdown
+++++++++++++++++++++++++++++++++++++++++++++++++++++++++++++
Light Schedule
===
Veg [Dec 18th 2021 - Mar 11th 2022]
18h on 6h off - 6am-12pm
Flower [Mar 12th 2022 - May 10th 2022]
12h on 12h off - 9am-9pm
This is extra tricky this harvest as I went through 2 different hydro rates in three different periods, plus a veg and bloom switch between them.
Mon-Fri are TOU rates, all weekends are off-peak pricing all day.
Off Peak = 7pm-7am + all weekend
Mid peak = 11am-5pm
On peak = 7am-11am + 5pm-7pm
TOU rates:
Dec 18th 2021-Jan 17th 2022
Cost of kwh with on-peak "17.0c", mid-peak "11.3c" and off-peak "8.2c".
Jan 18th 2022 - Feb 7th 2022
Cost of kwh with on-peak "8.2c", mid-peak "8.2c" and off-peak "8.2c".
Feb 8th 2022 - Current
Cost of kwh with on-peak "17.0c", mid-peak "11.3c" and off-peak "8.2c".
—
Dec 18th 2021-Jan 17th 2022
Weekdays “21 days”
6am - 7am -- 1hr @8.2c/kwh off-peak
7am - 11am -- 4hr @17.0c/kwh on-peak
11am - 5pm --6hr @11.3c/kwh mid-peak
5pm - 7pm -- 2hr @17.0c/kwh on-peak
7pm - 12am -- 5hr @8.2c/Kwh off-peak
Weekends “10 days”
6am - 12am – 18hr @8.2c/kwh off-peak
6h @17.0c/kwh
6h @11.3c/kwh
6h @8.2c/kwh + [email protected]/kwh weekdays/weekends
—
Jan 18th 2022 - Feb 7th 2022
Weekdays “15 days”
6am - 7am -- 1hr @8.2c/kwh off-peak
7am - 11am -- 4hr @8.2c/kwh on-peak
11am - 5pm --6hr @8.2c/kwh mid-peak
5pm - 7pm -- 2hr @8.2c/kwh on-peak
7pm - 12am -- 5hr @8.2c/Kwh off-peak
Weekends “6 days”
6am - 12am – 18hr @8.2c/kwh off-peak
18h @8.2c/kwh + [email protected]/kwh weekdays/weekends
—
Feb 8th 2022 - Harvest
Veg
Feb 8th - March 11th 2022
weekdays “24 days”
6am - 7am -- 1hr @8.2c/kwh off-peak
7am - 11am -- 4hr @17.0c/kwh on-peak
11am - 5pm --6hr @11.3c/kwh mid-peak
5pm - 7pm -- 2hr @17.0c/kwh on-peak
7pm - 12am -- 5hr @8.2c/Kwh off-peak
weekends “8 days”
6am - 12am – 18hr @8.2c/kwh off-peak
6h @17.0c/kwh
6h @11.3c/kwh
6h @8.2c/kwh + [email protected]/kwh weekdays/weekends
—
Flower
March 12 - May 10th 2022
weekdays “42 days”
9am - 11am -- 2hr @17.0c/kwh on-peak
11am - 5pm --6hr @11.3c/kwh mid-peak
5pm - 7pm -- 2hr @17.0c/kwh on-peak
7pm - 9am -- 2hr @8.2c/Kwh off-peak
weekends “18 days”
9am - 9pm – 18hr @8.2c/kwh off-peak
4h @17.0c/kwh
6h @811.3c/kwh
2h @8.2c/kwh + [email protected]/kwh weekdays/weekends
—
Total hours in each peak period
126+144+168 = 438h @17.0c/kwh
126+144+252 = 522h @11.3c/kwh
306+378+288+300 = 1,272h @8.2c/kwh
Lights
===
LED’s I use are 48w and 18w, per stick, they are arranged on an array totaling 300w.
6400k 18w*6 = 108w + 3000k 48w*4 = 192 108w+192w=300w | 300w/1000 = 0.3Kw
* note I am using 150w as stated in my disclaimers to account for the missing plant in a separate diary.*
Using the previous c/kwh numbers above I can find out the total cost of the lamps in the 3 peak periods. I converted the cents into dollar amounts beforehand to avoid dividing by 100. 8.2c/h = 0.082$/h
438h * 0.17c/kwh = $74.46kw * 0.15kw = $11.17 on peak
522h * 0.113c/kwh = $58.99kw *0.15kw = $8.85 mid peak
1,272h * 0.082c/kwh = $104.30kw *0.15kw = $15.65 off peak
The "h" hours and "kw" kilowatts cancel out and we are left with a value of $ dollars per peak period, add all the peak periods up and you get your total cost of running the lights in dollars.
$11.17 + $8.85 + $15.65 = $35.67 for the grow light only.
My light grew for 20 weeks and 4 days, or 144 days. almost 21 weeks total.
$35.67 / 144d = 0.2477$/d average of about 25c a day in electricity
337.2kw for the entire grow.
Using the regular calculation of grams harvested divided by watts used is not accurate to me, it does not account for all the time the lamps are on, the length of grow to the over all cost. The calculation that makes sense to me is this, harvested dry weight of usable cannabis buds/trim/keif/whatever in grams divided by total kw used. Could also combine it with grams per total single use costs “anything you used only for this grow and wont reuse in the next, or fractions of multi use items like fertilizers if they ½ full” and see how much you’re investing per gram.
"kw" ÷ "g" = kw/g
"$" ÷ "g" = $/g
I have harvested 4.57oz or 129.6g on 337.2kw.
337.2kw ÷ 129.6g = 2.60 kw/g of usable cannabis. This is not an ideal ratio for me and looks like a lot of energy waste happened from the extended veg period.
$35.67 ÷ 129.6g = 0.28c/g
It cost 28c/g when comparing total electricity cost to gross yield, almost identical to the comparison of total electrical cost to the number of days in the grow 25c/day.
Neat!
legend,
kwh = kilowatt per hour
kw = kilowatt
w = watt
h = hour
c = cents
$ = dollars
d = day
LED= Light Emitting Diode

Likes
49
Share


@Roberts
Follow
The Mandarin Squeeze sisters have been making good vegging progress this last week. I changed the solution on them a few days ago. The ph has been very stable, and good growth has shown this. They got some further lst and selective defoliation today. Everything is going really good at the moment. Thank you Terpyz Mutant Genetics, and Spider Farmer. 🤜🏻🤛🏻🌱🌱🌱
Thank you grow diaries community for the 👇likes👇, follows, comments, and subscriptions on my YouTube channel👇.
❄️🌱🍻 Happy Growing 🌱🌱🌱
https://youtube.com/channel/UCAhN7yRzWLpcaRHhMIQ7X4g


Likes
2
Share


@Giftedwithgab
Follow
Week 7 was on auto pilot until I realized it was 1 more plant to transplant. Since I got to transplant(work), every plant went to the hair salon(LST, Defoli, Fiming). My first time and I must admit I regret it. 😅 my plants look naked, I felt bad so I added Kelp into the NUTE line up....... I have no idea what I'm doing but I'm doing it at 150mph.
Processing
Likes
4
Share

