By continuing to use the website or clicking Accept you consent to our cookies and personal data policy and confirm that you are at least 18 year old. For details please see Privacy Policy and Terms
Accept
Likes
Comments
Share


@Cariboo_OG
Follow
This Diary contains one of Katsu Bluebird's Most Exciting breeding Projects;
Grape Ape Cake !
Lineage;
Hotcakes (Katsu Bubba X Burnt Toast from Raw Genetics)
X
Grape Ape
Welcome to Week Seven, our last Veg Entry
These Girls loved the topping last week.. & didn't really miss a beat as far as growth is concerned, a minor delay but still cracked an inch worth of height gained this week.
As most seam to have a very tight growth pattern I honestly think they're going to be monsterous tower's in the coming weeks. with that in mind I gave everyone a good leg shave to increase those chances.
Also The Frist trellis is up ! after talking with Katsu about how much he thinks this particular strain may stretch.. i've decided to hang 2 lines of support across these girls. this first being right as we move into FLOWER ! teh second line will go up one the stretch stops..(week3-4 maybe we will see)
With that being said, after a slight flush @6.6ph Water, & 24 Hours of darkness happening as I type this entry.. They will receive their first Flower Feeding in the Morning!
& the next entry will be our first week of flower !
It is always a blast working from a pack of Reg Seed, let alone an Exciting project like these Katsu beans ! and as we move into flower next week I've taken cuts that I'm hopeful will ensure I have the BEST of the Best Flowers from this run to keep for another run at least.. and maybe even outdoor 2021.
Thanks for Reading This far 🙌
If you have a question or a comment leave it down below otherwise,
I Hope You Check in Next Week,
Stay Safe out there & Happy Gardening
Cariboo

Likes
67
Share


@Hashy
Follow
Grow diary 11 Stage 1
Days 1-10
By day 4 all was looking good, she had a root coming out the bottom of the cube.
Day 6 I transplanted her to the 3 inch rockwool cubes that had been soaked for 15 mins in this stage nutrient solution and left to drain for 15 mins, then she went into the bigger propagator.
Day 10 she no roots coming out the bottom of the 3 inch cube yet.
Over the last few days she has been getting more exposure to the fan, with the lid of the propagator the humidity is on the low side, but i want to get some air movement around her.
She has grown o.k over the last 10 days. She looks healthy enough and is where I would expect her to be in growth. She is the ugly duckling of the grow so far, I always find when I grow gorilla glue or anything crossed with a gorilla glue I get funky 1st and usually 2nd sets of leaves.
Temp
Max 30.6c
Avg 26.6c
Min 21.2c
Humid
Max 85%
Avg 69.7c
Min 45.7%
VPD
Max 1.86
Avg 1.03
Min 0.44
Hopefully back in 10 days

Processing
Likes
27
Share


@Silverback_Guerilla
Follow
4/5:
Took 4 cuttings from the shortie
4/12:
All 4 are rooted and growing!
5/1:
Transplanted from 1gallon pots to 5 gallon pots.
5/3:
Decided to grow one of them in my tiny tent and the other 3 will go outdoors.
5/4:
Took 2 of them outdoors under the 270w and sunshine.
5/6:
Trained all of them today and fed some boomerang along with the kelp, molasses, big bloom, and silica. Foliar fed and took the last one outdoors.
The one in the tent is really flourishing!
5/7 - 5/17:
Excellent growth! The supplemental lights are making all the difference.👍
Did some more training on all of them early in the week.
The one in the closet is spreading out nicely and budding up pretty quickly...but what's very cool is that all 4 clones outdoors are flowering?!?!? I sure hope they go ahead and finish rather than starting to revegetate as the days continue to get longer.
Much rain for the past few days, but it let up long enough for me to install another 200w of waterproof 3000k LED lights a couple of feet above them. Very intense lighting, great bang for the buck. So now, I've got 350w of 3000k and 120w of 6500k in the outdoor garden. That's gonna have to do it, as I also am using 1400w in my indoor gardens, plus a/c..bills are getting ridiculous.
5/18 - 5/28:
The clone in the tent is still stacking up really well. I guess the ones outdoors are too, but next to the seedling plants, they seem puny. Many buds though...
Since they decided to flower early, I sprayed them all down with a product that is loaded with hormones and auxins and stuff that's supposed to retard vertical growth and promote branching. It's also supposed to speed arvest time by as much as a week. I hope they can finish before the summer solstice (June 21), otherwise they might try to reveg instead of finishing..
Hopefully it helps keep them from stretching so much that I'll have to supercrop them. Their mamma was a shortie, so they really shouldn't get too tall anyway.
I also foliar fed them several times this week with something called MicroLife Maximum Blooms, Pow! They love the stuff!
5/28 - 5/31:
I did some training on a two of the outdoor clones early in the week between rain showers, and foliar fed with Microlife maximum bloom formula. She was looking a little N deficient, so I assume the dry amendments have petered out. They were dry enough, so I top-fed her with another couple tablespoons of cavern culture and on the 31st. I gave them big bloom, tiger bloom, grow big, beastie bloomz, silica, endoboost, signal, humic acid, liquid kelp/fish emulsion, and liquid molasses. The indoor clone is looking awesome. I fed her heavily on the 30th.
It just feels so strange that I'll be harvesting outdoor photos in June!?!
That's it for week 8-
6/1 - 6/8:
Early in the week I gave them about a half gallon of water with liquid molasses, cal-mag, silica, and beastie bloomz only.
I foliar fed them a couple of times during the week, right at daybreak.
I fed them on Saturday, the 6th..about a gallon each..beastie bloomz, microlife maximum blooms, cal-mag, humic acid, grow big, big bloom, sweet & sticky, and signal.
They are looking very good..buds galore. The indoor clone got the same nutes, but on different days. She's also covered in buds, and they are beginning to fatten up.👍
6/9-7/4:
Busy with other gardens, so not many updates...
Indoor clone got to spend the last 2 weeks of her life in my closet under the quantum boards and UVB. I harvested and washed her buds on 6/28, let her hang dry and weighed and jarred her up on the 4th of July. She came in a 111g of cola and 45g of lower bud with only about 5g of larf. Nice!👍
She smells just like her mommy and has the same uber-dense buds. She was topped, so the buds aren't as mighty as the mamma's, but much more plentiful.👌
Outdoor clones:
I had a massive spider mite attack, and during the same week, I had a grasshopper invasion...I lost a few plants, one of which as a FFT1 clone.
I had just harvested my autos and my indoor clones from the closet, so I moved the remaining two clones in under the quantum boards. I treated them for spider mites several ways for several days and have given them much TLC. Hopefully their buds fatten up some more. They stanky, but they kinda slim...
7/11:
I harvested the last two clones tonight. So sticky!!! I washed them and hung them to dry.

Likes
24
Share


@GrowGuy97
Follow
I am honestly blown away with how amazing all 3 plants done! I didn’t really have any deficiencies or issues with any of them the entire grow & it really shows in the quality & weight these ladies put off! Bud smells almost like licorice & has a very sweet taste when smoking! If you havnt already make sure to go check out New420Guyseeds, he has extremely fast shipping, great prices and quality genetics! Thanks for following & happy growing friends!🙏🏼✌️🏼🌱

Likes
15
Share


@Skinnytalls420
Follow
So this was a simple going grow!!! It’s strange how the hot so big under the light! I had one blue cheese under the same light and tent and it was way smaller!! Anyway 1 of these has come out perfect very happy the other two I’m not to sure the hairs were still pointing up but I really don’t have the time to have them going another week there already over the time they was supposed to be done but yeah I’d say out of 10 I’d rate this blue cheese growing experience a 6 out of 10 hopefully this improves when it’s dry!!!

Likes
27
Share


@ButterfliesLittleFarm
Follow
Hello Diary.
The second week of flowering is behind me. There’s already a real jungle in the box, and as I announced last week, I did my first defoliation this week. I removed all the leaves from the lower branches and thus allowed her better airflow since there are three plants in the box. Two Haze Berry Auto and one Fat Banana Auto.
As you can see in the pictures, the plants are really beautiful, with a bunch of flowers that fill up and develop nicely.
Watering is every third day, when each plant in the box receives approximately 2.5 liters of water. I started adding CalMg preventively, 1.5 ml / lit and I continue with BioBizz, I will add it by feeling so we will see how the plants will react to that.
Here's what the week looked like:
23/10/2020 - Day 29.
Watering. This time I only added CalMg without BioBizz. p.H I regulated to 6.4 and the temperature of the water I water with is always around 20 degrees.
Temp / Humidity on the farm - 26.5 degrees and 51% humidity.
24/10/2020 - Day 30.
Defoliation. As I wrote earlier, I cleaned the leaves on the lower branches and allowed better airflow and easier watering.
26/10/2020 - Day 32.
Watering. I always prepare about 8 liters of water with which I water all three plants. This time I added both CalMg and BioBizz. p.H. - 6.4
Temp / Humidity on the farm - 25.4 degrees and 44% humidity.
29/10/2020 - Day 35.
Photographing and watering. I took photos for this week just in the box. I think I will only take photos on a black background for the last two weeks of flowering so as not to disturb them too much.
I then watered the plants only with water with regulated p.H at 6.4.
That's all for this week, so far everything is great and I hope it will continue that way. See you soon.
Likes
53
Share


@DogDoctorOfficial
Follow
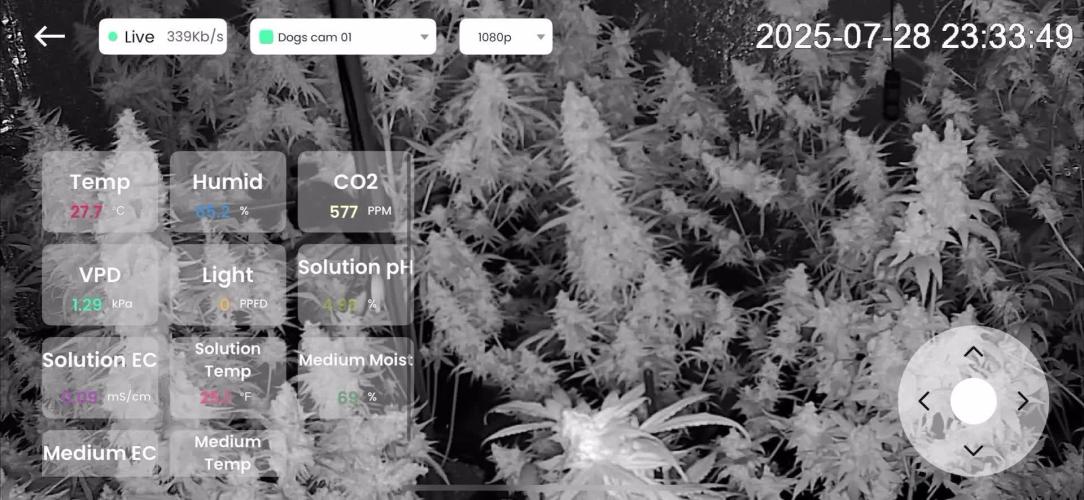
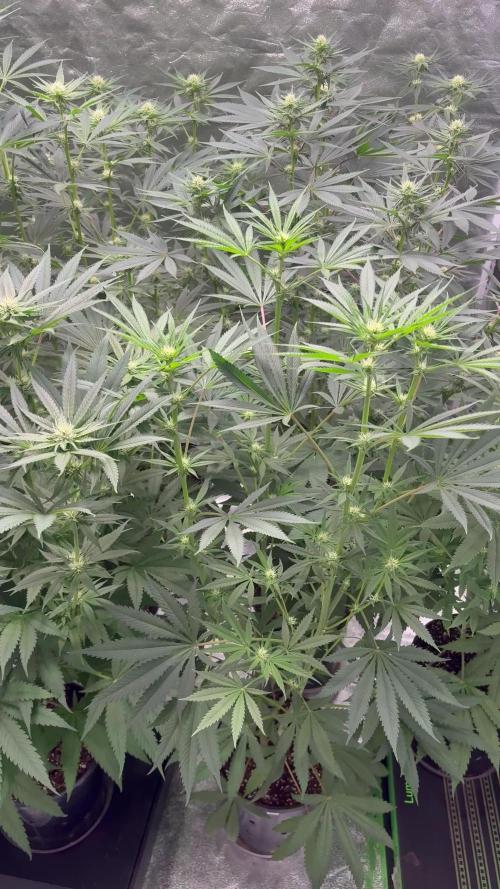
Hello, my amazing green-thumbed friends! Welcome to the Week 1 flower report for our beloved P.C.R.s. The transition from veg to flower is a magical time, and our plants are already showing signs of their future glory. Let’s dive into the exciting details of this week!
Entering the Flower Stage
Our P.C.R.s have officially entered the flowering stage, and the transformation is already visible. The stretch has begun, and you can see the plants reaching up, preparing to produce those beautiful buds we’re all waiting for. This stage is all about supporting their growth and ensuring they have everything they need to thrive.
NutriSpray Magic
This week, we’ve been diligently spraying Aptus Holland NutriSpray, and the results are phenomenal. NutriSpray is like a spa treatment for our plants, providing essential micronutrients directly to the leaves. It helps with nutrient uptake, reduces stress, and boosts overall plant health. Our P.C.R.s are absolutely loving it, standing tall and proud with their leaves praying to the light.
Nutrient Transition
With the start of the flowering stage, we’ve made some important adjustments to our nutrient regimen. We’ve stopped using StartBooster and replaced it with TopBooster, which promotes flowering and bud formation. Additionally, we’ve introduced P-Boost, a phosphorus booster that enhances root development and flower production.
TopBooster: Encourages larger and more abundant flowers.
P-Boost: Provides essential phosphorus for robust root and flower development.
NutriSpray: Continues to support overall plant health and stress reduction.
Optimal Conditions
Maintaining the perfect environment is crucial as we move into the flowering stage. Our TDS is now at 360, with a pH of 5.9 and a temperature of 21°C for watering. These conditions are optimal for nutrient uptake and overall plant health, ensuring our P.C.R.s have everything they need to produce those beautiful, resinous buds.
Care and Attention
Paying close attention to our plants during this stage is key. Regularly inspecting for any signs of stress or nutrient deficiencies and adjusting care as needed ensures our plants stay happy and healthy. The love and care we put into this process are reflected in the vibrant health of our plants.
In Conclusion
Week 1 of flowering has been all about setting the stage for a bountiful harvest. With the help of Aptus Holland NutriSpray, TopBooster, and P-Boost, along with our careful attention, our P.C.R.s are off to a fantastic start. The excitement is building, and I can’t wait to see how they develop in the coming weeks.
Shout Outs
A huge shout out to @aptusholland, our main sponsor, for their incredible products that keep our plants thriving. Another big thank you to @artgenetix for creating the phenomenal P.C.R. strain. And to the wonderful community at Grow Diaries and all our followers, your support and enthusiasm keep us going. Let's continue to grow together!
Until next time, happy growing, and may your gardens be full with love and green!
Genetics - P.C.R. @Art_Genetix_Team https://artgenetix.world/
Nutricion @aptusholland https://aptus-holland.com/
LED Power @Lumatek and @viparspectra
As always thank you all for stopping by , for the love and for it all, i fell blessed to have you all with me for one more love journey Thank you Thank you Thank you , you guys are great and have been amazing , thank you for everything !
#aptus #aptusplanttech #aptusgang #aptusfamily #aptustrueplantscience #inbalancewithnature #trueplantscience #dogdoctorofficial #growerslove
With true love comes happiness , Always believe in your self and always do things expecting nothing and with an open heart , be a giver and the universe will give back to you in ways you could not even imagine so !
Growers love to you all


Likes
2
Share


@Gromie
Follow
Had to add a trellis net, DP all the way on the left was getting way too heavy.
Likes
7
Share


@Organic_G
Follow
Die 4. Blütewoche hat noch 2 Tage, jedoch hat es mich in den Fingern gejuckt jetzt schon die Bilder zu teilen.
Gesund und Munter, schöne Blüten, super Geruch…
Bin gespannt was meine Schätzchen in der 5. Blütewoche zeigen werden.


Likes
6
Share


@jackh3rrer
Follow
End of the first week of flower now. Some of the sites became a bit too alpha, so I decided to pull them towards the sides / corners to attempt to keep an even canopy. So far, they don't seem to be getting too much hungry yet, so I slightly adjusted feeding schedule. I'm going with the "less is more" approach on feeding this run. PPFD in this week is now at 620 PPFD.


Likes
39
Share


@Belverde
Follow
Plants really very resistant and above all resinous..
I'm sorry not to have even posted the vegetative phase, it will be for next time..
With them I used a substrate filled for about half with light-mix
cocomix
perlite
humus
guano kalong ( bloom)
mycorrhite ..the upper part only Light-mix with perlite coconut.. In the vegetative phase I gave them only the root juice the few nutrients already present in the light-mix..
The light that I used is a 205w Black-dog phytomax 2-200..
The total of the light must be subdivided as well as their two also another Peyote C.
n ° 2 LSD autoflowering (for the whole first month of flowering)
n ° 3Cookies Kush (in the last two weeks)..
So the final weight in flowers has probably been affected enough ...but the quality is the quantity of the resin and it was really exceptional ..
Vaporizer test (mighty / ghosmv1) 180/185/190 °..taste on the classic line of kush, but with sweet notes of vanilla, coffee in mix with an earthy and pungent base, but not persistent..
Very good ...
Relaxing effect but not by "locking sofa"..
Mind quite clear and focused..like good kush ..
Of Critical has taken a lot in the structure of the plant, but also a little bit in the flavor with some fresh" notes "referable to some fruit like mango / lemon, just a pinch..
I think it is suitable for making extractions..
With secondary peaks and resin-laden leaves I will most likely make a coconut oil, to eat alone or in a mix where I happen to be..
Strain recommended for everyone ..
Excellent for beginners..
Thanks for reading..
🙏🌱😊
Processing
Likes
5
Share


@Ensign420
Follow
Week 02 Introduction
This week has been a bit of a struggle. Had my first experience dealing with slime and brown algae. But I think adding enzymes and increasing the beneficial bacteria helped to fix the issue. Also experienced nutrient burn for the first time. My nutrient solution strength got as high as 671 PPMs. So backed it down to about 430 PPMs during the end-of-week reservoir change. Also cut Hydroguard (expired?), CaliMagic, and Superthrive from this grow. Now she's still stunted, but is starting to recover. Hopefully...
[START OF WEEK 02]
Day 01 - Monday - 08/10/20 - Total Days: 008
-----------------------------------
- [0830]: Still looks a bit yellow. But getting larger!
--- Solution strength was at 248 PPMs.
--- Just topped off with a bit of distilled water
--- PH went up to 6.1 so PH'd down to 5.8
--- Ran the top feed for a bit to wet the hydroton.
- [2130]: She's looking even more yellow now.
--- Even the new leaves are really yellow.
--- Decided to add more base nutes.
--- Added 4ml of Sensi A
--- Added 4ml of Sensi B
--- Now at about
--- Solution Strength went up to 304 PPM.
--- PH was at 6,
--- Also raised the water level a bit more.
--- I really hope it's a nutrient deficiency and not an over-watering issue.
--- Please live!
Day 02 - Tuesday - 08/11/20 - Total Days: 009
-----------------------------------
- [0830]: Looking less droopy. But still yellow.
--- Decided to do a reservoir change.
--- 4.5gal of distilled water
--- 8ml of Sensi Grow A
--- 8ml of Sensi Grow B
--- 8ml of Voodoo Juice
--- 4ml of B-52
--- 4ml of CaliMagic
--- 4ml of Hydroguard
--- 4 drops of Superthrive
--- PH'd down to 5.8
--- Solution strength: 302 PPM
--- Since I didn't want to risk over-watering the rockwool, I did not to do a top feed, may do one tonight after the sleep cycle (lights are still set to go off at 10am and back on at 4pm).
--- As I was doing a reservoir change, I noticed that the tubes and bucket were a bit slimy. Didn't really stink or anything. Is this normal? Maybe due to the Hydroguard and Voodoo Juice?
--- I hope she gets better soon!
- [2215]: Getting larger! But still yellow.
--- Also can see a root growing through the net pot! Tiny little thing but it's there! Will have to start dropping water once more appear.
--- After looking over a few DWC diaries using AN nutes, seems like my solution strength is still too low. Most around this stage average around 500 PPMs with about 4ml per gallon.
--- Top fed for a minute to wet the top of the hydroton.
--- Solution strength went down to 263 PPM.
--- Added 8ml more of Sensi A
--- Added 8ml more of Sensi B
--- Now base nutes are at 16ml for 4.5 gal of water.
--- PPMs went up to 411.
--- Still lower than 500 PPMs, but that's okay.
--- PH was at 6. Not sure if I should adjust PH using AN nutes. So going to not ajdust unless PH goes above 6.1.
Day 03 - Wednesday - 08/12/20 - Total Days: 010
-----------------------------------
- [0830]: Looks like more root growth!
--- She still looks yellow. But leaves are perky.
--- PH was at 6.2 so lowered down to 5.8.
--- Solution strength was at 394 PPMs
--- Since roots are still growing, I decide to lower the water level a bit. Now water level is a bit below the net pot.
- [2200]: Root is getting longer!
--- Slime is returning. Not sure why.
--- Solution strength: 357 PPMs
--- PH: 6.1
--- Decided to add an enzyme along with more beneficial bacteria to hopefully cure the slime.
--- Added 16ml of Sensizym
--- Added 5ml of Hydroguard
--- Added 8ml of Voodoo Juice
--- New solution strength: 430 PPMs
--- New PH: 6.1
--- Top fed for a minute.
--- This slimy residue is really freaking me out! I hope the added enzymes will help eliminate the slime.
--- Going to do a full reservoir sterilization/nutrient change over the weekend. Please survive until then girl!
Day 04 - Thursday - 08/13/20 - Total Days: 011
-----------------------------------
- [0930]: I think the enzymes worked! There is little to no slime now!
--- Although I think the root was also dissolved in the process. It's now just a little stub sticking just below the net pot. The enzyme is also suppose to dissolved dead roots too but guess that root was too weak? Not sure what happened there. But I think the slime is cured!
--- Solution strength went down to 395 PPMs. Decided to add more base nutrients.
--- Added 8ml of Sensi A
--- Added 8ml of Sensi B
--- Added 4ml of B-52
--- Solution strength went up to 598 PPMs.
--- PH was at 6.1
--- As long as the PH is between 5.5 and 6.3, I'm not going to use PH Up or Down. But still will monitor PH levels.
- [1715]: Checked up on her after her nap and shes looking alive but stunted. But no slime!
--- Decided to add some sugars to help maintain the enzymes and beneficial bacteria.
--- Solution strength was at 587 PPMs.
--- PH was at 6.2
--- Added 8ml of Bud Candy
--- Solution strength went up to 671 PPMs.
--- PH also went up to 6.3
--- Lowered water level a bit to hopefully promote more root growth.
--- Top fed for a minute.
--- She is getting bigger, but still looks yellow.
Day 05 - Friday - 08/14/20 - Total Days: 012
-----------------------------------
- [0915]: Leaves look a little burnt on the tips. Still no slime.
--- Going to back off on the PPMs to hopefully fix the nutrient toxicity.
--- Solution strength was at 632 PPMs
--- PH was at 6.3
--- Added/Removed water until PPMs were at 536.
--- PH was still at 6.3
--- Raised water up a bit, then top fed for a minute.
- [2200]: Looking better. Still yellow though.
--- Solution strength: 514 PPMs
--- PH: 6.5
--- Added PH down.
--- New solution strength: 518 PPMs
--- New PH: 5.2
--- PH was kind of high. So decided to PH down. Had to use quite a bit to bring it down. But eventually got it to drop down to 5.3. A little low, but so far, the PH has always gone up so wanted to start it really low.
--- Ran the top feed for a minute to re-saturate the top of the hydroton.
Day 06 - Saturday - 08/15/20 - Total Days: 013
-----------------------------------
- [0830]: She looks stunted. leaves are still yellow.
--- Solution strength: 514 PPMs
--- PH: 5.6
--- Top fed for a minute.
--- Not sure what to do at this point. Going to do another reservoir change soon. Hoping she lives until then.
- [2145]: Looking pretty much the same.
--- A bit of slime has returned. Since I've been diluting the nutrient solution, the enzyme ratio has dropped. So I guess this is expected.
--- Also noticed that slime build up was on the air-stones. Never really checked the stones so not sure how long that has been there. Looks brown too, which can't be good.
--- Going to do an H202 sterilization of the system (minus the net pot) tomorrow so did not add anything.
--- Lowered the water level to below the net pot.
--- Then top fed for a minute.
Day 07 - Sunday - 08/16/20 - Total Days: 014
-----------------------------------
- [0900]: STERILIZATION DAY!
--- Decided to skip today's night cycle for a deep clean.
--- I'm hoping that skipping a night cycle won't be too stressful.
--- Temporarily moved her to a new bucket.
--- Used about a half of gallon of straight distilled water to flush out the net pot.
--- Drained the system and wiped up all the brown sludge. Also removed the air stones and cleaned up all the goo.
--- Filled the system with 2 gallons of distilled water and at least 30ml of food grade hydrogen peroxide (35% strength).
--- Yea its a lot, but since I'm not going to sterilize the system overnight, I went with a really high doseage. Basically I kept adding until I started to see little bubbles start to form.
--- Then I ran the water pump.
- [0915]: Boiled the air stones in tap water for about 10 min. Then reconnected them to the airlines.
--- I let the air stones and hose soak in the sterilization solution for about 5 minutes so the peroxide can absorb into the stones. Then ran the air stone to help mix and agitate the solution.
--- Occasionally, I'd repeat the process of turning the air pump off for a few minutes to let the stones soak.
- [1000]: Covered the top two row of holes of the net pot with some aluminum tape. Hopefully this solves the light leaking in through the hydroton.
- [1200]: Used an old toothbrush and scrubbed the pump clean. Then drained the system.
--- Refilled with more distilled water and peroxide. Again added a lot.
--- Ran system again to sterilize even more.
- [1530]: Drained the system and refilled with distilled water to rinse.
--- Ran the system for a few minutes, then drained and rinsed again.
--- Did this a few more times over about an hour.
- [1630]: Added 4 gallons of fresh distilled water.
--- Added 15ml Sensi Grow A
--- Added 15ml Sensi Grow B
--- Added 12ml of B-52
--- Added 16ml of Voodoo Juice
--- Added 16ml Sensizym
--- Solution strength was at 430 PPMs
--- PH was at 5.6
--- I was going to add Hydroguard, but I think the bottle is expired. Since 2017 or 2018!? I think Hydroguard is good for up to 2 years from the date on the bottle or 6 months after opening. So not going to use from now on. I wonder if this could have contributed to the slime build up.
--- Also removed the CaliMagic and Superthrive too. Going to only use AN products to eliminate the chance of incompatible nutrients.
--- Placed her back in the bucket and top fed for a minute.
--- Here's hoping for the best. Going to let it ride until morning! Please feel better!
[END OF WEEK 02]

Likes
13
Share


@WeedFlin
Follow
Retiro las primeras hojas que salieron que se quedaban sin fuerza/luz abajo y se estaban pochando.
Avanza lo que parecía sequedad, ahora tiene mas pinta de hongo (mildiu). Corto las 4 hojas afectadas.
Amanece reforzada y sin rastro del hongo.
Apliqué la solución para curarla a pesar de ver mejoría. Parece que crece bien pero sigue desarrollando una especie de manchas al final de las hojas grandes
Likes
47
Share


@Suemchen
Follow
Sanlight evo at 100%
Day 64: flushed yesterday. One week now and then 72 hours of darkness. Looks and smells really good🤙
Day 67: Looks really good 👍 a couple of days now and then darkness 🤙
Day 69: well, that's IT🤗 The Journey Has come to an end.... 😢 Today I turned off the lights, sprayed purolyt. She will get 48 hours of darkness and then cut and hung..
Get 15% Off Fast Buds with Code: FBSUMO
https://2fast4buds.com/
Likes
24
Share


@Kirsten
Follow
Watermelon 🍉 is maturing very well. Nice and dense, frosty buds! She's finished growing now, so concentrating next on just flower nutes.
The plant is very small due to my terrible attempt at LST! 😅
27.2.25:
Watermelon 🍉 and Purple Lemonade 💜🍋 are both far below the scrog net, they've definitely stopped stretching now.
My LST on these was much worse than even just using the net. 😅 That was certainly a valuable takeaway.
I'm sure Purple Lemonade 💜🍋 will be good.
Watermelon 🍉 was so stunted. It's not a tall strain, usually either, but nevertheless, the buds there are looking very frosty and are very, very sticky! 😅
Should be a good smoke, eventually, 🤗 just won't be much to bag unfortunately.
Likes
4
Share

@DogDoctorOfficial
Follow
Week 6 Flower – A Hard Lesson: Bud Rot
Quick Recap – From Seed to Here
This Lava Cake run started beautifully:
• Germination was smooth and fast using the Cannakan with Aptus Regulator and Start Booster.
• Veg went strong, with both phenos thriving under the Black Series LED and later joined by ThinkGrow and Lumatek support.
• Transplants into 11L fabric pots gave them space to expand, roots looked stunning.
• Early flower (weeks 1–4) brought explosive growth, thick white hairs, and dense colas forming under carefully tuned nutrition — Aptus base inputs with Plagron complements.
But the same density that made these flowers shine also made them vulnerable. High humidity swings and airflow inconsistencies created the perfect conditions for bud rot (Botrytis cinerea) to sneak in.
What Happened This Week
Despite our best efforts, phenotype two (Lava Cake #2) showed visible signs of bud rot. To protect the garden, she was harvested early. Infected material was thrown straight into the trash (not compost — spores spread too easily), and the healthy parts are now drying in a separate, controlled space.
Phenotype one (Lava Cake #1) remains in the tent. She has minor spots, but overall is swelling and pushing forward. She’ll be closely monitored daily to make sure the infection doesn’t spread.
👉 Full educational article from Zamnesia:
🔗 Bud Rot Cannabis Grower Guide – Zamnesia https://www.zamnesia.com/grow-weed/563-bud-rot-cannabis-grower-guide
What Bud Rot Is
• Caused by Botrytis cinerea, a fungus that thrives in warm, humid, poorly ventilated conditions.
• Begins inside dense buds, hidden from sight, and by the time it appears on the surface, the inner cola is usually already compromised.
• Spreads quickly if unchecked, especially in crowded flowering rooms.
Why It Happened
• Humidity spikes during flower.
• Airflow not perfectly balanced, leaving “dead spots” in the canopy.
• Dense colas trapping moisture.
• Temperature swings stressing the balance further.
Prevention Tips (for us and for everyone reading)
• Lower humidity in mid/late flower (40–50%, then 35–40% near harvest).
• Strong airflow: oscillating fans above and below canopy + efficient extraction/intake. need improving in here for my next run
• Regular defoliation to open the canopy.
• Daily inspections of the biggest buds.
• Harvest at the right time — pushing too long in risky environments can invite problems.
What to Expect / Not to Expect Going Forward
• Lava Cake #2: She’s drying now. Expect about 2 weeks of slow, careful drying under controlled temps and humidity. With bud rot, extra caution is needed — we won’t rush, but we’ll also make sure nothing risky makes it through. Expect reduced yield because of the early cut and loss of infected colas, but quality and safety will come first.
• Lava Cake #1: She will continue swelling in the tent. Expect daily monitoring, improved airflow, and cautious optimism. If she stays strong, she could still finish beautifully.
• The Room: We’ll dial in airflow and humidity management even tighter, keeping CO₂ and temps in check, and prepare the AC unit to avoid these swings in the future.
Closing Thoughts
Bud rot is a tough enemy, but also one of the most important teachers in growing. It reminds us that environment control is just as vital as genetics or nutrients.
Yes, we lost part of this run, but we also gained experience that will make every future run stronger. And sharing this openly might help others spot it sooner, act faster, and maybe even save their crop.
At the end of the day, that’s what these diaries are for: to celebrate the wins, learn from the losses, and keep growing together. 🌱💚
📲 Don’t forget to Subscribe and follow me on Instagram and YouTube @DogDoctorOfficial for exclusive content, real-time updates, and behind-the-scenes magic. We’ve got so much more coming, including transplanting and all the amazing techniques that go along with it. You won’t want to miss it.
• GrowDiaries Journal: https://growdiaries.woodroom.tel/grower/dogdoctorofficial
• Instagram: https://www.instagram.com/dogdoctorofficial/
• YouTube: https://www.youtube.com/@dogdoctorofficial
⸻
Explore the Gear that Powers My Grow
If you’re curious about the tech I’m using, check out these links:
• Genetics, gear, nutrients, and more – Zamnesia: https://www.zamnesia.com/
• Environmental control & automation – TrolMaster: https://www.trolmaster.eu/
• Advanced LED lighting – Future of Grow: https://www.futureofgrow.com/
• Root and growth nutrition – Aptus Holland: https://aptus-holland.com/
• Nutrient systems & boosters – Plagron: https://plagron.com/en/
• Soil & substrate excellence – PRO-MIX BX: https://www.pthorticulture.com/en-us/products/pro-mix-bx-mycorrhizae
• Curing and storage – Grove Bags: https://grovebags.com/
⸻
We’ve got much more coming as we move through the grow cycles. Trust me, you won’t want to miss the next steps, let’s push the boundaries of indoor horticulture together!
As always, this is shared for educational purposes, aiming to spread understanding and appreciation for this plant. Let’s celebrate it responsibly and continue to learn and grow together.
With true love comes happiness. Always believe in yourself, and always do things expecting nothing and with an open heart. Be a giver, and the universe will give back in ways you could never imagine.
💚 Growers love to all 💚
P.S. – Drying After Bud Rot Harvest
For Lava Cake #2, we harvested the entire plant and are drying her whole. Because bud rot was present, we’re being extra careful:
• Drying in a separate, controlled space, away from the main room.
• Temperature kept around 18–20°C, with humidity 50–55% — steady and stable.
• Gentle airflow moving through the room, never directly on the buds.
• Daily inspections to ensure no hidden spots continue developing.
The goal is a slow 10–14 day dry, preserving as much aroma and quality as possible, while making absolutely sure nothing unhealthy makes it through. With bud rot, safety comes first — anything questionable goes straight to the trash.
👉 Why whole-plant drying?
By leaving the plant intact, moisture moves more gradually from stems and inner tissues to the buds. This slows down the drying process, prevents overdrying, and helps preserve delicate terpenes and flavonoids that give Lava Cake her unique flavor. Especially after a bud rot scare, a steady, controlled dry is essential for both safety and quality.

Likes
2
Share


@EtnoGrow
Follow
here we see how the girls are advancing, the buds are becoming clearer and clearer which makes us feel that it will be a decent harvest at least, we cross our fingers.
Likes
1
Share

@Ninjabuds
Follow
Week three of flower is off to an amazing start! At day 22, the ladies are looking incredibly healthy. They're praying like crazy, reaching for the light, and stacking nodes like it's their job. The buds are starting to plump up, and the trichome production is getting intense. I'm so excited to see how they develop over the next few weeks!
