By continuing to use the website or clicking Accept you consent to our cookies and personal data policy and confirm that you are at least 18 year old. For details please see Privacy Policy and Terms
Accept


Likes
6
Share


@Kordo1990
Follow
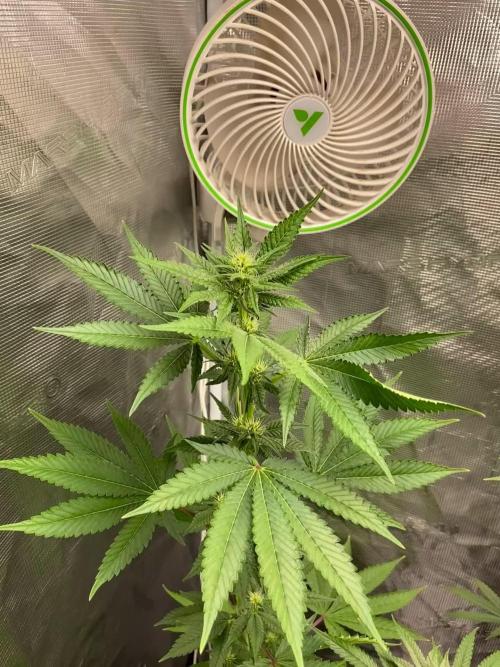
I really notice the flowers on the northern lights. The three easy bud are following suit. My box is small and i am might be forced to move them if i cant get them trained. I have also seen a small hole in one leaf and what looks like a small bleach spot on newer leafs. Only two spots at the bottom.

Likes
37
Share


@Kirsten
Follow
I have added some bat guano for extra phosphorus during late flowering, as well as Ecothrive life cycle, to deter pests and replenish the microbial life. I also mixed in some diatomaceous earth mixed into the top dress.
I have opened the two tent doors, as the humidity is at 72%. Minimum humidity with tent open is 64%. Also my tall oscillating fan can get through to the plants more effectively.
FBP1 and FBP3 are well behind FBP2. I estimate they have another 3 weeks or so. While FBP2 may be ready in approximately 10+
days. I have noticed some possible Nitrogen deficiency in FBP1 and FBP3, so I will be adding extra in this coming week. The Bat guano does not contain Nitrogen.
I've continued to defoliate lightly, to expose covered bud sites that are shaded by larger fan leaves. Additionally I move the plants around to adjust light exposure accordingly.
The plants are drinking heavily, and I'm not letting them dry out, to preserve the microbial life. They never have run off either.
Happy with the progress especially of FBP2.
Thanks for reading my diary 😊
Likes
16
Share


@DeepRootsGrowTrees
Follow
GORILLA KING AUTO / KANNABIA
This lady had no issues this grow she's a beautiful looking plant with her dense buds and purple hues through out. She was flushed the last 2 weeks then put into darkness for about 2 days before harvest. Overall a easy grow with rewarding results!! Stay Growing!!
Thank you for stopping by and taking a look it's much appreciated!!
Thank you KANNABIA !!!
Kannabia.com GORILLA KING AUTO

Likes
9
Share


@AUTOBUDDHA
Follow
Fantastic week. Lots has changed. Plants are stacking something fierce!
I cut out the nitrogen completely this week, qnd that's how it will stay for the duration of the rest of the grow. I have found with autos, i have had the best luck when I push them hard with nitrogen up until this stage in growth. I then cut out the nitrogen completely and up the bloom nutes quite dramatically.
For the rest of the grow I will feed every watering. Water at a 6.4 ph.
Gro- 0ml per gal
Micro- 10ml per gal
Bloom- 15ml per gal
Bug bud- 5ml per gal
Very much looking forward to watching this batch swell!!
This is the biggest plant in my grow at 27 inches tall so far! She may pick up an inch or two.
Beautiful plant. And a mutant at that.
3 branches from each node instead of 2. Really cool.
Great looking plant. Heavy stalk.

Processing
Likes
33
Share


@Ferenc
Follow
Day 72: 600W LED, 18 hours on 6 hours off the same with ventilation. Ferilization is the same except BlackBerry Kush and LSD-25 they are being flushed. Water intake also remains the same 200ml per day. Humidity approx 35 percent.
Day 74: BlackBerry Kush and LSD-25 have to be harvested this week Friday so no more water. Colorado Cookies and Northern Light next week so started flushing them. Glueberry OG needs a bit more time.


Likes
10
Share


@Kush_T_Big_Nugz
Follow
All looking good, was looking like there was gonna be a few mutants but they seem to have sorted themselves out. Topped most of them now at day 22, will start spreading them out a bit this week and start training them up

Likes
1
Share


@cadaver420
Follow
Ready for food for the first time Bactrex 0,5 g/L , K2 batboost 2ml /L, Orgatex 2ml/L
Sensi Cla-mag 2ml/l
I have 2 color leaf mutation on Royal Gorilla .
Start with CO2 tabs

Likes
10
Share


@Bakeryguy420
Follow
Double fucking grape completely impressed with this outcome leaving tomorrow to head outta state visit family. so I'll miss about 4 days. No worries. When I return just keep flushing down till harvest. She got about 2 more weeks or so cant wait to chop her :) smells so fucking good a super lemony diesel smell for sure. Outcome guestment dry weight around 5 zips and half its remind me of my sweet and sour phenotype

Likes
7
Share


@Wiffz_CBD
Follow
A real fun grow. Loving the purple color. She weighed in around 8oz with the stems attached she smells real fruity. Had a bit of leaf burn in early flower because the cored came out ever so slightly of the controller. My fault. I noticed ZERO gnats or pest.
Likes
119
Share


@Roberts
Follow
Divine indica is growing great. She is looking really healthy, and happy. She looks like she is getting ready to start bulking soon. I have not done any training this week. Nothing more to report. Thank you Spider Farmer, and Divine Seeds. 🤜🏻🤛🏻🌱🌱🌱
Thank you grow diaries community for the 👇likes👇, follows, comments, and subscriptions on my YouTube channel👇.
❄️🌱🍻 Happy Growing 🌱🌱🌱
https://youtube.com/channel/UCAhN7yRzWLpcaRHhMIQ7X4g

Likes
21
Share


@DeeDeeKushner
Follow
These videos are from yesterday and we’re on day 5 of flower. Been MIA trying get this girls back to being healthy. I think they’re pretty healthy these days for sure. I did a bud leaf strip yesterday and some super cropping as well. This strain takes 8 weeks to flower completely. Looking forward to seeing how they turn out! ✌️🏾

Likes
7
Share


@Cannabiszimba
Follow
segunda semana de 12/12. algumas noites frias mas ela está bem. seguimos nessa

Likes
3
Share

@LAShugars
Follow
Shes still hanging in there.
Poor thing. I soooo regret not letting her veg longer.
Shes green again!!! This is the best shes looked since transplanting. What a trooper she is! This is a very resilient plant
Likes
18
Share


@RickJames_Mcdank
Follow
So I had some internet issues so I couldn't upload. But now everything is alright.
This last week I only gave her water 2 times. first time I gave her 500 ml water and the second time only 250 ml water only.
And I took more fan leafs off her as you can see I only had to hang her up without trimming or anything.
After she is dried I am going to weigh her and see how much I got.
*****************************************************************************************************
As for grow report :
Blue kush is really easy to grow just make sure the temps optimal.
The buds grow really dense thats 1 of the parts I like about this strain.
She takes normal feeding.
Very strong genetics.
And she can take a few mistakes so this strain is perfect for beginners and in medium or expert hands she can get really nice with the colors and smell and taste.
Next week i will post the weight and the dried product.
Likes
33
Share


@MrStryker
Follow
Well everything will be done come Sunday I did stick another runtz in 48 hours darkness she was begging to go stink my seeet smelling girl she was the others Friday I’ll switch the whole tent off for48 hours and that’s that will be starting another grow up after I clean everything up stay tuned for harvest photos and weights happy growing

Likes
3
Share


Likes
3
Share


Likes
6
Share


@IQuSX
Follow
Formula 1 Royal Queen presents:
[Medusa];
Orion;
Epsilon;
Titan;
&
One sssecret seed…
Watch them, topman, and see the revolution.
Here goes!