By continuing to use the website or clicking Accept you consent to our cookies and personal data policy and confirm that you are at least 18 year old. For details please see Privacy Policy and Terms
Accept
Likes
Comments
Share


@BigNoob
Follow
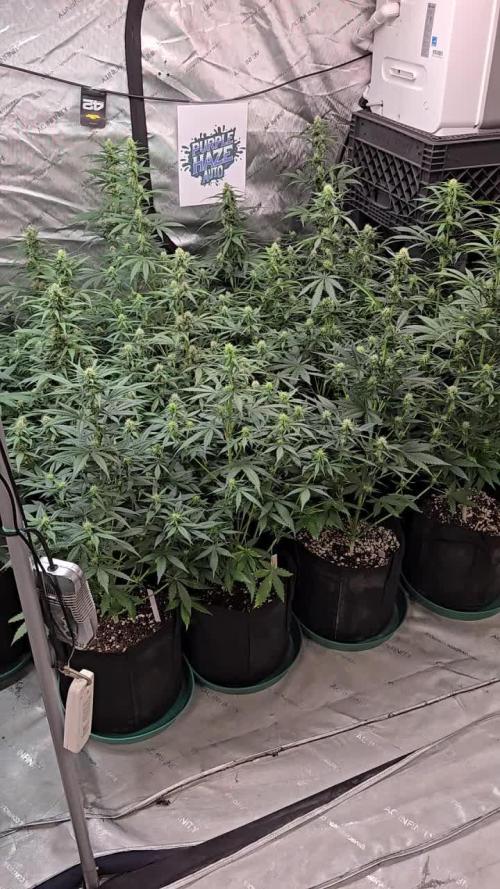
Im 20 days into veg. Recently gave them a feeding of compost tea with a top dressing of worm casting, they have responded very well. I topped 3 of the 4 plants. Only because the 4th somehow topped herself🤷♂️🏽. Put up a trellis that i had to maneuver around the AC, but seemed to turn out ok. Also added a small oscillating fan to go along with the other small 6 inch fan.

Likes
Comments
Share


@craudiaoDaMassa
Follow
Seguindo com regas de dois em dois dias, nas plantas 2,3 e 5 foram colocados uma colher pequena de substrato preparado completo. notado um desenvolvimento vagaroso da Tropical tangie, ela não parece se dar bem com o frio.

Likes
Comments
Share


@Cyabro
Follow
Yo wassup guys, starting little bit late the diary but this you cant miss flowering day 19 and they are crazy snow!

Likes
Comments
Share


@Ctrellis90
Follow
End of another week and dang are these girls going!
The alfalfa Ferment is definitely doing work down in that rhizosphere. It's pretty amazing how well this Ferment does for veging cannabis. I seriously cut my veg time down by almost half when I use it! That's the main objective right there, to be able to continuously flip into flower right after harvesting, and we're basically their now that we have everything dialed in.
These girls will be getting synthetics next week. We're going to start them on a light feed of Athena blended then go from there.
Thanks for stopping by and we'll see ya next week.

Likes
41
Share


@Jjthejetplane79
Follow
All jarred up. This stuff is amazing tasting. Super smooth and tastes like real strawberry. 10 out of 10 fastbuds nailed this one.

Likes
15
Share

@Chubbs
Follow
These girls are growing amazing. I did some defoliation and lollipopped them this week. Hopefully with more air flow at the canopy level and lollipopping, the tops and main colas can focus all the energy on growing some beautiful flowers. All in all Happy Growing.


Likes
3
Share


@MicroHidroGrow
Follow
Día 55. Ya casi terminando. Voy a tener que rever la configuración. Pero por suerte ya con un stock de base puedo armar el futuro cultivo con más tranquilidad. La semila de la próxima recién terminó de salir. Tomó más de 2 semanas, pero con el clima adverso se pudo. Ahora voy anconseguir unos esquejes de un amigo y preparar la próxima camada y ver si le agrego la madre que estoy armando. En todo caso me guardaré esquejes para ir manteniendo y preparar para la próxima.
Likes
81
Share


@Hou_Stone
Follow
Let's remember, in week 6 one of my king's tart had been broken in 2 because of the tension due to my bad LST.
This plant grows much taller than the others. I'm trying to lower his height by doing HST. Currently she does not seem to complain about it.
I preferred to remove my net this week, to more easily access my plants and water them. I hope the branches will hold
I cut a lot of leaf this week. I hear different opinions that say it's beneficial others not... At least it will have the advantage of lowering the humidity.
---------------------------------------------------------------------------
- Water: tap water at 300 PPM, I add 0.7G of Hybrid powder and 0.3g of booster PK+ per liter to reach 950PPM and I adjust the PH to 5.8. I watered daily until water drained from the pot (to release nutrients from previous waterings) and I take a 3-4 day watering break to let it dry out before resuming a daily watering schedule.
-Daytime temperature: 22-26°C
-Night temperature: 20-24°C
-Humidity: 50-75% ( Too high but it's hard to lower it... I need advice please contact me if you have :) )
-Lamp: Mars Hydro FC3000. intensity 90% at 35cm from the top leaves
-Room: Mars Hydro 100x100x180cm
-Extractor: Mars hydro 402 CFM Max. power 3/10
-Substrate : 70% coco, 25% perlite, 5% vermiculite.
My instagram : https://www.instagram.com/p/CuMhQ_BsjRP/?utm_source=ig_web_copy_link&igshid=MzRlODBiNWFlZA==
Looking for MarsHydro equipment for your crop? 🔥
You can use my promo codes! 🙏😻
"houstone3" for: TS LED Grow Light, Tent, Ventilation for 3% off
"houstone5" for: FC&FC-E&SP LED Grow Lights; Grow Tent Kits for 5% off
https://www.mars-hydro.com/?acc=hou-stone


Likes
3
Share

@MicroHidroGrow
Follow
Día 36.
Estamos en 6ta semana. Los esquejes se atrasaron debido a que han sido días muy fríos y no he logrado enraizarlos. Decidí poner el extractor de aire junto con la bomba de aire, así solamente se prende 15 minutos cada hora. Así estoy logrando temperaturas mayores a 24°C en el indoor y así voy a lograr el enraizado. La planta ya tiene un tamaño que ocupa casi todo el indoor. Pero lo importante es que la voy guiando y ya estoy proyectando como va a ir cada rama. El tamaño va a exceder lo que esperaba, pero aún así creo que si logro lo que tengo en mente, voy a sacar muy buenos resultados. Igual no me voy a arriesgar demasiado, así que si contando 10 días desde ahora, no logro que los esquejes enraicen, voy a pasar la madre a floración sola. Cómo pueden ver, las ramas están bastante gruesas, y el la ramificaciones van ganando su lugar cada una. Las raíces son demasiado grandes, aunque sé que voy a poder poner la planta en el sistema de arriba igual, aunque me voy a tener que ayudar de algo para meterlas. Es importante no utilizar las manos, ya que se pueden transmitir muchos hongos.
Voy a seguir actualizando e ir viendo que pasa. Pero ya estamos en los últimos días de crecimiento, haya o no esquejes. Incluso puede que ya pase la planta al indoor de arriba para darle mayor libertad de crecimiento. Esto me va a servir para tlmar en cuenta en la próxima camada que se vendrá. La idea de esto es hacer las cosas rápido, y no en gran tamaño. Pero siendo que ya estoy en el baile, no me queda otra que bailar.
Día 40
Los esquejes no estaban enraizando, así que decidí cambiarlos de lugar y los puse arriba de la luz, donde les da calor y luz tenue. Espero que ahora si agarren.
Y hoy fue el gran día, pasé la planta madre al módulo de arriba. Pero lo voy a dejar una semana más creciendo. De esa forma veo si los esquejes llegan a agarrar a tiempo. Y además tuve un problema en el trasplante. Primero que la planta se hizo más grande que lo esperado, y la raíz también. Cuando la pasé, hubo contacto de la raiz con prácticamente todo lo que había cerca. Sumado a que se enredó en el oxigenador, así que quedó una pidra difusora en la raíz.
Dado el alto riesgo de haberla contaminado con algún hongo, le puse una solución de agua con agua oxigenada, recirculando continuamente, para lavar las raices y de paso bajar el stress de teansplante. Mañana veremos cómo arranca el día.
En el aprendizaje me llevo que en la madre, es mejor hacer un corte en el primer nudo, o dejar las ramas del segundo y quitar las del primero. Y así que queden sólo dos ramas, para luego dejar a los esquejes en el medio. Eso planeo hacer con la próxima variedad.
Entre tanto ahora sólo me preocupa que la raíz no se haya contaminado en el traspaso. Ya en 8 días estaré pasando a floración si no hay esquejes. Si llegan a agarrar, habrá que dar unos días de crecimiento hasta que alcancen a la madre en altura. Pero ya está todo en definición. Ahora sólo queda esperar y seguir guiando a la planta. Ya tengo ganas de poner la próxima, pero falta bastante para eso. Tengo 10 semanas de flora, así que recién en 5 semanas voy a poner la nueva madre.
Likes
23
Share


@ILoVeThiSpLaNt
Follow
Le piante stanno bene.
La Grape Rolex V2 ha una marcia in più in tutto!!! Gran pianta e odore particolare mai sentito.
Le Crystal Candy sono perfette. Piante che se coltivate bene sotto 600w 20/4 ore ti regaleranno anche 100gr ognuna.
Ci vediamo settimana prossima per altre foto e aggiornamenti 🤞 🖐️

Likes
22
Share


@Smith420
Follow
It’s really difficult trying to figure out the watering at this point. Besides that and the lighting everything else seems to be easier to control due to the technology. The human nature aspect and learning about my medicine and how the plants start to develop more growth and require different needs and attention in each stage is fascinating. It’s my first time and trying to mash up all the information I read online. Well anyways to everyone reading and doing their thing, thanks for all the support and here’s my part 2…
Currently feeding distilled water every time I feel my fingers in the dirt are dry about 4” down.
I’m scared to water till run off at this point as the roots are still young.
I Fed 1/2 cup great white on 12/8
12/11 morning, showed first sign of vegetational stage(7sets of true leaves).
12/11 pm fed nutes(called advance and the guy was great very informative and helpful. Said for autoflowers to give half the dosage that is printed because those measurements are for photo’s)
2mil sense grow ph perfect a
2mil sense grow ph perfect b
4mil voodoo juice
4mil b-52
Mix all these into 1 gallon distilled in order from top to bottom. Then I fed 1/2 cup of that mix to each plant.
Used cheap Amazon test kit
270ppm/ water temp 67 / water ph 5.75
12/12 am low stress training
I forgot to mention that I increased the dimming from 4-6 on my light which gives the plants 420par ;) and I think 17000lux gotta learn how to use yet another cheap Amazon tool. Hey it works to give a general idea and as long as the numbers are consistent then why not use it as a reference.

Likes
65
Share


@Roberts
Follow
Gold Sativa is growing well. Colas are starting to develop. Lotscof stretching is going on. Doing a solution change ever 4 to 5 days. She is in a New Level Hydro bucket, under a Spider Farmer SE5000 light at 80 percent. Thank you New Level Hydro, Spider Farmer, and Quebec Seeds. 🤜🤛🌱🌱🌱
Thank you grow diaries community for the 👇likes👇, follows, comments, and subscriptions on my YouTube channel👇. ❄️🌱🍻 Happy Growing 🌱🌱🌱
https://youtube.com/channel/UCAhN7yRzWLpcaRHhMIQ7X4g
SE5000
https://amzn.to/3qFpAML
Spider Farmer Official Website Links:
US&Worldwide: https://www.spider-farmer.com
UK: https://spiderfarmer.co.uk
CA: https://spiderfarmer.ca
EU: https://spiderfarmer.eu
AU: https://spiderfarmer.com.au
Coupon Code: saveurcash
Www.newlevelhydro.com
Www.hygrozyme.com

Likes
15
Share


@gottagrowsometime
Follow
Welcome to my CBDV diary. Has been blast.. there's so much more to growing a CBD plant, my point is I'm far from where I want to be with the Quality of the end product as far as density goes. (I got the quality part down) she's 1 stinky sticky ass bitch.
Wk 9 Day 58-63 Plant was kept on feed till the bitter end. She was confided to the 70cm2 for her last few weeks of life but I've no doubt, if I had of kept her going under the FC 3000 she would of reached deeper down and gave me denser buds on top. There is so much airy ripe bud below I'd say it'll make up for 1/3 of the overall harvest. Which will be quite a lot. Id say in the 80-100g no doubt. She has some major big buds that are stacked with swollen calyexs that are glistening and very sticky. I can she's had enough. I didn't have the light to finish the end that the FC 3000 created on a lot of my autos. On most I clipped it away after I had to confine my plants to their own tents for good. But, she kept eating.
Wk10 63-67 I stopped everything nutrient wise. And let her finish the ride out on water until day 67 and she gladly ate what was in her pot and showed no signs of wanting more, so I hard flushed her 1x pot value (11L) and got a ppm of 900ish, so 2x (22ish) more the pot value until it came down to 210. And for 3 more days I left them girls drink what they could from the pot and left them under my 100w where they've lived the past 3-4 weeks and I'm gonna pull them this week, they are resting 30hrs already and then I'll pull them, and harvest them whole, roots and all will be pult and I'll shake the clay off, bag the roots and hang dry upside down, (so no dirt falls on the buds while drying from the roots) and will dry at 55-60 rh with a temperature of 17-19c. I'll try keep the RH around 59 but I'm not gonna worry too much if it differs from that range. I already cut a wee bud off her the today, just a small 1 to try her for taste. And I'll rate it on harvest. As she's low on CBD, I'll rate her on taste. But, she'll be a nice addition to my full THC smoke no doubt.
Never really removed any substantial growth from her to even call it a defoliation, there really was no need. I done a decent job at LST and my plants got rotated every day and I pult nodes/leafs this way and that. So, I'm happy with the results. She has a lot of girt and not too much lollipoped with a good amount of CBDV bud in 70 days. Very nice indeed..
Thanks so much for looking at my diary guys. I hope to do better the next time. But, as I am using dry additive powders I'm sure I'll be able to dial in that key nutrient ratio for my CBDS. She's been my biggest auto of this grow. At 71cm tall, and a big ass cola I am very happy. She has a lot of girt and stinks fruits, mainly passion, I'm guessing. As I've learnt, you don't know the true smell of your weed until you get at least a 2 month cure on it.
Harvest Day.. Day 70 was done on day 65 then I left as I like my weed little on the harsher side. She very punchy. Has like a deep wood smell but very citruses with hints of tropical fruits. I've harvested 6 autos today. And, its hard to pick up the smell. Very sweet smelling and citrus fruits. (Ill give a more independent smell profile upon the trim and hopefully she'll come into her true smell upon a 2 month cure. As all my bud is given)
To my sponsors from kannabia thanks so much for allowing me to try this plant. I've loved growing it. Hopefully I'll do it more justice on my next round of growing it.
And, to my sponsor from marshydro, she's a rock star. Thanks very much for all your help.
COUPON FOR MARSHYDRO
Use code "ggs" at any official marshydro site for a discount.
FC 3000 & MARSHYDRO LIGHTS
The FC 3000 300w it has a high ppfd 1525 umol/s, 2.85 efficacy and has the new UV addition which brings it closer to the (RA) spectrum, that's the Sun spectrum. The FC-FC-E has this, Also it has a much even PPFD making for a more evenly grown canopy and has a deep penetrative light as it allows you to move the light closer to your canopy with a reduced risk of light stress. The TS versions are a great light to. These are different though. As they have a much higher ppfd in the middle, so I suggest you rotate them plants and move em about to get the best out of the high PPFD
And to the community. Much respect for anyone that can grow their own bit of chronic. Fair play to you.
Enjoy your harvests and thanks for tuning in. Be sure to drop a like or comment so I can visit your diaries. Either way, thanks for dropping by.

Likes
13
Share


@Sadhus
Follow
Alerte spider mites sur une des 4 en pots, j'ai traité tout le monde au savon potassium 😥😭

Processing
Likes
55
Share


@CBD_Sweden
Follow
Week 19, day 6. Second week after switching to 12/12 lighting.
Nr 1 is 155 cm tall from top of soil and Nr 2 is 171 cm.
All video and pics is taken when the girls have hade 11.5 h of no lights and just got watered.
The stretch on these girls was incredible the past 2 weeks after switching to 12/12 lighting.
So fare this has gone smooth as silk and no problems at all despite temperatures over 30 degrees Celsius for the last 45 days.
I have manage the heat by having between 85-95 % of RH in the room all the time.
And this genetics from DinaFem seeds is awesome, i hope i will get a massive harvest of strong indica medicine.

Likes
20
Share


@Mrs_Larimar
Follow
Today i cut down the males.
they have pollinted the whole area,
the rest of the is into the refrigerator
they had lots of pollenpowder
its just everywhere in the roo---
means i have to do a very good cleaning

Processing
Likes
8
Share


@TheNetherstokeDruid
Follow
The Auto AK is loving life, handling a slightly over eager first time grower well! The West Coast OG is a little behind, seems a bit more sensitive to pH imbalance and has also suffered from a touch of nute burn 😕 rookie error! Did feed both with some seaweed and 6.0-6.5 pH water. They can't grow quick enough 😂

Likes
6
Share


@urbanmitchell
Follow
my god the frost on the leaf and the swell is like the blueberry note aroma whit the dosidos and the background this baby i will keep it for the next batch clone done under the light other tent

Likes
61
Share


@DreamIT
Follow
👨💚🌴 Grower HageWeed is delighted to introduce his🌴💚👨
⚜️👑🌱 Autumn Cup Contest by Royal Queen Seeds 🌱👑⚜️
💚🏁✅⚜️🏆🏅Today, 2nd October, I received the Royal Queen Seed package. I was just expecting seeds and a lighter with their nutrients, but instead a roundup of very interesting stuff arrived. Hemp papers, normal, clipper signed royal queen seed, a magazine I can't wait to read, nutrients, stickers, a complete catalog with the new genetics, a Zamnesia booklet, 5 seeds Honey Cream fast flowering, a door joint (which I have photographed several times, I already love it, my walking joint will no longer suffer from the long walks in my pocket waiting to be consumed), grinder, fabric vase that I really like at the sight, and the starter kit for germination. Due to the current lack of space to germinate, I dipped 2 seeds in water, (I started with one but it seemed to suffer from loneliness: D). I can't wait for them to start growing, I'm very excited to be able to participate in a contest. Stay tuned: D 🏅🏆⚜️✅🏁💚
➡️04/10 Yesterday, examining the packet of seeds carefully, I noticed that one of them seemed split, and so it really was. I put it directly in the jar covering it with plastic wrap hoping it will grow anyway. Should it be born we have 3 honey cream seeds: D On one of the two seeds 2 mm of radicle begin to be seen, the other still shows no sign of opening but we are not in a hurry: D
➡️05/10 Today the root of the second seed has also begun to emerge: D we continue to wait impatiently: D
➡️06/10 Very well, both seeds are coming out well. probably tomorrow they will be put in the jiffy. I have great things in mind for these two seeds: D Come on, grow up !!!
➡️07/10 Today these sweets have lengthened the radicle a little, just enough to win a place inside the jiffy. The broken seed I put in the jar also seems to have taken root, but we'll find out more in the coming days. With one of the two suits I will start a solo cup diary, even if I am out of time for the contest. It will especially help me to better understand how to manage plants in different situations. Well so, Yeah!
.➡️08/10 We are already two centimeters away. Even the broken seed seems to want to get out but we wait patiently. Well so, Yeah!
➡️09/10 Today I helped the leaves to free themselves from the seed, as soon as I see some roots, they will be moved to the final pot without too many transplants. Today I also start counting the days. Day 1 from the emergence started. Well so, Yeah!
➡️10/10 Tomorrow the jiffy will be moved to the 11 l pot of royal queen seeds: D can't wait. The one in the jar doesn't seem to have caught, too bad :( the sprout is about 3 centimeters high. Well so, Yeah!
➡️11/10 Today this sweetness has been poured into its final jar, positioned near the rim for a future LST. I added 1l of corrected water to the new pot, away from where I put the seedling. Unfortunately, the broken seed didn't make it.
➡️12/10 Everything is OK. I will try to take 2 photos every day, horizontal and vertical, then I will see the results: D
➡️13/10 Wet with 0.4 of fertilized water vegetative pattern, today is the first 12/12 light day. Well so, Yeah!
➡️14/10 Nothing to report today, Well so, Yeah!
➡️15/10 The humidity gizmo says it's still pretty wet at the bottom, I'll wait to irrigate. Well so, Yeah!
