By continuing to use the website or clicking Accept you consent to our cookies and personal data policy and confirm that you are at least 18 year old. For details please see Privacy Policy and Terms
Accept
Likes
Comments
Share


@PurpleFingers
Follow
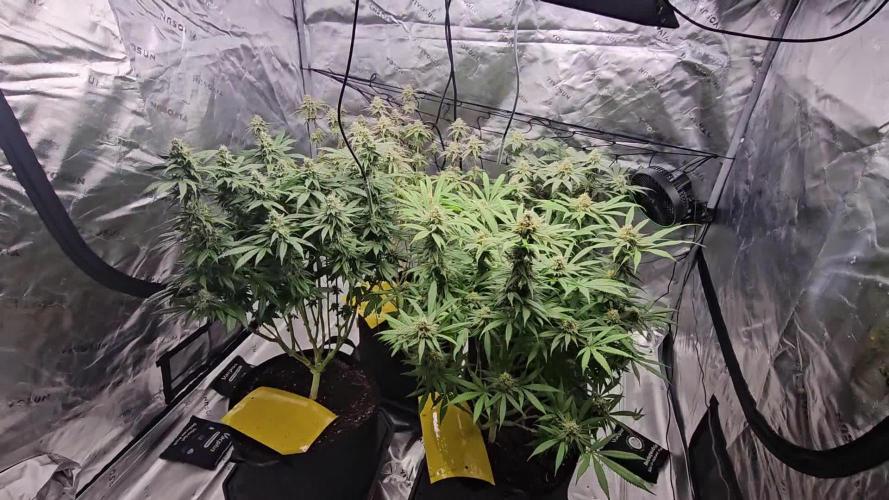
Ready for a week of water only.
Really frosty buds and extremely fruity terps.
I did hit he with a little dose of PK before the flush which looks like it has helped.


Likes
7
Share


@GrowSmith
Follow
Week eight started on the 30th
Contemplating whether to finish on week eight, as I’ve got a good mixture of brown trichomes with milky.
Would like to finish it with a lower percentage of brown

Likes
35
Share


@IndicaVibeMe
Follow
I'm going to need to transplant this gal! Already roots poking out the bottom so I'm prepared to get her in a bigger pot soon! Probably this week.-- update, she's loving Life in a larger pot!
Smells incredible already 👍

Likes
119
Share


@Tropicannibis_Todd
Follow
💩Holy Crap Growmies We Are Back💩
Well growmies we are at 63 days in and everything is going as good as can be 👌
👉 So even with some major issues in the early stages , shes bounced back as good as expected 👍Or better 👈
Lights being readjusted and chart updated .........👍Even with early major issues due to the soil/medium she's come a long way 👈
👉I used NutriNPK for nutrients for my grows and welcome anyone to give them a try .👈
👉 www.nutrinpk.com 👈
NutriNPK Cal MAG 14-0-14
NutriNPK Grow 28-14-14
NutriNPK Bloom 8-20-30
NutriNPK Bloom Booster 0-52-34
I GOT MULTIPLE DIARIES ON THE GO 😱 please check them out 😎
👉THANKS FOR TAKING THE TIME TO GO OVER MY DIARIES 👈

Likes
4
Share


@Exoticfarm99
Follow
Está semana echamos te de compost aireado + 200gr de humus de lombriz


Likes
16
Share


@Chocolopeison
Follow
Comenzando semana 7 de estás nenas, aun las mantengo en 1L y hoy le hicimos su primera defoliación masiva, ahora a esperar que se recuperen para hacerle trasplante a maceta de 3,5L.
La verdad no eh tenido muchos problema, todo sigue igual siguiendo el mismo orden de nutrientes, bacterias y hongos benéficos una vez por semana, enzimas ahora se las estoy dando día por medio o cada 3 día.
Ya logramos sacar los primeros clones de la watermelon, punch y cookie y la thc bomb. la dss aun la tenemos tirando fuerza que no va mal pero no tenia espacio para más clones.
Saludos


Likes
26
Share


@Rock_n_Roll_Randy
Follow
DID SOME MORE DEFOLIATION FOR THE 4TH WEEK. SO THE LIGHT CAN PENETRATE THE BOTTOM BRANCHES. NOT TOO MUCH DEFOLIATION THIS TIME
FINALLY STARTING THE PHOTOPERIODS AND I HOPE MY TIMING IS GOOD FOR CHOPPING THE AUTOFLOWERS..........SEEDS PUT INTO THE SOIL ON JUNE 22ND.
RUNNING OUT OF ROOM IN THE 8X8 TENT SO I PUT ALL THE PHOTOPERIODS IN THE 5X5 WITH A TSW2000. SOME FAN LEAVES ARE BIGGER THAN MY HAND NOW.
SORRY TO EVERYONE WHO TRIES TALKING TO ME....I STILL CANT TALK TO ANYONE BECAUSE I TRIED CHANGING MY EMAIL ON HERE AND IT MESSED EVERYTHING UP. I CANT LIKE ANYTHING OR COMMENT ON ANYTHING. THE WORST IS I CANT JOIN CONTESTS
STRIVE NUTRIENTS IS THE BEST IVE EVER USED. A MUST TRY AND I BUY IT MYSELF. GOT A SAMPLE LAST YEAR AND ITS SO GOOD I BOUGHT MORE. ITS A 2 PART POWDER NUTRIENT THAT DISSOLVES IN MINUTES AND YOU MIX THE SAME STRENGTH OF THE 2 PART NUTRIENTS FROM WEEK 2 UNTIL THEY ARE FINISHED (BESIDES THE FLUSH), NO MORE BULLSHIT OF SWITCHING TO BLOOM FERTILIZER. THATS MY FAVORITE THING BESIDES THE RESULTS.
CHECK EM OUT AND BELIEVE EVERYTHING YOU READ BECAUSE ITS NO BULLSHIT, AWESOME FRIENDLY AND HONEST PEOPLE


Likes
7
Share


@sellem
Follow
In this week, i defoliated most of the (very) sick leaves on both plants. Afghan Kush is really bushy, Blueberry not so much, she skinny. Both smell absolutely great. Both continue to sweel and grow. We are now, same as in the BPP diary, in what i call the "mostly boring" state. its nice to see the visual changes in the timelapse, but other than that, not much to do besides water them. Both have discontinued to show any new or lets say worse signs of any deficiencies, there are now some overfeeding signs but i rather have that then them trying to creep by.
Watering reduced to 2.2L for each to account for them taking to long to dry out. Roots are STACKED, the soil is almost solid by them. Next grow will be in airpots since i also expect root issues here(ringroots or the like, maybe damage due to overwatering in like week 3/4).
Timelapse i will add tomorrow. Thanks for stopping by and see you next week!


Likes
15
Share


@GroLife
Follow
Looks like I have to invest in a humidifier can’t get humidity above 32% lowest 26% girls still look good tho so I guess only time will tell about 3-4 weeks left until harvest :)
Likes
5
Share


@pzwags420
Follow
Cantaloupe haze needed a good flush brought runoff from 2000 ppm to 1100ppm will continue to monitor.


Likes
9
Share


@Grileon
Follow
Hello there.
Got a powerful strain from Super Sativa Seed Club for their ongoing contest.
It's honor to be one of the participants. Thanks a lot to the SSSC team.
Will be growing it in 20 l hydroponics, with some GHE nutrients.
Also have some new amazing led light: TS 1000 from Mars Hydro.


Likes
20
Share


@eldruida_lamota
Follow
Vamos familia que traigo ya la primera semana de crecimiento de estas Lava Cake de Zamnesia.
Los 9 ejemplares , palabra, los veo de miedo, tienen un color y unas ganas de salir palante, algunas las tuve que tutorar por mi culpa, porque tarde un poco en encender el foco y estiraron mucho pero crecerán y en el trasplante lo apañaremos.
Añadí un poco de enraízante y también aportamos la base de Agrobeta y Tucan.
Os comento que tengo un descuento y para que compréis en la web de Zamnesia de un 20%, el código es ZAMMIGD2023
The discount 20% and the code is ZAMMIGD2023
https://www.zamnesia.com/
Agrobeta:
https://www.agrobeta.com/agrobetatiendaonline/36-abonos-canamo
Mars hydro:
Code discount: EL420
https://www.mars-hydro.com/
Hasta aquí es todo , espero que lo disfrutéis, buenos humos 💨💨


Likes
27
Share


@Pennello
Follow
Hi guys,
At the end of the story, I am very happy with the whole cycle and finally the outcome, I almost killed everything in there 😂
The Acid Dough is a great sativa strain, with a short flowering period. I did have problems throughout the cycle overfertilizing the plant.
I toppped them, and then use LST training to help her growing wider, Probably if I wouldnt have messed up with the ferilizer I would have a much better final product, not even talking about quantity, but quality.
The whole plants were dried for 18 days after which they were finished in jars for another 6 weeks, if I dont fell...
I would like to thank Grow Diaries for this amazingly-organized community they have created, where we all can learn a lot, and share something we really love.
Thanks to everyone who stopped by and looked at the diary, squeezed the like button or comment the diary.
13/12 I'VE MADE MY FIRST RUN OF BUBBLE HASH!
Very very happy with the end result, did not weight anything yet because is still wet big time, I lightly squeezed it a bit, before let it drying on parchment on a cardboard. The smell it's just absolutely crazy. I can smell strong citrus notes in the 120µm but the 90µm and 73µm explodes with crazy-sweet note. While the 25µm (did not use the 43µm) where I did collect most of the hash, smell like good and sweet hash, nothing crazy like the previous ones but a very buttery like consistency that makes me want to eat it like this...dont ask me why...even though I know you all probably felt this way too...
Anyway, the paper sheet says it all about timing, washes and µm used for the extractions, but just in case I'll explain it down here.
I have done 3 wash with different timing.
1º wash: 5 min only to get the most brittle trichome heads
2º wash: 10 min stardard
3º wash: 30 min to stock up a bit 😅
I could have done an extra wash for sure and get more out, but I was running out of time so...I will update with the dry weight, it was not the only wash I've done, that were just too many grades to weight up..so I chose to do it once all dry!
See you really soon with on the nex run pals!


Likes
6
Share


@CryptAnon
Follow
Start of week 6. Smell is getting strong, lots of trichomes forming now and buds starting to swell.

Likes
6
Share

@FijiS
Follow
Week7 D1
I think things have stabilized and we are back on track. Since I flushed and wont be able to utilize top amendments like I would like I am going to use TSP One Bloom Boost Liquid Nutrient for the remaining 2 weeks.
Week7 D5
Blue dream is fading hopefully she is drawing in energy and going to swell soon. All girls are super frosty and sticky and dense.
W7 D6
Seems early but blue dream is maturing quick and sin mins is beginning to fade. We are now in harvest watch!!!


Likes
2
Share


@knicko
Follow
ab der Woche 3. (1.11.24) kriegen die Ladys ihren Dünger dieses mal von Advanced Nutrients das starter kit bin gespannt auf die Ergebnisse (gedüngt wird nach düngeshema)

