By continuing to use the website or clicking Accept you consent to our cookies and personal data policy and confirm that you are at least 18 year old. For details please see Privacy Policy and Terms
Accept
Likes
Comments
Share


@Generix
Follow
Sorry not many pics this week, struck down with man-flu! Few pics of the new 600wt lumni fully adjustable light I picked up and have replaced one of the smaller kingbo’s with it, thought about having the two kingbo’s either side of this lumni but I really didn’t wanna forfeit the 400wt cobs! Also bought another double output air pump, so going into flowering phase, watt/plant ratio has increased and so has aeration to the air domes inside the smart pots. I’ve also added a small water pump to the nutrient tank to keep it moving/oxygenated while it’s waiting to feed into the drip tray.

Likes
6
Share


@WeedM8
Follow
So beautiful looks its going vey well apart of thats its too hot the heat from the lights if there is no air circulation it gtes very humid and i have to leave the tent open


Processing
Likes
14
Share


@OilyEliteOrganics
Follow
Great smell and growing dense.
Fell over this week due to its weight on one side since one side grew more than tje other..
Is a great plant and is growing smoothly shouldve cloned it.
Likes
17
Share


@JuicyFruit
Follow
Hi! Thanks for checking out my Royal Dwarf grow!
Please comment on how healthy you think the plant is or any thoughts.
In less than 2 weeks I have learned so much from you guys and i want to make a point of thanking you as this medicine allows me to live what I would consider a normal day to day life! :)
So... Beginning week 2 and from the first few pictures and videos I think the plant is getting healthier, Getting a ph meter this week also, will probably resolve any issues I think I'm having.
Day 7/8
I was going to switch from the Vitalink Plantstart + Canna Rhizotonic schedule to Canna A, B, Rhizotonic and Cannazym. I have not gotten around to doing so yet as I think I've been overwatering the plant. stopped watering and started using the spray bottle to keep the moisture up. will water with the new nutrients once the plant has dried out a bit.
Day 9:
Transplanted from a 1L to a 19L/5Gallon, the top half of the 1L container was dry and had what looks like well developed roots and the bottom half was wet and the roots were hanging out when transplanting. I definitely should have let it dry out more.
Day 10: Rhino pro 200/600 Carbon filter arrived and it's the 1100cfm/overpowered version as I read it was better to get a filter with a better CFM rating than what your fan can move. The fan is an Isomax 900cfm or is it m3/hr ?
I added a short video after the pics so you can get a fairly good view of the setup.
I got 5m acoustic ducting and connected it up as best I could with the space I had. I Was covered in rock wool, didn't have wire cutters and had to go buy some to finish the job 😅. Talk about a nightmare!
I left 1mtr spare ducting for the intake fan in future grows.
I think it's worth mentioning that the 6 fans on the back of my grow light are louder than the filter/ducting/fan/ducting (in order).
Noise level of light and fan combo is between a really expensive/good quality bedroom fan and a hairdryer as a comparison.
As I don't have my intake fan yet Im using passive intake and my fan has a 3 speed controller so I have it on speed 1 and there is negative pressure.
Finally i mixed up the canna nutrients and changed ph from 7 to 6, I'm not sure what's ideal for autos but I read that anywhere between 5.8 and 6.3 is good for autos? Let me know!
Day 11 (update)
As I have now realised how to edit my weeks in the diary I will start doing so!
Read that a fluctuating PH is good between 5.5-6.5 so I'm gonna stay at ph 6 and let it do its thing.
The plant seems to like this a lot more than ph7 although it is still stressed from transplanting (1ltr-19ltr) it's still growing new leaves but growth appears slower.
Finally after a few cold showers I have recovered from being covered in rock wool! (thank god😂) also I started a RQS Quick One as a backup for the dwarf and RQS Fast Eddy as Im eager to see if medical marijuana has a better effect on my depression, anxiety and sleep problems than regular high thc low cbd strains. Check out my profile (JuicyFruit) to see my diaries for these strains!
Day 13-
my dwarf still seems stressed from the transplant, its growing some new leaves slowly but is still drooping from transplant. gonna be a dwarf-dwarf by the sounds of it! 😆 and i was doing some research on optimal hang heights for my Phlizon "3000w" COB LED, it seems that 40 inches is good to start from.
i also read another users opinion that the switch on the fixture labelled VEG&BLOOM is mixed up with the other switch that is labelled STRONGER.
The VEG&BLOOM switch is LEDs along with IR. (i read that the IR is probably further stressing my transplanted dwarf) and the STRONGER switch is COBs.
i took a minute to think about this but after realizing that the plants can probably handle the COBs (STRONGER) at the right distance i may aswell use them for veg and switch the LEDs and the COBs on 1 or 2 weeks before flowering for full flower power!
after reading all that i went straight over and switched the LEDs off and put the COBs on. il post pictures in the morning to show how the plants reacted.
fingers crossed people!
Please comment on anything you think i could improve on or any advice to help this plant grow better as it is much appreciated!
Peace!
Day 13 Update:
took some photos and it likes the COBs, although they are very hot combined with a sunny day reaching high temps of 29c. turned the fan up and opened another passive intake on the tent. finally im going to get some calmag and a oscillating fan for the leaves and hot spots in tent :)

Likes
15
Share


@DailyhighclubNLyara
Follow
Day 2 in the pots they came out beautifully with their seed as a hat! Day 4 they were all 3 1cm out of the ground, they were born!
Day 6 is almost over today and 2/3 seeds go delicious. Both of them already have their first set of real leaves and you can see the next set coming, oewhhh. Unfortunately there is one that I think is less gene/old seed. It sits around half the height and the lobs are almost closed, but hopefully it is still hard 💪 🏼

Likes
65
Share


@Mrs_Larimar
Follow
March, 11th.
The Nicole Kush Seedlings are growing vigor and nicely
I forgot to make Pics of all... But they arte to see in the Video
Tomorrow iam going to do that... Iam setting up another " Babytent" with a new Light
Stay courious
You can have a Sneak -Peak on the new Viparspectra XS-1000,
wich is going to be released on March 15th
March 13th.
Iam done with setting up
Now i have another Babytent. and Inside the New Viparspectra XS-1000
and the other Stuff to run the Envoirement
I already ca see a difference between both Tents. If you stand outside and just look with Eyesight
the Viparspectra seems to be brighter// has another color of Light.
I made a Unboxing Video for more informations.
Amazon: http://url-9.cn/0y9i
Amazon US: https://amzn.to/3e0P2bk
Amazon CA: https://amzn.to/3bTnEJC
Amazon discount Code:
it10mlarimar XS1000 10%
it15mlarimar XS1500 5%
it20mlarimar XS2000 5%
it40mlarimar XS4000 5%

Likes
25
Share


@Kakui
Follow
Veg15, han crecido como 2 centímetros desde el transplante, aún no necesitan riego, desde ahora regaré cada 3~4 días, cuando el sustrato este un 80~90% seco, han estirado un poco desde que subí la distancia del LED y bajé su intensidad, mañana haré Main Lining.
Veg16, hoy se torturaron las plantas con Main Lining, se cortó arriba del segundo nodo y se cortaron también las hojas de un dedo bajo el primer nodo, las plantas que tenían suficiente crecimiento de les hizo LST también, cuando se apague la luz se efectuará un spray foliar con B-52, y mañana un nuevo riego.
Veg17, riego con 5.5 pH y EC 1.8~1.9, se regaron con 1.5 litros y no se obtuvo drenaje, próximo riego tendrá que ser con más cantidad de agua para obtener drenaje, el agua se calentó a 23 grados y se oxigenó antes de regar, mañana se ajustará el LST ya que siguen creciendo muy bien.
Veg18, hoy solo se ajusto el LST, siguen creciendo bien.
Veg19, ajuste de LST, nada más que anotar.
Veg20, siguen creciendo, talvez hay que ajustar la cantidad de luz DLI.
Veg21, tuve que poner una estufa para aumentar la temperatura en el indoor y bajar la intensidad del LED a un 50% para alcanzar un DLI óptimo. Hoy haré ajuste de LST y revisar la humedad del sustrato.

Likes
81
Share


@UnorthadoxDude
Follow
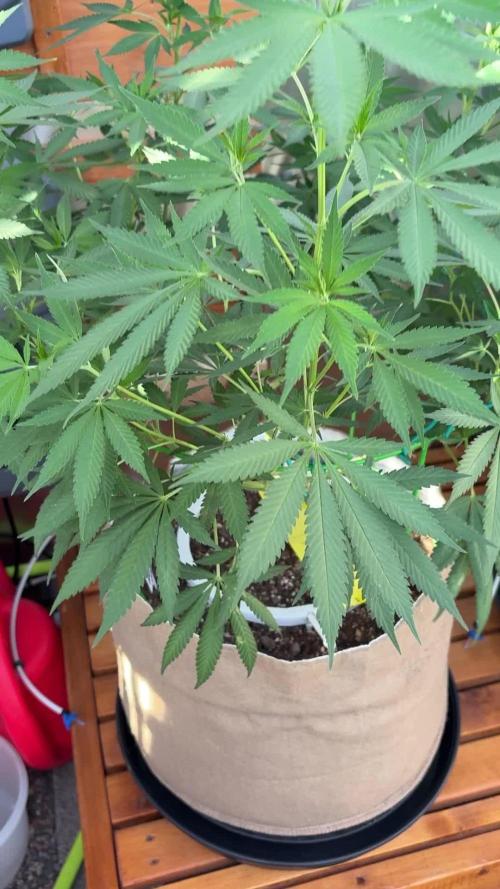
Transplanted to 40l container on week 4 day 1. Container has approx 30l in it.
Also added a photo of the setup for size reference.
Let me explain my thinking behind the repotting strategy. Firstly I should say that I am quite an old school kind of grower, although I've never grown cannabis before I have grown hundreds of other plants. Due to my experience with other plants, I understand the value of well planned and executed transplants, they can have an absolutely transformative effect upon root systems when done properly, as far as I know it's the main reason why they are done at all. It is fair to say I have never grown any auto-flowering plant indoors before, and I have read all about how you should not transplant autos, and all the good reasons why not. Ultimately though, as I am not called UnorthadoxDude for nothing, I believe that I can make it work with an auto, and get the benefit of improved root growth pattern, without delaying or interrupting the growth. I want to have my cake and eat it, as it were.
So the strategy is to avoid transplant shock, which admittedly I have already failed in the first unplanned transplant, but in my hopeful naivety I still believe I can make the second one work! I'm using coco, and I have had the larger pot prepared and have been watering and feeding them as well as the plant. If I am careful not to disturb the plant at all, and move the entire contents of the pot gently into the larger pot (which is exactly the same medium in broadly the same state), then I may be able to avoid shocking the plant and just let it crack on. We will find out in a few days! If it stops growing or slows at all then I failed, otherwise it worked!
A note about my use of organic nutes with coco. I have read a lot about coco and nutes and microbes and PH and TDS and what have you, and I know that the overwhelming majority of people believe that you can't or at least shouldn't use organic nutes with coco. The thing is, I like organic gardening, I prefer to cultivate a beneficial microbiota and keep it healthy. I recycle, and reuse all my compost except where a plant is diseased and this has worked well for me for a long time. I've never grown with coco before though, I always used soil. I wanted to gain the benefits of coco (better drainage, more air to roots, lighter, less inviting to pests, etc) - but I wanted to use a method of nutrition that I was already familiar with. I think I've mentioned that I am not called UnorthadoxDude for nothing, so I am using BioBizz and coco. By adding bacterial, mycorrhizal, and trichoderma inoculants and having the unplanted coco in the tent being fed and watered I hope to have cultivated a nice microbiota which will feed my plant. That's the theory. However just in case, I have a trick up my sleeve.
Now, I do not know if you are aware of this, but there is a fiery debate raging on the internet about using BioBizz organic nutes with coco for cannabis. Some people try it, most people shout it down, and I have not found much in the way of solid evidence of it being a good idea. Except one! I found a commercial grower that has used biobizz nutes, and he said that as long as you are using "Acti-Vera" you can use anything from the BioBizz organic range. Apparently the enzymes in the mix break down nutes chemically in a similar way to what the theoretically missing microbes do.
So I have ordered a bottle of that, and if my microbial cultivation attempts don't work out, I at least know I have a fallback that should work.
Those are my thoughts on it, let's see how it pans out.
Oh I should also probably point out that I am growing some companion plants, specifically alfalfa (nitrogen fixing), basil (improved flavour), and German Chamomile (increased essential oil production).
Update week 4 day 2 dropped PH to 5.8 after advice from a grow question. Look! It's carried on growing... maybe there was no transplant shock?
Update week 4 day 3: Growth continues, interveinal chlorosis lessening. Plant is pushing out node five at the moment.
Update week 4 day 4: Growth continues, interveinal chlorosis further lessening. Apologies for the poor quality photos for the last few days, I was lazy and didn't want to move everything out to photograph. Today I have done that and the pic is better. I am declaring the second transplant a complete success. I do not believe that plant was in any way shocked.
Update week 4 say 5: I think I've finally managed to overwater. Going to skip watering today.
Update week 4 day 6: Photo taken just before lights on hence wilting. Growth continues to accelerate. I believe the alfalfa has been raising the PH so I've removed it. Today I will flush through with PH lowered water and then fertigate. The colour is still too pale but the growth and overall look and feel of the plant screams to me that it's happy and about to explode.
Day 27.5 flushed with 30l of PH lowered water then fertigated with 5l.
Day 28: Height 12cm Width: 28cm Nodes: 6
Weekly growth data:
From 5cm Height to 12cm +140%
From 12cm Width to 28cm +133%
From 4 primary nodes to 6 +50%
Summary: Wow, wow. Wow. What else can I say. What a crazy week, amazing and unexpected given the problems. I am really excited to see what happens over the next seven days!!
It looks like it has quite severe chlorosis, but otherwise seems robust and is seriously stretching. Almost unbelievable growth. Pre-flowers appeared a few days ago, so I guess this was the final week of veg. Let's see how the first week of flowering stretch goes!
Update 7/2/23: My instincts about this plant on week 4 day 6 were absolutely correct, she was happy and, she was about to explode. Since my early attempts at transplanting, I practiced multiple times with Citronella (a photoperiod plant) and then I did it again with an auto (Polly) - this one went flawlessly and further demonstrates that you can transplant an auto without shocking it. Time will tell, because I can compare Polly to both Misty and Nesia both of whom were sown directly in their final pots.

Likes
44
Share


@Ukfarmer420
Follow
Started the flush on the skittles
The runtz is having a mega growth spurt and is growing very quick, lots of bud sites.
Little ethos is still a baby lol but hopefully will be a beast 🙏


Likes
37
Share


@Hawkbo
Follow
I still have to go thru all the photos but wanted to get the video up for all of them first. If your interested in the pics come back at the end of today and they will be up it just takes a while. Noticing more seeds poppin thru, I hope it's from the moonshine cookies pollen cuz the female turned out bomb and the male wasnt too bad either so they might be decent seeds. Started the flush on the citradellic and the other ones might have got their last feed yesterday. Should be finishing up next week and the week after.
This one says 70 day strain in the description but it's got alot of amber trichs so I'm gunna flush from here on out. I dont really know what's gunna happen since the leaves are already black but it should get interesting over the next week or 2.
Likes
24
Share


@GR0WER
Follow
New week starts.
☀️14.09.2023
I watered my plants with deminerised water + TA Pro Roots in a recommended doze yesturday. Today I'll do nothing exsept water-spraying them.
Special Queen 'Zombie'#2 (with a round milky leafes) shows a small green 'needle' inbetween them. I think it would live.
I have 9 of them total.
☀️16.09.2023
Bough of my Special Queen Zombie's are growing. #2 is pulling out its firat leaves (two weeks after its germination).
I bought liquid fungi 'Orca' and I'll start to use it tomorrow (watering time).
I'm using deminerilzed water till now and I prefer to use it as long as possible.
☀️17.09.2023
Watering with 'Orca' fungy.


Likes
10
Share


@agricola
Follow
My good friend convinced me that trimming and training are paramount, so I've started with slowly defoliating the Creme de la Chems to try and get to lollipop status. They're just starting to flower, so I figured I could get away with a more aggressive approach. Because I failed to train these girls early, I'm stuck dealing with a little rain forest. What I've tried to do is trace each flower topped stalk up from the base, and trim away from the bottom up. 1/3 of the way up per day. I've now got a thick canopy, and I've been trying to just use leaf tucking and manual manipulation every few hours in order to keep the different height flowering sites in direct light. These ladies have really been thriving, and it's been such a joy to watch them grow! I like having two plants in one net pot letting them grow wild, but I think in my next grow I'll keep it to one per pot and train better from the start.
As for the Super Orange Haze ... not as good. I attempted to pull the main branch over to train her to some empty space, but I was too aggressive and ended up popping her head off :(. First grow, first disaster. I took the head and stripped her/coated in clonex and pushed her into some potting soil just to see what would happen. There hasn't been enough foliage to really make me want to do any trimming, I've just tried to tie the stalks off to train them apart. I'm really sad about my mistake decapitation, but she seems to be doing well still. She's probably week 2 of flower based on others' journals.
I changed the water midway through the week (which is when the videos were taken). I drained most of the water out, but roots prevented me from getting the last few gallons. When I refilled the res with RO, I measured the PPM at around 200. I have to assume that remaining nutrient was completely unbalanced leftovers, so feeding will have to just have to be experimental. My approach has been to give around 1:1 Gro vs Bloom and Micro every 2-3 days when I refill with RO. I want to build my PPM up to 1000, but slowly so that I can detect if I hit a ceiling first. It's hard to measure how much food is in the water based on PPM. CalMag is what drives it mostly, so I've been using CalMag as a sort of measuring stick. I keep the CalMag pegged to the Bloom food, but I know it's only good for initial dosing. I can't assume the plants are eating CalMag in the same proportion as anything else :(. If anyone has a line on cheap lab testing ... hit me up. I'd love to be able to test a few hundred samples at a time for NPK and trace so that I can tell (even if post facto) what was going on.
Likes
6
Share


@Lukewarm
Follow
send nutes plz.
turned out that im a big noob. shouldve put more nutes in my 50/50 coco soil mix. now i have to wait few more days till its dry. all in all plants look kinda fine
day 24 - switching from MH250w to HPS250w
day 27 new growth shows white tips
Likes
14
Share

@cultivars
Follow
AUGUST 16 to AUGUST 22, 2025
Insofar as fertigation, this week each specimen was provided a Top Dress of Dry Organic Amendments as described in the Nutrients section of this diary post. The top dress was watered in with a Liquid Amended Soil Drench with the following ingredients and measures (mL/L):
Bloom Liquid Plant Food (1-3-3) - 5.0mL/L of plain rainwater
Yucca Schidigera Liquid Extract - 0.25mL/L
Monosilic Acid - 0.5mL/L
Activated Beneficial Microbes - 5.0mL/L
- All products from Optimize Organics (https://www.optimizeorganics.ca/)
Both Lemon Orange specimens are growing with vigour, and well into the transition to bloom. Pairs of pistils are evident in several locations on each plant. Sunlight hours have dropped to under 14 hours (Sunrise 07:00, sunset 20:58). I am considering this Week 1 of flower.
Considerable height gain over the week, with a noticeable increase in inter-nodal spacing, particularly on Lemon Orange #2. Lemon Orange #1 is the shorter of the two phenotypes, slower growing, and not taking in near as much water/nutrient (did not need to be watered this week). Lemon Orange #1 has an average height across its 8 main growing shoots of 51cm, while Lemon Orange #2 is is near 68cm.
Neither specimen is overly smelly on their own, but when rubbed up against or manipulated the scent of citrus with an earthy after-tone is present.
Fungus gnats have found a home in the garden, and for now I've deployed yellow sticky traps to control the adults. More aggressive treatments of other parts of the lifecycle will likely be needed, and I am considering acquiring nematodes to add to my living soil.
DAY 99 - Top Dressed with dry organic amendments (Bloom mix); Watered in with Bloom Soil Drench Formula; Went fishing for a couple of days.
DAY 100 - n/a
DAY 101 - n/a
DAY 102 - 1L drip of plain rainwater at 08:30 via automated irrigation system; Returned from fishing trip in early afternoon (14:00), plants looked good, if not a bit uneven as a result of not being turned 1/4 clockwise over the past 3 days.
DAY 103 - Witnessed droop under full sun in early afternoon, across all specimens on the back bench (Blue Dynamite #2. Lemon Orange #2, Blue Dynamite #1). Drip watered 1.5L of plain rainwater to that bench of plants only, as the front bench with the small plants (Lemon Orange #1 and Purple Romulan) seemed as though the substrate was sufficiently moist.
DAY 104 - Prepared Compost Tea for application on Day 106, set to aerate for 36 hours.
DAY 105 - n/a
Likes
31
Share


@420DeepGrow
Follow
Gracias al equipo de AnesiaSeeds, Marshydro, XpertNutrients y Trolmaster sin ellos esto no sería posible.
💐🤯 39%Thc Wham Boom:
Sube al ring con WHAM BOOM de Anesia Seeds, donde la energía electrizante de Wham choca con las vibraciones frías de RS54, creando una variedad que es todo equilibrio, potencia y sabor. Este peso pesado feminizado ofrece una mezcla perfecta de 50% Sativa y 50% Indica, proporcionando una experiencia que te hará flotar de euforia mientras tu cuerpo se sumerge en una serena relajación.
WHAM BOOM es una productora prolífica, con rendimientos en interior de 600g/m² y en exterior que alcanzan la asombrosa cifra de 900 - 1200g por planta. Con una floración de entre 65 y 70 días, esta variedad está lista a principios de octubre, lo que la convierte en una competidora ideal para los cultivadores que aspiran a una cosecha de campeonato. Con una imponente presencia de 100-140 cm en interior y 160-220 cm en exterior, WHAM BOOM se alza como testimonio de su destreza genética.
🏠 : Marshydro 1.50 x 1.50 x 1.80, carpa 100% estanca con ventanas laterales para llegar a todos los lugares durante el grow
https://marshydro.eu/products/diy-150x150x200cm-grow-tent-kit
🌬️💨 Marshydro 6inch + filtro carbon para evitar olores indeseables.
https://marshydro.eu/products/ifresh-smart-6inch-filter-kits/
💻 Trolmaster Tent-X TCS-1 como controlador de luz, optimiza tu cultivo con la última tecnología del mercado, desde donde puedes controlar todos los parametros.
https://www.trolmaster.com/Products/Details/TCS-1
🍣🍦🌴 Xpert Nutrients es una empresa especializada en la producción y comercialización de fertilizantes líquidos y tierras, que garantizan excelentes cosechas y un crecimiento activo para sus plantas durante todas las fases de cultivo.
Consigue aqui tus Nutrientes:
https://xpertnutrients.com/es/shop/
📆 Semana 3:
Muy buena semana, he aplicado un riego solamente con agua de manantial para reducir la cantidad de sales acumuladas en el sustrato y se ha notado una mejoria .
Creo que le quedan unas dos semanas por estirar, parece que va a ser una buena cosecha.
Se mantiene un buen control del cuarto de cultivo gracias a @marshydro y @trolmaster.
Mantengo las dosis de 1/3 de nutrientes recomendados por el fabricante.
Potencia del foco 80%


Likes
55
Share


@w33dhawk
Follow
So liebe grower, 20 Wochen voller Spannung sind für mich ins Land gezogen und ich muss sagen ich bin begeistert von dieser Sorte, das Wachstum verlief gut und sie hat sich fast garnicht für mein topping und lst Interessiert und einfach weiter gemacht mit ihrem Wachstum. In der blüte gab es dann ein paar Probleme mit Überdüngung die ich verursacht habe was mich sicherlich Ertrag gekostet hat aber dank der fleißigen Helfer hier auf Grow diaries war das Problem schnell gelöst und der Schaden minimal gehalten danke schon mal an euch ihr seid die besten. Aber ein ganz besonderes Dankeschön möchte ich an Mrs Larimar richten da er/sie mir bei einigen Fragen geholfen hat und eigendlich immer gleich zur Stelle war wenn was mit meinen Ladys war, also danke Mrs Larimar du hast 1000 likes verdient für deine Arbeit die du hier auf Grow diaries leistest. Zum eigendlich en Ergebnis zurück gelato 41#1 hatt 374,94 gramm abgeworfen, gelato 41#2 hatt 361,01 gramm her gegeben, gelato 41#3 satte 370,37 gramm und zu guter letzt gelato 41 #4 330,29 gramm sind insgesamt 1436,61 gramm nass Gewicht. Ich bin mehr als zufrieden mit dem Ergebniss und finde das gelato 41 ein guter produktiver Cannabis stamm ist. Zu dem Wachstum der Knospen im allgemeinen kann ich sagen das bei 4 Ladys 3 verschiedene Profile raus kamen gelato 41 #1 und #4 haben eher längliche colas entwickelt die relativ fest sind gelato 41 #2 hat eher tennis Bälle produziert die echt hart wie holzbälle sind und gelato 41 #3 war ne Mischung aus den beiden. Zum Geruch der sich über die gesammte blüte immer wieder verändert hat es fing an mit zitrus Noten die dann gepaart wurden mit so nem cremigen touch dann kam ein hauch von Minze hinzu und ganz am Ende Rochen die Ladys nach cremigen sauerlichen Beeren mit leichtem Zitronen Duft der gepaart mit cremiger minz Note einher geht einfach nur lecker im Duft. Trocken Gewicht werde ich updaten wenn die Ladys in die Gläser gehen und Rauch Bericht nr.1 folgt dann ca 14 Tage später und Rauch Bericht Nr2 weitere 14 Tage später, euch allen noch einen wunder schönen Grow mit reichlich ernte und bis zum nächsten Bericht cu........

Likes
21
Share


@MG2009
Follow
12/24/2021
So far only one male has been identified. Glad I just reviewed my video I didn't even notice how light green #3 is, guess I mix her nutes up separately and see if she just hungry? Or naturally lighter than others. All other plants are using coast of Maine mixed into soil
(her too) so I'll give her a little mirimichi 901C this week and see what happens.
12/30/2021
Noticing that there is two distinct differences between these girls, color light green and dark green.#1,#3,#8 are light green and #2,#4,#5,#6,#7 Other than that there very much similar growth and node spacing, little differences but very happy with uniformity.Both light green and dark green maintained their magenta petiols, gonna make notes on stem rub notes next week and see how they will compare.