By continuing to use the website or clicking Accept you consent to our cookies and personal data policy and confirm that you are at least 18 year old. For details please see Privacy Policy and Terms
Accept


Processing
Likes
3
Share


@CanapaBella617
Follow
Tried not to mess with them too much this week. Less stress for everyone!
Likes
190
Share


@Burmese
Follow
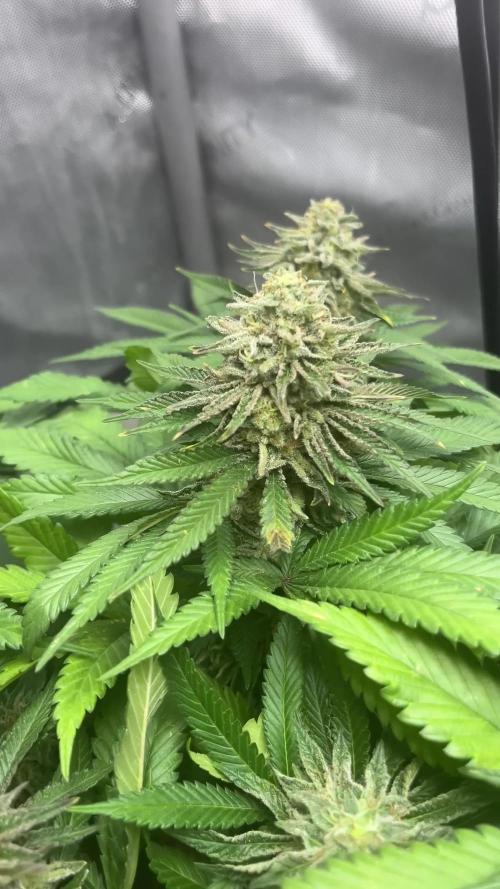
Hi everyone,This time I can update right on time and this could be the last week update before harvest.I am planning to harvest Soil girl or may be both of them next week.Hope you guys enjoy the journey.Actually Soil girl is more mature than Coco girl.More in amber trichomes.Coco girl, She got mostly cloudy trichomes and only some amber.Still not sure it will be better or not if I chop both of them together.I start giving them water only and will flush Coco girl before harvest.
Let’s see if I change my mind to harvest together or not ... 😂 ✌️ 🇲🇲
Soil-Organic-LST
Day 120~126
Soil
RO water
pH- 7.0
ppm- 10
Run off
pH-6.6
ppm-550
Soil Potting Mixed Recipe
10gallon Pot
-Coco peat: 30%
-Soil Compost: 20%
(Soil,Sand,Cow manure,Ash)
-Bone meal: 10%
-Earthworm fertilizer: 10%
-Perlite: 15%
-Marble stone: 5%
-Crash egg shell: 3%
-Chicken manure: 3%
-Banana peels: 2%
-Gypsum: 2%
———————————————
Coco-Inorganic-ScrOG
Day 120~126
Coco
RO water
pH-7.0
ppm-10
Run off
pH-6.0
ppm-1000
Coco potting mixed recipe
10gallon Pot
Coco peat : 70%
Perlite : 30%
Transplanted from 1gallon coco/soil mixed pot at Day-42.
Scrog size
Area : 1ft x 1ft (30cm x 30cm)
Hole size : 2” (5 cm)
Material : iron welded by four steel pillars.
Height from base: 6” (15cm)
Happy Growing to you all... ✌️

Processing
Likes
1
Share


@Nvchods3
Follow
esta semana empezare a fertilizar una planta con B.A.C y otra con TOP CROP.
han evolucionado de buena manera las plantas a la poda Apical realizada la semana anterior.


Likes
27
Share


@eldruida_lamota
Follow
Esos fumetillas, que ya ando por aquí, que las mudanzas son mu largas, pero todo acaba y ya al 100%.
Germine en que estuve estable 4 do sweet dos de sweetseeds, un híbrido que bien cultivado es increíble, tanto de sabor como de colocón, no os quiero adelantar mucho os dejo por aquí la información de la primera semana.
.
El ph lo tenemos en 5.8 la humedad ronda los 70/80% y la temperatura está entre 22/24 grados. Bien controlado en su primera semana de vida.
.
La alimentación de la gama agrobeta.
0,5 ml x L Piramid , vía radicular.
0,5 ml x L Growth black line , vía radicular.
0,1 gr x L Cancerbero , vía radicular.
0,1 ml x L Tucán , vía radicular.
0.1 ml x L Flash Root , vía radicular.
0,4 ml x L Great Green , vía foliar.
Son las cantidades exactas las cuales aplico 1 vez por semana.
.
Soy el primero que está deseando ver cómo florece, y se que todavía queda unas semanas, pero poco a poco lograremos el objetivo, buenos humos fumetillas 💨💨💨
Likes
13
Share


@Cgrow
Follow
Basically I'm taking this as new hobby. I don't smoke but since I was 16 that I wanted to embrace a grow project. 18 years later, decided to get my hands to the work, bearing in mind that it should be as simple as possible.
Ordered 3 easy bud seeds, germinated all 3, only 2 survived on the soil, mostly because of my technique. For me, it's all about learning so I did some experiences. 3 different soils, 3 different planting techniques and this is the result so far. The one that died, was due muddy soil, so she drown. No oxygen.
Started this project with a simple indoor greenhouse, 160x40x60cm size, 2 daylight lamps 11 watts, 6300 kelvin and roughly 700 lumen each, 1 usb cooling fan. Distance from the lamps to the seeds +20 centimetres, which you can see on day 3, we had a lot of stretching (video). Nevertheless, started to see some life!!!
Decided to take the project more seriously. We are now on the day 4, with a new setup. Adequate soil, carefully buried both plants in bigger vases and new lights.
4 cfl lamps, 1297 lumen, 97 watts and 6300 kelvin. I was about to buy the cfl pure light lamp 125 watts but found these cfl's at leroy merlin. I wanted to keep this low budget/experimental project as much as possible, therefore after doing some calculations I found that with these 4 lamps I would roughly get the same lumens and watts I would get with the pure light lamp.
Happy Growing.
Likes
233
Share


@Tropicannibis_Todd
Follow
🐶 🐕 🐶 🐕 🐶 🐕 🐶 🐕 🐶
So this diary is dedicated to my Big Boy Midnite 🐶
Due to his age and trouble with his hips , he needs a little help so I will be making him special CBD and CBG Treats ....
So keep in mind that I will be doing a Bubble Hash Water Extraction with the SDR and CBG once that's done and dried I will be Decarbing it by then placing it on a sheet of parchment paper and placing in over at 220 degrees F for 20 to 25 min to fully decarb it .
Get ready for a paw-some treat that your furry friend will go nuts for! These peanut butter CBD or CBG treats are made with wholesome ingredients like flour, rolled oats, and natural peanut butter. Perfect for a special treat or a relaxing snack, your pet will love these bite-sized delights!
Ingredients:
• 2 cups of flour
• 1 cup of rolled oats
• 1/2 cup of natural peanut butter
• 1/4 cup of water or beef and or chicken broth
• 2 teaspoons of decarbed CBD or CBG
Instructions:
• Preheat your oven to 350°F.
• In a large mixing bowl, mix together the flour, rolled oats, and natural peanut butter.
• Add in the water and or broth and the CBD or CBG, and continue to mix until well combined.
• Roll out the mixture to about 1/2 to 5/8 inch thickness on a lightly floured surface.
• Cut the mixture into bite-sized treats using a cookie cutter.
• Place the treats on a baking sheet lined with parchment paper.
• Bake for 20 minutes, or until lightly golden brown.
Allow the treats to cool completely before serving to your pet.
Who says bacon is just for humans? These CBD or CBG treats are made with a yummy mix of flour, rolled oats, and cooked bacon. Your pet will love the taste and the benefits of CBD or CBG in each bite.
Ingredients:
• 2 cups of flour
• 1 cup of rolled oats
• 1/2 cup of cooked bacon
• 1/4 cup of water or Chicken and Beef Broth
• 2 teaspoons of decarbed CBD or CBG
Instructions:
• Preheat your oven to 350°F.
• In a large mixing bowl, mix together the flour, rolled oats, and cooked bacon be sure to grind up the bacon.
• Add in the water and or broth as well as the CBD or CBG, and continue to mix until well combined.
• Roll out the mixture to about 1/2 or 5/8 inch thickness on a lightly floured surface.
• Cut the mixture into bite-sized treats using a cookie cutter.
• Place the treats on a baking sheet lined with parchment paper.
• Bake for 20 minutes, or until lightly golden brown.
Allow the treats to cool completely before serving to your pet.
Happy Growing And Happy Smoking and for all the Puppies out there Happy Snacking 😊
Side Note , I will be adding future pictures and video of the process of making the cookies as well as letting everyone know how it helped Midnite 🐶 Plus I will also give it a go and give my thoughts on the terps and the effects ...
👉Soil Provided by ProMix.ca
👉Nutrients Provided by Agrogardens
👉Lighting Provided by MarsHydro.ca
👉Seeds Provided by Kannabia Seeds
...

Likes
7
Share


@OwlGang_Uk
Follow
Week 12 - Mehn Oh Mehn - The Purple Is Really Starting To Come In Now I Think Last Week’s Cold Temp Situation Really Unlock The Purple Characteristics. The Scent Is Very High And The Trichomes Are Mostly Clear With A Few Cloudy Showing. I Am No Longer Using Nutrients Because I Will Start The 2 Weeks Now Because You Don’t Want The Weed Getting Over Ripe Thats When The Scent Would Start To Face. So In Two Weeks Time I Will Have Mostly Cloudy With A Few Clear Or A Few Amber With Strong Aurora At It’s Peak. Tell me What You Guys Think In The Comments.

Likes
2
Share


@JediGrow
Follow
Willkommen in der Käsemanufaktur,
die letzten Tage stehen an. Die Trichome sind so gut wie alle milchig, etwa 1/3 der Trichome sind Bernstein. Es wird nur noch mäßig Wasser ohne Dünger gegeben. Die Pflanze hat ein wunderbares skunkiges Aroma entwickelt, am liebsten würde ich in einen Bud beißen :)
Ich bin sehr auf den Ertrag gespannt, obwohl die Pflanze nur in einem 3L Airpot stand, sind sehr fette und harte Buds entstanden.
Am Montag wird die Pflanze geerntet, dann gibt es ein Update und weitere Bilder.


Likes
14
Share


@Jazzvet
Follow
This week was very well, the girl showed her first pistils and she's stronger and healthier than ever, so:
Day 30 sprayed with bioprotect
Day 31 watered with 3l of water with 6 ml of bh, bg an a-v
Day 33 The first pistils are appearing sign that blooming phase has begun.
Day 34 water with the mix
Day 35 I've turned on the dehumidifier trying to decrease the humidity and starting to defoliated some lower leaves, 3/4 leaves per day stress the plant to much.
See you next week
Happy growing
Likes
4
Share


@SuperGluedGrow
Follow
Number 2 pheno might herm on me so I have to watch but I have limited plants and I really want to keep these genetics so I need atleast one female. Number 3 the mutant stopped growing before I topped, or maybe not stopped but it threw out pistils at the apical meristem and not producing leaves so I topped to see if I could promote side growth but it hasn't worked; I'm going to keep her around just for the fun of it. 4 is my hope of producing female and a good clone.
Likes
6
Share


@JamaicanDream_420
Follow
Bueno intentando solventar la sobrada de ec 🤟🤟🤟🤟la planta sigue avanzando pero mas lenta,se le junta todo a las pobres💪💪💪
Likes
13
Share


@Miss_Earthquake
Follow
16/04/2021 (day 68): la plus grande plante a atteint le filet cette semaine mais j’ai été obligée de le retirer. Les tiges sont si épaisses et si rigides que j’arrive à peine à les plier pour les maintenir sous le filet. C’est seulement ma deuxième session et je n’ai pas assez d’expérience pour les plier sans les endommager.
J’ai surélevé les plus petites pour avoir une canopée à peu près régulière et j’ai augmenté la puissance d’éclairage à 60%.
Les plantes sont beaucoup plus vigoureuses que lors de ma première session et les fleurs sont beaucoup plus belles. Peut-être qu’elles apprécient plus les engrais Biobizz que les BioNova... ou peut-être que je commence à comprendre un peu mieux ce dont elles ont besoin 😀
Likes
22
Share


@LSDMan
Follow
Arrosage à l’engrais de croissance le jour 70. Tuteurage des plants. Les plants ne vont pas tarder à passer en floraison. Je pulvérise au purin d’orties le jour 73.


Likes
8
Share


@Professor_Chaos
Follow
The buds are pretty airy.. Not dense at all. But still very happy with the outcome. Can't wait to have it all weighed out.. (Dry of course) The root ball was HUGE... I always have an issue with drying too quick (3 days) so, I'm hoping that the box with the computer fan will still move enough air to keep mold from growing.. But not too much to dry out too fast. Also, keeping it in an unused room that stays alot cooler than the rest of the house. Will update when dried and ready for jars!
50 hours of drying.. She still seems pretty moist.. At least.. That's what she said.. Lol.. Had to.. Anyways.. Yeah leaves are still pretty soft almost lively kinda still.. Not crispy.. Trying to make this dry super slow.. And NO hay smell so far.. That's a good thing.. I think.. As long as it still smells like dank.. Tired of drying my buds too quick or too much if I push for 4 days.. 3 days is not good enough.. Im pushing for at least.. AT LEAST 5 days drying and the buds still able to produce about 65% humidity, or so, on their own.. That is what has worked best for me.. Even if it dried in 3 days.. As long as I get the humidity right for curing it wont ruin the terpenes from what I have been experiencing.. Anybody got any other ideas? Lol cuz what I find on the net doesnt work for me.. I didnt wanna use a fan on this.. And im only using a very small weak computer fan that I rigged up to use even less power.. Just scared to dry this too quickor too much.. Thinking about turning the fan off for a little bit.. Maybe the rest of the day and night.. Ok.. So 6 hours after I turned the fan off.. Still reading 55% RH and 20.5C.. It shouldnt mold *crosses fingers*
74 hours drying.. The buds seem very very airy.. And it seems like its one of those types that look like alot but really weighs half of what it looks.. Maybe when I trim her up she'll look better.. Still a very fun and interesting learning experience! On to the next! Still going to update more!!! Probably tomorrow lol
Its been a little over 100 hours of drying and the buds and leaves are feeling pretty crisp.. If I wait till the branches "snap" then it usually comes out too dry.. And so far jars 1 and 2 which are the popcorn buds is ready 70% after being in the jars for about 2 hours.. That is too wet still.. Just going to burp very frequently (3 or 4 times daily) and using a fan for a few minutes to help pull that moisture out and let her go right back into curing.. That's the best way I can get it to not smell like hay.. So far so good.. Still smells pretty dank. Some of the nugs are so linky it reminds me of Dr. Grinspoon's from Barney's Farm.. The calyxs are just spaced apart by stem.. Still looks pretty and smells great.. And smokes even better!.. Will update as I go...
After about 24 hours in the jars.. The hygrometers are reading 70% - 75% so I left them out overnight to dry out a bit more.. Just put them back into the jars and will check on them when I get home from work tonight.. I'd much rather not dry enough.. Than over dry ANY DAY.. ifit was overdried, it would smell like hay.. But it still smells dank asf.. Plus.. This is just technically giving more time to dry before the cure.. I read that this is considered the "pre-cure phase"... Wish I would have read that before my last 3 - 4 harvests.. But I have learned it now.. So no more excuses for fuckin it up anymore lol..
https://www.cannabisprogrower.com/curing-cannabis/
That is the link to the way that I have started curing.. It seems to be working pretty well. This has details that I could not find anywhere else and basically had to try and figure out on my own... Then I came across this page.. This is the perfect method for curing in my opinion.. Works great for me!
Its been in the jars for 6 days.. I now have the hygrometers reading 61% - 63%... According to that website.. I should stop burping daily.. That makes me a little nervous.. I will atleast open each jar daily to get a wiff of them lol.. They smell pretty good.. Not the best I've smelled.. But atleast I know I'm doing it right this time.. Geez.. The drying and curing is the most detailed part of growing.. My first time i thought you just dry it and throw it into the jars.. No matter how long or short of time it took lol.. My first grow was reading 49% after 3 days of drying.. With a fan!.. So glad I got it figured out finally!
Made some Bubble Hash with the trim.. Havent weighed it.. But judging by the size (plus I used to be addicted to black tar heroin) it looks like it could be just about 2 grams.. I'll weigh it later.. Still haven't smoked any of it. I only used the 220 micron and 25 micron bags.. 220 to remove all the leafy substance and the 25 to catch all the trichomes.. Usually my bubble hash turns out very dry and breaks apart.. This stuff is super gooey.. Even after drying for 4 days.. Hmm... Smells amazing.. Wish I could smoke it.. I wonder if I could make capsules of this stuff.. And just take it like vitamins.. Lol.. If anybody has tried that or knows anything about it, comment please.. I'm curious
A little after 2 weeks of curing.. The buds smell and taste pretty dank! I feel like I got the curing and drying down.. Yessss!

Processing
Likes
Comments
Share


Likes
13
Share


@Rob691
Follow
D-70 : Chaco Haze. They just look amazing, even 1/4 is very small (about 40cm). At this stage she should be 60 or 70 cm high... Anyway, the flowers are doing great. I really hope the will continue to grow. I dream of a grow room full of flowers between 1 and 1.4 m high ! Still 8-9 weeks to go, so they have time :)


