By continuing to use the website or clicking Accept you consent to our cookies and personal data policy and confirm that you are at least 18 year old. For details please see Privacy Policy and Terms
Accept
Likes
Comments
Share

@Kinghaze
Follow
I will put up the trellis this week and defoliate them
All the plants are looking good
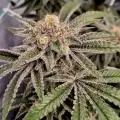
The black cherry gushers is stretching a lot.
Hope it will not go crazy in the stretching periode.


Likes
31
Share


@Grower_Tom
Follow
Pretty satisfied with this week as it was a very easy one. Not too hard to just balance some h2o and give the girls a drink. I’ve noticed they are slowing down a little bit on water though. Still about 80% trichomes are cloudy. About 40-50% of the hairs have gone brown. I gotta say these girls haven’t produced a lot of stigmas and I’m perfectly ok with that. The terpenes and THC coverage is perfect for what I’m looking for out of this strain. Think I might pay for the bud to be tested lol

Likes
3
Share


@MrPipi
Follow
doing great. we can see, Lance is a little behind, but he´s the one who got some issues in the first 2 weeks.


Likes
9
Share

@HUMO_Cultiva
Follow
Update of Goofiez 2 !! It’s incredible this strain is so strong and fast grow !! Stay tu ed

Likes
8
Share


@BigBaby420
Follow
Christmas week, family over so no pictures but she’s still looking good

Likes
Comments
Share

@TerpCloudzZz
Follow
🌱 Grow-Tagebuch – Woche 1: Keimung & Anzuchtphase
📅 Zeitraum: KW 41
Phase: Keimung & Einsetzen in Substrat
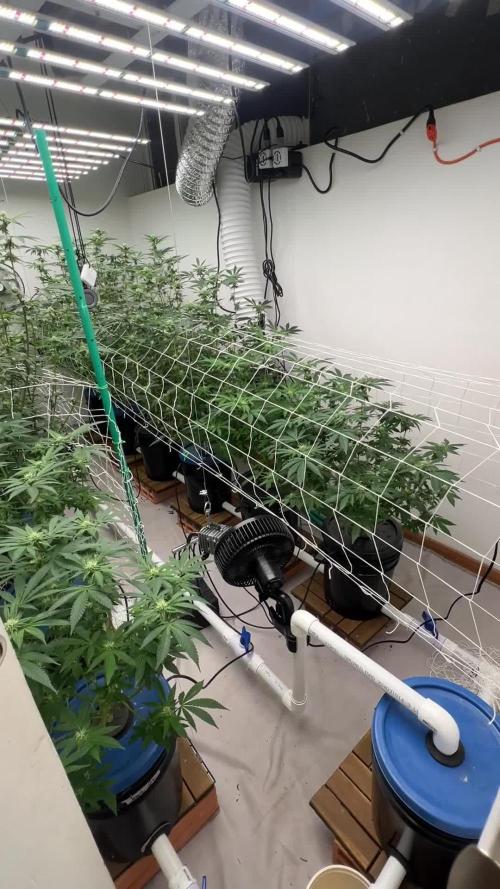
🌍 Setup: Indoor Growtent mit LED-Beleuchtung, reflektierende Innenwände, 15 beschriftete Töpfe
🔍 Übersicht der Aktivitäten
Keimung gestartet: Die feminisierten Samen wurden in Wasser eingelegt (klassische Methode) und anschließend in beschriftete Cups überführt. Sichtbare Keimansätze nach 24–48 Stunden bei optimaler Temperatur (22–25 °C).
Sortenvielfalt: Insgesamt wurden 15 verschiedene Strains eingesetzt, darunter:
Super Boof, Black Cherry, Don Mega, Blueberry Cupcake, Peach Crescendo, Permanent Marker
Fishy Zoap, Drizzl Pickl, Barcelona Puff
Banana-Serie: Banana Kush, Banana Zkittlez, Banana OG, Banana MAC, Banana Runtz, Banana Cake, Banana Sherb
Substrat: Leicht vorgedüngte Erde mit Perlite zur besseren Drainage und Belüftung. Alle Töpfe sind sauber beschriftet zur lückenlosen Dokumentation.
Beleuchtung: LED-Growlight mit weißem Spektrum, 18/6 Lichtzyklus zur Förderung der Wurzelbildung und Photosynthese. Abstand zur Pflanze: ca. 40 cm.
🌿 Pflanzenstatus
Erste Keimlinge sichtbar in mehreren Töpfen, insbesondere bei Blueberry Cupcake, Permanent Marker und Banana Kush.
Gleichmäßige Feuchtigkeit im Substrat, tägliche Kontrolle mit Sprühflasche zur Vermeidung von Staunässe.
Temperatur konstant bei ~24 °C, Luftfeuchtigkeit bei ~65 %.
📚 Lernimpuls der Woche
„Die Keimung ist der Grundstein für Vitalität.“ Eine saubere Umgebung, stabile Temperaturen und korrektes Handling sind entscheidend. Schon kleine Fehler wie zu viel Wasser oder Lichtstress können die Entwicklung hemmen. Tipp: Keimlinge nie direktem Licht aussetzen – sie brauchen Wärme, keine UV-Strahlung.


Likes
9
Share


@CottersChronic
Follow
Planted 20 germinated in 5 days going well germination nearly completed and stating to veg
On the 5th coming to a end of germination starting to veg
Processing
Likes
34
Share


@DudeGrowsWeed
Follow
Sour Diesel Haze is coming along. I'm starting to see what looks like a little bit of foxtailing to me. I'm going to start flushing her, then harvest in about 10 days.

Likes
6
Share


@TheMayor4434
Follow
Start of week six we start seeing rapid growth from all plants in height and bud production. 1 of the ladies is an absolute freak but in all the good ways. Shes reaching a meter in length and is going to have 5 slender long kolers. The rest are all around the 80cm mark minus the two under achievers which are at the 70 cm mark which is amazing as the plants are supposed to be the size at harvest. Not changed much apart from excluding the voodoo juice nutrients ,adding another 600w light to the tent and a tiny bit of defoliation. My flat is starting to smell amazing. Sometimes I bury my nose in the outlet pipe and inhale a deep breath. Haaaah

Likes
9
Share


@Wolfgreensmoke
Follow
Espero que os guste el resultado final. Buenos humos y nos vemos en proximos seguimientos


Processing
Likes
10
Share


@Fibro_Witch
Follow
This girl is looking great! Noticeably frostier than last year so I am excited! She smells really strong right now, lotta sweet and slightly skunky. I spend most of my video talking about how my plan for a tomato roof using stuff I already had didn't work out so looks like I'm going to Lowe's on Wednesday. Gotta get it up before the cold and rain starts in so I don't get moldy buds.
Likes
14
Share


@Smile_gan
Follow
At week 13 of Pineapple express. It nearly to finish. I think her will ready to harvest in next week.


Likes
2
Share


@GodZilla_Owner
Follow
Week 6 – Day 44
Flower Day 14
🔄 Looking back:
This week I did lollipopping and defoliation on Mimosa Evo and White Widow ✂️
Both plants took it well – no signs of stress or herms so far. Everything is stable and looking good ✅
💧 I also started mixing osmosis water with tap water at a 10:1 ratio.
That gives me a stable pH and a starting EC of 0.08, which is great for preparing nutrients.
💡 Lighting & DLI
Mimosa Evo is under the Kingbrite P55 320W, and I’ve now increased the light intensity.
📈 DLI is up to 78 (24h), which equals about 39 DLI under a 12/12 cycle.
She’s handling it well so far – no signs of light stress, and the stretch continues strong 🌿
🌿 Plant status – Mimosa Evo
📏 Height: 77 cm (+27 cm this week)
💧 Drain pH: 5.9, EC: 1.7
⚗️ Feeding at 75% of the nutrient schedule
✅ She looks vigorous and healthy, stretching strongly into early flower. No deficiencies, no complaints!
Likes
8
Share


@pzwags420
Follow
Started off week 6 off by adding 5ml of Flying Skull Z7 to reservoir and adjusted reservoir PH to 6.0. I've got the blumats nearly dialed in and keep making small adjustments every 24 hours. I am holding off a few days on the nutrients to see what the plant tells me. The clawing seems to have improved(combo of over watering and not getting runoff on hand watered nutrients I believe). When I apply nutrients going forward I will make sure there is plenty of runoff so I don't repeat the same mistakes. 😬 on day 2 I applied 1 gal of nutrients and watered until runoff. On day 3 I defoliated the bottom of my plants to improve the air flow. On day 6 I added 5ml of flying skull Z7 to the reservoir. I noticed a possible calcium deficiency on one plant so on day 7 I applied my 1 gal of nutrients with the addition of calmag and silica. Ive only used calmag once growing in coco and it burned my plants...so I assumed there was enough from my tap water and nutrients. I know this goes against all advice.. I think it finally caught up with me LOL.LIve and learn to buffer your coco. Next grow I will buy buffered coco and use a calmag product 😅 I defoliated the center of my plants to increase airflow and expose light deeper into the canopy.