By continuing to use the website or clicking Accept you consent to our cookies and personal data policy and confirm that you are at least 18 year old. For details please see Privacy Policy and Terms
Accept


Likes
12
Share


@Patregsj
Follow
Started topping yesterday, Noticed that one of the regular coco girls had a small "defect" on the 2nd group of internodes, left her alone and now see that the next group is shooting out 3 main cola's.. Curious to see where she is headed from here =)
Other then that nothing much really, still giving the same nutrients up to about 200ml per plant per day.
My biggest coco plus girl started to show 1 odd looking bright spot on one of her leaves, seems like it's nothing to worry about. The rest of them all looking and healthy.


Likes
23
Share


@Foggedaboudit
Follow
I got my work cut out for me trimming wise! Boy these are some big bushes!

Likes
36
Share


@NAS_Garden
Follow
End of Week 2 of Flowering Report:
This week, the plants continued their rapid stretch, and I've been watering them daily with no runoff.
Day 11: I reset the rockwool with 50 liters to thoroughly re-soak the medium and maintain optimal conditions. The light intensity was also increased to 75%, giving the plants more energy as they settle into the flowering stage.
R.I.P.
The Runtz plant was removed from the tent this week as it was too small and wasn't keeping up with the others. The Oreoz is also lagging behind, and if it doesn’t show better development by next week, it will likely be removed as well.
The increased light and regular watering have kept them happy and vigorous as they continue to develop!

Likes
11
Share


@Bthumb
Follow
She's starting to stack and fill out. I added a second circulation fan for the bottom of the canopy. The growdots and recharge has worked well for me so far. I am running a very user friendly setup, and have been extremely lucky so far.


Likes
20
Share


@Bongman
Follow
She is adjusted to the LED and she is loving the organic nuetrient and tea.

Likes
10
Share


@Kinghaze
Follow
In week 3 of flowering, the ladies suffered from nutrient deficiency.
Due to vacations, they had SPA water only for a week.
I immediately added nutrients to the water tank, with an EC of 1.8
I will also add green sensation starting this week.
I also defoliated them, all the affected leaves are almost all gone.

Likes
26
Share


@TheCannaProphet
Follow
-Start of Week 7-
8/30- Here we go...Week seven should end with ALL the ladies in flower, I hope! The Seedsman Zkittles #3 is the 'last girl out' having been a week behind the others. The Seedsman Gelato OG in Natures Living Soil is not as robust as its sister in the SOHUM Living Soil. They are both visually extremely similar in appearance except the one in Sohum is roughly 25% bigger!...interesting!
The ladies received Compost Tea for breakfast @ 1/2 gallon each but before I fed them I added 1 cup of Diatomaceous Earth to each pots medium which I worked into the soil by hand (this will cut the Fungus Gnats and any other undesirables in the medium to shreds! Muahaha!😈) then watered it in with the tea. The Crystal Meth #1 is showing nitrogen toxicity and possibly the Purple Lemonade #1 as the Crystal Meth #1's leaf tips are 'clawing' and she's deep green. The Purple Lemonade #1's also really dark and shes got some yellowing of a few leaves happening but no 'clawing'. I'm just going to let her eat as she's a short, stocky little biatch with some heavy, stanky buds forming!. The FastBuds genetics are appearing to be very sensitive to nutrients, more so than the Seedsman strains which haven't shown any real issues other than being slower to flower and BUSHY as hell!😁
*On a side note, I popped nine photo-period beans today- Dutch Passion Power Plant, White Widow & Meringue / Archive's Poochie Love and some Blueberry Skunk from bag seeds🙏
8/31- I moved the fans directions to avoid too much wind on the girls this morning as it was blowing pretty hard on the Crystal Meth #1 and Zkittles #1. Going to put pot elevators under all the fabric pots today to allow any water/nutrients to drain out and not be reabsorbed. Gave the Crystal Meth #1 a 2 gallon flush with straight de-chlorinated water ph'd to 6.8 to try to leech out some of the nitrogen from her. I gave the other ladies a lite water if they felt dry and tucked shade leaves on the Gelato OG's, Zkittles and Purple Lemonade's. Conditions in the 4x8 are right on point for Week 7: 64-82 deg., 65-70% RH and a 11.1 VPD
Heights as of 8/31-
FastBuds:
Purple Lemonade #1- 14"
Purple Lemonade #2- 19"
Crystal Meth #1- 24
Crystal Meth #2- 19"
Seedsman Seeds:
Gelato OG #1- 24"
Gelato OG #2- 21"
Zkittles #1- 17"
Zkittles #2- 21"
Zkittles #3- 20"
9/1- Lite water: 2 1/2 gal. de-chlorinated water ph'd to 6.7 @ 74 deg. divided evenly between all but Purple Lemonade #1 as she was still very moist and the Crystal Meth #1 which got flushed with 2 gal. of 6.4 ph de-chlorinated water @ 74 deg. I did a heavy defoliation on the Crystal Meth #2 taking off all the crappy looking shade leaves that were damaged from the ph'd imbalance she had. I also defoliated both the Seedsman Gelato OG's and Zkittles #1 & #2 as they are SO bushy and leafy they needed it to get the light down into their canopies.
9/2- The FastBuds Purple Lemonade's are displaying to vastly different phenotype's with #1 growing short, squat with THICK indica leaves and the darkest green color. #1 also is exhibiting fox tail structure on her buds which are extremely resinous already. The #2 Purple Lemonade is tall with wider node spacing, a traditional bud structure with the flowers exhibiting rich purple hues contrasted by snow white pistils...beautiful! Both ladies have an extremely pungent citrus aroma to them! The Gelato OG's are both putting their energy into the multitude of bud sites that both have and both are tall, bushy plants with multiple branches although the #2 in SOHUM Living Soil is doing slightly better than #1 in Natures Living Soil. The FastBuds Crystal Meth's are both stacking nicely although the #2 will never be the beautiful specimen her sister is I'm hoping she'll finish out with a decent yield of quality smoke. The Seedsman Zkittles #1 & #2 are both doing well, both into flower with their buds just starting their development. The #3 Zkittles is doing her best to catch up to her sisters but is still about a week behind them, just coming out of pre-flower.
Gave all the girls a drink of de-chlorinated water which had a ph of 6.7 @ 75 deg.. I evenly divided 4 gal between them, then went over all tucking leaves.
9/4- Gave all the girls 5 gal. of de-chlorinated water ph'd to 6.7 @ 74 deg. with 3 tbsp/gal of unsulphured molasses added to it and divided evenly between all. Daily branch coaxing and leaf tucking. The FastBuds ladies are all way ahead of the Seedsman girls and are well into flower. I'm guessing that the FB's will be harvested within the next 7-10 days and the Seedsman's 1-2 weeks later. All the Seedsman plants are doing fantastic! They're all bushy with good color and a ton of budsites!
9/5- Cleaned the pre-filter on the Terra-Bloom carbon filter as it was clogged. Watered all today with 4 gal de-chlorinated water ph'd to 6.6 @75 deg. with 5 ml/gal CalMag+ added. Goodbye Week 7...Here we go into the home stretch!!!

Likes
5
Share


@Rizza78
Follow
Sorry busy week. They are getting close. Just turned the lights down 20% to simulate fall for last couple weeks. Will add ice in 6 days to flush.
Likes
1
Share


Likes
Comments
Share


@MagCBD
Follow
Les plantes sont dans des conditions parfaite pour le moment pas de pépin
Il y en as une qui a un peux de retard ( en haut à gauche ) car elle n’as surment pas assez de limi


Likes
9
Share


@MMVSS
Follow
So I'm Upset That She Didn't End Up Being A Mutant! ABC AND STEALTH FIGHTER COMBINED AND IT DECIDED TO GO WITH MORE STABLE GENES 😆
Don't Worry Some Mutants Did Pop In Other Parts Of My Garden I'll Make A Journal Soon!
For Now We Will Just Pray This Is A Girl!
She Due For Her Topping Today!
She Exploded Once She Had Some Roots And I Blacked Out The Glass With Painters Tape!
So We Flip Very Very Soon!
One More Week!
This May Not Look Like Much, But Considering Her Constraints, It's A LOT! TERRA POWER!


Likes
20
Share


@eldruida_lamota
Follow
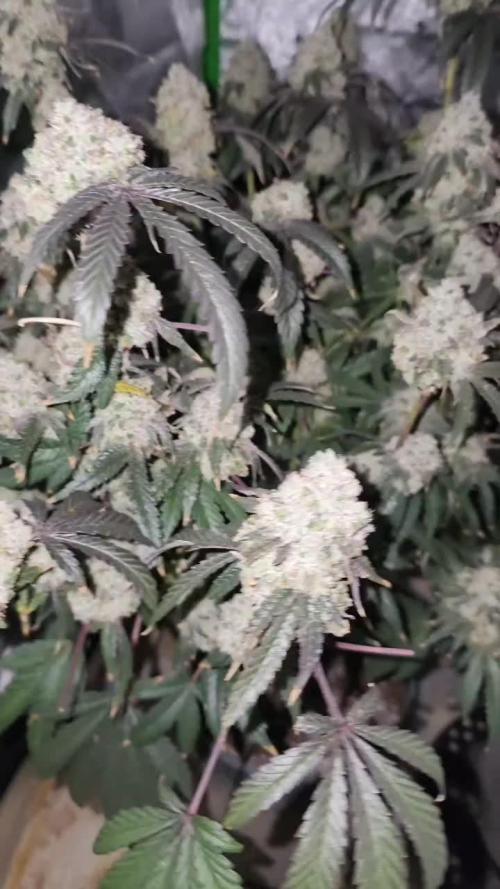
Que pasa familia, vamos a añadir la décima y última semana de floración de estas Apple Fritter de RoyalQueenSeeds, empezamos con la temperatura que la tenemos entre los 21/25 grados, la humedad está entorno al 50%, el ph está en 6.2 , el foco actualmente lo tengo encendido 12 horas y la potencia es al 75% de lo que da el foco.
Las flores han madurado bien, una flor central sospechó que igual tiene moho pero todo correcto, si está contaminado tiraremos la parte mala y si no lo está mejor.
Llevan una tricomada seria, esta variedad tiene que ser brutal para extracciones.
Estás próximas semanas que coche che y la seque ya os iré contando.
Mars hydro:
Code discount: EL420
https://www.mars-hydro.com/
Agrobeta:
https://www.agrobeta.com/agrobetatiendaonline/36-abonos-canamo
Hasta aquí todo, Buenos humos 💨💨💨
Likes
7
Share


@TegridyCal
Follow
The beautiful Purple Lemonade is growing really well, it is very large compared to the other little sisters, bushy has responded well to the topping and the first inflorescences are coming out, honestly we can't wait to see these beautiful purple fruits that promises.
Likes
17
Share


@Noob_quest
Follow
Such Bittersweet Joy
Added this week as ‘Flowering’ although technically should be harvested as I but I haven’t had a chance to weigh or anything. I will do that next week once trimmed etc.
So finally cut them down on D89, it was a beautiful day outside and it just felt right.
Although when it came to the deed itself I felt sadder than I thought I would for my girls and the time we had together.
All 6 (I’m growing another 3 different strains but not included on this diary) are now hanging to dry in the tent. Temp -18 C; Humidity-60% seems to be holding steady with no tinkering thankfully.
After the 3 days they have all dried noticeably, perhaps 4/5 more before trimming / curing.
I’ve had quite a close look at most of the harvest and as far as this noob can tell, there doesn’t seem to be any issues with mould / bud rot. Fingers remain crossed.
I did have one very profound moment this week... It happened as I was surveying the harvest hanging up for the first time.
I could feel my mindset change suddenly from the constant paranoia over their health and overcoming my impatience to “I actually have a crap load of weed”.
It was beautiful beautiful moment...
Thanks for reading. Have a great week 😊

Likes
52
Share


@Ferenc
Follow
Day 51, 4th of November 2020:
The 3rd day since the lamp switched to be 12/12...
I raised up the nutrition intake as it can be seen above only the BioBizz family 2ml/l and removed some LST because the plant remains in shape or just set a bit but nothing significant....
She looks really bushy good genetics and strech is on the way..... 😅
Nothing really to report there is crazy 2-3 weeks from now ;)
;)