By continuing to use the website or clicking Accept you consent to our cookies and personal data policy and confirm that you are at least 18 year old. For details please see Privacy Policy and Terms
Accept


Likes
10
Share


@Archieballs
Follow
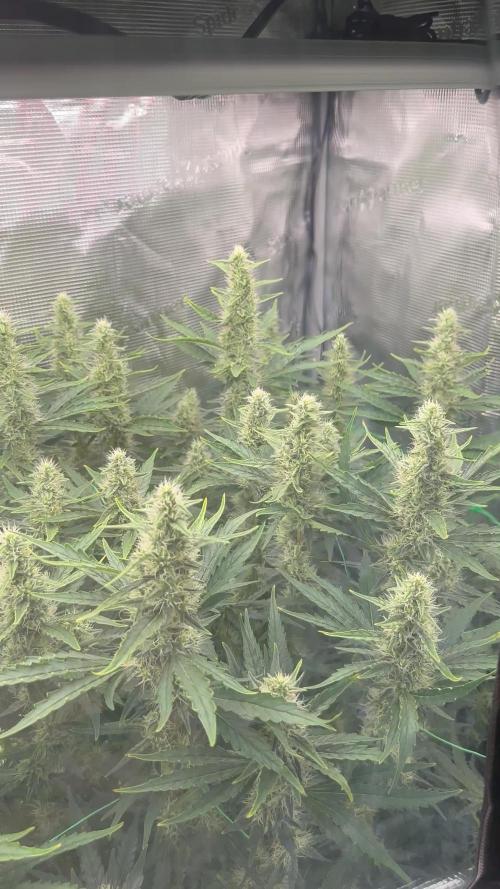
Both plants are looking good. Trichomes still not completely cloudy but giving nothing but PH water so that as soon as trichomes are right they can be harvested.

Likes
7
Share


@CannabisCultivate
Follow
Kind led lights have been raised, the X-420 is set at full spectrum with 25% UV/IR.
Upon closer inspection of the garden, I’ve found a mite problem, probably from my stupidity. Traveling between outdoor garden and indoor garden doesn’t help.
Everything has been treated with a mixture of water/neem oil / dish soap.
I will continue this until eradicated.
Growth rate is doing fantastic!

Likes
61
Share


@MadeInGermany
Follow
I have now put all 8 cuttings from the nutriculture x stream into the growtool 0.8. the best 4 cuttings stay in the ScrOG.


Likes
5
Share


@Growin_Ish
Follow
Day 8
One of these girls has an issue. I think my misting has not provided enough hydration. Trying not to overwater.
Today I watered to runoff with distilled water and a blended up aloe leaf. I would like to transplant no later than day 15. Hopefully she perks up by then. The other girl has a yellow coyledon. Since my last grow is wrapped, I dropped the light from 34" to 24" and decreased from 400w to 200w. Humidity set to 55%. We'll see.
Day 10
Light is at 24" and 25% (100w). Medium was super dry, so I spritzed it. Both plants have the droop. It's more of a downward leaf curl, so I'm going with light stress.
Lesson: one change at a time. I adjusted the light and switched up watering method at the same time so now I don't know which is causing the droop.
Day 11
Added a heaping half tsp of SimPro Veg to 17oz of spring water to clear up Nitro deficiency. Each plant got roughly 4oz. The second plant is stunted with severe leaf curl from light stress. She's off to the side in indirect lighting. Hopefully the food will wake her up.
Day 13
Transplanted the Sweet Cheese XL into the 3 gallon cloth pots instead of the 5 gallon buckets inadvertently, so these will stay inside while the others (Top Gun) go outside.
Super soil has been cooking for a few weeks. Watered in with 17oz of rain water, 2ml of CalMag, and 2ml of Fish Sh!t. A bird pooped in my rain water, I still used it🤣.
Looking forward to some rapid growth so I can top. If they don't take the transplant well, I won't top. On to week 3!💪🏾

Likes
9
Share


@Mazgoth
Follow
Little airy buds,not as fast flowering but really good colors,she needed one or two weeks for sure but i didn’t have time,I will grow it again for sure.
Likes
6
Share


@Gardens_of_Of
Follow
Green House Feeded one is enjoying life and keeps stretching. Advanced Nutrients one moved to left top corner and she seems to be doing better than last week. Light intensisty is at 90% in 50 cm distance.

Likes
16
Share


@RFarm21
Follow
Boas growmies.
Foi regada dia 15 Dezembro com 2L de água. Runoff pH: 6.3/ EC: 2.39
Aumentei muito a alimentação devido à quantidade de folhas amarelas( espero estar a fazer bem, e visto que é um solo lightmix decidi carregar um pouco mais para suprir as necessidades.)
É o meu 2 round com esta strain, embora desta vez tenha tido uma deficiência de nitrogenio por culpa minha, há uma coisa que não muda: a produção de tricomas. 😋
Likes
6
Share


@colla69
Follow
Everything going well so far, Res change on day 19 + started ScrOG
Day 21 will have the first 12h night.
Need to keep scrogging during the stretch.. but i won't be here -.-
UPDATE:
I will be going away at the and of this week for Approx 14 Days..
Day 25 [f3] I will move the plant to a bigger container so that it has enough water to survive on its own


Likes
5
Share


@Strangelet
Follow
Day 70 Almost there. Last week of feeding. Water next week. Then flush. 2 more weeks should be done.


Likes
11
Share


@JoeyGonz
Follow
My only regret is not mainling all. Everything is growing great still got couple few weeks left. But the difference in bud growth is still my topic cause there really no other issues. Buds from the bottom to the top of the mainline ones are all basically the same size. All on the same growth rate. I know due to shape and open canopy yada yada.. Fimmed, the canopy is more bushy. I mean I can see the bottom from the top, I know that's one of the main rules.. But just the leaf growth is different too... So of course buds on bottom still gonna be more popcorny. I still defoliate a little every few days.. Nothing crazy, just wanna irritate her a little. So going forward I'll only do one fimmed with my grows the rest mainlined..Just to get an idea how each one reacts to both grow techniques but still get my weight.
Likes
422
Share


@Crashoverite
Follow
Hi everyone 😁
Welcome back in another week update!
Thank you all for this amazing support on this bananas journey💚💚💚
Uploading and updating each week content on daily bassis so please revisit this diary if week not over yet.
So far all going great. Girls looking very healthy and happy. Due to my short trip had to leave my 🍌💜👊 girls unsupervised for 3 days. Was stunned when opened my cabinet on the Dec 5th. Athena stretched like crazy. Good 3 inches. She better slow down as not much roof space left for her. May tie some taller branches to netting if necessary. Introducing blooming nutes for the first time this week on December 6th at smaller dosage and on the second watering as listed.
Week 8
Dec 4 - Dec 10
Dec 5
Leaves tucking
Dec 6
Heavier selective defoliation on both girls. Athena fully lolipopped and Xena at 75%. Watered with 8 ltr beetwen both with perfect runoofs PH 6.4. Girls were very thirsty 🤤
Dec 7-8
Just enjoying how my girls developing. Frost has landed and they are start showing colours. All is looking great.
Dec 9
Second watering for this week 7 ltr beetwen both. Runoffs PH 6.4
Even with so much difrence in size of my 🍌💜👊 girls it seems that they are drinking my juice almost equally.
Dec 10
Applied selective defoliation and tied 3 tallest branches of Athena to netting to avoid any potential burns on these beautiful baby colas.
It's the end of the week!
Thank you all again for such a great support, all the likes, dm's, comments and follows 💚💜💚💜
Stay tuned for coming week update 😁✌️💚

Likes
11
Share


@CocoLogic
Follow
Sept 20th: (F34)
Fertigation once a day with NEW recipe (1300 EC 6.1 PH) watered until 10-20% run-off
Sept 21th: (F35)
Fertigation once a day with same recipe (1300 EC 6.1 PH) watered until 10-20% run-off
Sept 22th: (F36)
Fertigation once a day with same recipe (1300 EC 6.1 PH) watered until 10-20% run-off
Sept 23th: (F37)
Fertigation once a day with same recipe (1300 EC 6.1 PH) watered until 10-20% run-off
Sept 24th: (F38)
Fertigation once a day with same recipe (1300 EC 6.1 PH) watered until 10-20% run-off
Sept 25th: (F39)
Fertigation once a day with same recipe (1300 EC 6.1 PH) watered until 10-20% run-off
Sept 26th: (F40)
Fertigation once a day with same recipe (1300 EC 6.1 PH) watered until 10-20% run-off


Likes
38
Share


@PapaNugs
Follow
Another good week generally speaking. The girls are drinking a lot but nothing crazy. Things are wrapping up here in this tent shortly.
This Gorilla Cookie will go the longest out of the group and will push everyone else out. She looks good but no smell that I can tell
Dimmed to 80%
Here are the lights details:
Medic Grow Mini Sun-2 150W LED
Model: MN150-022
Spectrum mode: V1
Efficacy: 2.8 umol/J
Thanks for stopping by!
You can find the light on Grow Diaries:
https://growdiaries.woodroom.tel/grow-lights/medic-grow/mini-sun-2-150-watts
You can find the light on Medic Grow's website:
https://medicgrow.com/
Likes
5
Share


@Budzalot
Follow
Day 31. Trimmed 2 times not as bushy as led tent. Think I'm going to flip to flower next feed on wedsday
Likes
41
Share


@MR_PUUF_K93
Follow
Las Banana Cream 🍌 estan enormes!!
Los puntitos que empezaron a salir en una de ellas me han dicho que puede ser carencia de calcio.
Las Runtz que salieron después tuve que germinar dos por fallo de las semillas esta muy bien creciendo poco a poco y la que es de su día avanzando y comiendo 😎🤟🏼
Las ZKITLLEZ mutantes que salieron con un cotiledón han aguantado bien y estáN como nunca! La que salio con dos cotiledones SUPER ANCHA!! ME ENCANTA💪🏼🌴😎
ESTA SEMANA YA LAS CAMBIARÉ A 12/12 🌸🌸🌸

Processing
Likes
2
Share


@lupitalolita
Follow
Week 3 (April 12-18th)
At this point I was using water and a small amount of coffee grounds. Spent a lot of time talking and singing to the plant. The leaves got bigger and formed quickly this week. If you look at the different days you can clearly see how big the plant was getting.

Likes
17
Share


@masterofsmeagol
Follow
8/23 I WATERED THE NATURAL MK ULTRA AND THE 10TH PLANET IN THE BACK WITH A GALLON AND THE TWO TENS SPLIT A GALLON. It's hotter today and the wind is picking up. I wish I had gotten rid of that plant when I thought to. Oh well. I'm going to have to bite the bullet and treat things. Smell is increases as well as flower size. However I'm noticing more leaves that are yellowing and falling off. Smell has intensified. The special kush in late flower doesn't seem to be producing trichomes like it should. Or maybe it's still early. I see some but by this time I would think it would be frosty as hell! It's rained like once this summer. I've put tons of work into defoliating. I'm not sure if I'll try a controlled spray trying to avoid buds or if I should use a sponge and just hit every leaf. At least I'm seeing that the buds are still expanding and smelling despite these invisible Bastards. It's not like I see them. Even my traps only caught like one. I'll update as I go.
EDIT: WATERED THE TENTH PLANET AND THE LATE SOECIAL KUSH 1 GAL. PLAN ON FEEDING TOMORROW. I DID A SHIT TON OF DEFOLIATION. I DONT SEE ADULT THRIPS BUT I SEE THE EGGS AND SHIT IN THE CREVICE AND SOMETHING IS COMING AND EARING SMALL LOWER FOLIAGE. I RIPPED TWO INTERIOR BRANCHES OFF THE PLANTS I TREATED BEFORE WITH CITRIC ACID BECAUSE I FOUND A COUPLE STOPS OF MOLD ON THE STEM. AFTER RESEARCHING THRIPS WITH A.I. UNTIL IT LITERALLY CHANGED PROTOVAL AND STOPPED HELPING ME SAYING IT DANT HELP CULT8VATE CANNABIS AFTER GIVING ME SEVERAL DIFFERENT INSTRUCTIONS AND OPTIONS. I SCREENSHOTTED THEM THOUGH. I USED THE SAME MIXTURE OF CITRIC ACID AMD DAWN ONLY HALF STRENGTH AND HIT THE 10TH PLANET AND PINK KUSH THAT ARE PATIENT ZERO. THEN I TOOK A SPONGE AND EITHER DEFOLIATED OR WIPED THE LEAVES WITH A SPONGE AND SAME CONCOTION ON THE SPECIAL KUSH IN THE TEN. I DEFOLIATED MORE AND THEN "SPOT TREATED" A FEW LEAVES ON A BOTTOM BRANCH OF THE 10TH PLANET WITH MITE X. I'M WAITING UNTIL THE MORNING TO SEE THE RESULTS AND BEFORE I MOVE FORWARD. I HAVE ORGANOCIDE BEE SAFE AND I KNOW IT WORKS GOOD BUT IT SMELLS LIKE SHIT. IM HOPING ILL FIGURE THIS OUT.
8/24 Didn't have time to do a video or take any pictures. I pit a lot of work in the garden yesterday. I removed a couple small branches that had mold on the stem. If I had listened to my intuition and moved that plant (instead of listening to my dad) I probably could've negated this mess. Windy as hell yesterday. Maybe that's why I don't see mich damage from the thrips. The runt in the 50 has some silver ingredients on it. I'm considering using spinosad. Those are way earlier in flower and that shit WORKS. WATERED TODAY;BIG MK ULTRA 1.5, THREE IN THE BACK ROW, CHEMDOG AND TENTH PLANET ALL GOT 1 GALLON. THE TWO TENS SPLIT A GALLON. I THEN FED EVERYTHING WITH A QUART OF FOOD. I'll keep an eye out on the dosage and see what the can handle. I left out plant doctor as I'm dealing with thrips. Took a leaf that looked like sep off the pink kush in the 50 with half used soil. I didn't have much time to look around but I will when I get back and I'll put some vids/pics up. The plants that I treated with citric acid looked no worse for the wear and actually BETTER than they hadcthe day before. The other 10th planet and the Pink kusg in the ten are the worst. If I can't beat it I may junk them. I'm planning on treatingvtge plants I didn't yesterday tonight. I may use a different treatment I'm not sure.
EDIT: Went back over and took a few pics and a video. I defoliated a SHIT TON of leaves. I can just tell the ones that the thrips have been sucking and laying eggs. It's windy as hell. Plants are going crazy. I'm wondering if the wind will hurt the thrips. Maybe I should've just stood with the wind at my back and throw a buNch of D.E. in the air and have it coat the plants. I'm scared of using d.e. because it absorbs so much water. It's like 80%! The year I had fusarium I put a bunch of d.e. on the soil and it retained water like a mofo. The plants I treated showed no I'll effects. I'm th8nkobg I'm going to remove patient zero and isolate it. And I'm considering using spinosad on the pink kush. What would you do? If you had to use something in the middle of flower or loss your crop which would you choose? I'll probably just use citric acid or the rubbing alcohol. I don't know. I'll keep it updated.
UPDATE: WENT OVER AROUND FIVE AND DEFOLIATED. I CHECKED THE PLANTS I TREATED AND THE ONE IN THE TEN HAD A FEW LEAVES THAT LOOKED LIKE SEP. ITS EXTREMELY WINDY SO I DECIDED AGAINST SPRAYING TONIGHT. I LOOKED ONLINE FOR PREDATORS BUT IT APPEARS TO BE TO LATE OR EXPENSIVE. I MAY LOOK FOR AN OVERNIGHT SHIPMEBT OF LOST COAST PLANT THERAPY OR SOMETHING BUT WILL THAT WORK SUBSTANTIALLY BETTER THAN A DIY VERSION? ILL EITHER ORDER SOMETHING TONIGHT OR PICK UP THE LAST FEW INGREDIENTS I NEED TOMORROW. LOOKING THROUGH THE GARDEN THOUGH EVERYTHING LOOKS GREAT! I WISH THE TRICOMES WOULD DEVELOP A LITTLE FASTER ON THE EARLY SPECIAL KUSH BUT IT IS WHAT IT IS. THESE GIRLS HAVE BEEN THROUGH HELL AND BACK ARE REAL TROOPERS.
8/25 I thought about putting the late flowering special kush in the barn because it looks cloudy and we are supposed to get rain. I chose to wait until I got back but it started raining already. It's not raining right now but it will probably start again. I'm just worried because I haven't staked the branches. It's a strong plant though. I'll check on her when I get back. I'm looking for some Castille soap this morning and the rest of the things to make a diy lost coast plant therapy. The plants look good though and the flowers are really stacking up. I don't see that silvery shit so it doesn't look like it's spreading real fast. The pink kush is in early flower and I'm considering spinosad for them. They have a long ways to go. I'm not sure. I may just use the diy spray. I'm not sure.
EDIT: WENT OVER AFTER SUN DOWN AND MIXED UP THE DIY GREEN CLEANER/LCPT. I USED RUBBER GLOVES AND TREATED THE HUGE MK ULTRA, THE TWO TENS AND THE REVEG 10TH PLANET. I ONLY TREATED FOUR PLANTS. I HAD A PRETTY GOOD METHOD BUT IT WAS SLOW. I PUT THE LEAF BETWEEN MY GLOVED HAND AND SPRAYED THAN RAN THE LEAF THROUGH MY FINGERS TO AVOID FLOWER. ON PLANTS WITH SMALLER FLOWERS I WAS ABLE TO JUST FOLD THE LEAVES UPWARD AND GET THE BOTTOMS. ILL CHECK AND SEE HOW IT WORKED IN THE MORNING AND GO FROM THERE. WE GOT SOME GOOD RAIN TODAY. IM WORRIED ABOUT MOLD THOUGH. THATS WHY IM HESITANT TO SPRAY BUT SOME FLOWER IS BETTER THAN NONE.
8/26 IT POURED last night. Sheet rain. The storm had passed and it was like a 14% chance of rain at night. Oh well. The girls seemed to have loved it! The looked great this morning. I shook everything off and got soaked in the process. Inspected for damage and luckily didn't find any. I'm feeling optimistic about my diy green cleaner lcpt. I'm seriously considering spunosad on the pink kush as it's earlier in flower and I think it could handle it. I might just use this spray first and see how it goes. Buds are swelling and seem bigger everyday. I looked at some old diaries and I can see ive had thrips before. I also have some insect (ear wigs or pillars) that target lower branches and kinda lollipop them. I hope it's not earwigs because I've had bas luck dealing with them. I'll have to check at night.
EDIT: WENT OVER AROUND THREE TO CHECK THINGS OUT. PLANTS LOVED THAT RAIN AND SEEMED TO LOVE THE TREATMENT AS WELL. THAT RAIN AND WIND DEFINATELY DISRUPTED THE THRIPS. THE SPRAY I USED SHOULD KILL ON CONTACT AND SUFFOCATE EGGS AND LARVAE. PLANTS LOOK THE HAPPIEST IVE SEEN THEM IN A WHILE. I CANT TREAT THE OTHER PLANTS TONIGHT BUT I SHOULD HAVE TIME TOMORROW NIGHT TO GET WHAT I MISSED. IF ITS NECESSARY. ILL KEEP AN EYE OUT.
8/27 Rained some last night. I had to shake everything off this morning. Looking back through previous diaries I've HAD thrips before and couldn't identify it and made it to harvest so I think I'll be OK. BUDS arecrcploding in growth and the smell is turning into tjat pungent aroma we all love. The early special kush smells amazing. I think the rain and wind helped with the thrips. I'll do another application and get the plants I missed. That pink kush in the ten looks pretty rough. I probably would've been better off to ditch it earlier it's been treated now so I'll keep an eye on it amd I may just cut it. If I put in the work they would be fine. At least I hope so. We'll see. I'll update as I go.
8/28 Had to shake the plants off this morning. Must've rained last night. I'm not used to that since we've been in such a drought. I'll check later but I'll probably hold off as most are still heavy. I probably should selectively water the thirsty ones but I think tjey can make it. The rain (or the treatment) has greatly helped cut down on thrip population. Nights are in the 40's so it's not the most hospitable environment for them. I'm still keeping an eye out and will be applying another treatment at some point. I didn't do a video this morning as it was kinda dark. I'll check them again when I get back. It's suppised to rain tomorrow all day. I think I might bring the furyhest special kush in the barn under lights for the day. That way those huge buds don't get soaked. I'll play it by ear.

