


By continuing to use the website or clicking Accept you consent to our cookies and personal data policy and confirm that you are at least 18 year old. For details please see Privacy Policy and Terms
Accept
Likes
Comments
Share


@Bingbings_garden
Follow
Hello growers
Lost the White widow to nanas, probably the 4th herm from 10 WW seeds i got.
Others still looking good, feeding in nutrients this week. 3 part mix with calmag solution. 2ml of each into 6L of water. 580-600 PPM at 6.5ph. Feeding in 500ml every 3 days.
Special queen in veg still will start setting up the net soon. Wont flip until the end of the month

Likes
31
Share


@AcidBurn_40
Follow
02.01.25
VD#33
Frohes neues Jahr ein wunderschönen Guten Abend ✌️
Der Frozen Black Cherry geht es prächtig, Sie hat das Toppen super weg gesteckt.
Habe heute noch mal ein paar Blätter entfernt damit die unten liegenden Seitentriebe genügend Licht bekommen.
Ich möchte später alle Triebe wenn möglich auf einer Höhe haben somit ist die Ausleuchtung besser verteilt.
Beim heutigen Gießen gab es Nährstoffe, das auch alles vorhanden ist um die Lady zu befriedigen.
So bin ich sehr zufrieden mit der Frozen Black Cherry Fem. von Anesia Seeds, wir sind noch nicht am Ende es kommt noch
einiges wir können gespannt sein.
Ich danke euch vielmals für den Support im letzten Jahr, bleibt weiter dran es wird ein schönes Jahr 25 für alle viel Gesundheit, Glück und Erfolg stay High.
Mögen all eure Ladys Gesund und prächtig wachsen und euch mit schmackhaften Stuff versorgen 👌🍀
■■■■■■■■■■■■■■■■■■■■■■■■■
02.01.25 VD#33
Happy New Year a wonderful good evening ✌️
The Frozen Black Cherry is doing splendidly, it has taken the topping really well.
I removed a few more leaves today so that the side shoots at the bottom get enough light.
I want to have all the shoots at the same height later on if possible so that the light is better distributed.
Today's watering included nutrients so that everything is there to satisfy the lady.
So I'm very happy with the Frozen Black Cherry Fem. from Anesia Seeds, we're not at the end yet, there's still a lot to come.
we can be curious.
Thank you very much for your support last year, stay tuned it will be a nice year 25 for all good health, happiness and success stay high.
May all your ladies grow healthy and splendid and provide you with tasty stuff 👌🍀

Likes
15
Share


@Waveform
Follow
Waiting for first signs of life …
While we are, I thought I’d give you a short explanation on the software’s graphics in case you did not follow my first diary.
The one to the upper left, as its headline says, is the temperature graph. Most important line is the red one, showing the leaf temperature measured with an infrared temperature sensor. As there are no leaves yet, it is pointed towards one of the pot’s wall at soil level. Air temperature from a sensor that usually hangs around somewhere around top level is violet, and the grey line is the outside temperature close to the tent, helping the software to determine if a main blower action will effectively lower temperature.
As I learned from the first grow a plant day that corresponds to the natural day can cause enormous gaps both to temperature and humidity, I inverted the plant day now, starting their night at 11 a.m. So after the first day temperature will only vary around 1.5 °C, which is of course due to the low light intensity too.
Humidity graph on the upper right is quite crowded. Main line is the blue one, tent air humidity, which on this first day was between excellent 65 – 70% most of the time. For the moment humidifier is electrically disabled. There is quite some excess humidity on the tent floor and no reason to push this any further. Outside air humidity is grey again and taken from the same outside sensor that reports outside temperature.
The soil humidity sensors are simple analogue capacitive sensors which have their flaws. I am interpolating their measurements to have a somewhat smoother reading, but as you can see from the turquoise humidifier reservoir reading (in legend named as plant soil hum 1), they can get confused when humidity is very high and start to report random numbers for some time.
The most important graph for all growing stages is the lower left one, where the pink line meaning plant VPD should be inside the green optimum range for somewhat perfect conditions. This cannot be attained all of the time – dehumidifying isn’t as easy as humidifying –, but software tries its best to do so. Outside VPD is grey again.
The last graph is more for amusement than anything else. The light intensity sensor is hard to position correctly, and everything you see about illumination and DLI (orange and green, plus grey for the accumulated 24 h DLI) should be taken with some spoonful of salt. Any resemblance to real world professional instrument readings can be considered purely coincidental.
The violet line is the CO2 reading from such a sensor, and you can see that its tiny peaks correspond to even tinier black peaks at the bottom of the graph, reading TVOC values which in this case, once they will be more than possible measurement irregularities, can be interpreted as smell.
-------
End of week 1:
All seeds germinated. I wasn’t at home most of the time, and it turned out using the humidity sensor to monitor the humidifier’s tank wasn’t good for the stability of the system. Arduino crashed, so there are no pictures yet and no graphs to show. I have the feeling light was a bit low as the seedlings grew a bit tall, but with lights now up to 20% I guess this problem is fixed.
More tomorrow when I have some more data to share.
Even more end of week 1 (I extended this week to 9 days as I cannot tell when the seedlings started to show):
Lights are at 40%, meaning 40 W in total. No reason to give them new water until next week. As some flies showed up from the BioBizz soil, I added 2 yellow cards. So far, everything in normal ranges. I’ll switch the control to grow phase soon which will raise the VPD slightly by 0.5 kPa.
It’s interesting to see the CO2 level started to climb by 50% during their last night and has not come down to baseline afterwards. I restarted the app to check if the sensor had lost its calibration, but it still sits at around 660 ppm now.

Likes
207
Share


@DogDoctorOfficial
Follow
Last week wen smooth as it is supposed to go, girls are loving the conditions so its time to start feedings, for this run I’m using all in one pallets as food and just watering with Regulator ( a must in my water) and some microbiological help and iff and wen needed, only them i will complement extra N, P or K as needed.
Caps off to VIPARSPECTRA , so far so great 🌱🙏💚
All going smooth, not much to say, today I changed the gopro setup to a top view , lets see with one stays better on the time-lapse , fell free to comment and leave your opinion, and if you use gopro or other camera to do your time-lapses, i love to learn about others ideas and ways to do things 💚💚💚
You can check out last week timelapse here https://growdiaries.woodroom.tel/diaries/126067-grow-journal-by-dogdoctor and if you in to timelapse stuff i have just recently uploaded the Magnum auto Timelapse just for fun here https://growdiaries.woodroom.tel/diaries/105893-grow-journal-by-dogdoctor , hope you guys enjoy it 💚💚💚 growers love and one more week up we go 🙏🌱💚
And with enormous honor and pleasure that i start collaborating with Zamnezia and Viparspectra
For this run i will have the pleasure of growing some Runtz genetics from Zamnezia seeds that they wore kind enough to send me for test and review 🙏🙏🙏💚💚💚🙏🙏🙏 and for the testing and reviewing i was blessed with the VIPARSPECTRA model P2000💚💚💚🙏🙏🙏 they wore amazing and send me this LED light for me to do some testing and some reviews. Special thanks to Zamnezia and to Viparspectra for this opportunity, lets make magic together 💚💚💚🙏🙏🙏
All i grow is medicine for myself, for me and for my best friend with is me 😆 nothing to sell, so don’t even ask 😅💚💚💚
All info and full product details can be find in can find @
https://viparspectra.eu/collections/grow-lights DISCOUNT CODE - DOGDOCTOR
https://www.zamnesia.com DISCOUNT CODE - GROWITGD
https://aptus-holland.com/
More info and updates @
https://growdiaries.woodroom.tel/grower/dogdoctor
https://instagram.com/dogdoctorofficial
https://youtube.com/channel/UCR7ta4DKLFMg2xxTMr2cpIg
💚💚💚Growers love to you all 💚💚💚

Likes
20
Share


@QueenOfTheKind
Follow
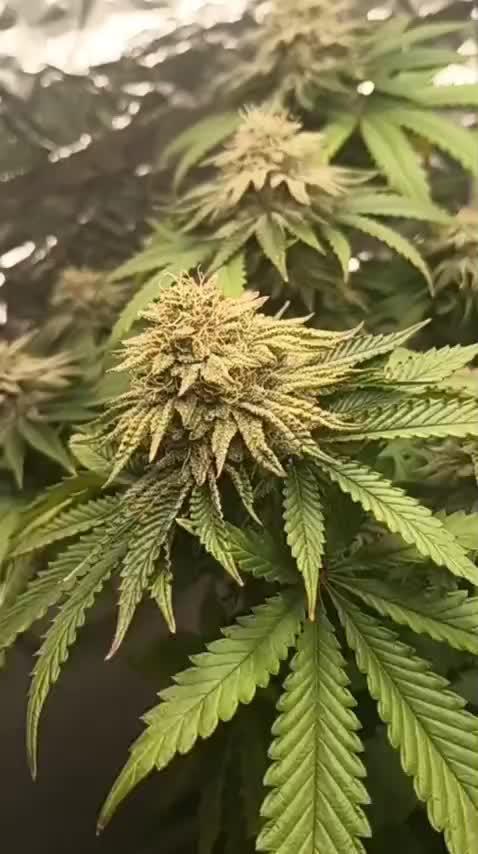
Overall great strain to grow. She looks and smells amazing and her buds are big, dense and full of trichomes. I’m always impressed by the quality of genetics from this company.

Likes
19
Share


@LittleBigTrees
Follow
Taking the top fan leaves so the sides can catch up to the main stem.
Will repot next week.


Likes
39
Share


@Secretflower
Follow
Hello my friends,
...May 16, 2022....Day N°64...
My three Automatic White Banana are awesome, smells very good.
I feed them with the complete stuff of the Green Buzz Liquids nutrients from Germany.
They are under a Viparspectra P4000 at 80% of power and at 40cm of the canopy.
www.exoticseed.com
www.viparsprectra.com
www.gbliquids.com
15% discount code : secretflower
That's all for now my friends.
Thank you very much for passing by.
Wish you the best with your green projects, peace.
See you soon 💨💨💨

Likes
15
Share


@AlienScrOG
Follow
The final phase... Lot of wrong and lot of broken... All job is is gorgeous.. end I love teach by my wrong Everybody see my diaries I love you tell me a little comment about... I like received teach to experience people...... By my now grow call purple lush and ayawascha purple barney's seeds... My Las is only a 205watt effective... I wrong to not buy another 200w... È and the harvest is more little than 400w... But after in 2 time after I want yield 100gram?.... Whats you think about the max yield?

Likes
58
Share


@AsNoriu
Follow
Day 97. Fast Buds Thank You !!!!
Day 109. Girl is in jars and waiting for Christmas ;)))
Happy Growing !


Likes
6
Share


@nonick123
Follow
Día 30 (10/06) Sigue creciendo. Tendrá un tamaño medio me parece
Día 31 (11/06) Sigue el stretch y empieza a florecer
Día 32 (12/06) Come on! Tendremos una planta más o menos decente
Las Autos deben germinar en Light Mix antes de que las raíces lleguen al Super Soil! (30% Light Mix - 70% SuperSoil)
Día 33 (13/06) Sigue creciendo
Día 34 (14/06) Riego 150 ml de H20 pH 6,5
Día 35 (15/06) Se ha quedado una planta de tamaño medio. Algo saldrá
Día 36 (16/06) 500 ml de Té de Floración con Healthy Harvest 8 ml/L + Insect Frass 16 ml/L + Melaza 1 ml/L
💦Nutrients by Lurpe Solutions - www.lurpenaturalsolutions.com
🌱Substrate PRO-MIX HP BACILLUS + MYCORRHIZAE - www.pthorticulture.com/en/products/pro-mix-hp-biostimulant-plus-mycorrhizae


Likes
Comments
Share

@KurtThePlantGuru
Follow
This is actually Week 6, little delayed on this diary.
Grease Monkey is performing beautifully, noticing first signs of fade. Was going to give one more feed before I start flushing, as it could definnetly still use some nutrients!
Buds are bulking incredibly, fat golf ball sized nugs, that real of rubber tires, fastfood/garlic burger, with notes of an oil spill or diesel spill.
Super intoxicating aroma, never smelled anything like this before
Packing on frost amazing, bulking up super well. If it wasn't for the Herm, would've been my best grow yet!
Likes
13
Share


@CanarianGrow92
Follow
Week 2 flowering for the girls!
We already see the streching, some plants are a little smaller but i will put a support under the pot if they continue smaller, we want to have a quite even canopy.
We also removed some lower branches.

Likes
145
Share


@Salokin
Follow
Hello Growmies,
The final chapter of this incredible journey has unfolded, and it's time to share the bountiful harvest and reflections on the entire cultivation process. Trimming the plant was a joy, and with gentle fingers, I removed all the large fan leaves. The precision in this process revealed the true beauty of the buds, setting the stage for a smooth harvest. With care and gratitude, the plant was chopped, and the buds were hung to dry. The anticipation for what lies ahead only adds to the sense of accomplishment. The wet weight, excluding fan leaves, stands at an impressive 782 grams. The buds are massive, a testament to the efficacy of the nutrients used, particularly the Power Buds. The name seems apt, as the result is a collection of sticky, dense buds with subtle lemon notes and sweet pungent undertones. In the final moments, the plant unveiled some delightful purple hues. While I wish I could have allowed them to intensify further, it's a reminder that each grow is a learning experience. In hindsight, a slightly longer fading period would have accentuated those beautiful colors. We live and learn, and that's the essence of this journey.
A heartfelt thank you to Plagron and Zamnesia for hosting this amazing contest. The quality of the products and the support throughout the journey have been invaluable.
As this chapter concludes, I'm left with a sense of fulfillment and gratitude for the collective experience we've shared. The plant's growth, from seed to harvest, has been a testament to the art and science of cultivation.
Feel free to check out my other adventures in my bigger environments, until then...happy growing!
Stay Lifted
Salokin
Likes
3
Share


@Cultiv8or
Follow
Brought them inside this week and borrowed a Dehumidifyer. I’ve been able to get RH , 45-55 now and the resin production has already started increasing


Processing
Likes
23
Share


@Boos_Buds88
Follow
Well it got really cold this week, from 23°c down to 11°c, it was the perfect conditions to get my plants acclimated on the windowsill for the great outdoors 😊 i apologise i seem to be missing some photos but the girls were all topped at the 5th node to give them a stronger structure for the battling winds to come later in the year. When i got to site i mixed my own super soil, compost, coco & perlite with some additives, lime, potash, blood, bone & fish mix, keeping things 100% organic for the best flavours 👌 the girls are now out into their new homes for the next 6 months 😊 i hope you enjoy the tour of the garden 💚
Likes
32
Share


@ArtisticGrown
Follow
Weeks been going well cruising a long steady growth!! Making sure I keep that fresh air in the tent, starting to really smell that dankness! Headed into week 5 of flower. By week 6 I’ll know if I need to start flushing my plants or wait another week. Looking to harvest around week 10 of flower. We shall see! Love this journey the plant in the front left in the video is a bit behind the others but she’s doing well. Been trying to figure out what Dan leaves I can trim without shocking the plant. But all is well! 🔥
Likes
1
Share


@BudGardener420
Follow
Hallo liebe Grow-Community!
Ich freue mich, euch heute an meinem neuen Grow-Projekt teilhaben zu lassen!
Nach einiger Vorbereitung und mit viel Vorfreude habe ich mich entschieden, meine Reise mit GreenHouse Seeds NL5xHAZExKALIMIST zu dokumentieren. Dabei möchte ich nicht nur meine Fortschritte festhalten, sondern auch von eurer Erfahrung und euren Tipps profitieren.
Es ist meine 1. Erfahrung, welche ich im hydropoischen Anbau sammeln darf.
In diesem Report werde ich regelmäßig über die Entwicklung meiner Pflanzen berichten, angefangen bei der Keimung über die vegetative Phase bis hin zur Blüte. Ich bin gespannt, wie sich alles entwickeln wird, und hoffe, dass wir gemeinsam viel lernen und uns austauschen können.
Über Feedback, Ratschläge und konstruktive Anregungen freue ich mich immer – schließlich macht das gemeinsame Growen noch mehr Spaß! Also, lasst uns starten und gemeinsam in diese spannende Reise eintauchen.
Vielen Dank schon mal für eure Unterstützung und viel Spaß beim Lesen 🌱
In deiner ersten Woche der Cannabis-Keimlingsphase habe ich die Samen in Steinwolle gekeimt, die mit pH-reguliertem Wasser vorbereitet wurde.
1. Vorbereitung der Steinwolle:
Die Steinwolle wurde vor dem Einpflanzen der Samen mit Wasser getränkt, dessen pH-Wert auf etwa 5,5 bis 6,0 eingestellt wurde. Dies ist der optimale pH-Bereich für die Nährstoffaufnahme in der frühen Wachstumsphase.
2. Keimung:
Die Cannabis-Samen wurden in die vorbereitete Steinwolle gelegt und leicht bedeckt. Die Steinwolle hält die Feuchtigkeit gut, was für die Keimung entscheidend ist. Die Samen benötigen eine warme und feuchte Umgebung, um zu keimen, idealerweise bei Temperaturen zwischen 22°C und 25°C.
3. Erste Anzeichen des Wachstums:
Innerhalb von 24 bis 72 Stunden sollten die Samen zu keimen beginnen. Die ersten Anzeichen sind die Öffnung der Samenschale und das Erscheinen der Keimwurzel (Radikel).
4. Entwicklung der Keimblätter:
Nachdem die Keimwurzel sich in der Steinwolle verankert hat, beginnen sich die Keimblätter (Cotyledonen) zu entwickeln. Diese sind die ersten Blätter, die aus dem Samen sprießen und sind für die Photosynthese in dieser frühen Phase verantwortlich.
5. Licht und Feuchtigkeit:
Während dieser Phase ist es wichtig, dass die Keimlinge ausreichend Licht erhalten, jedoch nicht zu intensiv, um Verbrennungen zu vermeiden. Eine dimmbare LED_Lampe - um eine geringere Intensität einzustellen - ist ideal. Die Steinwolle sollte feucht, aber nicht nass gehalten werden, um Schimmelbildung zu vermeiden.
6. Überwachung:
In dieser Woche solltest du die Keimlinge täglich überwachen, um sicherzustellen, dass sie nicht austrocknen und dass keine Anzeichen von Schimmel oder Krankheiten auftreten.
Am Ende der ersten Woche sollten deine Cannabis-Keimlinge gut verwurzelt sein und die ersten echten Blätter beginnen sich zu entwickeln, was den Übergang in die nächste Wachstumsphase markiert.
Hello dear grow community!
I am happy to share my new grow project with you today!
After some preparation and with a lot of anticipation, I have decided to document my journey with GreenHouse Seeds NL5xHAZExKALIMIST. I not only want to record my progress, but also benefit from your experience and your tips.
It is my first experience in hydroponic cultivation.
In this report, I will regularly report on the development of my plants, starting with germination, through the vegetative phase, and finally flowering. I am excited to see how everything will develop and hope that we can learn a lot together and exchange ideas.
I am always happy to receive feedback, advice and constructive suggestions - after all, growing together is even more fun! So, let's get started and immerse ourselves in this exciting journey together.
Thank you for your support and happy reading 🌱
In your first week of the cannabis seedling phase, I germinated the seeds in rockwool that was prepared with pH-regulated water.
1. Preparation of the rockwool:
The rockwool was soaked with water before planting the seeds, the pH of which was adjusted to around 5.5 to 6.0. This is the optimal pH range for nutrient absorption in the early growth phase.
2. Germination:
The cannabis seeds were placed in the prepared rockwool and lightly covered. The rockwool holds moisture well, which is crucial for germination. The seeds need a warm and humid environment to germinate, ideally at temperatures between 22°C and 25°C.
3. First signs of growth:
Within 24 to 72 hours, the seeds should start to germinate. The first signs are the opening of the seed coat and the appearance of the radicle.
4. Development of the cotyledons:
After the radicle has anchored itself in the rockwool, the cotyledons begin to develop. These are the first leaves to sprout from the seed and are responsible for photosynthesis in this early phase.
5. Light and humidity:
During this phase it is important that the seedlings receive sufficient light, but not too intense to avoid burns. A dimmable LED lamp - to set a lower intensity - is ideal. The rockwool should be kept moist but not wet to avoid mold growth.
6. Monitoring:
During this week you should monitor the seedlings daily to make sure they do not dry out and that no signs of mold or disease appear.
By the end of the first week, your cannabis seedlings should be well rooted and the first true leaves should begin to develop, marking the transition to the next growth phase.
Thx


