


By continuing to use the website or clicking Accept you consent to our cookies and personal data policy and confirm that you are at least 18 year old. For details please see Privacy Policy and Terms
Accept
Likes
Comments
Share


@JeyGanesha
Follow
Seconda settimana di veg...la runtz che è nata prima dell'altra sta mutando in modo strano. Non avevo mai visto spostarsi il centro apicale..sembra che si è piegata e l'apicale sta crescendo come sé fosse un ramo laterale 😂🤣🤦💪

Likes
6
Share


@Magical_Surgeon
Follow
After you found some good sector and clone it you let the mycelium grow and fill almost all the petri dish like I did last week.
So now you're ready to move forward.
Making grain spawn!🍄🍄
For grain you can use Organic Rye Berries, but you can also get away with wheat berries, or brown rice or even corn kernels(which I used myself) !
And you'll need some mason jars or honestly I used some jars that I had home just clean them very well and sterilise before using
Making a grain spawn can be broken down into 6 easy steps.
🍄Hydrate Grain By Soaking
🍄Make Specialized Lids
🍄Simmer, Drain and Dry The Grain
🍄Sterilize
🍄Put your agar in the jar
🍄Colonize
🍄Soak the grain by placing it in a bucket, covering in water, and leaving it for 12 -24 hours. Easy.
🍄Drill 1 hole on top of the lid. Right in the center and cover with a small dab of high temperature silicone sealant, and leave it overnight to dry. And your jars are done. There other diff types for different methods like liquid culture etc. But I'm just going roughly through what Ive done.
🍄The next step is to simmer the grains on the stove. This will thoroughly hydrate the grains, and will soften them to make them easier for the mushroom mycelium to consume.
Cook soaked grain on the stove for about 15 minutes. You don’t want to cook it too long, because eventually all the grain will crack and you’ll get some mushy grain spawn. We don't want that. 🧐After the grains have simmered on a low boil, you’ll need to drain them off. What I did is I drop them in the sink with the drain cover on. The grains will drain over an hour or so, after which you can go ahead and fill your jars.
🍄Once your jars are filled, they need to be sterilised.This kills off all the other nasty contaminants in the grain cover the lids in tinfoil (to prevent water dripping into the lid) and then just pressure sterilise them for about 90 minutes at 15 psi.
🍄After that let them cool down. Get your SAB, wipe down the walls with some alcohol wipes and place the jars inside. And wait untill they will be warm to the touch... not hot and painful 😤patience is key. Bring in your plates that had been stored by you in a dark place. And what u have to do is sterilise your scalpel and just accurately and efficiently decide your mycelium into about 10 pieces and quickly place them in your jar. And complete for every jar u make. You have to be very quick. The more you keep you're jar and your agar plates lids open the more cans they will get contaminated. There certain technics you can see online..
🍄Ones you're done close all your jars lids tight and Jake your jar so the mycelium pieces will mix around the jar and place them in the dark place to colonize. And just keep waiting... 😅 Untill the mycelium will conquer your grain. Keep your eyes on the jars, any weird smells or colour during the waiting time.. because that would mean you got a contamination going on. Oh yeah and when about 55% of your jar is filled with mycilium shake the sh*t out of it so it will break the mycilium inside and make spread more faster.
Likes
104
Share


@SmokingTiki
Follow
Good growth this week, the roots have already reached the pots! The Blackberry Cake seems to develop nicely but it's still smaller than the two others. I topped the plants and started to apply some LST and they responded very well. This is the first time I try to do some LST without bending the main stem, let's see how it goes.
I increased the light power to 75%. I moved the fan to be further away from the Blackberry Cake because it seems that it suffered from the wind, the leaves look and feel dry.
During watering, only a small quantity of water ran down in the saucer and I poured 2l in each pot. The Blackberry Cake and the Cashew Kush looked a bit droopy, I think I should have watered a bit sooner.
It starts to smell in the room 😏
Plants heights at the end of the week :
-------------------------------------------
Blackberry Cake : 12,5cm
Jack Herer : 18cm
Cashew Kush : 19,5cm

Likes
10
Share


@HideAndFly420
Follow
Day 64 my baby is going really well by now, she s been running fast until now and I think that’s enough with fertiliser. From today o start my flush, I will give today my last dose of regulator and from next irrigation just on controlled water until the end of maturation, I want this baby to eat everything .
day 65 started flushing. ph controlled water at 6.0 i think 20 more days at max before m
Day 68 First check with micro today. The baby looks already milky and amber on the top buds but the rest of the plant is still transparent. I’ll wait at least until this weekend for a re check maybe I’ll cut her in two rounds. As I be been watching a lot with micro I noticed so many dust and other stuff on the buds so I think I’ll wash her in water.
Today watered ph 6.
Let’s see!
🌱🔥🌱🔥🌱🔥🔥

Processing
Likes
6
Share


@Theperfectionist
Follow
12 days after the switch Tropicanna Banana shows her sex and officially begins flowering. On day 28 I started with the Bio Heaven and Acti Vera stimulators, although the soil is prefertilized for only 2 weeks, the girls are in perfect shape and for now they don't need fertilizers. I inserted wooden supports in the grow to reduce the effect of negative pressure, it took away important space for growing. This week i've stopped using the humidifier.

Likes
91
Share

@GERGrowDesigns
Follow
Welcome to Week 4 Everyone,
You been just Invited to Take a Seat at the :
-Designers Club -
Special Thanks to John for hopping through my Messages to Join The SSSC/DP Photo
The Project will be Supported by Narcos Seeds to give the Strain the Perfect lifespan it could Deserve .
Light used for The Contest Grow :
Tenty Pro x4 200w in a space of
60x60 Homebox Ambiente Tent.
Were only Starting with 2 Plants from Fast Version B . One didnt worked well .
Quickly Reminder , this Diarie will be a Time Eater . If you Enjoy what you see just show it with Some Thoughts and Thumbs in the Weeks. I will Appreciate that.
Both Topped Early at Day 9 as Project and Time Deadline from Contest .
Everything Doing Well ive done some Mainlining and Defoliation over the days .One Growed a little bit special at the topping .
Nutriets used/using now in Week 4 :
-Narcos Root Stim
-Narcos Grow Stim
-Narcos Hydro A+B
Enough Talk from me , just Enjoy youre Seats and be a part of The Designers Club .
Good Luck to Everybody and Keep up Growing !
Likes
17
Share


@Tommyweedseed
Follow
March 8-15th: This week had moderate weather with some overcast and strong winds. The Plant did not have much of a shock after transplanting and her pistols are growing in more as the days go by. She is also getting pretty tall for being on a windowsill. Going to get some Atami Bloombastic for her flowering stage and hopefully we see good results. Any advice is welcomed! 😊

Likes
25
Share


@Grower_Of_Persia
Follow
week intel:
everything is perfect!
stresses :
just a little E.C stress around 1.7 once a week
feeding:
i feed them 3 times this week with this order :
day 1 : i feed them heavy with silicate +base nutrients(calcium & micros + Bloom) about 818 ppm - 1.7 e.c to cause a little stress.
day 3 : i feed them low dose of Feeding Booster + Karbo Boost around 382 ppm - 0.7 e.c to let them recover a little but not fully recover still a little stress will caused.
day 5 : i feed them with low dose of Top-Max + B-52 around 250 ppm - 0.5 e.c to let them recover the stresses to get ready for another stress next week.
guide of the week :
know your plant tolerance limit of E.C stress once you saw the very very little yellowing on tips of leaves , that's the sign to don't go further , never reach that limit if you want a high quality buds, in my case tolerance is 1.8 and i'll reach to that level only once a week to cause precision stress , love your plants and have a happy growing!

Likes
20
Share


@TeamQuality420
Follow
The notes will follow just trying to get all caught up !
Stay tuned 😉

Likes
11
Share


@PrinceAlbert
Follow
Week went very well, never had such a good flower before.
Some leafes are getting brighter and the ones who dont catch light are falling but its okay.
Wish you all the best

Likes
21
Share


@MiyaguiOkPolilla
Follow
Hola amigo de cultivo!
Han pasado tres semanas desde el transplante de esta pequeña, creí que tendría una mala noticia al subir la ultima vez dado que pasaron 3 semanas sin lluvias, pero sin duda que ha sido muy gratificante llegar y encontrar este color en las hojas, el suelo se mantiene perfectamente gracias al Bactogel de Agrobacterias y mantiene la humedad perfecta.
La capa de mulch no deja calentar el sustrato y la planta es muy resistente que es lo importante.
Sinceramente estoy agradecido por todo esto!
Un abrazo grande para todos 💚☘️💐


Likes
14
Share


@Viking_s_farm
Follow
Ciao a tutti e benvenuti! Questo è il mio diario «...there are many like it, but this one is mine…», diceva un famoso personaggio di un film (se non avete capito vergognatevi!🙄).
Prometto che questa introduzione sarà rapida e indolore: sono Viking_s_Farm e vi basta sapere questo. 😈
Ora che ci siamo conosciuti, vi annuncio che questo è il mio PRIMO DIARIO (speriamo bene 🤞🏻🤞🏻🤞🏻).
Il seme che ho scelto è di una Purple Punch della Fastbuds, casa produttrice americana che si occupa esclusivamente di genetiche autofiorenti. Ho scelto questa varietà in particolare perché le immagini fornite dal sito ufficiale erano molto interessanti… fiori grossi, compatti e dai colori incredibili (e certo, mica mettono foto di merda 😅) . Inoltre, a parte tutte queste belle parole, devo dire che ultimamente sono alla ricerca di un high più fisico e rilassante.
Spero di poter trovare in questa piccolina tutto quello che cerco!
Devo ammettere che le mie esperienze con altre varietà della stessa casa produttrice non sono state delle migliori ma sono convinto che oltre alla mia mancanza di esperienza abbia influito il carente spazio di coltura! Per questo, quello che vado a iniziare sarà un diario singolo. Quindi… iniziamo!
SETUP:
Growbox: Mammoth lite60
Lampade: Spiderfarmer led sf-1000
Roleadro led 300w
Roleadro barre led 10w x 4
Trattamento aria:
- Ventola immissione: Plumbing4home 100mm;
- Ventola estrazione: Vents TT-100, ventola di aspirazione in linea da 100 mm
- Filtro Carboni attivi
- Ventilatore clip da 20 cm
Vaso: Air pot da 12,5 l
Substrato: terriccio Biobizz light mix
con aggiunta di 20gr di Mykos extreme
22/12/2021 Come metodo di germinazione, viste le basse temperature (19°), ho deciso di utilizzare un semplice dischetto di torba inumidito con acqua tiepida e posizionato direttamente nel vaso. La lampada è posizionata ad un’altezza di circa 45 cm è regolata al 40% della potenza, un po’ più alta rispetto a quanto consigliato dalla casa produttrice per questa fase, ma per poter mantenere la temperatura al di sopra dei 18/19º non potevo fare altrimenti.
25/12/2021. BUON NATALE 🎄🎁💫
Babbo Natale non é ancora passato a darmi il regalo, confido passi entro un paio di giorni!🤞🏻
26/12/2021. La piccolina è germogliata 🎉🎉


Likes
23
Share


@555ABKY555
Follow
A NOTE ABOUT greenhouse zstrawberry
the scent of the leaves is reminiscent of lemon peels it is very strong and more pungent than the others it differs from other houses the log suffered mortally from the heat the leaves curled up without water.
HOT WEEK😵
the temperatures have risen abundantly and for three days the plants have not taken water they have lost a lot of foliage but I took advantage of the incident to defoliate and implement lollipopping I hope that B-52 will sanitize the structure before fertilizing with big bud in the meantime I have started to fertilize with SPRINT linea herba and fertilizer for flowering after several rinses I will keep low with the fertilizer and try to water more


Likes
47
Share


@AsNoriu
Follow
Day 141. Girl is thriving, but now nobody will close greenhouse for nights and watering will be very limited...
In two weeks I am back and will give her all TLC she will want.
She is the healthiest plant in all greenhouse ;)
Happy Growing !!!
Likes
1
Share

@HavelGrower
Follow
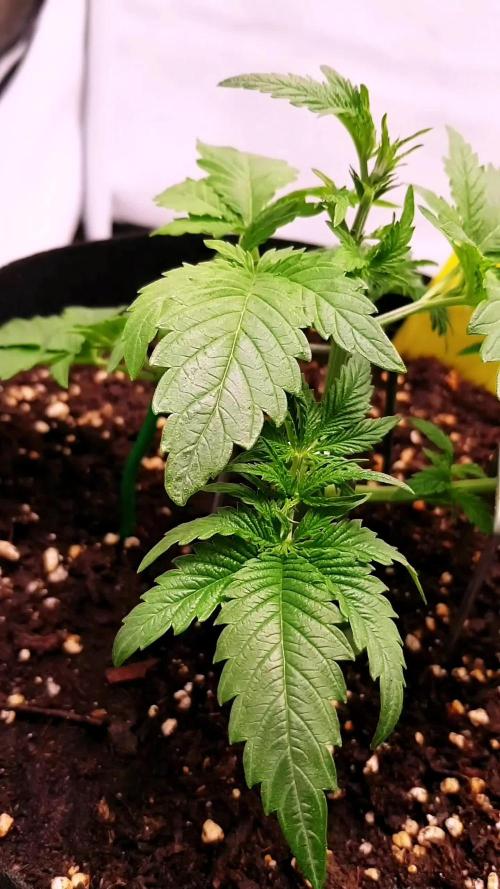
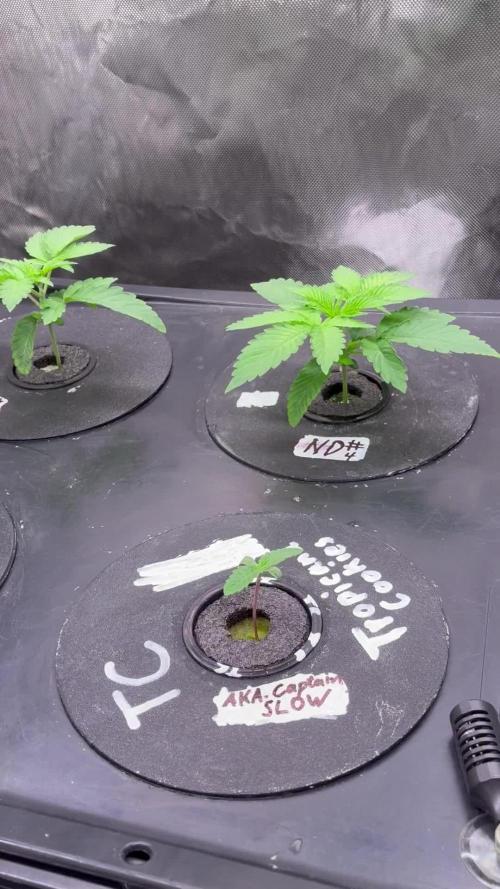
Week 2 has passed by. (Pictures from Day 10 and Day 14.)
Our 6th friend finally decided to pop out aswell. Let’s call him Captain slow.🐢 He was the reason why I waited pretty long until I added more nutrients. The result of that was a deficiency on #4. I fixed that quiete quickly and increased the light intensity, by adding 2h to the light cycle and increasing to 400 umol/m2/s. Conditions were pretty stable.
Pretty excited to see them racing. It’s getting fast now. The thing is I just don’t know how fast at the moment. But it’s looking pretty good right now.
Conditions of the Grow:
💡 PPFD: 400 umol/m2/s
☀️ DLI: 26 mol/day
🌓 Lightcycle: 18/6 h
💨 Humidity: 55-60 %
🌡️ 🌞Daytime Temp.: 25-26 *C
🌡️ 🌙Nighttime Temp.: 21-22 *C
🌡️🌱Leaf Temperature: 23 *C
🌡️💧Water Temperature: 19-21 *C
Water TDS: 450 ppm | EC: 0.9 us/cm
🚰Watersource: Rainwater (TDS: 15ppm | EC: 0.03 us/cm
Vegetation Equipment:
🔦 Lamp: Pro-Emit DIY-M-KIT 300W
📤Container: DIY 63L Euro-Box with lid
Pot: Netpot 2 inch
💦Pump: M.R.S. Standard Whisper Powerpump 8.5 bar
🚿Nozzles: 6x 0.2mm
🫧Waterfilter: 150 microns
🌬️Fan: 2x Clipfan
🌪️Duct-Fan: AC Infinity 100 mm with Controller and no Filter
🍶Nutrient Brand: Terra Aquatica
🔬Sensors: Waterstation (EC, TDS, Temp, PH, Salt), CO2, Air Temp. & Humidity (VPD), Temperature-Sensor Root Container
Likes
142
Share


@PapaNugs
Follow
Super excited for this run. I'm always on the search for new quality genetics and fruity terps. This time I chose Elev8. I watched an interview with them and decided to try. They start all their genetics with high quality clone cuts. Pretty interesting and if you ask me that's how I'd do it if I was gonna to something like that.
Water for 36 hours then in the solo cup. 80% filled with my mix and the top 20% is just coco/perlite. 5/6 popped up. We begin!

Likes
67
Share


@XG_Jack
Follow
Ready for harvest. A beautiful dark purple/black pheno of fastbuds lemon pie. This plant should yield pretty well. Frosty, smells great. Hope you’ve enjoyed, dry weight with harvest will be my next and final post for this grow. Feels like 10 stars all around here, we will see how it finishes.
Processing
Likes
8
Share


@Lady_NugWitch
Follow
I always put them with a baggie over the cup to hold humidity. Works wonderfully. You should try it.
Likes
19
Share


@HisHope
Follow
6/21 Week 9
Tricones at 50% clear 50% milky
She is building so fast we have had to trellis her branches (bamboo and jute) to keep them from snapping even with the SI in her cells.
Continuing PK for now hold CocoTek where it is as she is going into her last week of nuets
We do not want to start that flush until we are satisfied its time and at the rate she is building it aint today and may not be till the end of the week.
We still think this a 300 gram dry plant at least, she seems to be putting on several grams a day of flower so every day is a weeks worth of CBD.
6/23
Pics later
Trics at 75% milky 25% clear want more mature before taking away all her nuets
Removing PK she is slowing down greatly only waiting on the trics to flush
Reduced Lights on to 18 hours
Plant and grower
6/24
Reducing lights on to 16 hours
Showing off her buds and trics a little
6/25
Light hours were reduced for heat (its hot this week) nothing else. Off during heat of the day.
Begin Flush this evening trics are 80+% milky plan on using an agent for the first flush just water thereafter.
6/26
Day 2 of flush no major def yet
6/27
Ok the deficiency fairy showed up last night, seeing mostly CA which does not surprise at all, and Mag.
Still she is managing to build a bit of bud.