By continuing to use the website or clicking Accept you consent to our cookies and personal data policy and confirm that you are at least 18 year old. For details please see Privacy Policy and Terms
Accept
Likes
Comments
Share


Likes
3
Share


@AustinRon
Follow
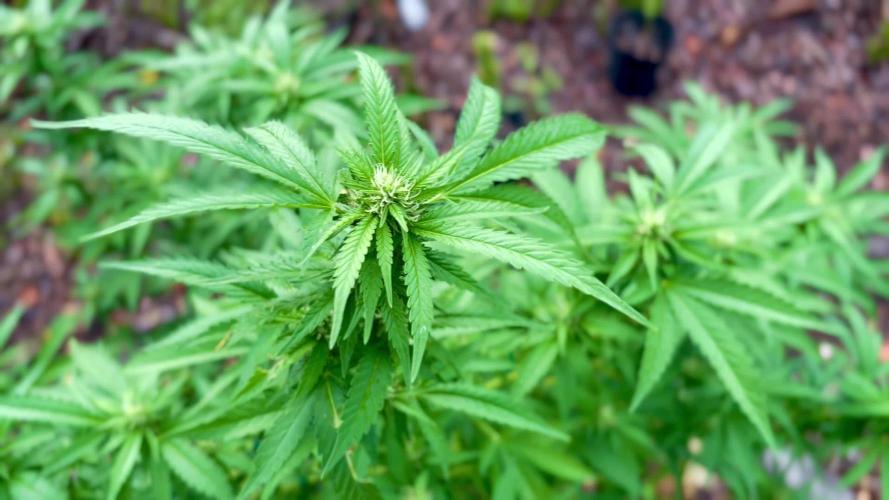
Week 6 - Bolt II - Lemon Jeffrey (FEM)
Lemon Jeffrey by IRIE Genetics (6 Starts for 2 Finishers)
63-70 Days Flower (9 - 10 Weeks)
Seeds Wet: Monday 14 May 2023
Harvest Date Range: [ 2023-06-30, 2024-07-07]
Weeks Observations
After flip, #7’s Meristem switched to Alternate Nodes instead of the symmetric typical of Meristems. It also is a 9 leaflet plant. (One of 3)
End of week struggling with humidity, can’t bring below t68-69% with medium high inline fan. De-foliated bottoms again, super cropped Overly tall plants (4) to lower canopy, raised light to HIGHEST DISTANCE at 100% - ~680 PPFD across canopy. Will have to remove some lower growth tips that don’t reach with 2” of canopy.
Start of week:
- Dates: [2023-06-26: LJ2Q 43:B:2:1, 07–02-2023-07-02: LJ2Q 49:B:2:7 ]
End of Week:
- Plant Height Range: [ 13, 26, in]
- Water/Day/Plant: [420, ml]
EnvironmentalCurrent:
- LightIntensity: [ 811, µMol//m2/s ]
- LightDistance: [ 19.5, in]
- TempAvg: [79.1 , °F]
- RH: [ 70, %]
- VPD: [ 0.75, kPa]
- Scotoperiod: [ 12, hrs]
- Feedwater per Day: [ 3360, ml]
- EC: [ 1.8, mS]
Environment NOTES:
- Because room temperature overnight is 68°F, we need to
1. Nightly (2200) CLOSE AC VENT to Grow Room
2. Daily (0700) OPEN Vent to Grow Room
- Goal is to maintain TENT & CABINET TEMPERATURES OVERNIGHT
- RULE
- CLOSE Room Airflow during LOW TEMP periods(2200 - 0700)
- OPEN during HIGH TEMP Period (0700 - 2200)
SOG Strategy
- Eliminate weak, funky plants
- @18” Height @ Flip to 12/12 (or …?)
- Target Minimal DLI: 40 Mol/day (Optimal w/out CO2 Supplementation)
- Ref: https://hortamericas.com/blog/science/mastering-light-management-optimizing-crop-performance/'
Objective
- 8 Plants, Single Colas, Sea of Green
SOP:
- WEAR CLEAN GLOVES FOR ALL SEED OPERATIONS
- CLEAN All Instruments before use
- Light Strengthveg := 100 + (#nodes * 100)
- Light Strengthflower := [ 1000, 600, µMol/m2/s]
- Scotoperiodveg := [ 1300, 1900, 6, hr]
- Scotoperiodflower := [ 0700-1900, 12, hr]
Environment
- Bolt (3 Weeks) (Week 5-7) (F1-F3) # Last Week of Bolt!
- Temp: 78-82°F
- VPD: 1.0 ± 0.1
- Photoperiod: 12/12
- Light Strength: 930 µMol/m2/s
- Rooted Leaf Hydro (Reservoir), (RLA EC 0.8 - 1.6 - Half the RLA Hydro Chart)
- Primer A, Primer B: [ 8 ml, gal]
- Silica Skin: [ 4, ml, gal]
- EC: 1.1 - 2.2 # 1.1, 1.4, 1.7
- Mid Flower (2 Weeks) (Week 8-9) (F4-F5)
- Temp: 78-82°F
- VPD: 1.2 ± 0.1
- Photoperiod: 12/12
- Light Strength: 930 µMol/m2/s
- EC: 1.7
- Late Flower (Week 10-14) (F5-F9)
- Temp: 78-80°F
- VPD: 1.2 ± 0.2
- Photoperiod: 12/123
- Light Strength: [930, 850, µMol/m2/s]
- EC: 1.7 # Week 9-11
- EC: 1.4 # Week 12
- EC: 1.1 # Week 13
- Finish (Week 14) ( F10)
- Temp: 78°F
- VPD: 1.3 ± 0.2
- PPFD: 750 peak
- Resin Bloom ONLY
- EC: 0.8
Rooted Leaf Hydro 1.7 - 2.0 EC (Half RLA,Hydro Chart, EC to Targets):
- Primer A: [ 8, ml, gal]
- Primer B: [ 8, ml, gal]
- Silica Skin: [ 4, ml, gal]
- SLF-100: [ 5, ml, gal]
- PhotosynthesisPlus: [ 6, ml, gal]
____________________
Mon 26 Jun 2023 # Bolt 2
LJ2Q 43:B:2:1
- Canopy Grew 1.5”, Raising Light to Maintain Intensity
- Are we ready to raise EC to a Max ~ 2.0 mS? NO! Not Yet (If ever)
- We’re going through 4 Gallons in 3 Days
- [x] Refill w/ 6 Gallons Rooted Leaf Hydro Feed
- [x] Add 6 Gallons Filtered H2O to Reservoir
- [x] Add
- [x] Primer A: [ 48, ml, 6, gal]
- [x] Primer B: [ 48, ml, 6, gal]
- [x] Silica Skin: [ 24, ml, 6, gal
- [x] EC to 1.7 mS (1.8 MAX)
- [x] Mix 1 Gallon of FULL Flower Week 2 Nutes, EC: 1.2 @ Lights On @ 300 ml/plant: 2.4 Liters
- Primer A: [ 6, ml, gal]
- Primer B: [ 6, ml, gal]
- Silica Skin: [ 3, ml, gal]
- Calmag Fuel: [ 3, ml, gal]
- Lush Green: [ 3, ml, gal]
- Root Anchor: [ 3, ml, gal]
- Peak Bloom: [ 3, ml, gal]
- [x] @2300: Enable normal HYRDO Chart Feed @ EC 1.8, @ 67 ml/plant per 90 Minutes
Take Two Cuttings per Plant

- [x] Prep Clone Dome
- [x] Clean, Rinse, Dry
Clone Procedure
- [x] Cut 1” below desired node,
- [x] Immediately dip in Aloe Gel AND place tip in Rooting Plug
- [x] Apply Tag to Cutting
- [x] Create TAG for EACH Cutting
- [x] Load Rooting Tray with Pre-Soaked (Filtered H20, Fulvic Acids [Ful-Power) Rooting Plugs (FloraFlex 40/40)
- NEXT!
- [ ] Take Cuts
- [ ] #5b
- [x] #1a
- [x] #1b
- [x] #5a
- [x] #6a
- [x] #6b
- [x] #7a
- [x] #7b
- [x] #8a
- [x] #8b
- [x] #10a
- [x] #10b
- [x] #11a
- [x] #11b
- [x] #13a
- [x] #13b
- [x] For 3 Weeks, monitor Humidity, Start with Vent’s CLOSED!
Tue 27 Jun 2023
LJ2Q 44:B:2:2

- Canopy Grew 1.5”, Raising Light to Maintain Intensity
PEAK Tent PPFD: [ 829, µMol/m2/s]

Peak DLI: [ 35.8, Mol/m2/s]

Center PPFD: [ 709, µMol/m2/s]

Center DLI: [ 30.6, Mol/m2/s]

Wed 28 Jun 2023
LJ2Q 45:B:2:3
Thu 29 Jun 2023
LJ2Q 46:B:2:4
- Tallest Grew ~ 2-1/4” ‘Overnight’ - Raised lamp to maintain minimum 19.5” Distance
Friday 30 Jun 2023
LJ2Q 47:B:2:5
Sat 01 Jul 2023
LJ2Q 48:B:2:6
Sun 02 Jul 2023
LJ2Q 49:B:2:7
- Added 5-1/2” overnight
- first ‘real’ pistils apparent.
- Can’t survive another week of 2-1/2 to 5 1/2 “ a day :-)
- I can’t get RH below 72, night or day. Need to defol lowers again, and remove sure ti be larf lowers.

Likes
3
Share

@Organic473
Follow
Fed her some bloom nutrients, she took it nicely.
I will continue to feed her nitrogen into the third week also.


Likes
22
Share


@MicrowGrow420
Follow
Colas have increased in size, still looking to develop more mass, trichome production does not seem as abundant as some grows i have done but this strain has only an 8% THC content and a higher CBD ratio. Increased nutes strength by .25 pml to .75 pml. Pistols are still standing upright so no sign of them being ready for harvest, will be studying the trichomes for any amber changes in the next week of flower. The fragrance is getting much stronger and is very fruity and pleasant, unlike most ganja aromas that can be strong and dank, this grow has a very uplifting fresh Bubblelicious scent.

Likes
48
Share


@CrystalMagic
Follow
[Day 10] 7/07/21
periodically playing various music and nature sounds, adding more crystals and just watching the plants grow...👽
[Day 11] 7/09/21
lowered the lights from 30" to 24" - 21,000 lux
[Day 12] 7/10/21
lowered the lights from 24" to 14" - 35,000 lux

Processing
Likes
5
Share


@xxBudgetAutosxx
Follow
Missed this week somehow. Will try to get some more pics or just comment for info

Likes
12
Share


@CanadianFillmore
Follow
Week 5 begins for LSD and Green Crack! The LSD ladies had the most yellowing over the last week, yet they have the most frost on the buds. The Green Crack ladies had a little bit of yellowing and has bigger buds, but no frost at this time. They all seem very happy in their new 4x8 home.
Thanks for stopping by growfessors, tune in next week for another episode of growfessor theatre. 👽🌳💚

Likes
12
Share


@DeepRootsGrowTrees
Follow
MIMOSA by ROYAL QUEEN SEEDS
Week #7 overall June 12th-18th
Week #6 Veg
This week she's doing good after supercropping she also got topped this week. Overall she's a good looking plant no issues to report this week!
Stay Growing!!
ROYAL QUEEN SEEDS MIMOSA


Likes
179
Share


@Tropicannibis_Todd
Follow
💩Holy Crap We Are Back At It And Loving It💩
Growmies we are at DAY 56 and she's just killing💀it👌
👉We are in full flowering mode and she's doing great 👈 Everything is looking good even the Tiny Cup 🥤
So Shit , I gave them just a tad to much nutes at the start of feeding 👈 But I have since fixed it
So I'm still doing some low stress training 🙃 and some defolation 😳
Lights being readjusted and chart updated .........👍rain water to be used entire growth👈
👉I used NutriNPK for nutrients for my grows and welcome anyone to give them a try .👈
👉 www.nutrinpk.com 👈
NutriNPK Cal MAG 14-0-14
NutriNPK Grow 28-14-14
NutriNPK Bloom 8-20-30
NutriNPK Bloom Booster 0-52-34
I GOT MULTIPLE DIARIES ON THE GO 😱 please check them out 😎
👉THANKS FOR TAKING THE TIME TO GO OVER MY DIARIES 👈

Likes
15
Share


@SmokingTiki
Follow
The harvest is pretty small but in these conditions, I didn't expect much more. This grow was more for fun than for harvest so I'm quite happy with it :)
- I didn't weight wet buds.
- Drying was made around 21°C and around 55% of humidity.
Veg time : 29 days.
Flowering time : 48 days.
Total time from seed to harvest : 81 days.
Height : 53cm
Pot size : 10l
Processing
Likes
142
Share


@MadeInGermany
Follow
Hi everyone :-)
This week the buds developed super ;-) All are beautiful 😍.
Super genetics 👍.
Blue Cheese pheno 1 is slowly coming to an end :-)
This week I will start to use up the remaining nutrients and harvest in 10-14 days ;-)
Everyone else needs something else :-) have fun with the videos, stay healthy 🙏🏻 and let it grow 🌱


Likes
47
Share


@Northern_Ent
Follow
July 13: perfect cannabis weather after last week’s heat wave. Another heat wave next week, but for now it’s perfect.
Added a third scrog layer and tied it off to some water bottles. This type of scrogging works, is easy, cheap, and it’s easy to still move the plant around the yard as needed.
July 14: re-did the scrog net using a larger piece with more squares. Supercropped some ends to keep the growth tips at the same elevation. We’ll see how many colas I can make of this.
July 16: looks happy enough but I need to up the water volume in this heat.
July 18: really hot the last few days (33 C) so lots of watering and misting to keep them a bit cooler. Look really green and robust. 👍👍 Also wetting outside of grow bags to get some evaporative cooling for the soil.
Added malted barley and Power Bloom to some soil and added it as a soil layer. Added plain soil on the top to deter birds from stealing the barley kernels. A bit less than 1 tbsp of Power Bloom per 1 gallon of soil with a bit more than 1 tbsp of malted barley per gallon of soil.
#seedsman420growoff
#seedsmanseeds


Likes
9
Share


@Krissci
Follow
Day 3
1st bit of training this week.
Looking healthy.
My aim is to allow lowest bud sites to keep up with the main heads..
LST LST LST LST LST
During this stage is most important to train Ur plant into the shape u want.
Processing
Likes
17
Share


@Easygrower
Follow
Hello growers day 42 in the garden with the crystal candy and red poison autos another easy week all girls are doing very well the red poison are starting to buff up now the red poison that’s not red is now the tallest girl in the tent all 4 crystal candy are budding up nicely like I said not been doing much to them just feeding 2L every couple of days to each girl and that are fine so until next week be safe and happy growing ✌️
Likes
7
Share


@Ms_Herbalist
Follow
Full of resin 😍 smells amazing
Curr it properly and you can smell the papaya and gassy tones

Likes
6
Share


@DonPato
Follow
Increíblemente, hace unos días atrás, diez para ser exactos, incorpore de forma casera, cO2, con una mezcla de levadura fresca y azúcar, en orden de 1 burbuja por segundo, Los resultados obtenidos en las flores inferiores fue de una explosión de tricomas muy densa y de maravilloso olor y calidad, estoy muy contento con los resultados obtenidos, gracias a los consejos y practicas obtenidas en todos lados. agradecido 🙏
ENG.
Incredibly, a few days ago, ten to be exact, incorporate homemade, CO2, with a mixture of fresh yeast and sugar, in order of 1 bubble per second, The results obtained in the lower flowers was an explosion of trichomes very dense and wonderful smell and quality, I am very happy with the results obtained, thanks to the advices and practices obtained everywhere. grateful 🙏

