


By continuing to use the website or clicking Accept you consent to our cookies and personal data policy and confirm that you are at least 18 year old. For details please see Privacy Policy and Terms
Accept
Likes
Comments
Share


@420DeepGrow
Follow
Gracias al equipo de Herbies Seeds, Marshydro y XpertNutrients sin ellos esto no seria posible.
💐🍁 Runtz Punch:
Runtz Punch no es una cepa para personas de mente superficial, está hecha para reflexiones filosóficas, euforia dichosa y un gran subidón corporal a la hora de dormir. Es la cepa perfecta para romper la tolerancia en cualquier fumador experimentado. ¿Cuál es su secreto? Esta cepa tiene un gran impacto con un 29% (sí, 29%) de THC. Es mejor reservarla para noches de ensueño bajo las estrellas, deja que tu mente divague mientras tu cuerpo absorbe todas las cualidades terapéuticas que tanto necesita.
🚀 Consigue aqui tus semillas:
https://herbiesheadshop.com/cannabis-seeds/runtz-punch-herbies-seeds
💡FC6500: Eficiencia líder en el mercado: la lámpara de cultivo LED FC-E6500, que ostenta un estatus líder en el mercado, es una solución rentable con un PPE de 2,8 µmol/J y un rendimiento máximo de 2,5 g/vatio. Ofrece un PPF alto de 2026 umol/S y es adecuada para una cobertura de vegetación de 1,50 m x 1,50 m y una cobertura de flores de 1,20 m x 1,20 m.
Iluminación versátil y uniforme.
https://marshydro.eu/products/mars-hydro-fc-e-6500-730w-commercial-led-grow-light/?gad_source=1&gclid=Cj0KCQjw1qO0BhDwARIsANfnkv9IIrYSbmJqz8PqpJOIyWwJfp5bc3SGJgUV68USLQ4tjmXDYwoBuAsaAue3EALw_wcB
🚥 MarsHydro ADLITE UV/IR/RED:
Para lograr un crecimiento óptimo de las plantas y maximizar los rendimientos es un arte simple que depende en gran medida de las condiciones ambientales adecuadas. Reconociendo las limitaciones de la iluminación natural y las soluciones de iluminación tradicionales para satisfacer estas necesidades únicas, lanzamos ADLITE. Estas luces especiales UV, IR y roja están diseñadas para llenar áreas del espectro, proporcionando las altas longitudes de onda que las plantas necesitan para un crecimiento y desarrollo óptimos.
🚀 Consigue aqui tu Adlite:
https://marshydro.eu/collections/adlite-supplemental-lights/
🏠 : Marshydro 1.50 x 1.50 x 1.80, carpa 100% estanca con ventanas laterales para llegar a todos los lugares durante el grow
https://marshydro.eu/products/diy-150x150x200cm-grow-tent-kit
🌬️💨 Marshydro 6inch + filtro carbon para evitar olores indeseables.
https://marshydro.eu/products/ifresh-smart-6inch-filter-kits/
🍣🍦🌴 Xpert Nutrients es una empresa especializada en la producción y comercialización de fertilizantes líquidos y tierras, que garantizan excelentes cosechas y un crecimiento activo para sus plantas durante todas las fases de cultivo.
Consigue aqui tus Nutrientes:
https://xpertnutrients.com/es/shop/
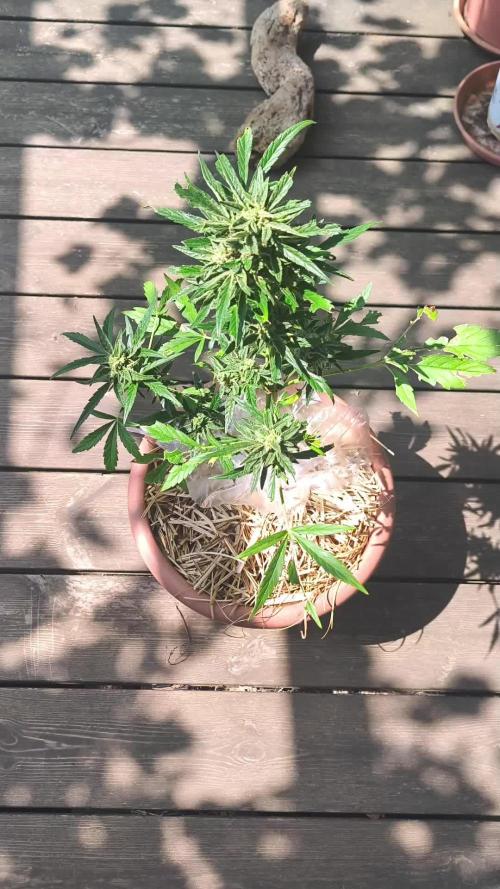
📆 Semana 11:
Finalmente estoy contento con los resultados pese al error que tuve con el temporizador, lavado de raíces para esta maravilla y corte final en una semana.

Likes
9
Share


@Luv2Grow
Follow
Day 43 - Starting week 7 and she’s looking good. She’s starting to stretch more every day and flowers are starting to fatten up a bit. Gonna continue with the foxfarm feeding schedule. Can’t wait for her to finish!
Day 44 - The room is really starting to smell amazing. Just keeping on with the foxfarm nute schedule until she’s ready to be cut in a couple more weeks. Still plenty of fattening
and growing to go.
Day 45 - No major changes, she’s just chugging along. Gave a feeding of just water today and tomorrow will be the foxfarm feeding. I love her look and the smell starting to really come from her.
Day 46 - No major changes, just continuing to fatten, grow and definitely getting really frosty!
Day 47 - What can I say? This thing is an amazing grow and smelling amazing. She just growing and fattening each day. Still to early to really look at the trichs but wanted to look anyway. Got a few decent pics and there’s a few cloudy ones in there. Gave her straight pH’d water today and tomorrow and will give another feeding on Saturday.
Day 48 - No big changes, just continuing to fatten up. Held off on watering today, she didn’t really drink munch compared to the GC. Will give her an actual “feeding” tomorrow.
Day 49 - All is looking good and she’s plumping up each day. Gave her the foxfarm feeding today. Tomorrow starts week 8 so will continue with the feeding schedule until the end. She’s really starting to smell up the room in my house and loving it.

Likes
53
Share


@Pr3m_85
Follow
More than a day in the drying tent and I'll give you the report on the weight, the taste and the effects!
‐-----------------------------------------------------------------------------
FINAL WEIGHT : 153,5 g
Effect : very pleasant. I have the impression of being in a cotton field.
Taste : cream berries 🍓🍓🍓🍓
Peace to all ✌️🏽✌️🏾✌️✌️🏿✌️🏻✌️🏼
------------------------------------------------------------------------------
✔️Pheno 1 : the appearance of the flower is much more purple than the other two phenotypes. Her effect is much more sativa as well.
✔️Pheno 2 : The strawberry taste is much more pronounced. In this phenotype, there is a not at all unpleasant mint aftertaste !!
✔️Pheno 3 : the effect is felt very quickly. In a few seconds, you find yourself in a state of joy. It's very nice !!!!


Likes
13
Share


@Huntress007
Follow
She is looking good growing bigger and bushier! I am working hard to get her nice and big!

Likes
2
Share


@CannaIGrow
Follow
I did not top this girl, yet. Her top lowers started catching up to the top so I didn’t want to stop her yet lol. But all in all she’s looking healthy.
Likes
100
Share


@ILoVeThiSpLaNt
Follow
Giorno 49
Ho girato in fioritura.
Le due Zombie come già detto nelle settimane scorse sono due fenotipi completamente diversi. Uno sicuramente haze e l'altro bubba Kush. Stanno bene entrambe ma la più grande l'ho dovuta defogliare per bene e sono certo che tra 15/20gg farò una seconda passata. Ultima bevuta prima di mandare in fioritura EC 1.28 ph 5,8.
Anche le due Rainbow Belts sono diverse perché sfregando il gambo una sa di Zkittlez l'altra di frutta quindi penso più a qualche fenotipo dosidos.
La Milk Monkey è quella che per struttura mi piace più di tutte.
Per la prima volta ho preso dei cloni anche se non so dove tenerli e sotto che luce. Per ora li ho messi in un vaso ricoperto da velina nel box delle autofiorenti


Likes
81
Share


@UnorthadoxDude
Follow
Transplanted to 40l container on week 4 day 1. Container has approx 30l in it.
Also added a photo of the setup for size reference.
Let me explain my thinking behind the repotting strategy. Firstly I should say that I am quite an old school kind of grower, although I've never grown cannabis before I have grown hundreds of other plants. Due to my experience with other plants, I understand the value of well planned and executed transplants, they can have an absolutely transformative effect upon root systems when done properly, as far as I know it's the main reason why they are done at all. It is fair to say I have never grown any auto-flowering plant indoors before, and I have read all about how you should not transplant autos, and all the good reasons why not. Ultimately though, as I am not called UnorthadoxDude for nothing, I believe that I can make it work with an auto, and get the benefit of improved root growth pattern, without delaying or interrupting the growth. I want to have my cake and eat it, as it were.
So the strategy is to avoid transplant shock, which admittedly I have already failed in the first unplanned transplant, but in my hopeful naivety I still believe I can make the second one work! I'm using coco, and I have had the larger pot prepared and have been watering and feeding them as well as the plant. If I am careful not to disturb the plant at all, and move the entire contents of the pot gently into the larger pot (which is exactly the same medium in broadly the same state), then I may be able to avoid shocking the plant and just let it crack on. We will find out in a few days! If it stops growing or slows at all then I failed, otherwise it worked!
A note about my use of organic nutes with coco. I have read a lot about coco and nutes and microbes and PH and TDS and what have you, and I know that the overwhelming majority of people believe that you can't or at least shouldn't use organic nutes with coco. The thing is, I like organic gardening, I prefer to cultivate a beneficial microbiota and keep it healthy. I recycle, and reuse all my compost except where a plant is diseased and this has worked well for me for a long time. I've never grown with coco before though, I always used soil. I wanted to gain the benefits of coco (better drainage, more air to roots, lighter, less inviting to pests, etc) - but I wanted to use a method of nutrition that I was already familiar with. I think I've mentioned that I am not called UnorthadoxDude for nothing, so I am using BioBizz and coco. By adding bacterial, mycorrhizal, and trichoderma inoculants and having the unplanted coco in the tent being fed and watered I hope to have cultivated a nice microbiota which will feed my plant. That's the theory. However just in case, I have a trick up my sleeve.
Now, I do not know if you are aware of this, but there is a fiery debate raging on the internet about using BioBizz organic nutes with coco for cannabis. Some people try it, most people shout it down, and I have not found much in the way of solid evidence of it being a good idea. Except one! I found a commercial grower that has used biobizz nutes, and he said that as long as you are using "Acti-Vera" you can use anything from the BioBizz organic range. Apparently the enzymes in the mix break down nutes chemically in a similar way to what the theoretically missing microbes do.
So I have ordered a bottle of that, and if my microbial cultivation attempts don't work out, I at least know I have a fallback that should work.
Those are my thoughts on it, let's see how it pans out.
Oh I should also probably point out that I am growing some companion plants, specifically alfalfa (nitrogen fixing), basil (improved flavour), and German Chamomile (increased essential oil production).
Update week 4 day 2 dropped PH to 5.8 after advice from a grow question. Look! It's carried on growing... maybe there was no transplant shock?
Update week 4 day 3: Growth continues, interveinal chlorosis lessening. Plant is pushing out node five at the moment.
Update week 4 day 4: Growth continues, interveinal chlorosis further lessening. Apologies for the poor quality photos for the last few days, I was lazy and didn't want to move everything out to photograph. Today I have done that and the pic is better. I am declaring the second transplant a complete success. I do not believe that plant was in any way shocked.
Update week 4 say 5: I think I've finally managed to overwater. Going to skip watering today.
Update week 4 day 6: Photo taken just before lights on hence wilting. Growth continues to accelerate. I believe the alfalfa has been raising the PH so I've removed it. Today I will flush through with PH lowered water and then fertigate. The colour is still too pale but the growth and overall look and feel of the plant screams to me that it's happy and about to explode.
Day 27.5 flushed with 30l of PH lowered water then fertigated with 5l.
Day 28: Height 12cm Width: 28cm Nodes: 6
Weekly growth data:
From 5cm Height to 12cm +140%
From 12cm Width to 28cm +133%
From 4 primary nodes to 6 +50%
Summary: Wow, wow. Wow. What else can I say. What a crazy week, amazing and unexpected given the problems. I am really excited to see what happens over the next seven days!!
It looks like it has quite severe chlorosis, but otherwise seems robust and is seriously stretching. Almost unbelievable growth. Pre-flowers appeared a few days ago, so I guess this was the final week of veg. Let's see how the first week of flowering stretch goes!
Update 7/2/23: My instincts about this plant on week 4 day 6 were absolutely correct, she was happy and, she was about to explode. Since my early attempts at transplanting, I practiced multiple times with Citronella (a photoperiod plant) and then I did it again with an auto (Polly) - this one went flawlessly and further demonstrates that you can transplant an auto without shocking it. Time will tell, because I can compare Polly to both Misty and Nesia both of whom were sown directly in their final pots.
Processing
Likes
16
Share


@fvckinginfamous
Follow
First day of second week, its been 8 days since this babies sprouted, and from my newbie eyes, they seem to be growing quite happy and healthy
Starting to add Bio/Grow since yesterday, going for 1ml/l for at least 2 or 3 more days, then doubling the dosage to see how they handle
Day Number 11 Update>
Plant 2 in the center seems to have much wider leaves than 1 and 3, obviosly because its recieving more light than the others
Upping just a tiny bit of the Bio/Grow since today
Likes
1
Share


@undermink
Follow
At the beginning of week 11 they both look strong and healthy to me. Though their buds still seem smaller than the one in the 20l pot. But the look great after all :) So colorful and frosty (the smaller one) and so big and yellow (the taller one). Can't wait to harvest them :D
At the middle of week 11 they both still look great and I think I saw the tall one's buds grow a bit again... There was something strange going on at the top of the head bud (of the taller one). There'S a close up picture... I guess it's just a kind of mutation and no seed. I was shocked first when I thought it was a seed...

Likes
101
Share


@FrontRowAG_BrianG
Follow
I apologize upfront for all the photos. It was hard to pick which ones to upload, so I picked a good variety.
There is gonna be between 4-6 pounds once dried/cured. These were all super dense and very little larf.
This was a higher temp/higher humidity run with lots of co2 and they blew up big. It’s been a minute since I’ve grown a cola or 2 that were bigger than my arm…this time there was dozens of them.
Each plant was only topped one time. The temps were usually mid 80’s and humidity in the mid 60’s during flower. This might seem high to some, but learning to apply VPD to a grow should not be trial and error, in other words, this was intentional. It’s not risky either. During the first 6 to 7 weeks of flower it is very important to not let your night time temps to go below 75 degrees. POWDERY MILDEW=LOW TEMPS AND HIGH HUMIDITY. Take one of these away and there will not be any powdery mildew! Do not let your temps go below 75! The last 2 weeks I dropped the humidity to 40% and my night temps to mid 60’s for resin production.
A couple of thing one should have to create large buds is a temperature gun(for leaf temp), a par meter and co2. Keep the stomata open and feed lots of co2=huge buds. Learn about VPD and not just a quick google search!
When it’s dry and cured I’ll be back for an update on weight, taste and effects. Currently the plants are drying in the room at 60 degrees and 60% humidity until I can get in there to trim them. Might be 2-3 weeks.
Thanks again for all the likes and comments!

Likes
5
Share


@CanarianGrow92
Follow
Week 5 flowering for our strawberry gorilla from fastbuds 420!
The buds are starting to get fatter day by day, we continue with our food program. This week again we gave sugar shot, sticky fingers, bloom booster, silica, amino and master root all from xpert nutrients.
All good at the moment 🤗
Likes
1
Share

@Nistnov
Follow
I harvested the plant in week 9. I put her in dark room for 3 days before harvesting. I didnt flush her, just let the soil dry out.
I gave the buds 3 washes in water and one wash with water with lemon juice.

Likes
7
Share


@Mr_nugs_lover_David
Follow
This lady is killing it so far! Another beautiful pheno of Mimosa EVO by Barney's Farm, It's a pleasure to work with their genetic, this plant looks absolutely gorgeous, I hope that she performs well under the Spanish sun this season, we can have very high temperatures but I think this lady is gonna handle the summer without any issues, let's see how this lady keeps developing guys!!


Likes
10
Share


@Reaper
Follow
seeds germinate in rockwool
untill roots hit the water i only use calmag and small amount of nutes


Likes
8
Share


@SkunkyDog420
Follow
Hallo zusammen 🤙.
Sie wächst sehr schön und macht keine Probleme.
Rabattcode für den BIOTABS-Webshop https://biotabs.nl/en/shop/ GDBT420, damit erhalten Sie 15 Prozent


Likes
38
Share


@ChachoGreenCrown
Follow
Esta semana podar, clonar y voy adquirir nuevos productos.
**6.1.1.- CLONACIÓN
DIA8:
Ya toca hacer podita, para este tipo de cultivo (SOG) interesa que las plantas tengan un cogollo central… y todo lo demás sobra!
Trataremos de sacar unos esquejes para tener esta genética presente, creo que saldrán bastantes, aunque la verdad voy a tener que hacer milagros porque son muy pequeños, pero estoy seguro que saldrán adelante.
Si todo va bien la segunda parte de este seguimiento tendrá que ver con esos clones. Vais alucinar con la poda tan agresiva que les he practicado, pero les va a venir bien.
Saco todas las plantas para hacer una inspección de forma individual.
