By continuing to use the website or clicking Accept you consent to our cookies and personal data policy and confirm that you are at least 18 year old. For details please see Privacy Policy and Terms
Accept


Likes
20
Share


@greenAF
Follow
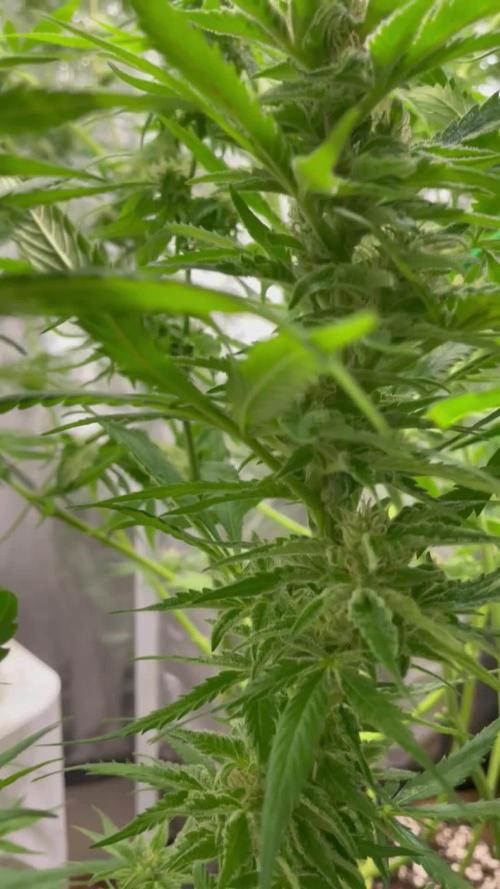
Lights 6500EVO 7(511w) UV (50w) 15min a hr, Under canopy (86w) 12hrs, IR 15min pre and post main lights, Deep Red 15min per hour
pH 6.2
EC 2.5
PPFD 1150-1300
Turned the lights up to 8 (580w) D33
Likes
3
Share

@Miketama
Follow
Fractal #2 - Week Update 🌿
Quick update on Fractal #2! Brought her inside next to the open grow box to spare her from extreme cold for a few more days. She’ll finish strong indoors with supplemental light. Watering only when soil is almost dry - keeping it minimal in the final stretch!
Thanks to everyone for checking in! 🙏 Appreciate you taking a look!

Likes
7
Share


@DisTentAint4Campin
Follow
Growing great I open my tent smells like dead fruit love it 😀 can't wait for these flowers to form and show the true character of this cultivar

Likes
3
Share

@AestheticGenetix
Follow
8/9/25 This is a gorgeous plant. Lavender purple buds with long thin bud structure and long spikey pistils shooting up everywhere. She started looking a little hungry so I tossed in some dr earth 396
8/14/25
Pistils are starting to change and she's producing a strong fruity stank too her with a back end funky smell. While working with the other plants I could smell her over and over again.
Applied some cal mag in the form of uprising foundation. And will continue to add microbe charge
Still tweaking the auto water set up. Trying to keep it between soaked and only partially watered. Maybe it's the drip heads


Likes
12
Share


@JeyGanesha
Follow
La prima delle runtz è quasi arrivata a maturazione. Aspetterò ancora qualche giorno poi inizio a tagliare le più mature..mm
Gnam gnam gnam 😆🤣non vedo l'ora di gustare queste delizie🤣😆😆
Likes
47
Share


@GMSgrows
Follow
This is the girl's final week. The wife will be happy the stink is coming to an end. Will be stripping off all the useless leaves at this point, getting them ready for a quick trim. The ppm in the planters is down under 200 ppm now
Kannabia genetics made these easy to grow. I had no problems growing these 3 different strains out. They all flourished except for 2 of the smaller ladies. They were a little overfed as I treat all girls in the tent with equal amounts of everything. Those girls still did well, just not as well as their bigger sisters. The Kritical will be coming down first as most of the pistols have oranged over and the trichs are clouded over.
The Super OG will be the next to come down. The buds on these girls are so hard I think you could knock someone out, if you through it at someone's head lol....
The Hellfire OG will be the last to come down as their still throwing pistols. Mostly still white and gaining more weight.
I gave 3 of the seeds to my bud and he grew his out under cmh lighting. Plants stayed much more compact and he just finished his trimming. Under the HID the plants get much larger and buds twice the size. I gave him the same feed my girls got through his entire grow, mixed and ready for him, so it was mostly lighting that made the difference. My climate controls are also much better, but he is very happy with the amount he trimmed from each plant. Grade A looking weed for sure....
Thanks for the looks and like my frinds. 🙏

Processing
Likes
10
Share


@Rikikush
Follow
Creció bastante y está formando sus cogollos, espero que se formen los cogollos sanos y densos.
Processing
Likes
4
Share


@ReelEyezEnt
Follow
she is still going strong another 3 weeks and she might be ready
Having some issue fugus bugs trying to dry them out, Ill keep you all posted
Likes
5
Share

@Selkot
Follow
.
FIRST DAYS
-------------
This week is off to a good start; the girls are growing up to 35 cm, the pistils are developing, and there are no abnormalities to report.
I waited a little too long before starting the CalMag (I live in the countryside, so I have to order everything online...), which resulted in a few yellow and brown spots on some leaves at the end of last week, but the deficiency has already been contained.
I removed the “bandage” from the injured plant; it has healed perfectly.
The plant affected by an infection has recovered well: the two branches trained to replace the main branches have grown well. They will undoubtedly each bear a respectable bud.
One of the scars curiously resembles a half-lion, half-gorilla face: I see this as a sign of robustness😊
Finally, there is no doubt: all the girls are indeed girls, with no signs of hermaphroditism.
Honestly, Fastbuds' White Widows are very resilient! 💪
MIDWEEK
-----------
7cm more in half a week; 2cm per day, good cruising speed
Nothing to do today, they are recovering from lollipopping without any problems, they seem to appreciate the watering schedule, as well as the temperature and humidity.
I can only watch them grow and resist the urge to manipulate them 😉
Oh, and one thing: frost is coming. 😍
Likes
6
Share


@Magical_Surgeon
Follow
After you found some good sector and clone it you let the mycelium grow and fill almost all the petri dish like I did last week.
So now you're ready to move forward.
Making grain spawn!🍄🍄
For grain you can use Organic Rye Berries, but you can also get away with wheat berries, or brown rice or even corn kernels(which I used myself) !
And you'll need some mason jars or honestly I used some jars that I had home just clean them very well and sterilise before using
Making a grain spawn can be broken down into 6 easy steps.
🍄Hydrate Grain By Soaking
🍄Make Specialized Lids
🍄Simmer, Drain and Dry The Grain
🍄Sterilize
🍄Put your agar in the jar
🍄Colonize
🍄Soak the grain by placing it in a bucket, covering in water, and leaving it for 12 -24 hours. Easy.
🍄Drill 1 hole on top of the lid. Right in the center and cover with a small dab of high temperature silicone sealant, and leave it overnight to dry. And your jars are done. There other diff types for different methods like liquid culture etc. But I'm just going roughly through what Ive done.
🍄The next step is to simmer the grains on the stove. This will thoroughly hydrate the grains, and will soften them to make them easier for the mushroom mycelium to consume.
Cook soaked grain on the stove for about 15 minutes. You don’t want to cook it too long, because eventually all the grain will crack and you’ll get some mushy grain spawn. We don't want that. 🧐After the grains have simmered on a low boil, you’ll need to drain them off. What I did is I drop them in the sink with the drain cover on. The grains will drain over an hour or so, after which you can go ahead and fill your jars.
🍄Once your jars are filled, they need to be sterilised.This kills off all the other nasty contaminants in the grain cover the lids in tinfoil (to prevent water dripping into the lid) and then just pressure sterilise them for about 90 minutes at 15 psi.
🍄After that let them cool down. Get your SAB, wipe down the walls with some alcohol wipes and place the jars inside. And wait untill they will be warm to the touch... not hot and painful 😤patience is key. Bring in your plates that had been stored by you in a dark place. And what u have to do is sterilise your scalpel and just accurately and efficiently decide your mycelium into about 10 pieces and quickly place them in your jar. And complete for every jar u make. You have to be very quick. The more you keep you're jar and your agar plates lids open the more cans they will get contaminated. There certain technics you can see online..
🍄Ones you're done close all your jars lids tight and Jake your jar so the mycelium pieces will mix around the jar and place them in the dark place to colonize. And just keep waiting... 😅 Untill the mycelium will conquer your grain. Keep your eyes on the jars, any weird smells or colour during the waiting time.. because that would mean you got a contamination going on. Oh yeah and when about 55% of your jar is filled with mycilium shake the sh*t out of it so it will break the mycilium inside and make spread more faster.
Likes
12
Share


@ChitownCannaChica
Follow
She’s getting a little bigger day by day! Popped when it was pretty cold outside, but it’s has been very hot and humid this past week—- and she loves it!
Likes
23
Share


@Kagonisss
Follow
I lollipopping this and add a ladybug and phitoseious persimillis for kill spider mite

Likes
10
Share


@InnerCityGardens
Follow
Week 9, the Girl Scout Cookies is starting to go into flower. It’s been in transition for around 3 days before this video. Starting to stretch so plenty of plant bends will be on hand. Stay tuned


Likes
11
Share


@Skunkiest_bender39
Follow
Die Mädels legen richtig los und machen endlich weiter mit Höhenwachstum. Die Töpfe sind seit ca 10 Tagen durchwurzelt. 2L Wasser reichen Max 5 Tage meist eher 3-4Tage. 1x wöchentlich 7ml/L düngen funktioniert meistens sehr gut.
Die neue europäische Dünger Serie von Advanced Nutrients ist super!

Likes
69
Share


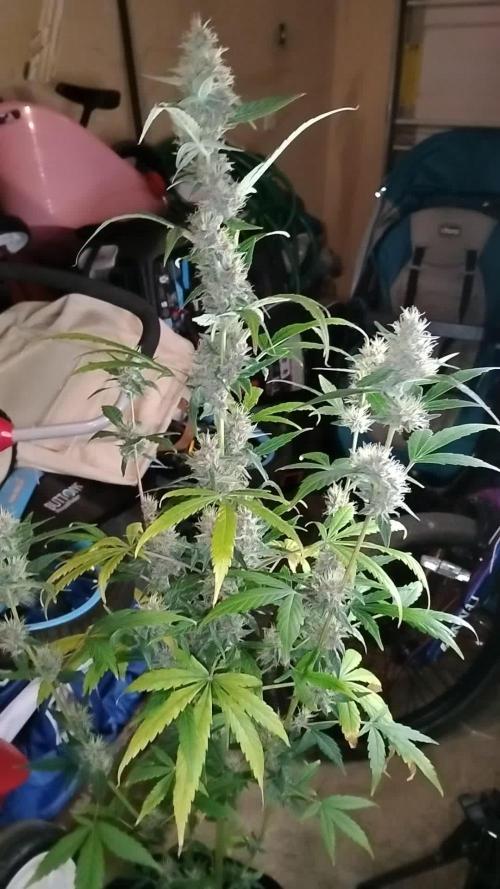
@TOTEM
Follow
I love all my plants, but this Euphoria has been my favorite since the start of this journey. A REAL MONSTER since the beginnings!!!
By the way, I’ve had a BIG PROBLEM with my digital timer after the 12/12 switch: the led panel didn’t switch off completely because of one defective timer. A little light was always there, like the light of the Moon. This caused the plants not to flower for about two weeks.
The other problem is that I immediately switched to the bloom nuts schedule and completed 3 weeks of it. But the flowering period is about to start now!! Thanks to Mr_Di, we’ve realized it’s better to give these current nuts for the next 3 weeks, just reducing B-52 and Bud Bud by 50% (because it could be a little too much). After 3 weeks, I’ll resume with the normal schedule for week 4. I know it’s a bit tricky, but if you have other solutions, please leave a comment below! I can’t flush now, because it’s risky and I should do it to all my 9 plants. Unfortunately that’s not an option!!
DESPITE THESE PROBLEMS, flowering here is about to start, YAY, and you can see that from the photos!! See you next week, buds! 👊

Likes
18
Share


@FarmerFred
Follow
First 35 days of flower. Will slowly decrease the feedings for the next 4 weeks and then chop. Smells great with purple hues in the leaves and buds. Every seed has had different physical characteristics but they all seem to have a similar gassy smell.

Likes
12
Share


@StonedandSteady
Follow
AutoBlueberry 9th w/ 4th W/ Flower breed by #DivineSeeds #DivineSeedsSquad #DivineSeedsBreedingCompany
Flowering out and her Smells are already getting Stronger of Gasy and Candied Blueberries! I recently Trained down her branches to expose more Bud sites and Removed the Biggest fan leaves to expose the Bud site's to this Glorious #OsreeQB1000w Full Spectrum Grow Light! I've also Super Cropped, Topped um, Defoliated, Leaf tucked, and Implement the 3D's method like my Broski #TigerfishOrganics to remove the Dead, Dying and Diseased leaves!
Origin:Afghani/Thai
Type:50% Indica/ 40% Sativa/ 10% Ruderalis
Flowering:56 days
THC:22%
Harvest:400-550 g/m2
Height:110-150 cm
They were Growing under the #Growatt600w and in my #TopoLite 24×24×48 Grow Tent but I've Upgraded and Updated it to my #OsreeQB100W I'm also using #TNBNaturals #TheEnhancer Co2 Despersal Canister and using thier Ph⬆️⬇️ for my Decolinated Tap Water!
Green and Growing Up Great! She's Growing into her 4th week of Flower! She's Growing in my special blend of ProMix potting mix, a 1/2 bag of Earthworm castings and 2 light handfuls of Diatomaceous Earth mixed Up well for before transplanted! Diatomaceous Earth: Diatomaceous earth is made from the fossilized remains of tiny, aquatic organisms called diatoms. Their skeletons are made of a natural substance called silica. WHAT IS DIATOMACEOUS EARTH?
In a nutshell, DE comes from the fossilised remains of small marine organisms called diatoms. Over a 30 million year period, these hard-shelled algae collected on the bottom of bodies of water, eventually forming into a type of sedimentary rock. Fast forwarding, it wasn’t until around 1836 that a German peasant Peter Kasten discovered the ivory-coloured, powdery substance while drilling a well in northern Germany. Ever since, the usefulness of DE for multiple purposes, including industrial and horticultural applications, has been well-reported. Just sprinkle some diatomaceous earth on top of your soil and watch mother nature's secret weapon work its magic.CONDITIONS THE SOIL
When it comes to growing cannabis, everyone strives to provide the best soil to grow the best plants—but there’s always a way to make it even better. Making the soil a better medium is called soil conditioning, which is exactly what diatomaceous earth does. It works by improving the retention of moisture in your potting soil, holding a large amount of fluid and drying at a rate that’s much slower. This natural soil additive also helps to retain nutrients and allows for better oxygenation of the substrate. NATURALLY CONTROLS PESTS
DE is an all-natural, safe-to-use substance that doesn’t harm the cannabis plant with toxic chemicals. The nature of diatomaceous earth makes it useful against most types of insect infestation you might be experiencing; and unlike chemical insecticides, insects can’t develop a resistance to the effects of DE. So once they’re gone, they’re gone for good. DE is an abrasive. and when used as an insecticide, it gradually scrapes away an insect’s exoskeleton, absorbs the fluids, and dehydrates insects and other critters to eventual death. IMPROVES PLANT STABILITY
When using DE in your soil, it can be especially beneficial as it frees up nutrients so that they are made available to the plants as needed. This works via the silica content of DE being absorbed into the plant tissue, which helps improve the plant’s ability to respond and receive more nutrients as DE activates. This in turn results in greater yields and better stability under small pH fluctuations!
https://divineseeds.net/
https://instagram.com/divine.seeds?igshid=osxe2v7en33v https://divineseeds.net/
Thanks Again to All my Friends, Family's, Teams, Sponsors, Followers and Subscribers!!! Your Genetics are Merry Magnificent, Mega Marvelous and Mighty Medical! Love um!!! I really Can't stress enough how Thankful and Grateful I am of All of you and what you've Shared with Us! Means the World!!! It's definitely a Pleasure being able to Grow with these Phenomenal Grow Lights! Please Enjoy! BudBrothers4-Life! Cheers Famz!!! Much Props and Much Topz!💯🔥 #Osree #GrowStarStore #Growatt #TNBNaturals #TNBTeam #GrowYourOwn #Bliss
https://instagram.com/osree.light?utm_medium=copy_link
https://instagram.com/as420.ca?igshid=1f116alw054wp
The Grow Bags: https://www.as420
https://instagram.com/tigerfish_organics?utm_medium=copy_link
https://www.facebook.com/Tigerfishorganic/
#TigerfishOrganics YouTube Channel Link: https://youtube.com/channel/UC6OSXTda1JYaVNoCxdcYqIg
Likes
4
Share


@Birthdaycakeuk
Follow
Week 3 started off well. Gave my plants nutrients for the first time. Lowered the water dose compared to last week and noticed more growth so sticking to less is more until the flower stage. The temperature has been consistent. This week also allowed me to top my plants. And I have seen the new stems coming out the plant. I’ve added a co2 bag hoping to see some difference. I did add a second fan in to just keep the leaves wafting but it reduced the temp so I took it out
