By continuing to use the website or clicking Accept you consent to our cookies and personal data policy and confirm that you are at least 18 year old. For details please see Privacy Policy and Terms
Accept
Likes
Comments
Share


@andzzz
Follow
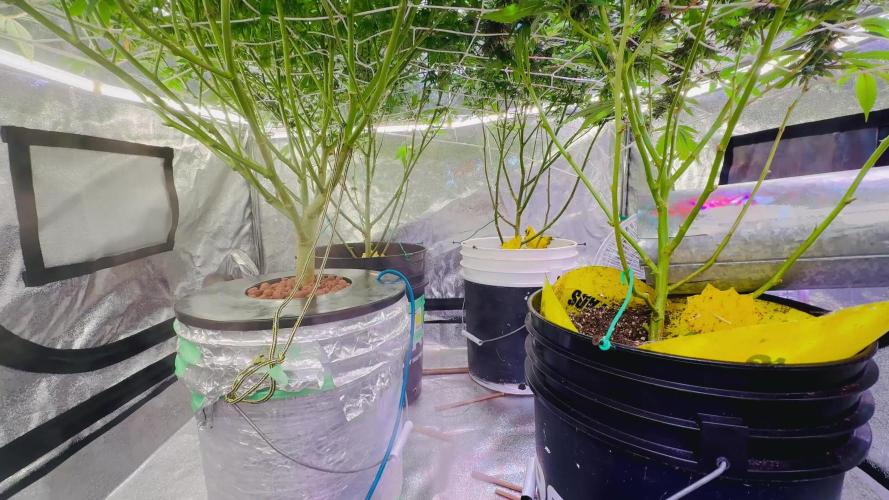
added a layer of coco soil (1l) mixed with 80g BioBloom at the beginning of this week
now every other day following combination:
- 2ml CalMag + 5ml Bio Heaven + 200 ml water
- 4ml Mono Trace + 5ml Bio Heaven + 200 ml water
@PH 6
therefore removed 800ml of water that week
applied nemathodes and a little bit of leaf coat, because flies take over


Likes
120
Share


@TheBudWhisperer
Follow
Week 27 - 4 weeks into the new flower cycle and bud development is a lot more advanced, much earlier post-transition too. It’d be great if these finished out early as we’ve got some extra cuts on the white widow that may need a home in a few weeks. Couldn’t resist - it’s such a vigorous plant that we’re gonna keep it for the next pollen chuck if the schedule aligns.
Chopped out a massive amount of larf from the undercarriage and we were ruthless here due to super high humidity and ideal conditions for botrytis. Still hoping on some useable seed and/or bud but this whole thing has been touch and go since the partial reveg. Alls good for now. Thanks for take’n a look.
As for the outdoor… meh. Like everyone around here we’ve fallen victim to far too much sustained rain recently and the WPM on the strawberry has really set in. The harvest window has cracked open slightly with about 2 weeks to peak. Still waiting on chop day though so it’s 50/50 if there’ll be anything usable on this plant. In a last ditch effort to get er to the end we’re gonna strip most of her fan leaves now. That’ll alleviate the WPM somewhat (in combo with a daily peroxide spray). We’ll likely chop early too. The bud wash should greatly assist with and offset any lingering small amounts but she’s gotta get there first and this strain is not known for mold resistance. Time will tell. The Lost Coast OG - an absolute champ. Lush and green, came through the rains just fine and should be a great smoke when it’s all said and done. Not long for either now - should be better part of 2 weeks for the strawberry and then whenever the og says fini👍.
Background/Repetitive Nonsense
These plants will be the two mothers this growing season that will be utilized for stage 2 of the pollen chucking project. We’ll be taking clones and stressing the genetics for some fem. pollen using colloidal silver.
Instead of trying to reinvent the wheel with landrace genetics, we’re effectively skipping initial hybrid crossing and stabilization, going straight to the polyhybrid mix. I call it the shotgun approach to selective, unvetted and amateur breeding on a micro scale😉.
These 2 parent strains will form the basis for 8-10 different F1 polyhybrid combinations and a further S1 back cross of each of the mothers. Not only should we be able to preserve the genetics for both mothers in feminized form but we’ll also be running an entire family of new hybrids after seeding out clones from each on the initial lineup of this summers photoperiods.
Method is pretty simple here; once we’ve got our pollen off the two mothers we’ll be clipp’n clones on 4 select strains that have proven results from various respected breeders. We’ll be using those for pollination purposes in what is expected to be a 10 plant recirculating Dutch bucket hydro system.
***Update***
The feminization process didn’t take at all with the strawberry or the Skywalker so it’ll be reg. Seed crosses with only Skywalker and some other 707 Headband that we have in the vault.
*********
Strain details:
Parent strains for self pollination
- Skywalker Kush by Reserva Privada
Classic kush effects and earthy aroma. The strong kush element of this cultivar will compliment any cross.
- Spliffs Strawberry by Spliff Seeds
Incredible mix of flavourful terpenes and hard hitting high THC. She’s got some Herer as well as some Diesel in ‘er so an obvious choice for any cross as well.
***UPDATE***
The strawberry had to come out of this breeding run to wait for a better mother that hasn’t been attacked by aphids. It’s been a tough battle this season and we’ve had to make a couple of heartbreaking sacrifices already.
Parent Strains for cross pollination
***UPDATE***
We added another 2 strains to the mix just in case we need to spot swap for some more variety.
- Ghost Train by AMS Seeds
A cross of Alien OG x Ghost Train Haze. Never tried the strain but I’ve heard only good things. This one might be worth mixing with the Strawberry so we’ll see how it goes.
***UPDATE***
Sadly - the ghost train turned out to be an auto so cloning her out as part of the breeding project is a no-go. Really disappointed about this but at least we still have a ready backup strain on the lost coast og to take her place.
- Boogie Nights by AMS Seeds
A cross of Kalijah, aka afghani/skunk/diesel/blue heaven X Juanita, aka NYC Diesel/Reina Madre). No idea here so naturally I’m interested😉.
**************
- Lost Coast OG by Emerald Triangle
Pakistani Kush x Lemon Thai x Chemdawg #4. Essentially a classic, west coast combo of landrace kush genetics that Cali is famous for, mixed with hard hitting Chemdawg #4.
***UPDATE***
The Lost Coast is a winner of a plant. Still outdoors and in veg. Looks like it’s recovered from the aphid attack. Might consider trying to take another cut of this and just rooting it in a pot for pollination. At this point, what the hell and if we could salvage anything it would be a positive.
*****update: got lazy and taking a cut never happened… so dumb - this plant is amazingly resilient and thicka than a snicka!******
- Spliffs Blueberry by Spliff Seeds
(Chocolate Thai x Afghani #1 x Highland Oaxaca) x Northern Lighhts Special. Only 1 bean of this left and the whole purpose is to blend the best of Spliffs Berry strains as a tribute. Awesome breeder and they’ve been very kind to us over the years.
- Northern Light by Royal Queen Seeds
NL means nuff said. A combo of 11 unknown strains believed to originate from the west coast of North America. This cultivar is a great take on these classic genetics and a perfect compliment to just about any cross. A biased fave of ours.👍
- White Widow by Seedsman
Brazilian Sativa x South Indian Indica. This classic strain has been unluckily elusive for us the last couple years. We know the quality of seedsmans version of this cultivar having grown it in the past. Sadly, a very strong performer that never made it to harvest due to an uncontrollable aphid infestation.
And we’re only at step 1.... still gonna need an assist with pheno hunting all of the crosses so if anyone’s interested in running the testers (when we finally get to that point) just let me know👍😎.
*****Update - plagues by issue after issue and having this project go an extra 6 weeks at least has been frustrating as fuck. Still on the way to chop as I write and really unlikely we’ll be pulling seed off this run. Big time bummer but it is what it is. Lessons learned, move on👍.****
Gonna be a Dope ass summer project and can’t wait to see it in full swing🤟. Thanks for stopp’n in y’all👊


Likes
2
Share

@BenDidKnEe
Follow
It’s more like week 7 of flower I was slack keeping up with updating my grow diary so I’ll try and fill in the missing time. Finish line is just a couple weeks away. Fingers crossed I get at least 1 kelogram


Likes
7
Share


@NCgrower252
Follow
Next week will flush plants with flavored extract and unsulfured Molasses. All is great!

Processing
Likes
73
Share


@Andres
Follow
she has a strong smell ... it takes a couple of weeks to enjoy ... she continues to fatten those buds ... a smell of mint and feels the smell of indoca to wood and earth ....


Processing
Likes
16
Share


@GirlGoneWeed
Follow
I have introduced a second bottle of CO2 to pump flowering weeks, I have cut off nutrients completely to get rid of nutes burn, plants are been fed PH water only.
For this run I have been using a DIY automated drip system that cost me less than $100, this system can be used to feed up to 10 plants, now I can go way for days without a worry :) if anyone is interested here is my Instagram video: https://www.instagram.com/p/Bwm1kO0BTNC/?utm_source=ig_web_copy_link
Stay Lit folks 👩🌾🏻

Likes
21
Share


@Staffedition
Follow
Привет друзья!
И так сегодня 13 день моей малышке.
Выглядит здоровой и счастливой
За 13 дней ни каких сбоев в росте и развитии, генетика хорошая
Всем добра и мира
#Smail_Seeds

Likes
6
Share


@CityFarmer
Follow
Hello everyone,
Been busy this week working around the house so not much I can say. Heres a little video of there growing...
See you guys next week

Likes
27
Share


@valiotoro
Follow
Pheno 1 dark purple : On the nose, it reveals a sharp burst of fresh lemon, layered with a powerful eucalyptus aroma that’s both invigorating and camphorous. A truly refreshing and vibrant terpene profile😈🍋
Pheno 2 Green : this one is a real surprise! If I close my eyes, it’s like Nutella! It’s as if you’ve just walked into a kitchen where hazelnuts have been freshly roasted 🤤🌰
Pheno 3 light purple : It’s a mix of the first two with a hint of amarena cherry at the end🍒🍧


Likes
13
Share

@birdmountain
Follow
Hollands Hope macht gerade die auffälligste Entwicklung durch. Ihre Blüten haben sich seit letzter Woche sichtbar vergrößern und entwicklen sich en Masse entlang der Triebe. Sie spreizt sich in die Breite. Die regnerische, windige und manchmal sonnige Woche hat sie gut überstanden, so soll es bleiben.
Die Blüten beginnen sich etwas rötlichbraun zu verfärben, wahrscheinlich eine Reaktion auf die sinkende Temperaturen. Ein Duft ist bei ihr nicht weiter festzustellen, das Höhenwachstum ist nun eingestellt.
Vielen Dank für den Besuch und beste Wünsche für eine schimmelfrei Woche!😀
Processing
Likes
18
Share


@AuntMeanie
Follow
Week 6 starts 12/31/21 but I happened to notice a weird leaf the night before. The Northern Light X Blueberry auto is very dark green and has sharp downturned tips. Which starts down the rabbit hole of google search to see the cause. I decide that is is Nitrogen toxicity caused by underwatering. At this time I was not really paying attention to when I feed them just whenever the pots were light. I watered them I later realize that while it may have started with underwatering it was so many other problems at once. I forgot to check the ppm or ph going in one day last week so I checked them going out. The run off was 2700ppm and I forgot to look up what that meant. I also doubled the strength of the nutes.
1/2 Saturday I flushed all the plants with 5 gallons of fresh water each that read 6.43 ph & 51ppm. I have Fox farm sledge hammer but for some reason I decided to use just water. The run off was consistently 6.2ph and I rinsed until the ppm was about 450 on NB. 250 ppm on Gorilla Glue and Pineapple express. I then decided that since it was nitrogen toxicity from underwatering that I should not starve the plant so I gave her week 1 of flower nutrients from the Foxfarm feeding schedule at 1/2 strength. I did not use Calmag since it's nitrogen was 2 and I didn't add the boomerang because that has nitrogen as a 1 and I thought since this plant has nitrogen toxicity I should skip the extra 3 nitrogen for now. I set each plant up on blocks so air could totally circulate to dry out the pots. Turned the fans on and waited.
1/6 There has been almost no growth since the flush. NB started off at a little over 9 inches and if I stretch her she is 10 at most.
Likes
7
Share


@MadeInGermany
Follow
Hi everyone 🤗.
Welcome to a new diary.
Cuttings were cut and rooted last week 🙂.
Today they were placed in 11 pots in Canna Coco Proffesional +.
Green Buzz Liquids is used for the fertilizer 😀👍.
Made in Germany 🤗.
I looked at the compositions of the individual elements and I am very impressed and excited about him 😎.
Greetings go out to Green Buzz Liqudis, and a big thank you for the support 🙏🏻👍.
Which training methods I will use will be decided spontaneously each day 😃.
I wish you a lot of fun with the diary, stay healthy l and let it grow 🌱.
You can buy this Strain at
https://thecaliconnection.com/original-sour-diesel.html
You can buy this Nutrients at
https://greenbuzzliquids.com/
Type:
Original Sour Diesel ( Clone )
☝️🏼
Genetics:
Fem seeds- Original Sour Diesel to Original Sour Diesel BX3 RVSD Male
Reg seeds- Original Sour Diesel x Original Sour Diesel BX3 Male
👍
Vega lamp:
2 x Todogrow Led
Quantum Board 100 W
💡
Bloom Lamp :
2 x Todogrow Led
Cxb 3590 COB 3500 K 205W
💡💡☝️🏼
Soil :
Canna Coco Professional +
☝️🏼
Fertilizer:
Green Buzz Liquids :
Organic Grow Liquid
Organic Bloom Liquid
Organic more PK
More Roots
Fast Buds
Humic Acid Plus
Growzyme Big Fruits
Clean Fruits
Cal / Mag
Organic Ph - Pulver
☝️🏼🌱
Water:
Osmosis water mixed with normal water (24 hours stale that the chlorine evaporates) to 0.2 - 0.4 EC. Add Cal / Mag 2 ml per l water every 2 waterings . Ph with Organic Ph - Pulver to 5.8 .

Likes
38
Share


@ChachoGreenCrown
Follow
Esta semana podar, clonar y voy adquirir nuevos productos.
**6.1.1.- CLONACIÓN
DIA8:
Ya toca hacer podita, para este tipo de cultivo (SOG) interesa que las plantas tengan un cogollo central… y todo lo demás sobra!
Trataremos de sacar unos esquejes para tener esta genética presente, creo que saldrán bastantes, aunque la verdad voy a tener que hacer milagros porque son muy pequeños, pero estoy seguro que saldrán adelante.
Si todo va bien la segunda parte de este seguimiento tendrá que ver con esos clones. Vais alucinar con la poda tan agresiva que les he practicado, pero les va a venir bien.
Saco todas las plantas para hacer una inspección de forma individual.

Likes
179
Share


@Grow3rPT
Follow
👉 ( Floração ) 👈
📅 Total de Dias 71 (F 41) - 12/10/2021 / 💦 Rega com nutrientes apenas planta 4 ( Plantas 1,2,3 e 5 não foram regadas )
📅 Total de Dias 72 (F 42) - 13/10/2021 / 💦 Rega com nutrientes plantas 1,2,3 e 5 ( Planta 4 não foi regada )
📅 Total de Dias 73 (F 43) - 14/10/2021 / 💦 Rega apenas com agua planta 4
📅 Total de Dias 74 (F 44) - 15/10/2021 / 💦 Rega planta 2 apenas com agua. Plantas 1,2,3 e 5 não foram regadas
📅 Total de Dias 75 (F 45) - 16/10/2021 / 💦 Rega de todas as plantas apenas com agua
📅 Total de Dias 76 (F 46) - 17/10/2021
📅 Total de Dias 77 (F 47) - 18/10/2021 / 💦 Rega apenas com agua (apenas a planta 4) 1,2,3 e 5 não foram regadas
👉 MARSHYDRO
👉 CODIGO PORMOCIONAL : Grow3rPT
👉 Em marshydro.eu 3% de desconto em qualquer produto

Likes
14
Share


@Chronigmatic
Follow
Just watering and waiting...🤤
How many days do you think??
Please lmk
Likes
53
Share


@cheetah844
Follow
Dirty Aquarium Water:
6.43 pH
381 PPM
73.4⁰F
They've gotten both bushier & taller, I needed to create more room in the tent for the clones that I will make seeds from, so I moved the extra clones I'm uncertain of what I'm going to do with it into a makeshift grow area.
I'm waiting for temperatures to stay consistently warm outside so I can get these soon to be forced female outdoors to start making feminized seeds.
Likes
17
Share


@The_Projexx
Follow
Welcome to the start of week 3 of flower for our Project Sativa. Things are grooving along and with lots of time on the stretch period I'm excited to see how the ladies fill out their lovely flowers!
Huge shoutouts to @MarsHydroLED for their outstanding work on lights and grow tents that make a huge impact on growing.
Huge shoutouts to @Seedsman , @PyramidSeeds and @GreenHouseSeedCo for their outstanding work genetics to bring us the fine medicine we all love and enjoy!
A big thank you to all my followers and to the people who stop in to show some love, keep inspiring to grow!!!
Follow along and stay tuned this shows just getting started!!
-The Projexx
Day#15F Ladies are absolutely loving the water increase , they're pumping new flower sites. We cleaned up the bottom of the 4 plants.
Day#16F Ladies are growing along, I will be moving them into the bigger tent with the same light they are under now.
Day#17F Pictures N/A. Watered ladies. Ladies continue to stretch along. Cotton balls are getting bigger daily!
Day#18F We got a sweet smell filling up our tent hard to pin exactly what it is but its a sweet nose for sure. Ladies continue to stretch along.
Day#19F Pictures N/A. Flower sites continue to swell, some have started to pump trichomes like crazy already.
Day#20F Pictures N/A. We had a timer stop working on us and the light stayed on for 5 extra hours. Likely nothing will happen other then being delayed one week at the end. Life happens wear a helmet lol.
Day#21F Pictures N/A. Replaced timer everything is as it should be now. Hopefully I did not stunt them to bad if any at all.
Recap: Things went ok this week, between trimming my last run and dealing with some slight issues on this run (Timer) I've been extra busy. I'm still very pleased with these ladies they are all performing very well and it wont be long till we start to see some nice thick flowers!

