By continuing to use the website or clicking Accept you consent to our cookies and personal data policy and confirm that you are at least 18 year old. For details please see Privacy Policy and Terms
Accept
Likes
Comments
Share


Likes
8
Share


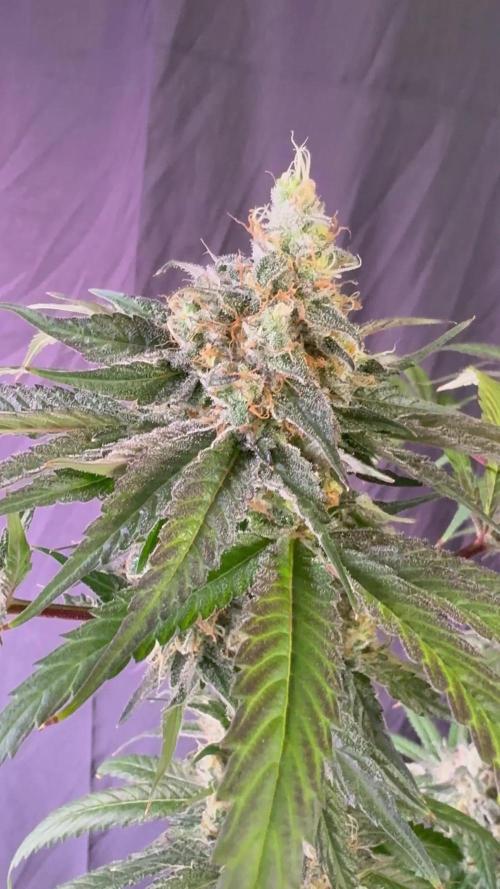
@SherbGrows
Follow
Fast Buds
Wedding Glue Auto
Day 25 from sprout
Light: ViparSpectra XS2000 dialed in at 75%
Watering top and bottom every other day to every 2 days
Growing in Natures Living Soil Autoflower mix with happy frog.
I will honestly say I am very pleased that this wedding glue is starting to take off! It did take it this long to build its root system but I am happy. I think it may take this girl another week to 2 weeks to enter pre flower. Because she is the "runt" of the 4 plants in my 4x4 I will probably give minimal training for this run.
See you all next week! Happy Growing!

Likes
5
Share


@HempZ
Follow
Been a while since any updates here on growdiaries, but now im back! Gonna start keeping progress of my plants here again, so here is the info of this new diary:
11 straberry lemonades from Barneys farm
1 granddaddy purple from Blimburn seeds (freebie)
i've been hunting for a special SBL pheno to keep as a mother. 3 of the them have the terp profile im looking for, i'll refeer to them as SBL 1, SBL 2, SBL 3. the other 8 SBLS are not what im looking for.
The GDP is looking and smelling amazing too, one of the best looking plants i've ever grown.
Plants with 34 days of flower - 31/08/24


Likes
82
Share


@WhiteEdge
Follow
26.03.2024
Continue into week 4
Update firmware on TrolMaster Tent-X (3.6)
Replace all filters, remove and clean drain buckets and tubing.
Mix new batch with 56ml AN connoisseur AB + 4.5g Big Bud Powder + 7.5ml Silica - total 30l @ 1.34EC. NPK Ratio is 1-2-3 , Cal/Mg ratio is 4-1.5
Target EC for this week is 1.2 start and end week with 1.3. Checking plants will determine timing of strength
Donne one pass off long misting (3min) with diluted solution @ 0.84@C
Set Day/Night misting cycle @ 60s ON time
Finally have time for managing canopy, pull down taller branches and position all tops to fit under screen without touching. Try ro spread them evenly across the net, top per square of net
Defoliating all girls, remove all fan leaves and prune lots of smaller branches from middle. Lot of foliage is removed!
After stripping humidity drop significantly (41%) , need to install humidifier again to keep RH @ 50-52%
Set dehumidifier thermostat to work @ 50% RH. Reduced light intensity for this day, let girls recover from stress
PAR map 1150max/650min PPFD, VPD -1.2-1.3, DRH 50-54%, NRH 45-49%, NT-20-21c, DT-24/25.5c, Leaf temperature 22-23c, Light distance 45-55cm, CO2 700+ppm
HLG Scorpion Diablo @ 65-75% - 45-55cm distance
60s ON time 20min OFF time @ Day Time
60s Off time 30min OFF time @ Night Time
NT-Nutrient Tank - PH -5.90-, EC -1.32, Temp-20-21
27-28.03.2024
All girl looking great after defoliation,)
Clean benches and floor in box
Replace all filters
Set dehumidifier thermostat to work @ 47% during night times, 50% @ day. Humidifier is also connected and set @ 49% Day and 45% @ night, if needed
Inkbird humidity controller stop executing's automation for day/night settings. Start manually to change day/night values for now
Next several days, until weekend, temperatures outside will be high , 29c max. Hope it will not raise temperature in box to much.
Light is set on TrolMaster Tent-X controller to dimmed at 28c
AC Infinity fans are set to AUTO mode with height temp set at 26c and high RH set at 54%
Top up tank with 25ml AN connoisseur AB + 4.5g Big Bud Powder + 7.5ml Silica - total 75l @ 1.34EC
PAR map 1180max/680min PPFD, VPD -1.2-1.3, DRH 50-52%, NRH 45-48%, NT-21-22c, DT-24/25.5c, Leaf temperature 22-23c, Light distance 45-55cm, CO2 700+ppm
HLG Scorpion Diablo @ 80% - 45-55cm distance
60s ON time 20min OFF time @ Day Time
60s Off time 30min OFF time @ Night Time
NT-Nutrient Tank - PH -5.90-, EC -1.26, Temp-21-22
29-30.03.2024
Refilled the tanks with 20l of fresh mixture. 25ml AN connoisseur A+B + 3g Big Bud Powder + 7.5ml Silica - total 20l @ 1.21EC
Refilling is done in two passes, one time before light up, and second time early in morning, two hours before night time.
This give additional nutrient cooling without running water chillier. Refill solution is @ 18c
Checking EC and PH 2-3 times a day. The electroconductivity values are around 1.24EC.
I maintain the strength until it drops or rises. For now, I’ve caught the perfect strength, the liquid is almost static with very small oscillations in electroconductivity and PH.
Replaced all filters in the system, replaced on washing… Every other day is enough, during daily cleaning there is no dirt on the filters.
The girls are handling the environment well, leaves are raised as they should be, they seem like very happy plants.
Formation and enlargement of flowers can be noticed with the naked eye.
The wave of warm weather continues all this week. Expected temperatures for the next seven days range from 25-29c. Need to pay attention to that
Raise light 10cm, top of canopy now is around 50-55cm
PAR map 1180max/650min PPFD, VPD -1.2-1.3, DRH 50-52%, NRH 45-48%, NT-21-22c, DT-24/25.5c, Leaf temperature 22-23c, Light distance 50-55cm, CO2 700+ppm
HLG Scorpion Diablo @ 80% - 50-55cm distance
60s ON time 20min OFF time @ Day Time
60s Off time 30min OFF time @ Night Time
NT-Nutrient Tank - PH -5.95-, EC -1.24, Temp-21-22
31.03.2024
Girls totally recovered from defoliation. Almost all gig leaves grow again on all girls.
Tropicana Cookies have most apparent bud development, in size as well
Purple Lemonade is going to be a biggest in height in this grow . They already around 85+cm with SCROG branches.
Tropical condition continue. Temperatures going from 26-29c, night temperatures still colder and stay around 16c
Outside temperatures affected water temp in nutrient tank, will se if i need for a water chiller or i will cool with adding cooler nutrient solution.
Lower wattage on light , set Diablo @ 75%
Replaced all filters in the system, replaced on washing…
Refilled the tanks with 15l of fresh mixture. 25ml AN connoisseur A+B + 3g Big Bud Powder + 7.5ml Silica - total 15l @ 1.21EC
PAR map 1180max/680min PPFD, VPD -1.2-1.3, DRH 48-52%, NRH 42-48%, NT-22c, DT-25/25.5c, Leaf temperature 22-23c, Light distance 50-55cm, CO2 700+ppm
HLG Scorpion Diablo @ 80% - 50-55cm distance
60s ON time 20min OFF time @ Day Time
60s Off time 30min OFF time @ Night Time
NT-Nutrient Tank - PH -5.95-, EC -1.21, Temp-22-24
01 04.2024
Outdoor Climate: It’s hotter outside. I’ve set the Diablo at 73% to maintain temperatures in the box within the 25-26°C range.
Humidity: After defoliation, the humidity is low, which is great! The dehumidifier hardly worked this week.
Misting Routine: I start the day with a 3-minute misting session; this will be the routine for now.
Nutrient Solution Temperature: I’m keeping the nutrient solution temperature between 20-23°C. I refill the tank twice a day to cool down the solution.
Light Parameters:
PAR Map: Maximum PPFD is 1080, minimum PPFD is 650.
VPD: Ranges from -1.2 to -1.3.
Daytime Temperature (DT): 25-26°C.
Nighttime Temperature (NT): 22°C.
Leaf Temperature: 22-23°C.
Light Distance: 50-55 cm from the plants.
CO2 Levels: 700+ ppm.
HLG Scorpion Diablo: Set at 73%, positioned at a 50-55 cm distance.
Lighting Schedule:
Daytime: ON for 60 seconds, followed by 20 minutes OFF.
Nighttime: OFF for 60 seconds, followed by 30 minutes OFF.
Nutrient Tank (NT):
pH: Maintained between 5.9 and 6.1.
EC: 1.18.
Temperature: 20-23°C.
Week 4 off Flowering in Summary
120 litter off RO water,
210ml+210ml AN connoisseur A+B, 18g Big Bud Powder, 45ml Growth Technology Liquid Silica
70kW electricity in total for light, Pumps and AC Infinity Fans. 63kW for Light + 2kW Dehumidification + AC Infinity ventilation
Week start @ 1.31EC, nutrient strength., keep strength @ 1.24 till the end of the week
Girls look superb all time, Wedding Cheesecake have two pheno, realy like buds on one girl
Tropicana Cookies fill bud sites this week a lot, Purple Lemonade is going to be talles from all three stains. Nice bud formation also.
PH was stabile and move from 5.90 min to 6.2 max.
Light distance for this week - 50-55cm from tallest top , PPFD levels around 1100 in center, trough whole week. Lowest reading 680 @ corner
Temperature are from 23c at start off day to 26c max at some points. AC Infinity T6 extracting fan program in AUTO to kick in @ 26c
Night temps around 21-23c, dehumidifier work less this week. Outside humidity is low this week
Water temperatures in middle off week start to rise, reffiling solution is cooled to bring temp back from 23-24 to 20c
Defoliate girls on first day off ths week, pruning off smaler branches, lots off foliage is removed
After defoliation humidity drop inmediately in box. Need to bring back humidifier for couple of days. RH was low trough whole week
Day RH is moved from 45% to 50% max, at night times drop to 40-45%
Next week outside temperatures continue above average for this time of the year.
Continue in next week, starting probably with one more light defoliation, bigger fan leaves only
Likes
10
Share


@Green_Dream
Follow
I'm very happy about how the buds have developed in this 2nd week of flower!
The girls stretched a lot this week, about 15cm. The bud sites are a bit too close to each other, but I can't do much about it now, I will have to put up to the extra work when harvesting.
They get fed 6 times a day and they drink a looot, about 2,8l per day 😮
I'm doing a flush today, the first one, to get the roots rinsed out of any accumulated salts.
Likes
2
Share

@Ninjabuds
Follow
The Superboof harvest was impressive, yielding large, crystal-covered buds with a captivating aroma. What's truly striking is the deep purple hue revealed when the buds are broken apart, adding a unique visual element to its already impressive qualities.
Likes
6
Share


@HowtoBubatz
Follow
We’re officially in the final week for my Strawberry Gorilla Automatic from Fast Buds! 🌟
This beautiful girl has had a very quick flowering phase, but looking at the trichomes, they’re right where they need to be so no complaints!
She will be flushed throughout this week and then harvested and hung up to dry next week.
I’m super happy with how she’s developed!😋
Processing
Likes
8
Share


@GrownwithLED
Follow
After defoliating both Barbarian (=AK-47 x Barbara Bud) plants after week 11 they now develop more and amore flower clusters, since the light can penetrate deeper int the canopy now. The plants are producing trichomes like crazy, even the bigger sugar leaves are covered in them! VERY FROSTY PLANTS! The flower clusters clearly form colas now along all side branches and both plants fill up nicely. The smell is now strong and sweet with a clear peach aroma to it, it makes me smile every time I look into the tent. The plants love the Advanced Nutrients feeding schedule and are getting the recommended dose every watering.


Likes
12
Share


@CanadianFillmore
Follow
Thanks for stopping by growfessors! Harvest time has arrived for LSD! Woooweee! This strain continues to impress me and is going to be a mainstay in the garden for the foreseeable future.
Will update in 7-10 days with dry weight and initial smoke report. 👽🌳💚
Update April 30 - dry weight 181 grams. Very happy with this result.
Initial smoke report, citrus and fruity, very much a heady cerebral high.


Likes
20
Share


@MrWolfe
Follow
So this round I just lollipopped and didn’t strip the top at all, with better veg next round it’ll work better but I’m having issues with some plants not quite trellised how I’d like. Everything smells great, BCS,BD and WM are getting fat and PKB is frosty and tight. Watering is more of a chore than I’d like I think I’m just going to use some 5s for the next round . Thanks for following along I hope your buds are fat and frosty.


Likes
376
Share


@Metatronix
Follow
Good day to all my friends and visitors here on GD.
After this week end, we will cut the first Tropicanna XL plant:D
Middle this week we changed the reservoir water for a fresh solution.
This plant will not get a flush before harvest, it's the first time i'm not flushing a plant for the cut but you know only two of the four girls are ready to chop and it's not possible in my RDWC to seperate feed them.
So yes it's kind of an experiment for me.
Something's not right with my fresh solution or the plants get root rot or something but the girls starting to show K deficiency...good that the plants are on the finish line :)
The SE7000 runs at 540 Watt and about 33cm from the canopy and is doing an astounding job.
For anyone who is interested in obtaining this efficient and affordable light fixture here's the link:
https://spider-farmer.com/products/spider-farmer-upgraded-se7000-730w-commercial-led-grow-light/
A shout out to Sweter Seeds for the gift of genetics, this cultivar really rocks 💪☘️💚 https://sweetseeds.es/en
I also want to thank Jungle Indabox nutrients for supplying me with their excellent nutrients line: https://www.jungleindabox.cz/en or
https://numazon.cz/homepage/
That's it friends, I hope to see y'all next week, bless.


Likes
10
Share


@Audi_grows98
Follow
This week gorilla cookies finally got the chop! She was a very fun plant to grow and she produced dense,sticky buds that have some very pretty colors to her. If you wanna impress your friends with a plant,she’s one to do it with🔥
Processing
Likes
61
Share


@Dunk_Junk
Follow
She's over doubled her height this week!!!!!!!!!!
Looks like she's going great!
An educated guess says she is just about to enter flowering in the coming week.

Likes
2
Share


@Ese_muchach0
Follow
Loving the steady growth !! Fimmed and bottom branches tied down . Another week/ten days and I reckon she’ll start flowering.
Likes
184
Share


@OrganicNature420
Follow
Germination date 🌱 12/07/2021
Day 71 24/09/2021
Strain 🍁 SinCity seeds YUZU SORBET
(Purple yuzu x whitenightmare)
THC% • Unknown
💡 Mars Hydro FC4800
• Power draw 480W + 5%
• Max coverage 5 x 5
• LED 2070pcsSamsungLM30B1&Osram660nm
• Max Yield 2.5g / watt
• Noise level 0 DB
• Removable Driver +2m cable
• Daisy chain (multiple lights)
https://marshydroled.co.uk/products/mars-hydro-fc-4800-led-grow-light-samsunglm301b-commercial-greenhouse-medical-indoor-kit 🇬🇧
https://www.mars-hydro.com/buy-fc-4800-480w-4x4-energy-saving-full-spectrum-commercial-led-grow-light-mars-hydro-for-sale 🇺🇸
PROMO CODE • (ORG420) DISCOUNT 👍🏻 marshydroled.com
⛺ Mars Hydro 120 x 120 x 200cm
📤📥 AC infinity 6inch
💧 10lt dehumidifier
❄️ 3.1kw air con system
💉 Nutrients GreenBuzzLiquids
Organic Grow Liquid • 1-4ml until 2wk flower
Organic Bloom Liquid • 2-4ml flower stage
Organic More PK • 2-4ml +wk3 of flower
Organic Calmag • 1-2ml/lt whole grow
Fast Plants Spray • first 3days at night lights off
More Roots • 2-5ml veg +2wks flower
Fast Buds • 5ml +wk2 of veg until 1wk flower
Humic Acid Plus • 2-5ml whole grow
Growzyme • 2-5ml whole grow
Big Fruits • 2-5ml flower stage
Clean Fruits • 5ml flush 1wk
Ph powder
Root Gel
Living Organics
PROMO CODE • organicnature420 15% off ✌️🏼
https://greenbuzzliquids.com/
🥥 Growing Media • Coco Coir
Notes 📝
Both Sincity strains have some nice early frost levels ❄️ got a feeling they will be dripping in tricones when done. No complaints so roll on next week. Happy grower 💚
Happy growing fam ❤️🌱🍁👍🏻
Likes
16
Share


@TooQuiikk
Follow
The hardest part of growing, is the time for harvest...
I didn't do the norm, no 12/12 I do 10/14.. Do I harvest? I flushed her out, its only week 6 of flower, and I feel like there is plenty of time for these babies to bulk up... things are on cruise control, moon mintz is a 9 week flowering plant. She is looking absolutely BEAUTIFUL.
This whole grow, except the hermie... has been a blessing. I love this plant, seeing my efforts going into these huge buds is very very amazing.


