


By continuing to use the website or clicking Accept you consent to our cookies and personal data policy and confirm that you are at least 18 year old. For details please see Privacy Policy and Terms
Accept
Likes
Comments
Share


@ao_grows1978
Follow
Well, not the biggest yield from my little mainline...28g of keeper buds and 28 grams of trim and little buds for RSO. The smell from the buds is hard to pinpoint. A little pine, a little sweet, a little chicken soup. Very much on the earthy side and affects are smooth and sedating. 100% some chill, social smoke or great for anxiety.

Likes
16
Share


@Marijuanaisland
Follow
Infelizmente ainda não posso por a florir tenho o quarto de floração lotado ainda mais 8 dias talvez mais elas estão indo bem, assim que colocar na flora vou atualizar de semana em semana obrigado a todos que estão acompanhando meu diário


Likes
3
Share


@P_Silas
Follow
Season 2 is officially underway and so excited for this grow. Growing 4 plants, but space is a lil limited. Growing in an 80x80cm so using small pots. 2x 8l and then 1x 5l and 1x 4.7l (if you wanna be exact lol).
This time I decided to experiment a bit.
I'm testing 2 different soils, both in 8l pots, both Purple Punch Auto by Fastbuds, both in airpots. Their names are Robin and Lily.
Also testing fabric bags against airpots. Both in same soil, both in 5l pots, both Wild Dwarf Auto by Bulk Seed Bank (that was the plan but now it's 1 WD and another Purple Punch). Their names are Jess and Cece.
For this one, Robin, had the seed in water for about 24 hours then in paper towel. Then, into Living Organics soil.
If you check the pics, when she popped out the soil, the root was showing also, ouch. But she looks ok now.

Likes
18
Share


@KushAllDayLong
Follow
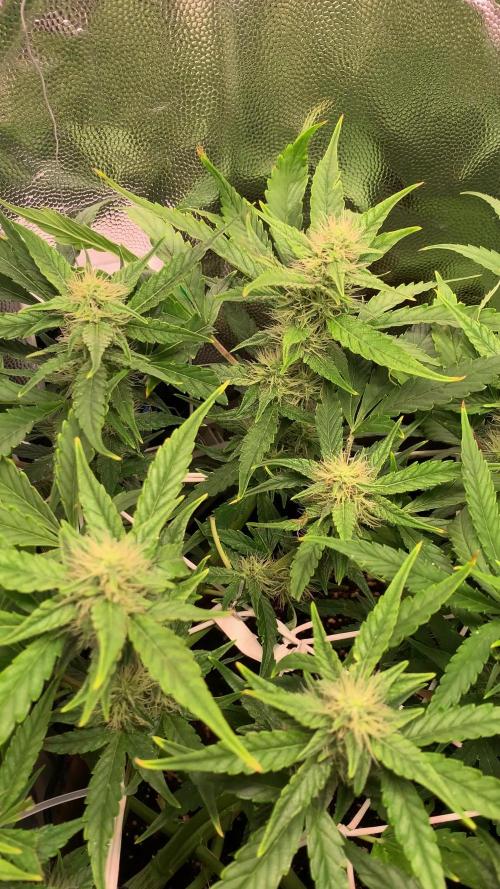
Week 10! First week of flower! I was eager and may have jumped the plan I had the other day of waiting another week but after some sound advice from a few people that inspired me to flip them to flower and watch them flourish!!
Day 1..fed fox farm trio with some added aloe vera, very little..won't add anymore from here on out..I added some peroxide as well!! I opened the tent this evening and they were praying up to the mary Jane gods!! Just what their daddy wants to see!! Let's get this smoke to the heavens for the loved ones!! Aye!!!
Thanks again to everyone who inspires me and has helped me along the way! Oh and I ordered a trellis net so it should be set up in the coming days!!
I was going to enter the solo cup challenge with the mini Starbucks cup you see but I didn't realize time was ticking and i may end up throwing her away unfortunately as I dont have a tent to put her in with a light set at the right hours or whatever!! She wouldn't survive on 12 12 or would she?
Day 2 of flower - I opened the tent this morning and the girls are reaching for the sky even more! I forgot to mention I made some fresh Aloe Vera tea/juice for the last feeding I did before flipping to flower..next run I'm going to try not using aloe vera on one of my plants to see the differences..I feel the aloe vera has helped my girls alot but I'm not too sure!! I made a video on youtube about how I made it!! If you have some time and are interested in making your own...
Day 3..I opened the tent and BAM!! These girls know how to make you feel good!!
https://youtu.be/ud9Yi-F5HSQ ( one of my high school friends band is called Katastro, Andy Chaves..lead singer, passed away in a tragic car accident this past year and it's been really tough on everyone!! R.I.P Brobro! The link above is a song I listen to, it's helps me through on tough days and sometimes it helps me shed a much needed tear!! I'm here for anyone that is struggling..have a good day!!
Day 4 of flower..Half way through the day I made the video above titled day 4 of flower..they are all looking happy but the Watermelon Zkittelz is really taking off!! If you have any advice please send it my way!!
Day 5 of flower in the books. Plants look healthy, few minor adjustments next watering for one of the girls..but for the watermelon Zkittelz she's taking off like crazy!!
Also I'm doing a SPIDAR FARMER SF1000 NEW YEARS GIVEAWAY (PURCHASED BY ME ) ON MY NEW YOUTUBE CHANNEL. IF YOU ARE INTERESTED COME CHECK IT OUT AND GIVE ME A LIKE COMMENT AND SUBSCRIBE TO ENTER THE GIVEAWAY!! I FIGURED WHEN I UPGRADE MY LIGHT SET UP WHY NOT GIVE ONE AWAY TO ONE LUCKY WINNER!!
FOLLOW THIS LINK BELOW TO ENTER:
https://youtu.be/pqEeoWQjCAM
End of Day 6 of flower - the girls are filling out and stretching high!!! Let's go!!!
THANK YOU!!
CHEERS!!
One love!!
Likes
175
Share


@love_2_grow
Follow
Day 15
Today I switched the lights from the Seedling program to the Growth program. I measured around 640 PPFD at the canopy level so a bit high for early veg but I will leave it where it is now and keep an eye out for light stress, and raise the lights if I have to.
I also added a second USB fan for increased circulation. USB fans are great when the plants are small and you don't want the stronger winds that the regular clip fan generates. I also started the clip fan but directed it towards the lights to help keep them a bit cooler.
I adjusted the extractor fan from 60 secs Off/30 secs On to 30 secs Off/30 secs On in order to remove more hot air. This will have to be tweaked further and I'll monitor my temps to figure out a suitable setting. It becomes a balance between temp and humidity. I really wish I had a system where I could set a target VPD and then the system would automatically adjust temps and humidity to follow that target. Not practical in my small setup though but maybe one day...
Temps are always an issue in my setup as I have two powerful lights inside one small tent without AC. I have set the light cycle so that the lights are on during the night but off during the day to help to balance the temp a bit. I'm also considering getting some extension cables and put the LED drivers outside the tent to see if that helps to bring down the temps a bit further. Later in the grow I will use CO2 so that will help a bit against higher temps.
Finally, I watered the plants as they were getting a bit dry. The left plant got 1 liter and the right plant 1.5 liters as the sensor reported that that pot was a bit drier. I reckon it has to do with the plant being larger (almost double the size of the other plant!) I should also really get my ass in gear and hook up the Blumat system so I don't need to worry about hand watering.
Day 16
Nothing to report really except some additional growth, both vertical and horizontal.
Day 17
Watering time again. Gave them 6.2 pH water this time and once again more to the right plant as it drinks more. I guess around 1.3 liters for the left plant and 2 liters for the right one. I tried putting in my small USB humidifier into the tent but I soon realized that it can't share the USB power that the fans are running on so will have to get another USB power cable in there. Didn't expect that small humidifier to use that much power. Oh well, that's a job for another day.
Day 18
The girls are thirsty it seems as I had to water again today according to the Blumat sensors (I really, really need to install my Blumat system as soon as possible but should get the last bits that I need in a day or two). I gave them 2.5 liters of water (pH 6.7) and once again a bit more to the right plant.
I also was able to squeeze in my tiny humidifier into the tent even though the tomatoes are still in there. Turns out that all I had to do was to switch the USB power adapter from the old Samsung one that I used to a more powerful iPad charger. Now it works just fine to run the fan and the humidifier on the same power. The reason why I'm using a small USB humidifier instead of a proper one is simply due to the lack of space in my small tent. This (very basic) humidifier is the smallest one I could find yet have a decent size tank so I don't need to fill it up all the time.
Day 19
The cover crop EXPLODED since yesterday so the first thing I had to do today was to cut that back a bit. I also started brewing some compost tea (AACT). I mixed together worm castings, rock dust, biochar, lime, bentonite, neem meal, kelp meal, and molasses and will leave it brewing for 24 hours and then feed it to the plants tomorrow. Would have liked to add alfalfa meal as well but haven't been able to find any. I usually put my seed starter warming mat under and taped to the brewing bucket to increase the tea temperature and microbial activity.
The plants are doing their thing, a little bit taller and a little bit wider. I will probably top the right plant next week but not sure about the left one as it is smaller so might need another week.
Day 20
The compost tea was ready today after 24 hours of brewing. I fed each girl with around 3 liters of tea (pH 6.8) and as I wasn't planning any foliar feeding this time around I kept the tea unfiltered. So that everything that went into making the tea ended up as a top dressing. I guess I don't have to water for a couple of days after this.
Not much change is plant size but the leaves are filling out.
Day 21
Today was completely uneventful so not much to report except that I probably will top the right plant tomorrow as it is up to 5 nodes.


Likes
3
Share


@GASOnly
Follow
They still youngings so I only give straight water P.H at 6.5, 18-6. Germinate on the 29th of Dec straight into coco loco sprouted on the 2nd of Jan. NEWYEARS BABY!!
Likes
18
Share


@potcommunication
Follow
Florganics is a living soil starting fertiliser
the earth is this time plagron light mix
the lamp is at the start at 25 watts and 20cm above canopy
i will start to remove water from the system by placeing a spongecloth on the waterslide
i think the earth is a bit on the wet side
Also want to add nutrients at some point and fresh nematodes to make sure i dont get the damn flies again
i move the controller to the other side to make sure the sensor for temp and humidity is close to the plants
I had to change the soil mid week as it was too hot. It was made from last year's FLO Florganics and too bad...
It switched to biotabs NL
And put ZK 1 and ZK 2 in the fridgegrow system. I removed ZK 3...
WHATEVER
FLO Florganics is actually a great product and as soon as it is available again we will use it again...
There was trouble with the factory and Flo learnt a lot. Now the fertilizer gets tested in and independent lab....
END of week all looks great the plants are growing the one that had too many nutirents for a while is now ... bigger of course

Likes
55
Share


@Organic_LarF
Follow
High GD community
Week 16,
Zuchinis all around, tomatoes getting ready on a daily. Cucumbers are getting almost mature proportions. Everything going well.
Terra preta
Location: center perma garden
Surface: 125cm x 105cm
Depth: 115cm
The hole was dug out over 3 days, it were very sunny days. 😅
Theres mostly loamsand with a small sandloam bottom that was very hard. The sand was also very compressed and hard. The top layer is this grey dusty soil of about 40cm deep.
At the bottom theres pure sand thats soft, easy drainable.
First step is to fill up the entire bottom with fine chopped wood, progressively using bigger pieces of wood. I try to use some hardwood like oak to for its extra K (potassium = pot ash). A bit of charcoal to.
This will take the entire first day, bcs it needs to have a minimal ticknes of pure ashes of around 5cm. Otherwise, after compressing it with the upcoming layers, the ash-line would almost disappear. Not all the wood needs to be burned entirely. Its a first layer with lots of N and K. Bones can be used to in the fire making the NPK complete. But it can be added also as a separated layer. I dont have that much bone material because my 2 dogs, or eating, or burry them somewere.
Little warning at the end, be aware of your local laws applied to open fires. 😅😉
After a good burn ive got between 8 and 12cm of ashes in total over the entire surface.
A small layer of soil (5cm) is put on top of that. Theres no need to harden out that layer, pressure will to the work and the layers will compress over time into ideal circumstances.
On to the next layer!!
Next is a layer of the compost, but the part that isnt allready decomposed. Its green/brown/yellow of color. And a bit of everything, grass, weeds, leafs and some thin branches.
Another layer soil to cover that up.
Now i formed a thin layer of chopped(10mm) wood(beech), just enough to make a thin,almost 1 piece high, layer. On to this i added a complete wheelbarrel of compost(black) with small pieces of still not completly decomposed materials. Lots of worms here.
On that, you guessed it, an other layer of soil. I try to have both types of soil in that mix, the almost pure sand and the more grey type.
Next, back to the beech. This time the rest of the bag follows. Theres a good layer of around 3cm deep. On this ive layed down some new small woodsticks to make a small fire again. Starting at the center and adding some last branches i found. It turned out really smoky!!
Half way the burn ive opend the core of the fire, trying to spread the small pieces of char over the complete surface. After that, i added for the first time some water here.
And an other layer of soil again, this is just covering up each time. Max 5cm!!
Now we are at the upper half of the pit. Still 50cm to go.
Now ive added some compost again, the green/brown/yellow one, with on top of that, a 15 liter bucket with compressed bokashi fermentated kitchen leftovers. Making a layer out of that and some fresh bokashi juice with 10 liters of water to drain those benificial bacteria into to compost layer just underneath it. This layer is almost 20cm tick.
Again, yeah, soil, 5cm.
Ive bought some blond peat to at to to toplayers. Last 25 to 30cm of soil, is a mix of the peat(20%) and the two other types of soil. First ill do tiny layers of each, last 10cm i try to mix it.
And to finish the job, ive took some 100% reused and composed soil with some perlite in it from past use.
I havent watered a lot, but the meteo predicts a good amount of water in the upcoming days.
The soil that stayed and didnt get back to its original place, ive used to make a new top layer on the rest of the mini field.
I havent used clay because it was hard to find or just to expensive. Beside the peat(250l), i didnt buy anything. So its labor intensive, but real cheap. If you dont get a sanction by the community ofcours! 😅😅😅
Feel free to comment and give your toughts.
🙏🌿🌿🌿🙏
Thats it for this week boys and girls,
Thanks for reading and passing by and 💚💚💚👏👏👏👍👍👍 for Marshydro leds. Quality/price top!
Grow safe buds and feel free to check out my other ladies doing fine thanks!
🙏🌿🌿🌿🙏
Weedseedsexpress!!!! 👏👏👏
LarfxWSE for discount at weedseedsexpress!!! 15% off!!!
Zamnesia!!! 👽👽👽
Add OrganicLarF as a code when buying your own MarsHydro LED light and get a nice reduction!!!👽🚀🛸
Likes
7
Share


@Herbz_Unkraut
Follow
such an beautyful strain! the colors are really outstanding and the scent is incredible!
loads of resin production on this one, not the highest yield but insane quality!


Likes
16
Share


@SAC87
Follow
Hey Growers.
These FastBuds Afghan Kush are coming along nicely. These girls are in their final week/s. I’m just watering and watching trichomes. I removed a bunch of leaves especially the damaged ones and the buds bulked up immediately and the frost poured on. The trichomes are bulbous and granular, they’re so big. The buds aren’t massive, but they are firm. I think that may be because of the XS2000. They are quite similar to the super lemon haze from last run. I’m totally fine with a bunch of buds the size and firmness of golf balls!!
A bit more time and I’ll chop them down.
Happy Growing 🌱
Likes
9
Share


@YockerCClown
Follow
Por el momento ha ido todo bien, he tenido unos problemas con algunas plagas depredadoras qué hay en el jardín, por lo cual he aplicado riegos foliares de aceite de neem + jabón potásico para alejar todas las plagas posibles.
En cuanto a los riegos estoy regando con 2L: 1L agua ph 6.5 + 1L agua y nutrientes ph 6.7 día por medio. (No aplico fertilizantes en todos los riegos para no acumular sales, ya que he notado que al regar la tierra aun cuenta con fertilizantes por lo cual con el riego solo de agua, es como si se diluyeran las sales en el sustrato.)


Likes
8
Share


@LoudLemon
Follow
No problems with growth, buds rapidly putting on weight and smell is getting stronger each day! Had to cut down on nutrients slightly as I think was feeding a little more than she could consume. Looks like she will be fully ripened around or on the 8th week. I liked the fact she started with the Durban poison, sweet smell and then as she progressed into flower, the loud, dank Kush slowly creeps up before finally taking over the the sweet smell of the Durban poison. Right now as I wright this, the Kush smell has started to mellow down and mix into a nice sweet nutty scent.


Likes
5
Share


@TJHeadley
Follow
Everything is going great except the RQS is twice the size of the the Cherry Cola lol. Ended up setting the one plant up and raising the light some.


Likes
60
Share


@DaGrowQueen
Follow
After 12 weeks of flower this grow is FINALLY over It was a relatively easy grow as far as maintenance and feeding are concerned. Midway through the flowering cycle the smell became very loud and the buds were sticky and frosty. I would definitely grow this again especially since I have around 50 more seeds lol. I didn't add the wet weight of the plants because I never weight wet because it doesn't matter but I will post the dry weight for all of you when they're done drying.
