By continuing to use the website or clicking Accept you consent to our cookies and personal data policy and confirm that you are at least 18 year old. For details please see Privacy Policy and Terms
Accept
Likes
Comments
Share


@PolezGardn
Follow
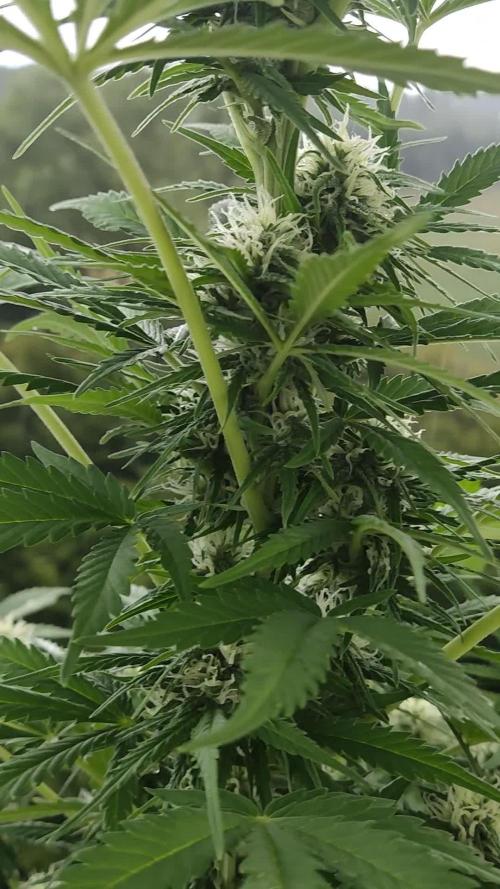
week two flower everything looks healthy :D
today i defoliated them
i watered them with 1.5l every 48h
the light i use was set to 80% and it hangs 80cm away from the tops

Likes
12
Share


@StonedandSteady
Follow
AutoBlueberry 9th w/ 4th W/ Flower breed by #DivineSeeds #DivineSeedsSquad #DivineSeedsBreedingCompany
Flowering out and her Smells are already getting Stronger of Gasy and Candied Blueberries! I recently Trained down her branches to expose more Bud sites and Removed the Biggest fan leaves to expose the Bud site's to this Glorious #OsreeQB1000w Full Spectrum Grow Light! I've also Super Cropped, Topped um, Defoliated, Leaf tucked, and Implement the 3D's method like my Broski #TigerfishOrganics to remove the Dead, Dying and Diseased leaves!
Origin:Afghani/Thai
Type:50% Indica/ 40% Sativa/ 10% Ruderalis
Flowering:56 days
THC:22%
Harvest:400-550 g/m2
Height:110-150 cm
They were Growing under the #Growatt600w and in my #TopoLite 24×24×48 Grow Tent but I've Upgraded and Updated it to my #OsreeQB100W I'm also using #TNBNaturals #TheEnhancer Co2 Despersal Canister and using thier Ph⬆️⬇️ for my Decolinated Tap Water!
Green and Growing Up Great! She's Growing into her 4th week of Flower! She's Growing in my special blend of ProMix potting mix, a 1/2 bag of Earthworm castings and 2 light handfuls of Diatomaceous Earth mixed Up well for before transplanted! Diatomaceous Earth: Diatomaceous earth is made from the fossilized remains of tiny, aquatic organisms called diatoms. Their skeletons are made of a natural substance called silica. WHAT IS DIATOMACEOUS EARTH?
In a nutshell, DE comes from the fossilised remains of small marine organisms called diatoms. Over a 30 million year period, these hard-shelled algae collected on the bottom of bodies of water, eventually forming into a type of sedimentary rock. Fast forwarding, it wasn’t until around 1836 that a German peasant Peter Kasten discovered the ivory-coloured, powdery substance while drilling a well in northern Germany. Ever since, the usefulness of DE for multiple purposes, including industrial and horticultural applications, has been well-reported. Just sprinkle some diatomaceous earth on top of your soil and watch mother nature's secret weapon work its magic.CONDITIONS THE SOIL
When it comes to growing cannabis, everyone strives to provide the best soil to grow the best plants—but there’s always a way to make it even better. Making the soil a better medium is called soil conditioning, which is exactly what diatomaceous earth does. It works by improving the retention of moisture in your potting soil, holding a large amount of fluid and drying at a rate that’s much slower. This natural soil additive also helps to retain nutrients and allows for better oxygenation of the substrate. NATURALLY CONTROLS PESTS
DE is an all-natural, safe-to-use substance that doesn’t harm the cannabis plant with toxic chemicals. The nature of diatomaceous earth makes it useful against most types of insect infestation you might be experiencing; and unlike chemical insecticides, insects can’t develop a resistance to the effects of DE. So once they’re gone, they’re gone for good. DE is an abrasive. and when used as an insecticide, it gradually scrapes away an insect’s exoskeleton, absorbs the fluids, and dehydrates insects and other critters to eventual death. IMPROVES PLANT STABILITY
When using DE in your soil, it can be especially beneficial as it frees up nutrients so that they are made available to the plants as needed. This works via the silica content of DE being absorbed into the plant tissue, which helps improve the plant’s ability to respond and receive more nutrients as DE activates. This in turn results in greater yields and better stability under small pH fluctuations!
https://divineseeds.net/
https://instagram.com/divine.seeds?igshid=osxe2v7en33v https://divineseeds.net/
Thanks Again to All my Friends, Family's, Teams, Sponsors, Followers and Subscribers!!! Your Genetics are Merry Magnificent, Mega Marvelous and Mighty Medical! Love um!!! I really Can't stress enough how Thankful and Grateful I am of All of you and what you've Shared with Us! Means the World!!! It's definitely a Pleasure being able to Grow with these Phenomenal Grow Lights! Please Enjoy! BudBrothers4-Life! Cheers Famz!!! Much Props and Much Topz!💯🔥 #Osree #GrowStarStore #Growatt #TNBNaturals #TNBTeam #GrowYourOwn #Bliss
https://instagram.com/osree.light?utm_medium=copy_link
https://instagram.com/as420.ca?igshid=1f116alw054wp
The Grow Bags: https://www.as420
https://instagram.com/tigerfish_organics?utm_medium=copy_link
https://www.facebook.com/Tigerfishorganic/
#TigerfishOrganics YouTube Channel Link: https://youtube.com/channel/UC6OSXTda1JYaVNoCxdcYqIg

Likes
20
Share


@sneal
Follow
week (16) 3 weeks into the flowering stage. Slight increase in the nutrients. This past week we had some hot muggy weather along with some nice rainfall. The girls loved soaking it up!


Likes
7
Share


@Madman2020
Follow
(39 day VEG)(56 day flower)(107 day clone to harvest)
Co2@800 Made a huge difference
70klux is to high lighting. 60-65 was best
87f+ leaf temp is to high in flower - 80did well
Hot temps made the leaves ugly
Auto irrigation went wrong because the water pressure was not even on all 11 spouts.
Two box fans were not enough. It seems more wind make denser buds
The plants closer to the fans were denser
The Liquid humic acid i think made a small difference.
That “Grow More Liquid kelp” exploded growths during veg stage
The southern AG microbes did well to keep my roots healthy(once a week)
I should have topped the clones at the 3rd node so itd be easier to harvest
I lollipopped plants day 1 flower, day 21 flower, and start of week5.
I defoliated before flower, day 14 flower, wk7 flower, and 2 days before harvest
I want to defoliate the week before harvest and flush 5days before harvest
————————
Harvest
Wet Trimmed
First 3 days 55%RH then 52-60% for 17 days. Ill split branches to speed drying next time
Temp 68F
Indirect Fans
After Drying:
Homemade tumbler/trimmer
Pvc pipe inserted into a barrel made from chicken wire and bucket lids tacked together. Sits inside of a tote bucket. The tote bucket holds the trimmings and kief that falls from buds
Put into mason jars
——-
Weight:
1: 71g
2: 48g
3: 78g
4:41g
5:56g

Likes
15
Share


@TheGreenThumb
Follow
First day under led lights after receiving the fresh cuttings.
All of them are healthy but unfortunately is the night temperature at the moment a bit to low.
All lights are dimmed; the sunlight leds on the lowest setting and the Cree cobs around 20%.
Output watts for all leds is at the moment 280W.
PAR readings coming up in the next days 💡
Now the PAR readings: 3x3 measurements at plant tip. Front row to the back. Measurements in mmol/m2s with the quantumsensor from apogee.
400,570,400,550,620,610,410,470,410.
Around 500 in average.

Likes
5
Share


@UnicornSparklehorn
Follow
Annnnnnndddddddd we're done. Eight weeks in flower and I might have let her go too far. Many amber trichomes, but that's mainly on the tops of the upper buds (tops of the tops, hehe).


Likes
17
Share


@Blkout959
Follow
Getting a early start since I'll be busy all week will add photos this week when I have a minute looking forward to the next few weeks happy Sunday everyone let's kick this coming week's ass

Processing
Likes
15
Share


@MG2009
Follow
05/19/2020
All going well, have to grow in containers this season, I might be moving before harvest so only veggies in the ground.
But all are adjusting well 😊
I will give more details on individual plants shortly
#1 is10" tall new growth looks good getting thick.
#2 is 11.5" tall
#4 is 7" tall but healthy
#5 is 16"
Likes
19
Share


@ScrogFreak
Follow
Grow nutrients have been weaned sour entirely and on full strength bloom nutrients. The plant is a little dense on the left side, but responding well to the AGLEX light and Remo Nutrients. Buds are really packing on the weight, and building lots of trichomes, though mostly all clear heads at this point


Likes
10
Share


@barlobruz
Follow
6/14/2021:
- Just when you think the shit isn't growing, you're three nodes deep, lolll
- Plant and soil seem to be taking well to neem, karanja cake & kelp tea soil drench and foliar spray
- No negative effects of spraying diluted mixed lacto + wild yeast solution so far
- Combined some lacto + yeast solution with tea in a separate container. After fermenting overnight, smelled of butyric acid. Tossed it
- Starting to see red in the stems
- Plant is growing well
- Thinking about transplant beginning or end of week 4

Likes
13
Share


@WeedM8
Follow
Hello m8 welcome to this journey with me in this diary will have very interesting strains hope u find something useful
Persian Girl
- [ ] 1st week Veg: germinated in substrate lighting very close so it jets medium high humidity after the 3rd day they started sprouting
- [ ] 2nd week Veg: this week my ventilator broke down and as the temperature stayed very warm nothing developed much
- [ ] 3rd week Veg:fortunately this week i had fixed the ventilation and the temperature has go down a bit allowing the little plants to develop and reinforce
- [ ] 4th week:
- [ ] 5th week Veg:
- [ ] 6th week Veg
- [ ] 7th week Veg
- [ ] 1st week Fl
- [ ] 2nd week Fl
- [ ] 3rd week Fl
- [ ] 4th week Fl
- [ ] 5th week Fl
- [ ] 6th week Fl
- [ ] 7th week Fl
if this was useful please like and follow

Likes
20
Share


@Robin87
Follow
Day 62! Not long left at all now with the 🍋🍒🍪 they smell amazing! 🦍🍪 setting a decent pace now too, the first defoliation session I’ve had on them too, wasn’t sure if to just leave them , but I’m more than happy with them now, everything’s looking and smelling 10/10.. untill next week! 👊🏻


Likes
14
Share


@Momgrowsthechronic
Follow
Welcome to Week 6, Day 42 for the Sweet Seeds Gorilla Girl XL Autoflowering grow. All four of these lovely ladies are now fully into flower and the tent has filled up considerably. Even though this grow cycle is not going to produce the XL plants I was originally hoping for, this strain seems to have a lot of bud sites compared to other autos I have grown previously. Had these plants reached their full potential- I truly believe that this could/would have been a massive harvest. I fertilized them again in Week 6 with their final dose of a Grow based formula at 2 mls/gallon. They will be switched over a Bloom based fertilizer in Week 7 at a rate of 2.5 mls/gallon. I am still watering every 4th day and all four plants are receiving 3 litres each or 0.75 of a litre per plant per day. There is something killing off the foliage from the bottom up on the plant in the front of the tent on the left hand side. Not sure what the problem is so I am simply removing the dead/dying foliage as needed and hoping that she’ll have enough leaves to make it through to harvest.
Mom’s Tip for Week #6- When it comes to Fertilizer- $Less$ = More… For me, successfully growing Cannabis indoors means trying to mimic what nature normally provides for free. Sun, fresh air, water and nutrient rich soil are all essential for healthy, happy plants. At some point during the grow (usually 4-6 weeks in) the plant has used up all of the nutrients originally present in the soil thus requiring the grower to have to supplement with some type of fertilizer. I see many growers photographing and showing off their huge displays of colourful bottles and I gasp when I read their long lists of 10-15 different fertilizers and supplements being added to every single batch of water. Not only is this unbelievably expensive and overwhelming but time consuming and completely unnecessary for a successful grow. For those seeking an Organic path there are options such as homemade compost tea or powdered formulas consisting of bat guano, glacial rock dust, bone meal, alfalfa meal, etc. I often use a Canadian made brand called “Gaia Green Organics", mixed in at the start to create my own super soil thus carrying the plants through their first 4-6 weeks of life needing nothing more than PH’d water. The organic fertilizers are usually more expensive and often have a slower uptake by the plants themselves as they tend to feed the soil first which in turn feeds the plants. For novice/newbie growers and those with fast flowering strains such as Autos- a non organic, liquid, water soluble fertilizer is often the way to go. They are generally cheap, easy to use and quickly taken up by the plants when they need it most. My ride or die brand is "Flora Nova” by General Hydroponics and it comes in a 1 part nutrient grow and bloom formula catering to my plants’ needs from start to finish. This company has many options available including all kinds of additional supplements to be used in conjunction with their standard grow/bloom formulas but I’ve never found these products all that necessary or beneficial. Using them in the past has led to over fertilization resulting in burnt foliage, stunted bud development and harsh flavours when smoking/vaping the final product. Not only does $Less is More$ apply to how many fertilizers you are giving your plants but it also applies to how much. Most photosensitive strains can easily tolerate a full dose (as per the manufacturer’s recommendations) and thrive with being fed every time you water. But Autoflowers and some smaller photosensitive strains seem to respond differently to a slight tweak- keeping in mind that if you start small, you can always add more but if you start big, you can’t take back what’s already been given. I will generally only fertilize at half of what the manufacturer recommends for a photosensitive strain- every other or every second watering. Starting out at a quarter dose for the initial feeding which can sometimes be as low as 1.25 mls per gallon and working my way up from there. It doesn’t seem like much but within hours I can see my plants responding positively with increased/sustained turgor, greening up a little and increased resin production which equals "smell/scent". For me, I can smell when I’ve just fertilized my plants- it’s a stronger smell than the normal scent that they give off with a plain watering. If you’re lucky, you’ll end up growing a greedy Autoflowering strain that seems to want more than what you’re giving it. Rather than increasing to a higher dose in a single feeding, try feeding more often at the same dose- so if you’re feeding every other or every second watering, try feeding every watering at the same dose (trying not to increase above half of the manufacturer’s recommendation for the photo strains). Occasionally I will increase beyond the halfway dose to accommodate for the plants’ needs in late flower as most fertilizer companies list an increase to adequately feed during late flower anyhow. I guess the main message for this week is to keep it simple as nature intended. Learn to read your plants and supplement the small amount of nutrients that your plants don’t already have in the high quality soil you initially provided. Cannabis cultivation can be overwhelming at first but the $Less is More$ approach will save you time, money and the realization that you’ve accidentally fried your plants!
Likes
5
Share


@Drtomb
Follow
Flush flush, all night long... Flush flush while i sing this song... Gonna flush them roots, gonna make them white, gonna wash off the nutes with helping enzymes.

Likes
136
Share


@CocoTheClown
Follow
Today was the day!
Both girls have been chopped at day 55 of flower. Reason being is after 2 days of plain water
**(I’m aware this is a short flush, but nutes were tapered down in the week leading up to this, then with plain non pH’d water there was 6 fertigations, 4l per plant per time over the last 48 hours - the runoff has been coming out plain 0.3EC tap water, same as the inflow).**
The trichomes that we’re only cloudy on top had began to change over to amber and the lowers that were clear became milky after having plain water so I pulled them down for peak potency. Maybe could have had a couple days more but not the end of the world I am still very happy so far with the result from what I can see so far.
I have just removed the largest fan leaves off and separated into branches or more like clusters of tops on branches. In a couple days I will probably remove a little more leaves or if they are drying evenly and nicely I will just remove them when I dry trim.
They are now hung inside the tent, aiming for 18-20°C temps & set to 50% RH, hooked up to a Inkbird Humidity Controller and a dehumidifier. Hoping these will take a week to ten days to dry so the flavour and smell is not lost.
Both Phenos of this strain have come out in beautiful colours under the torch on video, I can’t wait to see them both when their dry and all trimmed up in all their glory.
That’s all for this week, in 7-10 days hopefully they are dry and I will update with the harvest week with the final weights and some trimmed up pictures! 🤙🏻🙏🏻💚