By continuing to use the website or clicking Accept you consent to our cookies and personal data policy and confirm that you are at least 18 year old. For details please see Privacy Policy and Terms
Accept
Likes
Comments
Share


@TickleToast
Follow
Looking very good here at the beginning of week 5,
Finally upped the ppm a bit, can tell they're starting to get hungry.
9/10 clones rooted, picked out the 3 best looking and got them transplanted! 🚀🚀🚀
Nutrients for the transplanted clones are as seen in the previous few weeks,
Remaining 6 clones will be donated to some fellow growers in need ~ Always feels good to not have to throw plants away 😎
~~~
Small defol - bottom leaves and some crowding the center,
Definitely some of my biggest early fan leaves so far - over 1ft long AND wide 🤯🤯🤯
~~~~~~~~~~
Granddaddy Purple (Feminized Photoperiod)
(Sponsored By)
~Zamnesia~
https://www.zamnesia.com/us/11056-zamnesia-seeds-granddaddy-purple.html
Hybrid: Grandaddy Purple x Purple Kush (Purple Urkel x Big Bud*)
30% Sativa / 70% Indica
Flowering Time: 63-70 Days
22% THC
CBD 1%
~~~~~~~~~~
Zamnesia was kind enough to give us a discount code with this grow ~ go get you 20% off at checkout!!!
20% Off Code: ZAMMIGROW2024
https://www.zamnesia.com/us/
~~~
In-depth information regarding my day-to-day / common practice may be found on the front page of my profile (in the comments).
~~~
Breeders - my services are available!
I'm always keeping an eye out for great genetics to test and showcase.
Shoot me a message! :)
~~~
https://bit.ly/3MplXqf
^^^GrowAce Affiliate Link^^^
Use this if you want to show some support!
(Just follow that link and the cookie stored in your browser is good for 30 days!)
~~~
Questions & Feedback are welcomed, feel free to message me!
Thanks for stopping by growmies! 🤙🤙🤙🙏🙏🙏
~~~~~~~~~~

Likes
9
Share


@High_Grade_Dadli
Follow
This week was crazy with the weather for couple of days....2 girls didn't see much of light or water like one took it lil better than one.....the other one was left on the battlefield n she sure put up a fight
Likes
37
Share


@GreenHouseLab
Follow
Apple Fritter smell for days, makes you want to keep your nose in the bag. Ill need to grow this one again.


Likes
6
Share


@Sir_scrogalot
Follow
Still going strong. I think mid week 5 now since flip. So week 4 of true flower.
Lowers are solid, I forsee this being very dense.


Likes
19
Share


@Mr_Juice
Follow
3x anesia seeds/frozen black cherry
1x sweets seeds/skywalker og runtz auto xl
I love Spanish seed banks ❤️
the plants in the back contain guanocalong, the plants in the front are fed with plagron


Likes
44
Share


@Roberts
Follow
After the solution change the spotting slowed and stopped. She has a bunch odmf new roots leaving the basket. She is most likely stunned from that. But I will let her go, and see what she does. She looks overall a lot healthier. Thank you Medic Grow, Athena, Xpert Nutrients, and Fast Buds. 🤜🏻🤛🏻🌱🌱🌱
Thank you grow diaries community for the 👇likes👇, follows, comments, and subscriptions on my YouTube channel👇. ❄️🌱🍻
Happy Growing 🌱🌱🌱
https://youtube.com/channel/UCAhN7yRzWLpcaRHhMIQ7X4g
If anyone needs to purchase fastbuds here is a link for my affiliate program
https://myfastbuds.com/?a_aid=60910eaff2419

Likes
17
Share


@GAS_TENT_GENETICS
Follow
This week i switched to the new tent and been working on my vpd . Both ggs are doing amazing and bushing out moee then growing tall. They all are very happy now and growing faster then ever. Added lst clips this week and i really like them


Likes
9
Share


@CanarianGrow92
Follow
We will start to check the tricomes next week but i think that some more time is needed, the buds are nice and fat and have a tremendous smell, great strain, specially if you like something easy to grow, its really a pleasure growing this strain, i took some monster crops some weeks ago and have a separate diary for these 😁

Likes
265
Share


@Budz_Bunny
Follow
Grow Report Week 16: Harvest Approaches
Hello dear grow friends,
We are approaching the long-awaited harvest time, and the plants are now revealing their true beauty. The scents are becoming more intense, and I can hardly wait to taste the results.
The Purple Surprise
In particular, the Gorilla Zkittlez had a little surprise for me: it turned purple! I’m exceptionally pleased with this color change. Thanks to the controller provided by TrolMaster, I was able to maintain a constant temperature of 24 degrees Celsius, which should positively impact the development.
Anticipation for the Coming Weeks
Although the next two weeks will determine my harvest, I am completely satisfied with the progress so far. I will continue with the fertilization schedule, as it did not adversely affect the taste in the last attempt.
I look forward to soon harvesting the fruits of my labor. See you soon, and thank you for being part of this journey! 😊

Likes
147
Share


@Coco4CocoPuffs
Follow
Here we have Sleepy Joe Og 😴💤😴💤😴 From Premium Cultivars
Soaked seed for 24hrs
Placed seed in paper towel 24hrs
Once rooted placed in Main Pot
😴💤😴💤😴💤😴💤😴💤😴💤😴💤😴💤😴

Likes
Comments
Share


@Organic473
Follow
Lost about 2 weeks in documentation however her transition to direct soil is really successful. I may pollinate her with some Durban Skunk Pollen and Blue Skunk pollen.


Likes
18
Share
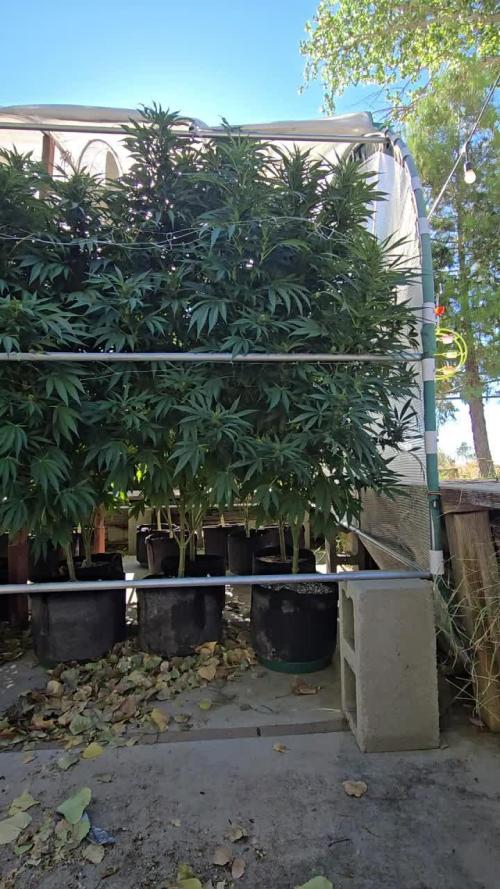

@Chubbs
Follow
This week has been wild. I had to cut the sides of the greenhouse as the plants had it bursting at the seams. These girls are all flowering beautifully and starting to frost up. Still loving the pink pistols. Happy Growing


Likes
36
Share


@Ganjagrandaddy
Follow
Day 8: All of thesenladies are nice and settled now.
They all have 3rd nodes visible and are close to letting the 4th nodes out too. besides the damage from germination and seed husk , they are looking OK so far. I am attempting to get the rootbball wide by watering more towards the pots edges. hopefully this will make them spread out above the soil similarly. A quiet and steady week Growmies. They will bendirectly under light in a few days time so should have grown a good amount for the next update.
Be safe

Likes
12
Share


@JeyGanesha
Follow
Prossime settimane via....anche queste forbidden runtz sono pronte da conciare,🤣❤️💛💚... quest'ultima settimana la notte la sto lasciando fuori in balcone per fargli un buon sbalzo termico..,,.......
Ho tagliato anche quest'ultima forbidden runtz
Likes
15
Share


@Waveform
Follow
Day 17 (starting Aug. 2nd afternoon): Will water them with a lightly enhanced RO water that was imprinted with frequencies via a PEMF coli for about one day when their day starts.
After being away over the extended weekend, on day 20 ladies have grown very nicely. I topped nr# 1 and #2 after I took the photos and will give them a bit of water with Root Complex to compensate for the shock later. Sadly my brilliant control equipment has crashed completely and will not even take a photo currently. Yikes. Hope I can get it back alive this week again. Also turned the left light up by another 20%, now running at 40 W, and lifted it a bit. Eye inspection told me lights were lower here and ladies can get a bit more.
At the end of their day 20, they seem to have survived the topping well. I managed to cut right above the new nodes which are already growing. Ladies are at 20 cm height before going to sleep.
Day 21 shows great growth again, with lady #1 being at 22 cm now and lady #2, while being a bit less tall, extremely good side branch development. I hope that the rearranged lighting on the left side of the tent will make #1 grow a bit bushier too.
Besides from that, I am really happy I tested Hesi HPE. I had such enormous success with room plants that made me want to see how Cannabis plants react to it. It will not add much to salinity, so I dared to add it quite early. While the photos are processed to compensate the lighting, I did not add much to saturation, so leaves are indeed of a very vivid, luscious green and ladies looking extremely healthy. Speed of growth has increased too as the added video shows. It also tells me lighting is enough – they are turning their leaves away right at the end of their day. I am really uncertain if I will change to usual Hesi grow fertiliser at all …
Did a bit of LST to the lowest branches of lady #2 which spread almost to the border of her pot.
Both temporary girls will leave the tent soon, so that the competitors will have maximum space to develop.
Day 22, end of week 3:
Outside girl went to get fresh air from now on. Wishing her luck, good weather and not a single male in the vicinity.
I rearranged the lights and positioned them a bit higher. First preflower signs appeared on the ladies, so I will change the lighting phase when I return next week. Currently, I have them at 18/6, 45 cm above heads, with 80% running to a total of 80 W.
I wasn’t so lucky topping #2. She has only one "top side" branch now … But grows extremely well, so ok!
