


By continuing to use the website or clicking Accept you consent to our cookies and personal data policy and confirm that you are at least 18 year old. For details please see Privacy Policy and Terms
Accept
Likes
Comments
Share


@MorangoTango
Follow
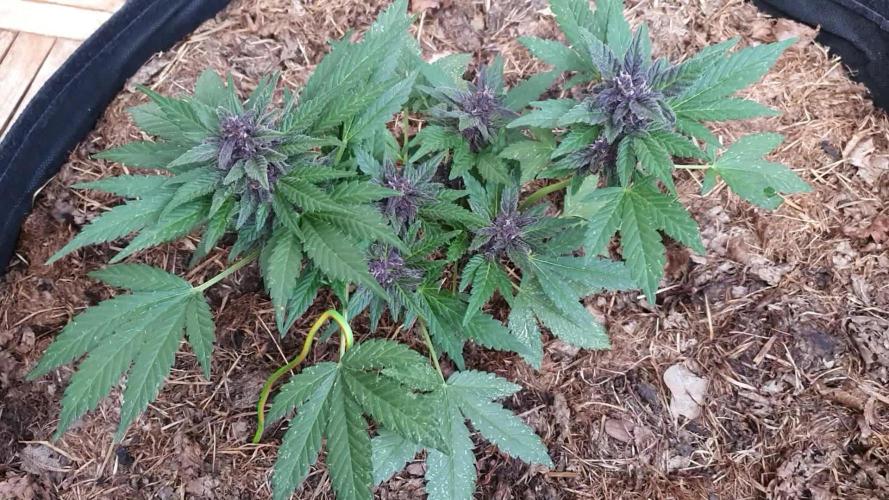
As altas temperaturas arruinaram a colheita, as plantas estão sem cheiro a WW#1 foi a mais resistente ao calor, ainda exala um aroma muito bom, porem as outras plantas sofreram mais, a C99xBB#1 perdeu totalmente o cheiro, e nasceram novos pistilos diminuindo a densidade das flores.


Likes
6
Share


@Dengued
Follow
28 days later....worm poo and coffee grounds not made much difference to colour of leaves, although all are growing nicely...trying some spirulina powder next to see if that helps

Likes
20
Share


@MMSC16
Follow
Day 77 - June 18
June 18 - 06.00AM One Amber trichome found. Will water with 5L of water at 6.3PH this morning. Wilted leaves are still springy. I'd like to defoliate but will wait until they're completely wilted.
June 18 - 06.45AM Soil is still cold, a little moist. I'll water at approximately 9AM
June 18 - 10.45AM Removed dead leaves to avoid pests (as sharing tent with outdoor plants at night).
June 18 - 10.45AM Watered 4.5L to runoff at 6.3PH. Time taken approximately 1 hour to saturate soil.
June 19 - 09.00AM Trichomes are starting to morph from clear to cloudy. Each clear head is now about 50% cloudy. There are slightly more light amber trichomes appearing. I suspect just under a week remaining.
June 20 - 07.00PM Found another amber trichome on a more developed cola. With more half-clear trichomes becoming cloudy. I suspect I'll chop in 5 days or so. Leaf necrosis is developing further with some fan leaves (with trichomes) are decaying. I'd really like to see more purple by this stage, but I'll settle for a pineapple fade.
June 22 - 08.20AM Temperature ate 78F at ground level. TOO HIGH! Had to turn the AC off due to partner being cold overnight. Possibly lost terpines+potency - frustrated. Trichomes still seem too clear for my liking.
June 22 - 10.40AM Watered 4-5L to runoff at 6.3PH. Should have watered yesterday, though pot was still relatively heavy. Removed one dead leaf resting on budsite.
June 23 - 06.00AM Removed a few dead leaves. Trichomes are still cloudy. Some milky, it's close - though little to no ambers.
June 24 - 07.00PM Removed more dead leaves + 1 healthy accidentally. Trichomes are about the same. Removed all LST ties.

Likes
20
Share


@DeepRootsGrowTrees
Follow
NORTHERN THUNDERFUCK AUTO / RQS
WEEK #12 OVERALL
WEEK # 7 FLOWER
This week she's looking good her buds are frosty and they continue to get dense her colors look vibrant she's had no issues so far!! Stay Growing!!
Thank you for stopping by and taking a look it's much appreciated!!
Thank you ROYAL QUEEN SEEDS!!
NORTHERN THUNDERFUCK AUTO/ RQS

Likes
31
Share


@TheItalianGrower
Follow
This week I had some problems with the electricity .. Now everything is fine, and the plants are fine .. They have resumed their normal growth .. Another 4 days and I will switch to flowering
Likes
8
Share

@Oldwied
Follow
My little cherry bonsai becomes denser and the resin glands glisten across the entire flowers.
Under the spotlight, the lady shows how she can glitter.
I'm very happy that the first side branch, getting thicker and thicker.
Day 65
Photoshooting


Likes
3
Share


@TTerpz
Follow
Fade colors are really starting to push through
Fed with nutrients: 5/7/25
Fed with ph water at 6.5 : 5/11/25
Fed with nutrients 5/12/25
Likes
34
Share


@JUNGLE_B4RNS
Follow
Hello fellow grower
Week 3, when taking the pictures and comparing from only 7 days ago, I said to myself it’s unbelievable... Look the development in just a week. The Mars Hydro FC6500 is absolutely remarkable. It’s like growing under the sunlight in a controlled environment !
_________________________________________________
Barney’s Farm genetics is no bullshit, vigorous and resilient, they have exploded during this week. Transplanting last week was done in time to keep the growing rate at maximum.
_________________________________________________
Last week transplanting using Cellmax BIO RootBooster did a great job. I can already see some tips of the roots coming out from the drain holes of the pot.
_________________________________________________
No water during the week, no need. Just a nice story about the Dutch Golden age, 17th century.
World is round since not so long, the Dutchmen are all over the globe on board of their galleon across the seas. Imagine a crew of sparrow full of tattoos with sharp teeth. On board, in a chest, well kept in a dry place, there’s some Cannabis seeds .... 😊 How they were able to navigate so far and so long ? Because they were able to repair the ropes in case of a wreck growing the seeds to make hemp quickly and Cannabis seeds holds enough protein...
Stay tuned folks, it’s growing crazy 😝


Likes
19
Share


@A_Rolling_Stoner
Follow
Now all plants are fully blooming and producing buds.
The two plants on the back are really difficult for me to reach, so they'll have more leaves as I can't trim em. Especially the rigt back corner one, it's way bushier.

Likes
9
Share


@Kushizlez
Follow
Blackberry Breath #1
Yield: 57.5
Smell: 9/10 - sweet, grape, berry, gassy, earthy, hashy
Bag appeal: 8.5/10 - dense, sparkly buds
Crystal coverage: 9/10 - super impressed
Ash: 5/10 - flaky, mostly grey/blackish
Fire holding: 4/10 - stays lit for 10-30 seconds
Smoke: 5/10 - tastes like chalky shit
High: 6/10 - indica dom
Comment: looks amazing, smells amazing, tastes like shit, burns like shit.
46.5/70 = 66% 👎🗑️
Blackberry Breath #2
Yield: 76.1g
Smell: 6/10 - musky, tea, berry, herbal
Bag appeal: 8/10 - slightly leafy/stemy
Crystal coverage: 7.5/10 - very impressed
Ash: 5/10 - flaky, mostly grey/black
Fire holding: 4/10 - stays lit for 10-30 seconds
Smoke: 5/10 - taste is shit
High: 6/10 - indica dom
Comment: looks nice, smells shitty, tastes shitty, burns like shit.
41.5/70 = 59% 👎🗑️

Likes
60
Share


@Roberts
Follow
Alaskan Purple auto is doing good. She had a solution change. I also trimmed out the bottom of the plant today. While doing some selective defoliation in the canopy. She is doing good under the Medic Grow Mini Sun-2. She is stretching now, and should start developing her colas soon. Thank you Seedsman, and Medic Grow. 🤜🏻🤛🏻🌱🌱🌱
Thank you grow diaries community for the 👇likes👇, follows, comments, and subscriptions on my YouTube channel👇. ❄️🌱🍻
Happy Growing 🌱🌱🌱
https://youtube.com/channel/UCAhN7yRzWLpcaRHhMIQ7X4g
Likes
14
Share


@BudgetGrows
Follow
So as you can see she is now foxtailing, trichomes almost there, she will probably be took done at some point in the next week
Thanks for stopping by 👍
Likes
11
Share


@ADHDselfmedication
Follow
3 seeds from barneys farm : glue gelato auto.
Diary :
Day 1:
I dug a pit and cleaned my dirt with metal grid and a wheelbarrow & Installed the greenhouse.
Day 2 : I rotated my dirt and added universal soil. 4 x 70l to area of 6m2. I also planted seeds in universal soil without sprouting first.
Day 3 :
I gave water and checked for sprouts. Bought moist meter and dripping hose.
Installed those and making the greenhouse more moisty now.
Feeling : Verry happy for my first time. Lots to learn.. . Excited
Likes
2
Share


@BackyardGrower23
Follow
Another week of rain storms! She was a trooper and stuck through all the wind and rain! Starting to see some good secondary growth from the LST. Shes bushing up so quicly, so i removed some more big fan leaves that were blocking some sunlight to the middle of the plant.


Likes
47
Share


@rhodes68
Follow
11/10 Week 7 Long week
Maggie is responding well to treatment, will continue until I see something that says its gone far enough.
I know she needs defoliation but I just hate to take health(ish) leaves when its already stressed. Maybe next week air flow is good.
May add some sulfer to the mix but keeping it as is otherwise, 6.8 PH, 1-2% H2O2 and CalMag in a day or two as she drys.
Brandy... not sure it did as much for her but see nothing that says stop so will continue as the pot drys.
Layla ya got me on my knees... shes my girl. lovely not perfect but has handled things that left other plants stunted and yellowed.
Were she a photo I would have cloned her.
Continuing feeding as I have, may add Karo may not, defoliation continues as needed.
May this continue God willing and the creek dont rise.
Last note - Raised the lights up 4 inches to 22" for better dispersal across the canopy now that its getting used.
Think this strain likes that.
11/11 Looking better.
Did some defoliation on Maggie, nothing stressing and mostly damaged leaves though some were for blocking bud sites
Same on Brandy though less so.
Picking up some chemical bloom nuets so I can continue lightly feeding them through these treatments, the organics are getting blasted by the h2o2
Layla looking her usual lovely self, buds building, her and Maggie get fed today, Brandy still too wet.
11/12
Brandy still not dry enough, may adopt the feeding I set out for Maggie below when it is time.
Changing the treatment on Maggie, for one feed only dropping the calmag and adding two TBS of Epson salts , fish sh!t and recharge to get the bug healthy, and continue the cocotek nuets for the time being, it the only mineral fert I have, to the water at 6.5 PH . Believe the H2O2 has done all its going to do repairing the roots and now I can address the sulfur (i hope) issue. Plant is huge BTW so if I get her producing, yield is going to be huge. IF
Layla just continue as before, the Dr Earth is doing a marvelous job of covering all the bases. Will absolutely use this when I go back to organics.
Had to reset the lights again... Maggie :)
11/13 New Pics of Maggie as she is the only one causing me concern, no feed today still too wet
Defoliated bottom 1/3 of Maggie getting rid of all unwanted under growth. Will continue as it goes. Large leaves looking normal now.
11/14 Feeding time:
Maggie and Brandy - 1 gal at 6.5 1.5 TBS Epsom Salt (decided to hit the middle), 5ml cocotek A&B , 6ml Fish Sh!t holding the recharge for next time.
Layla - 1 gal at 6.5 5ml Cal Mag , 5ml Bio-Bloom, 5ml Fish Sh!t
Getting a bit of height growth on Maggie. Expect more if we are right on this. Decided to hold off a mag/Sulfur foliar until tomorrow if needed.
New Vid posted few minutes post feed. Maggie was a bit dry as she is really drinking
11/15 New Vid
Foliar feed of 1.5 TBS Epsom Salt / gal unPH water on Maggie primarily though also hit Layla and Brandy.
Only the very top of the colas now have the paleness so progress.
Likes
2
Share


@Poohboomin
Follow
Almost ready to start feeding nutrients noticing better results so im guessing they love the new environment.


Likes
146
Share


@EZgrower
Follow
Day 63 - add about 0,5l of soil. weight of pot from 3,0kg to 3,6kg
Day 64 - Filling. ppm 460. weight of pot from 3,2kg to 4.3kg (1100 ml)
Day 66 -filling. ppm470, weight of pot from 3,15kg to 4.15kg (1000 ml)
Day 67 - fiiling. ppm490. weight of pot from 3,15kg to 4.15kg (1000 ml)
