By continuing to use the website or clicking Accept you consent to our cookies and personal data policy and confirm that you are at least 18 year old. For details please see Privacy Policy and Terms
Accept


Likes
2
Share


@SamDo
Follow
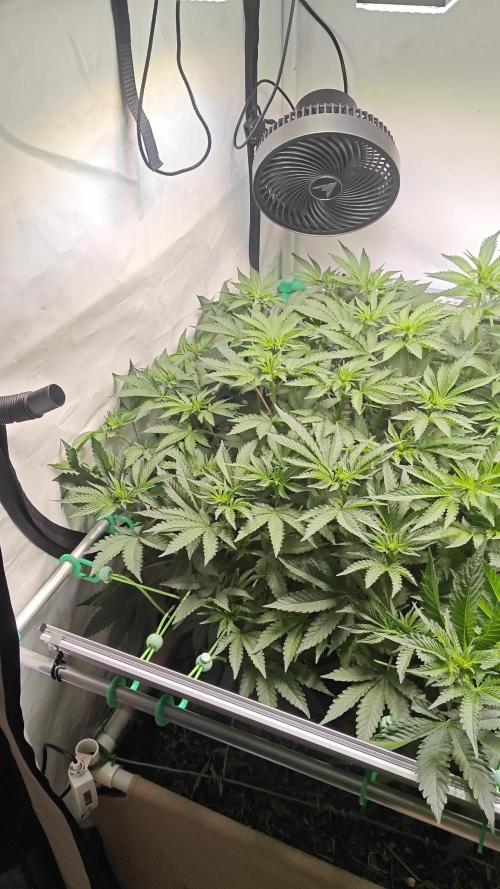
Journal de Culture – Semaine 1 : Transplantation du Clone
La culture démarre avec une bouture de Mother Gorilla (Royal Queen Seeds), prélevée sur mon pied-mère. Après un enracinement en douceur, elle a été transplantée dans son nouvel environnement de croissance. Bonne nouvelle : le système racinaire s’est bien développé, signe que la transition s’est faite correctement !
Cette fois, j’ai bien veillé à maintenir une hygrométrie stable à 80 %, ce qui avait été un souci lors de ma précédente culture. Pour ça, j’ai investi dans un humidificateur AC Infinity qui fait très bien le job.
Côté paramètres :
• Éclairage : 18h de lumière
• Humidité : 80 %
• pH : 5,5 - 5,8 (légères corrections à faire)
• Température de l’eau : 18°C
Pour l’instant, la plante est encore en phase d’enracinement, mais ça se passe bien. On va voir comment elle évolue la semaine prochaine ! J’espère que cette variété réagira bien en hydroponie. Hâte de voir la suite !
🇺🇸Grow Journal – Week 1: Clone Transplantation
This grow cycle kicks off with a Mother Gorilla (Royal Queen Seeds) clone taken from my mother plant. After a smooth rooting process, she’s been transplanted into her new grow environment. Good news: the root system has developed well, which means the transition went smoothly!
This time, I made sure to maintain a steady 80% humidity, something I struggled with in my last grow. To help with that, I picked up an AC Infinity humidifie and it’s working great.
Key parameters:
• Lighting: 18 hours
• Humidity: 80%
• pH: 5.5 - 5.8 (minor adjustments needed)
• Water temperature: 18°C
Right now, the plant is still in its rooting phase, but everything looks good so far. Let’s see how she progresses next week! I’m curious to see how this strain performs in hydro. Excited for what’s next!


Likes
3
Share


@Nat889
Follow
May 8th. 12pm. Gale has broken the surface of the soil and showed herself!!
May 10th growth shown in thickness of stem and length of leaves.
Open to suggestions and advice. First time grower here!

Likes
25
Share


@Ninety1
Follow
THC building up bud growth is good. Had to move into a room as space was running out due to growth
Likes
12
Share


@cookingwithninja
Follow
day 38 stopped giving PK, carbs. only humic, folvic fishsh!t in watering. lifted terps video sticky icky video
day 39 just humic and folvic into water.
day42 bridal party gained a lot of weight, started to lean over blackberry. I feel like I could chop today.. slight chance might meet remo :)


Likes
9
Share


@bonemealheavenly
Follow
things are getting huge. did another feed with 2-8-4 and brewed a compost tea. i bought one of those huge vivosun air pumps and a couple big air stones. just warning the pump get hot! i have really big fan blowing on it and it seemed to keep it a nice normal temp

Likes
3
Share


@Diy_autoflowers
Follow
ET vs Widow.
Personal cross.
day 19 in the pics.
Today makes day 21


Likes
64
Share


@Prof_Weed
Follow
Der Sour Jealousy von FastBuds geht es ganz gut 👍.
In Hydroponic dauert es am Anfang immer ein wenig länger bis die Pflanze richtig durchstartet..
Ich denke mal in 2 Wochen fängt es dann richtig an.
DLI liegt bei 16.92 ( 20 h Licht bei 235 PPFD).
Heute wechsle ich das 1. Mal Wasser und gebe additiv Silicate von Terra Aquatica hinzu.
Die ersten Tage hatte ich Schwankungen im PH Wert,ich denke weil der EC Wert so niedrig ist und weil die Blähton Kugeln auch erstmal den angestrebten Ph Wert annehmen müssen.
Die Pflanze bekommt hier und da gelegentlich Streicheleinheiten von dem Mini Ventilator damit sie kräftiger wird.
Bye
Likes
101
Share


@Ferenc
Follow
Day 73, 25th of November 2020:
Hi! Well they are getting nice maturing buds getting bigger and all good.
I love the red colour of the Red Hot Cookies. Unfortunately, Tropicanna Poison and Red Mandarnine does not show any signs of purple or red colour.
Kalini Asia neither albeit, the bonsai version gets purple.
Gelato is little beauty. So yes, basically not much to say.
Fertilization is still the same every second day with the ratio and mixture above stated.
The lamp is on 11.15 min and off 12.45 min.
Last week was 15 min longer light cycle....
So every week 15 min shorter light cycle until the 5th week. So far -45 min. It switches on at 6 am and off at 17.15 pm.


Likes
21
Share


@BigBudWolf
Follow
BLUEBERRY AUTOFLOWERS (QUEBEC CANNABIS SEEDS)
42 DAYS FROM SPROUT
ADVANCED NUTRIENTS (ORGANICS)
IM LIKING THE FLOWERS! EXCITEMENT BUILDS!
Likes
15
Share


@TAXFR33
Follow
This grow is on it’s last lap 🏁
These are by far the most beautiful buds i have grown and would definitely recommend fast buds genetics to anyone. Can’t wait to try these now.
Last week i said i was starting the flush but decided to push it back to this week so they only have 1-2 weeks left
Will be checking the trichomes daily
Let me know what you guys think so far👌🏾🤞🏾
Likes
14
Share


@sunshinegroww
Follow
Very easy genetics did only topping at 21st day and just light feed throughout,she is very thirsty for cal-mag from early flowers ,not very much purple going on but i can see some pink going around ,produced very big colas ,now whole plant hanging to dry for about 7-10 days and will update soon 🌞🌞💚✂️😍
End result im pretty happy with love the purple colours too will defo run this again
💚💚💨🍑


Likes
Comments
Share


Likes
2
Share


@EtnoGrow
Follow
this is the beginning of the 4th week along with the publication of the end of the 3rd week, this is how the fourth week is received, another intensive pruning that has no choice but to do it due to the size of the indoor, which is working great for us and we believe that I will always work like this, I am happy, here then the pruning of its results a little before and after and how it is receiving this fourth week, with the threads I touch a little bit of hair I hope it does not affect much but all in favor of opening the field to all the branch buds alike.WE CHANGE THE MESH FOR A BETTER ONE AND OF THE IDEAL SIZE AND AGAIN WE USE THREADS THAT HELP US VERY WELL, WONDERFULLY
Likes
22
Share


@DeepRootsGrowTrees
Follow
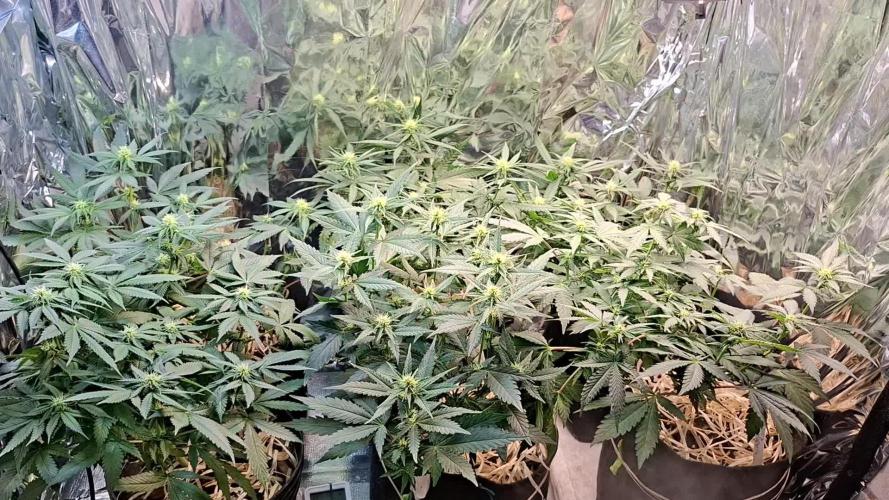
GSC BY KANNABIA
Week #21
Week #10 Flower
This is the last week for feeding the plant trichomes are about 50% clear 50% milky so it's about that time. This plant is a beautiful lady!!
Stay Growing!! Thank you for taking a look!!
