By continuing to use the website or clicking Accept you consent to our cookies and personal data policy and confirm that you are at least 18 year old. For details please see Privacy Policy and Terms
Accept
Likes
Comments
Share


Likes
2
Share


@AustinRon
Follow
El Diablo Week 4 - Bolt II
[Twenty20Mendocino]
(X-Factor X Whiskey Zulu)
Objective
- Trained Plant - @3Nodes - Bend apical meristem to Node 1 Height, 7 STEMS . . .
Week 4 : [ Wed Feb 14, 2025, ED 1Q25 29:B:4:1]
[ Tue Feb 21, 2025, ED 1Q25 35:B:4:7]
24/0 @ Germination through 24 Hour Open Cotyledons (then 18/6)
Germination: 25 Jan 2025
#3A Earliest Harvest Date: Thu Apr 10 2025
#3B Latest Harvest Date:
Mon April 21, 2025
__
Fri Feb 21, 2025
ED 1Q25 29:B:4:1
Applied 1 Gallon (3800), or 14% of pot volume, focused on periphery of PLANT to periphery of POT.
- Cal Mag Fuel: [ 4, ml, gal]
- Silica Skin: [ 4, ml, gal]
- Peak Bloom: [ 3, ml, gal]
- Root Anchor: [ 4, ml, gal]
- Quillaja 60 Powder: [ 2.5, g, gal]
We’ve oversaturated the pot - center unaffected, plant happy. Need to train down Apical - this afternoon.

__
Sat Feb 22, 2025
ED 1Q25 30:B:4:2
Edwina Pheno is Cold. There is MORE than enough moisture through Monday.
- Let’s Foliar, CalMag Fuel and Peak Bloom
Root Steering is based on Phosphorous/Potassium Levels -
- @2.5+:1 - Root Bias
- @ Shoot Bias
__
Sun Feb 23, 2025
ED 1Q25 31:B:4:3
__
Mon Feb 24, 2025
ED 1Q25 32:B:4:4
Watered Bottom Half of container -
LST: Trained Top DOWN


Cold snap is ending - should be able to get a little warmer . . .
Tied down remaining Stems for flat canopy
__
Tue Feb 25, 2025
ED 1Q25 33:B:4:5


LightIntensity: [ 350, µMol/m2/s]
- [ ] Temp: [ tbd, °F]
- [ ] RH: [ tbd, %]
- [ ] VPD: [ tbd, kPa]
- Lowering Light Height to Raise PPFD
- We’re at about 350 - Need to get to 700 in the next 10 days
- Watered ~ 500 ml to periphery . . .
__
Wed Feb 26, 2025
ED 1Q25 34:B:4:6
LightIntensity: [ 350, µMol/m2/s]


She is incredibly supple - the transplant has taken, and she seems to have a grown about an inch. Took advantage and bent her outwards and radially to balance space between extended stems, and to maintain EVEN canopy height.

__
Thu Feb 27, 2025
ED 1Q25 35:B:4:7
LightIntensity: [ TBD, µMol/m2/s]
Temperature: [ tbd, °F]
RH: [ tbd, %}
VPD: [ tbd, kPa]
Lighting
- [x] Lower Light 5 clicks per day UNTIL 700 µMol/m2/s achieved, then re-evaluate.

Likes
10
Share


Likes
9
Share


@DeepRootsGrowTrees
Follow
TRIPLE G by ROYAL QUEEN SEEDS
Week #23 Overall
Week #6 Flower
This week she's really starting to get sticky with her trichomes on full display she's smells 👍 great and her buds continue to get full and dense!!
Stay Growing !!!
ROYAL QUEEN SEEDS
TRIPLE G

Likes
6
Share


@The_Projexx
Follow
Shes growing and stretching this lady has started to flower let the show begin !!! She's stretched quite abit over the past week lets see what else she does !!
Thanks for the continued support !
-Happy Growing!

Likes
5
Share


@Capzinator
Follow
Day 28: I have started into week 4, and im curious when the first sights of flower begin. i decided today to cut down my bags, because the lower branches didnt had enough space, maybe this is even the reason why they are so bushy. lets see how this is working now, i bet it will be much easier to water them now. i also cutted one leaf, because it had sunburn because of waterdrops i didnt recognized.
The smell is getting also stronger, but still couldnt figure out which plant smells so nice. it is a very nice and fruity mixture.
i also decided to Stop LST through binding and bending. i will just Scrog it soon, that should do the part.
Day 30: I hope the Temperatures wont drop anymore. had a night with 10.6 °C. The Pineapple Express and StrawberryGorilla did not liked this a lot. But Blueberry, Northern Light and Weddingcake seem to be stronger against the cold. I watered them a bit today, and will also stop giving to much fertilizers. maybe i will skip one Week of fertiolizers, and start again when bloom is starting.
Day 32: i think i was again not patient enough. I will just keep them watered until they start to bloom. Will install a SCROG net in a few Days.
My worries: 1. I think my Pineapple Express and the Strawberry Gorilla really didnt liked the cold Days. There were Temperatures about 10 °C in the nights. The PE seems to be stunned a bit.
The others are developing gut actually, but i hope to have warmer climate soon.
My happies: The Red Mimosa is still developing great. Also the Northern light is growing pretty good, and they dont show any sign of struggle because of the low temperatures.
My biggest is 30 cm (Red Mimosa), the smallest is my pineapple Express, its only 20 cm so far, but still growing bigger somehow.


Likes
Comments
Share


@Dankmark420
Follow
We cut her early due to a block off in the autopot system.. but she was frosty as a mofo for being cut way to early and the taste was surprisingly very sweet with a piney/spicy kind off aroma and taste

Likes
8
Share


@LittleBigTrees
Follow
Lots of bud sites with nice buds forming , some trichomes are now on the plant , it's eating the feed really fast and looking healthy

Likes
4
Share


@HowtoBubatz
Follow
The stretch phase is officially over, and now the plant is shifting its energy toward trichome production!🌱
I’ve started noticing a light scent developing, though it’s still not very intense yet. I expect that to change in the coming weeks.
I did a light defoliation to improve airflow and light penetration, and I plan to do another round in about two weeks.
Interestingly, the fan leaves are starting to take on a slight reddish hue—curious to see how that develops! 💪😊
So far, everything is looking great, and I’m excited to watch the buds bulk up in the next phase!
Processing
Likes
2
Share


@Kcho21
Follow
Seedling popped out of the soil and is off to a good start. The led light from home depot seems to be working okay for the seedling. I think it may be stretching a little. I'll be getting the blackdog led PhytoMAX-2 400W soon.


Likes
11
Share


@Green_Dream
Follow
Such a great week!
I’ve never seen such a fast growth before.
Since they were ready the girls got transferred in their final pots, 5l pot + 2l extra from the self watering grow box.
The soil is ca. 50% coco, 50% soil … well there’s probably about 15% perlite in there as well.
They soil mix is amended with ca. 1,5g/l green house feed biogrow. Plus ca. 6g/pot Aktivator.
And from now on they will stay in the greenhouse.

Likes
7
Share


@bro8006
Follow
Hi. Just defo The older leaves and letting it grow, starting to motive some white hairs...
Likes
2
Share


@HomegrownGenetics
Follow
All things good this week! Did my weekly water change on Monday and kept nutrients the same as last week, so right around 3.2-3.3 EC (Gunna start lowering EC around week 6 of flower). Wish I had my reservoir set up since PH has been dropping a little, been using a good amount pf PH up to kept PH around 5.9.
Did a lot of defoliation, lollipopping and turned up the lights the slightest amount. Got about another 5 inches of stretch this week and shouldn't see much more. Time for the buds to develop and fill in!!! Terps is coming in strong, like you're walking through an orange field.
Likes
47
Share


@FreddyGrows
Follow
From this week on i stop with the vitarace.
Further i keep her on the same diet.
I try to keep everything as steady as possible the only thing im changing is the humidity.
From now on im gonna keep it as low as possible around 40%
The freaky plant is the only fuck factor in this growth she stays very small.
I think she got more of a kush phenotype very bushy.
We will see what kinda trick she's gonna pull.

Likes
20
Share


@BruWeed
Follow
🍀25/01 - Empieza su séptima semana en etapa de floración.
🍀Ya empece con su lavado de raiz, los pistillos ya estan de color ambar.
🍀Se encuentra muy bien, no tuve ningun problema con ella en toda su etapa.
🍀Esta cumpliendo 83 dias de vida desde su germinacion.
🍀Va a estar 1 semana en lavado de raiz y la podo.
🍀Su ph se encuentra en 6.0, en estos días voy a ir bajando gradualmente hasta llegar a un ph de 5.8.
🍀En su primer lavado le agregue 30L de agua aproximadamente con 10ml de Flawless Finish. La maceta que estoy utilizando es de 10L.
🍀En estos dias estare subiendo mas imagenes de como viene.
🍀🇦🇷😶🌫️Podes seguirme en Instagram como @BruWeed_arg🍀🇦🇷😶🌫️

Likes
25
Share


Likes
37
Share


@Whitey307
Follow
Hi all back with another week all goin good hopefully. flushed both plants with small nutrients dose on advice as tips getting a bit yellow plus new growth .it looked like nutrient burn 🔥.plus when did runoff ec was 1.6 so dropped it all back and with a bit of look i caught it early but to be honest they look amazing and loving life so fingers crossed all going good. as it my first time ever tho seen them in flesh. they could be in a bad state and need chopping down and me thinking I'm doin a alright job 🤣🤣🤣that's why I put it up on here is well just incase im a cabbage wasting me time on 2 apple trees or something haha main reason is ta get as much help as I can.love this site any free time going through all your grows amazing 👏 plus to all that have help me so far honestly it well appreciated and if yous see anything or find anything I'm doin stupid from now please let me
Day 42:defoliated and gave a little hair cut ✂️ like lst hadn't a clue what i was doin and that work well I think so fingers crossed.
Marshydro ts1000 on 75 percent at 50 cm.move to 80 percent in few days see how they react.Good luck all and
Keep growing and blazing till we stoned
Likes
5
Share

@Susquihanna
Follow
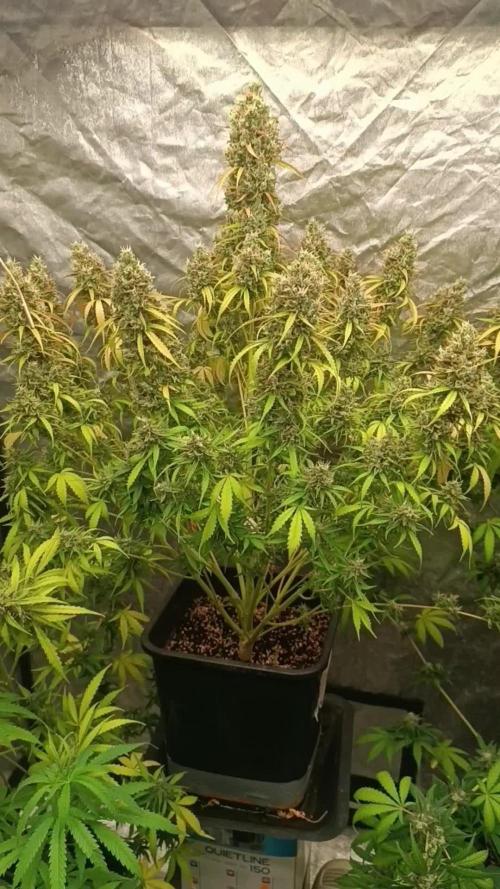
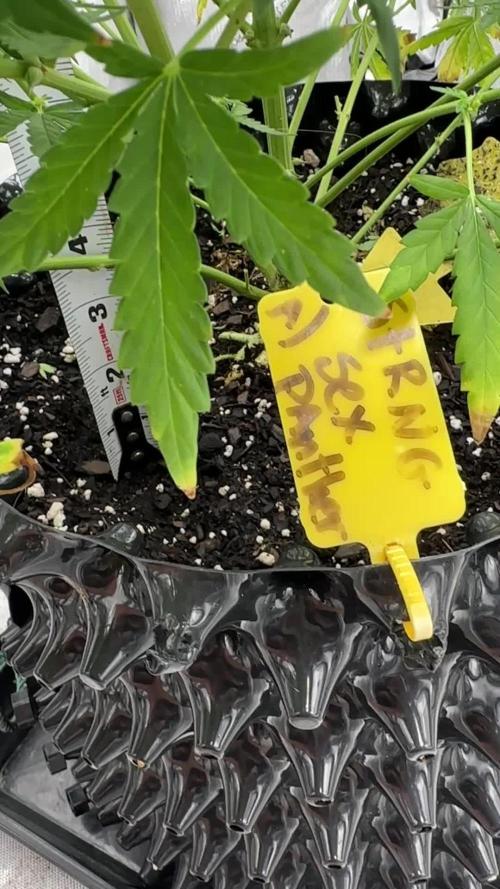
Cooler weather outside means my garage and grow tent are cooler, which is a good thing. Sex Panther @STRNG seeds grew 1/2 inches this week and her buds continue to mature. We have a hurricane is the near future so I hope I don't lose electricity.
This is week 3 out of a possible 10 weeks of flowering. It should be ready around October. I look forward to its sweet, fruity, pine, earthy and woody flavor which in turn will produce an uplifting, calming, focus and creative effect.
Take a look at the Max-see up close and personal pictures of Sex Panther trichomes.
As always, Find you Happiness. Comments and Likes appreciated.
Susquihanna
Likes
6
Share


@Lovemabud
Follow
Buds are really fattening up. Now comes the difficult part, deciding when to start the flush and then when to harvest. With likely warming days, quite likely an early harvest is on the cards so I can avoid curing in a hot tin shed. Closely monitoring the extended forecast to hopefully harvest at the perfect time as all will be wasted if curing in a 30c tent. At the moment due to a changing forecast its possible I will only achieve a 5 day flush, and have 3 days to cure in mild temps. Unfortunately from then it looks.like things seriously heat up, if extended curing is required then likely I'll bring in side the house in mason jars during the heat of the day then cure further on the drying rack in my tin shed till during the cooler evenings until ready. No. I know this isn't ideal but I've done this previously and always ended up with good.buds just way more effort that's for sure. This being a secret grow has additional challenges that's for sure. My wife, and 2 teenage kids have no idea what goes on in this shed as to their knowledge only garden tools are stored here, if anyone in my house did gardening apart from me then this grow would be impossible that's for sure