By continuing to use the website or clicking Accept you consent to our cookies and personal data policy and confirm that you are at least 18 year old. For details please see Privacy Policy and Terms
Accept
Likes
Comments
Share


@IndianaGrow
Follow
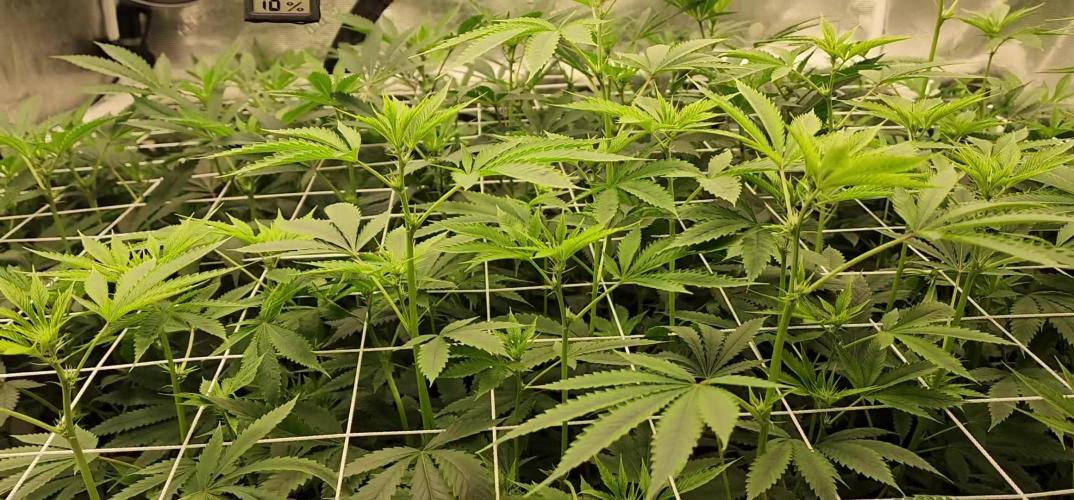
Week 6th done so far so good i put scrog net down and small bit of defoliation to get some air flow through the canopy next week i will be put another scog net down to open some light penetration for the lower buds

Likes
21
Share


@cadavxr
Follow
this week has just started but im anticipating serious growth with my tent and mars led when it arrives :D still need to buy proper nutes and a ph tester but
update ( just wait till you see how much the mars ts 1000 has helped her

Likes
2
Share


@High_Grade_Dadli
Follow
Jus a reg day at work for dem girls.....did a lil soil building(top^) with reg feed and water....clones doing well add a lil kick start to the


Likes
120
Share


@OrganicNature420
Follow
Germination date 🌱 02/12/2021
Day 73 16/02/2022
Strain 🍁 Barneys Farm Biscotti Mintz
(Biscotti x Mintz)
THC% • 30% 🤤
💡 Mars Hydro FC-E6500
• Power draw 650W + 5%
• Max coverage 5 x 5
• LED 3978 pcs high quality chips
• Max Yield 2.5g / watt
• Noise level 0 DB
• Removable Driver & Light bars
• Daisy chain
• Fast cool system
https://marshydroled.co.uk/ 🇬🇧
PROMO CODE • (organicnature420) DISCOUNT
https://www.mars-hydro.com/ 🇺🇲
PROMO CODE • (ORG420) DISCOUNT 👍🏻
⛺ Mars Hydro 150 x 150 x 200cm
📤📥 AC infinity 6inch
💧 10lt dehumidifier
❄️ 3.1kw air con system
💉 Nutrients GreenBuzzLiquids 🇩🇪
⭐⭐⭐⭐⭐
Organic Grow Liquid • 1-4ml until 2wk flower
Organic Bloom Liquid • 2-4ml flower stage
Organic More PK • 2-4ml +wk3 of flower
Organic Calmag • 1-2ml/lt whole grow
Fast Plants Spray • first 2wks at night lights off
More Roots • 2-5ml veg +2wks flower
Fast Buds • 5ml 12days before flower until wk1
Humic Acid Plus • 2-5ml whole grow
Growzyme • 2-5ml whole grow
Big Fruits • 2-5ml flower stage
Clean Fruits • 5ml flush 1wk
Ph powder
Root Gel
Living Organics
https://greenbuzzliquids.com/
PROMO CODE • organicnature420 15% off ✌️🏼
🥥 Growing Media • Coco Coir
Notes 📝
Super exited about these girls. Terp levels are crazy and this is going to make some seriously nice bubble hash from the trim. My growing game is getting better each grow 👊🏻
Discount codes in bio for Mars and GreenBuzzLiquids 👍🏻 game changers 🏆
Likes
46
Share


@Capo420
Follow
This strain was a breeze to grow. The purple phenotype is hands down some of the best herb I have ever tried. Will definitely recommend to anyone looking to grow a highly resilient, highly potent strain. Thank you to all those on this platform.
Grow diaries really made it easy to have my first grow be a success! Until next time Growmies 🤙😎🤙
Likes
119
Share


@DogDoctorOfficial
Follow
Hello, my green connoisseur! The moment we've all been eagerly awaiting has arrived—the Harvest Report for our botanical queen, Jealousy, in the Power Buds competition. This has been a journey filled with anticipation, and now, we stand on the shores of botanical triumph.
Jealousy, in her final act, bestowed upon us a generous yield of 195 grams of dry bud. It's like a cornucopia of green abundance, a testament to the meticulous care and strategic decisions made throughout this green saga. Each nugget is a jewel, a culmination of weeks of growth, love, and dedication.
But the story doesn't end there. Jealousy, in her love for the trim bin, gifted us a beautiful golden pollen. This precious powder, transformed into ash via the French Cannoli style. Also gave me a Charas/Finger Ash ball. It's like capturing the essence of the plant in a tangible form—a botanical relic that encapsulates the spirit of our green empress.
Now, let's talk about the auditory symphony that accompanied the harvest. The sound, reminiscent of a tree making timber, is like nature's applause for the bountiful harvest. It's the soundtrack to a successful cultivation venture, a melody that resonates through the grow room, echoing the grand finale of this green symphony.
The drying process, carried out over two weeks with a temperature of 17°C and humidity at 58%, is like the slow and methodical crafting of a fine wine. Each day, the buds undergo a transformative journey, evolving from freshly harvested flowers to dried and cured masterpieces.
And now, the pièce de résistance—the preservation of terps with the Grove Bag featuring Terploc technology. It's like locking the aromatic essence of Jealousy in a time capsule, ensuring that every toke carries the full spectrum of flavors and aromas. The anticipation for the smoke report is palpable, as the strawberry candy profile promises an exquisite sensory experience.
Reflecting on this entire journey, from germination to harvest, it's like turning the pages of a botanical epic. The decisions, the challenges, and the moments of sheer joy have shaped the destiny of our green empress. It's a narrative that will be retold, shared, and cherished in the annals of our horticultural adventures.
As we conclude this harvest report, let's extend our heartfelt thanks and shout-outs to Zamnesia, Plagron, Grow Diaries, and the vibrant community. Your support and contributions have been the guiding lights on this extraordinary green expedition.
To my fellow contestants and growers, may your own harvests be as abundant, flavorful, and joyous as this one. Here's to the culmination of our shared green dreams, the thrill of the harvest, and the anticipation of what lies ahead. Stay green, stay inspired, and keep cultivating those dreams!
With true love comes happiness. Always believe in yourself and always do things expecting nothing in return, with an open heart. Be a giver, and the universe will respond in ways you can’t even dream of .
Friendly reminder: all you see here is pure research and for educational purposes only.
Genetics - Jelousy @Zamnesia
Nutrients @Plagron
Light - @viparspectra P2000
Room size - 3x3 - 0,9x0,9

Processing
Likes
21
Share


@SupremeTimmy
Follow
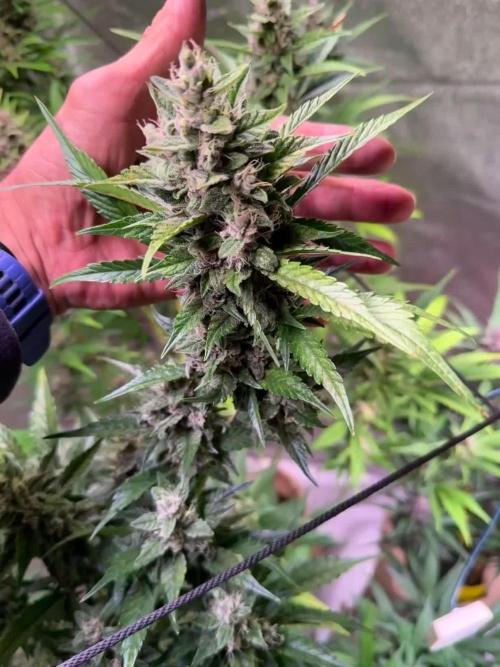
I welcome everyone who came in for the first time or has long been following my blueberries. the girl blossoms and smells and already showers herself with trichomes.
two days ago I used iron chelate on a sheet to stimulate photosynthesis and also, due to phosphorus deficiency, introduced dry water-soluble fertilizer NPK 10/54/10

Likes
174
Share


@Roberts
Follow
A little over a week in the fade. She is just starting to show deficiency signs a little. Will likely be harvesting next week. Got some beautiful frosty buds, that smell amazing. Thanks again fast buds
Thank you grow diaries community for the likes, follows, and all of my YouTube channel subscribers. I greatly appreciate the support, and glad to help others when I can. Happy growing 🌱🌱🌱
Likes
4
Share

@Ensign420
Follow
|»» LOG DISCLAIMER: Not intended as a grow guide. Grow log entries are usually posted 3 weeks later and are for my learning reference. ««|
Introduction - Week 17 Summary -
Ensign's log, stardate 17553.9,
Another incredible week in the garden!
First week of flower and already my best grow cycle yet!
Wow these girls can stretch! Did not expect the canopy to double in size! By the end of the week, had to super-crop the top growth. Buds are also starting to swell up and everything looks really healthy. Ca-Caw! Let’s go ladies!
Decided to reset the veg garden. All mother plants were cycled out and pots were reset and re-amended. Transplanted the Heady OG and TKO clones which are looking healthy and vegging along beautifully! Also transplanted the spare Heady OG clones. Still need to transplant the original mother clones into solo cups.
Still have lots to do! Onwards to next week Ensign!
[START OF WEEK 17]
==========================================================
---------- [ 4x4 MAIN TENT ] ----------
Heady OG BX1 #1 [Round4 ~Wk10] - WEEK 17 - Full Bloom Wk1
TKO [Round2 ~Wk15] - WEEK 17 - Full Bloom Wk1
----------- [ 3x3 VEG TENT ] ------------
TKO - WEEK 00 - Transplant
Garlic Budder OG#2 - WEEK 10 - Cycle-Out
Heady OG BX1 - WEEK 00 - Transplant
Gorilla Goat #2 - WEEK 10 - Cycle-Out
08/11/25 → 08/17/25
This Week's Estimated Goals
----------------------------------------------------------------------------------------------
DLI: ~20 mol/m²/d
PPFD: ~463 μmol/m²/s
VPD: ~1.0 kPa
This Week's Meter Readings & Averages
----------------------------------------------------------------------------------------------
Light On/Off: 19:00 - 07:00 | Wattage: ~326.5W [LV04]
Distance From Canopy: ~7”, 9”
DLI: ~26.40 mol/m²/d
PPFD: ~611 μmol/m²/s
VPD: ~0.61 kPa
Soil %: [48.6, 48.1, 29.4, 52.3, 43.3, 44.7, 45.3, 44.9]
==========================================================
Day 01 - Monday - 08/11/25 - Total Days: 120
-----------------------------------
Daily Averages ~[+01:00]
- Temps: 83.5°F [28.6°C]
- Humidity: 83.9%
- VPD: 0.64 kPa
- Soil %: [45, 49, 30, 53, 44, 48, 46, 43]
-----------------------------------
- [+00:19]: Night check on the 4x4 tent.
--- Ca-Caw!! Looking great my ladies! Wow the garden is thriving and I’m definitely vibing!
--- Both Heady OG (BX1 #1) and TKO are both starting to crown with more pistil hairs!
--- Ooo yea! The 14in canopy space between the two nets is completely full!! Wow!
--- Also upward growth has slowed down, but top growth is still growing through the top scrog netting. A few tops may even need super-cropping if they get too close to the grow light.
--- First week of flower is looking better than ever! High-grade! Let’s go!
--- Need to start the under-canopy pre-flower defoliation soon, but will wait a few more days for the stretch to completely stop.
- [+00:22]: Checked the Ecowitt soil moisture sensor data:
------------------ [ 4x4 MAIN TENT ] ---------------
------ 53% - [CH01 FT » G30 - Heady OG BX1 #1]
------ 49% - [CH02 FB » G30 - Heady OG BX1 #1]
------ 25% - [CH03 BT » G20 - TKO]
------ 51% - [CH04 BB » G20 - TKO]
------------------ [ 3x3 VEG TENT ] ----------------
------ 43% - [CH05 BL » GR7 - Garlic Budder OG#1]
------ 46% - [CH06 BR » GR7 - Garlic Budder OG#2]
------ 44% - [CH07 FL » GR7 - Gorilla Goat #1]
------ 42% - [CH08 FR » GR7 - Gorilla Goat #2]
--------- Veg: 38% - 45% | Flower: 45% - 55%
--------- General: 30% [Dry] «| 45 - 60% [Moist] |» 70% [Wet]
- [+00:24]: Checked the 3x3 veg tent.
--- Wow even the veg garden is looking great and healthy!
--- All mother plants are still recovering, but wow growth looks great! Since healthy is looking really good, may not need to do a full mother plant cycle out. Might just swap out two (Gorilla Goat #2 and Garlic Budder #1) while preserving the genetics as clones.
--- Also still researching tissue culture and eventually plan to take my first explant cuttings into subculture.
--- Anyways!
--- Need to water both Heady OG and TKO clones. Let’s go Ensign!
- [+00:27]: Here are the starting initial watering ranges:
------ Heady OG BX1 » 261.4g → 301.2g
------ TKO » 240.9g → 301.4g
--------- General Solo Range: [Dry] «| [Initial Cup Weight] + ~55-100g |» [Wet]
--- All cups were last watered 3 days ago.
--- Took the starting weight of both clones before watering,
------ Heady OG BX1 weighed 243.9g
------ TKO weighed 243.9g
--- While on a scale,
--- Gently misted the straw mulch of both cups with RO water.
--- Focused on the straw and sprayed as evenly as possible.
--- Misted 10-20 sprays. Waited a moment, then misted again.
--- Made sure to reference the watering weights.
--- Repeated this process for both cups.
--- There was no runoff.
- [+00:58]: Took the saturated weight of both clones after watering,
------ Heady OG BX1 » 355.3g
------ TKO » 361.2g
--- Marked the final wet weight on the back of each cup. Also marked the watering date on the front.
--- Placed both phenos back into the tent.
- [+01:02]: Checked on the propagation dome.
--- Nice! All mother plant cuttings look green and healthy!
--- Both Heady OG cuttings also look healthy and not droopy!
--- Misted the top growth with RO water.
- [+01:07]: Checked the humidifiers.
--- Tanks are still full and no leaks found.
Day 02 - Tuesday - 08/12/25 - Total Days: 121
-----------------------------------
Daily Averages ~[+01:00]
- Temps: 83.2°F [28.4°C]
- Humidity: 83.3%
- VPD: 0.66 kPa
- Soil %: [50, 49, 33, 53, 42, 44, 43, 42]
-----------------------------------
- [09:40]: Quickly checked on the 3x3 veg tent.
--- Wow the veg garden is looking beautiful and healthy!
--- Mothers are all definitely going to be alright and am still determining what to do about this cycling process.
--- Clones are looking healthy and need to be transplanted soon.
--- Cuttings are looking green, but stalks are turning purple with anthocyanin. Will change the water tonight.
- [19:05]: Night check on the 4x4 tent.
--- Ahh yea! Looking beautiful my girls! Growth is still stretching and more tops are making it through the top netting!
--- More tops are showing pistil crowning and bud sites are staring to form.
--- Not much to do right now while I wait for the stretch to stop.
--- Ca-Caw!!! Let’s go ladies!
- [19:36]: Checked the Ecowitt soil moisture sensor data:
------------------ [ 4x4 MAIN TENT ] ---------------
------ 48% - [CH01 FT » G30 - Heady OG BX1 #1]
------ 48% - [CH02 FB » G30 - Heady OG BX1 #1]
------ 35% - [CH03 BT » G20 - TKO]
------ 54% - [CH04 BB » G20 - TKO]
------------------ [ 3x3 VEG TENT ] ----------------
------ 42% - [CH05 BL » GR7 - Garlic Budder OG#1]
------ 44% - [CH06 BR » GR7 - Garlic Budder OG#2]
------ 43% - [CH07 FL » GR7 - Gorilla Goat #1]
------ 43% - [CH08 FR » GR7 - Gorilla Goat #2]
--------- Veg: 38% - 45% | Flower: 45% - 55%
--------- General: 30% [Dry] «| 45 - 60% [Moist] |» 70% [Wet]
- [19:40]: Checked the 3x3 veg tent.
--- Wow these mama’s are recovering beautifully and Heady OG and TKO clones look great!
- [19:41]: Took all 4 cutting cups out of the tent.
--- These spare mother cuttings need the water to be refreshed.
- [19:42]: Made a simple PVC rig to hold the mother cuttings.
--- Earlier in the day,
--- Using spare 1in PVC, cut four 1.25in pieces. Sanded and hot glued each piece together. Then wrapped the rig in spare garden support wire to make a handle. Marked the names on each tube with painter’s tape and a marker.
--- Okay!
--- Filled a clear solo cup with 1.5 cup of RO water.
- [19:45]: Placed the rig which fit snug and just above the water line. Great!
--- Placed the mother cuttings into to the cup making sure to group the phenos appropriately.
- [19:55]: Placed the cup into the tent and onto the floor rack.
--- Added a third drip tray and placed the cutting in the middle.
--- The PVC rig should make water changes a bit easier. I hope.
--- Anyways!
- [19:57]: Checked on the propagation dome.
--- Ahh yea! The cuttings are all looking beautiful!
--- Did not mist the top growth and only refreshed the air for a few minutes.
--- For this rooting cycle, going to leave the vents fully closed for longer.
- [20:02]: Checked the humidifiers.
--- Tanks are still full and no leaks found.
Day 03 - Wednesday - 08/13/25 - Total Days: 122
-----------------------------------
Daily Averages ~[+01:00]
- Temps: 83.2°F [28.4°C]
- Humidity: 84.3%
- VPD: 0.62 kPa
- Soil %: [49, 48, 25, 51, 40, 42, 41, 43]
-----------------------------------
- [+00:35]: Night check on the 4x4 tent.
--- Ca-Caw! Looking beautiful my girls!
--- Wow the netting is full and healthy!
--- Both Heady OG and TKO are perky and soaring upwards with more vertical growth!
--- Still waiting for the stretch to stop before I try to defoliate.
--- Keep on growing ladies!
- [+00:39]: Checked the Ecowitt soil moisture sensor data:
------------------ [ 4x4 MAIN TENT ] ---------------
------ 45% - [CH01 FT » G30 - Heady OG BX1 #1]
------ 48% - [CH02 FB » G30 - Heady OG BX1 #1]
------ 27% - [CH03 BT » G20 - TKO]
------ 49% - [CH04 BB » G20 - TKO]
------------------ [ 3x3 VEG TENT ] ----------------
------ 40% - [CH05 BL » GR7 - Garlic Budder OG#1]
------ 41% - [CH06 BR » GR7 - Garlic Budder OG#2]
------ 40% - [CH07 FL » GR7 - Gorilla Goat #1]
------ 40% - [CH08 FR » GR7 - Gorilla Goat #2]
--------- Veg: 38% - 45% | Flower: 45% - 55%
--------- General: 30% [Dry] «| 45 - 60% [Moist] |» 70% [Wet]
--- Swapping out the soil sensor really seems to have affected the moisture levels for TKO, but going to leave everything as is for now.
--- Anyways!
- [+00:43]: Checked the 3x3 veg tent.
--- Mother tent is looking great!
--- Veg growth is recovering and looking good!
--- The extra mother cuttings could be healthier, but not bad for just RO water.
--- Both the Heady OG and TKO clones need to be watered!
- [+00:47]: Here are the starting initial watering ranges:
------ Heady OG BX1 » 261.4g → 301.2g
------ TKO » 240.9g → 301.4g
--------- General Solo Range: [Dry] «| [Initial Cup Weight] + ~55-100g |» [Wet]
--- All cups were last watered 3 days ago.
--- Took the starting weight of both clones before watering,
------ Heady OG BX1 weighed 245.9g
------ TKO weighed 231.4g
--- While on a scale,
--- Gently misted the straw mulch of both cups with RO water.
--- Focused on the straw and sprayed as evenly as possible.
--- Misted 10-20 sprays. Waited a moment, then misted again.
--- Made sure to reference the watering weights.
--- Repeated this process for both cups.
--- There was no runoff.
- [+01:11]: Took the saturated weight of both clones after watering,
------ Heady OG BX1 » 360.7g
------ TKO » 365.1g
--- Marked the final wet weight on the back of each cup. Also marked the watering date on the front.
--- Placed both phenos back into the tent.
--- Plan to transplant both tomorrow!
- [+01:16]: Quickly checked on the propagation dome.
--- Looking great and all cuttings are looking green!
--- Both Heady OG clones are slightly starting to yellow (can also see a root on the one on the left). Will do a proper root check tomorrow.
- [+01:19]: Checked the humidifiers.
--- Tanks are still full and no leaks found.
Day 04 - Thursday - 08/14/25 - Total Days: 123
-----------------------------------
Daily Averages ~[+01:00]
- Temps: 83.3°F [28.5°C]
- Humidity: 84.3%
- VPD: 0.63 kPa
- Soil %: [49, 48, 31, 52, 40, 39, 43, 40]
-----------------------------------
- [+09:47]: Quick morning check on the 4x4 tent.
--- Looking great in the veg garden!
--- Both Heady OG and TKO clones are looking healthy and more than ready for a transplant.
--- Mothers are recovering, but have decided to cull and cycle the tent out.
--- The veg tent is getting cluttered.
--- Since lights are about to turn off, going to wait until the next day cycle (in ~6 hours) before cycling out the mother plants.
- [16:44]: Okay! Time to start the mother cycling process.
--- After the culling, will also top dress each pot.
- [16:59]: Took the floor rack, floor fan, clones, and cutting out of the tent.
--- Will transplant both Heady OG and TKO clones before watering.
- [16:01]: Using a basic hacksaw,
--- Cut the base of each mother and mulched the entire plant.
- [17:21]: Done!
--- Mulched all mother plants into a paper bag.
- [17:34]: Time to top dress the first pot!
--- Starting with the front right pot,
--- Disconnected the auto watering system.
--- Took the pot out of the tent and placed it on the floor.
- [17:59]: Removed the rootball.
--- Temporarily removed the soil sensor and swapped the AA battery with a new one.
--- Also temporarily removed the straw mulch.
--- Tilled and removed the larger roots as well. These will be added back later as part of the mulch.
--- Continued until the top 5-6 inches of top soil was loose and soft.
--- The soil moisture felt great and smelled earthy with no foul odors.
--- Also glad to find worms in all pots!
- [18:03]: Time for the soil amendments!
--- Top dressed:
------ 1/4 cup of Kashi Blend
------ 1/2 cup of Craft Blend
------ 2 cups of BuildASoil Worm Castings
--- Sprinkled each amendment evenly.
--- Using my fingers, gently tilled the amendments into the top few inches of soil.
--- Also dug and loosened the center area. Made sure the area was deep enough for a solo cup and had some of the top dressing mixed in.
--- Dug a hole and placed a solo cup into the center of the pot.
--- Made sure the sides of the cup were tucked in and each cup has drainage holes.
- [18:24]: Placed the larger roots as mulch. Spread the roots evenly.
--- Placed the original straw mulch on top.
- [18:33]: Placed the Ecowitt soil sensor back into the pot.
--- Also re-connected the drip-ring rig.
--- Set the pot aside for later.
- [19:36]: Repeated this process for each pot.
--- Alright all pots have been reset!
--- Time for a bit of cleanup!
- [19:53]: Cleaned the tent floor.
--- First sweeped and removed the larger leaf debris.
--- Then sprayed the floor with distilled water and let it soak for a bit before wiping with paper towels.
- [22:48]: Placed all pots into the tent and connected the drip-rings to the auto-watering system.
--- Also placed the floor fan back.
--- Ca-Caw! Time to transplant both Heady OG (BX1 #1) and TKO into the (7-gallon) pots!
--- Let's go!
- [22:59]: Gently removed the left two solo cups from the fabric pots leaving perfect holes.
------ Sprinkled 1/4tsp of Great White into each hole,
--- Dusted the sides of the hole.
--- Also sprinkled a bit around the top soil.
--- Great! Time to transplant!
--- Going to start with TKO since she is going to be in the back left quadrant.
--- It’s been a day since her last watering.
--- To loosen the rootball from the cup, I gently squeezed the sides before pressing the bottom upwards.
--- Vulcan-gripped the base of the plant and flipped her upside down.
- [23:09]: TKO easily dropped straight out of her cup!
--- Nice! Roots look healthy and white!
--- Did not break up the rootball.
- [23:15]: Gently placed her into the pre-inoculated hole (back left quadrant).
--- Pressed and evened out the top soil.
- [23:22]: Repeated this process for Heady OG (front left quadrant).
--- Looking great my ladies!
--- Okay! Time to water the new mothers and re-amended pots!
--- Since most of the time these girls will be receiving straight RO water, going to water in a diversity of microbes to start off the initial breakdown process.
- [23:57]: Filled a pitcher with 8 cups of RO water,
------ Added 1/16tsp of Quillaja Saponaria Extract
------ Added 1/16tsp of Beauveria Bassiana Plus
------ Added 1/8tsp of Recharge
------ Added 1/4tsp of Horticultural Aloe
------ Added 1/4tsp of Horticultural Coconut
------ Added 1/2tsp of Mycrobe Complete
------ Added 1/2tsp of WDG3000 Extra Strength BTI
- [+00:04]: Mixed the solution before pouring 2 cups straight into a pump sprayer.
--- Misted the solution onto the straw mulch of the back left pot.
--- Tried to avoid spraying the solo cups.
--- Repeated this process for each of the pots in the veg tent.
--- Misted the straw mulch evenly.
- [+00:22]: Done with the tent reset!
--- All pots are fully re-amended and clones have been transplanted!
--- The tent is ready for another veg cycle!
- [+00:25]: Checked on the propagation dome.
--- Growth is looking great!
--- Heady OG cuttings have probably both rooted, but will leave them in the tray for a bit longer. The Heady OG (BX1 #1) mother is clearly going to survive and the genetics has been preserved. So going to wait to transplant the extra cuttings into solo cups at the same time.
--- Did not mist the top growth.
--- Opened the right side vent. Now only one vent is open.
- [+00:27]: Oops! The extra mother plant cuttings still need to be placed into the tent.
--- Earlier in the day, refreshed the RO water.
--- Also while culling the mothers, took a few more cuttings from each to root in the cup.
- [+00:35]: Instead of using the floor rack, decided to place the cup of cuttings on top of the propagation dome.
--- Placed the cup on top of an upside-down drip tray. Since these cuttings don’t need a lot of PPFD, hoping the in-direct bounce lighting will be enough.
- [+00:42]: Quickly checked on the 4x4 tent.
--- Ca-Caw! Woah these ladies are still stretching!
--- To my surprise, Heady OG has stretched taller than TKO and may need to be super cropped soon.
--- This grow cycle is starting to get pretty wild! Let’s go ladies!
- [+00:47]: Checked the Ecowitt soil moisture sensor data:
------------------ [ 4x4 MAIN TENT ] ---------------
------ 53% - [CH01 FT » G30 - Heady OG BX1 #1]
------ 48% - [CH02 FB » G30 - Heady OG BX1 #1]
------ 26% - [CH03 BT » G20 - TKO]
------ 51% - [CH04 BB » G20 - TKO]
------------------ [ 3x3 VEG TENT ] ----------------
------ 55% - [CH05 BL » GR7 - Garlic Budder OG#1]
------ 56% - [CH06 BR » GR7 - Garlic Budder OG#2]
------ 58% - [CH07 FL » GR7 - Gorilla Goat #1]
------ 62% - [CH08 FR » GR7 - Gorilla Goat #2]
--------- Veg: 38% - 45% | Flower: 45% - 55%
--------- General: 30% [Dry] «| 45 - 60% [Moist] |» 70% [Wet]
- [+01:06]: Checked the humidifiers.
--- Tanks are still full and no leaks found.
Day 05 - Friday - 08/15/25 - Total Days: 124
-----------------------------------
Daily Averages ~[+01:00]
- Temps: 83.0°F [28.3°C]
- Humidity: 84.8%
- VPD: 0.60 kPa
- Soil %: [49, 48, 31, 53, 49, 50, 51, 52]
-----------------------------------
- [22:25]: Night check on the 4x4 tent.
--- Wow growth is still continuing to stretch!
--- Heady OG’s tops are getting sort of close to the light, but going to continue to let her grow.
--- TKO is still filling in the second layer and staying relatively squat. Nice!
--- Regardless, the canopy is looking better than ever!
- [22:39]: Took the weekly general PPFD readings.
------ Heady OG (BX1 #1) was around 611 μmol/m²/s which gives a DLI of 26.40 mol/m²/d under a 12/12 light cycle (at ~326.5W).
------ TKO was around 469 μmol/m²/s which gives a DLI of 20.26 mol/m²/d under a 12/12 light cycle.
- [22:57]: Took the weekly height and light distance measurements.
------ Heady OG (BX1 #1) was about 47" tall.
------ TKO was about 45" tall.
------ Heady OG (BX1 #1) was about 7" away from the grow light.
------ TKO was about 9" away from the grow light.
--- Wow Heady OG is getting pretty close to the grow light. Will need to super-crop the taller tops soon.
- [23:07]: Checked the Ecowitt soil moisture sensor data:
------------------ [ 4x4 MAIN TENT ] ---------------
------ 46% - [CH01 FT » G30 - Heady OG BX1 #1]
------ 48% - [CH02 FB » G30 - Heady OG BX1 #1]
------ 30% - [CH03 BT » G20 - TKO]
------ 54% - [CH04 BB » G20 - TKO]
------------------ [ 3x3 VEG TENT ] ----------------
------ 47% - [CH05 BL » GR7 - Garlic Budder OG#1]
------ 47% - [CH06 BR » GR7 - Garlic Budder OG#2]
------ 48% - [CH07 FL » GR7 - Gorilla Goat #1]
------ 49% - [CH08 FR » GR7 - Gorilla Goat #2]
--------- Veg: 38% - 45% | Flower: 45% - 55%
--------- General: 30% [Dry] «| 45 - 60% [Moist] |» 70% [Wet]
- [23:09]: Checked the 3x3 veg tent.
--- Wow the veg garden is looking clean and the new mothers are growing along beautifully!
- [23:10]: Quickly checked on the propagation dome (in the 3x3 veg tent).
--- Cuttings look great!
--- Did not mist the top growth.
--- Refreshed the RO water for the spare mother cuttings.
- [23:17]: Checked the humidifiers.
--- Tanks are still full and no leaks found.
Day 06 - Saturday - 08/16/25 - Total Days: 125
-----------------------------------
Daily Averages ~[+01:00]
- Temps: 82.6°F [28.1°C]
- Humidity: 85.1%
- VPD: 0.58 kPa
- Soil %: [49, 48, 26, 51, 45, 46, 47, 48]
-----------------------------------
- [07:56]: Quick morning check on the 3x3 veg tent.
--- The new mother garden is looking beautiful and growth is healthy and perky!
--- Grow strong my girls!
- [19:45]: Night check on the 4x4 tent.
--- Holy Cannoli! The tent is getting full!
--- Heady OG and TKO are raging with growth! The middle of the canopy is completely full and wow growth looks healthy!
--- Nodes are also starting to swell with bud growth!
--- Ca-Caw!! Let’s go ladies!
- [19:56]: Checked the Ecowitt soil moisture sensor data:
------------------ [ 4x4 MAIN TENT ] ---------------
------ 47% - [CH01 FT » G30 - Heady OG BX1 #1]
------ 47% - [CH02 FB » G30 - Heady OG BX1 #1]
------ 24% - [CH03 BT » G20 - TKO]
------ 50% - [CH04 BB » G20 - TKO]
------------------ [ 3x3 VEG TENT ] ----------------
------ 44% - [CH05 BL » GR7 - Garlic Budder OG#1]
------ 45% - [CH06 BR » GR7 - Garlic Budder OG#2]
------ 47% - [CH07 FL » GR7 - Gorilla Goat #1]
------ 47% - [CH08 FR » GR7 - Gorilla Goat #2]
--------- Veg: 38% - 45% | Flower: 45% - 55%
--------- General: 30% [Dry] «| 45 - 60% [Moist] |» 70% [Wet]
- [19:56]: Checked the 3x3 veg tent.
--- Mothers are looking incredible!
--- Growth is healthy and perky! Nice!
--- Both the Heady OG and TKO moms are looking happy and growth is looking healthy!
--- The spare cuttings on top of the propagation dome are looking great! Glad the low PPFD levels are enough for cutting growth. Refreshed the RO water.
- [20:00]: Checked on the propagation dome.
--- Cuttings are looking beautiful and growth is looking green!
--- Yea both Heady OG cuttings can clearly be planted into solo cups, but going to wait a bit longer.
- [21:32]: Checked the humidifiers.
--- Tanks are still full and no leaks found.
Day 07 - Sunday - 08/17/25 - Total Days: 126
-----------------------------------
Daily Averages ~[+01:00]
- Temps: 82.5°F [28.1°C]
- Humidity: 85.3%
- VPD: 0.57 kPa
- Soil %: [49, 47, 30, 53, 43, 44, 46, 46]
-----------------------------------
- [08:06]: Quickly checked on the 3x3 veg tent.
--- Veg garden is looking great!
--- No flooding, and no gnats! Great!
--- Mother plants, rooting clones, and spare cuttings all look healthy and green!
- [19:20]: Night check on the 4x4 tent.
--- Woah! These ladies blew up with growth!
--- Ooo yea! Looking both healthy and the canopy is completely stacked!
--- Both Heady OG and TKO are still stretching upwards! TKO is staying relatively shorter, which is great because I have no way of training the back area. Heady OG is now a few inches from the light!
--- Ca-Caw! Time to super crop! Let’s go!
- [19:46]: Gently pinched and trained the taller branches down a good 10-11 inches.
--- The canopy looks a lot more even now. Looking great my girls!
- [19:55]: Checked the Ecowitt soil moisture sensor data:
------------------ [ 4x4 MAIN TENT ] ---------------
------ 52% - [CH01 FT » G30 - Heady OG BX1 #1]
------ 47% - [CH02 FB » G30 - Heady OG BX1 #1]
------ 29% - [CH03 BT » G20 - TKO]
------ 53% - [CH04 BB » G20 - TKO]
------------------ [ 3x3 VEG TENT ] ----------------
------ 42% - [CH05 BL » GR7 - Garlic Budder OG#1]
------ 44% - [CH06 BR » GR7 - Garlic Budder OG#2]
------ 45% - [CH07 FL » GR7 - Gorilla Goat #1]
------ 45% - [CH08 FR » GR7 - Gorilla Goat #2]
--------- Veg: 38% - 45% | Flower: 45% - 55%
--------- General: 30% [Dry] «| 45 - 60% [Moist] |» 70% [Wet]
- [19:58]: Checked the 3x3 veg tent.
--- Looking great my ladies! Both mothers are vegging along beautifully!
--- On top of the propagation dome, the spare mother cuttings are looking great!
--- The rooting cuttings are looking good too!
--- Woah! Yea, both of the spare Heady OG clones have visible roots from the top.
--- Was planning on waiting, but need to transplant now!
--- Ca-Caw!! Let’s go Ensign!
- [20:24]: Took 2 old solo cups (bottom corners cut for drainage) and labeled each cup (Heady OG BX1).
--- Partially filled each with some fresh (dry) BuildASoil 3.0 potting soil.
--- Made sure that the soil was well packed.
--- Misted the dry soil with a bit of RO water (~3 sprays each).
- [20:36]: Inoculated each cup with Great White mycorrhizae along with a bit of Beauveria Bassiana.
------ Sprinkled 1/64tsp of Beauveria Bassiana Plus
------ Sprinkled 1/16tsp of Great White
--- Time to plant!
--- Could have transplanted earlier, but wanted to wait for the new cuttings to root, but oh well.
- [20:41]: Root check!
--- Wow both Heady OG and TKO’s roots looked white and healthy!
- [20:43]: Placed each clone into the solo cups.
--- Made sure each cup had enough room for more soil.
- [20:47]: Inoculated each Coco Coin with Great White mycorrhizae.
------ Sprinkled about an 1/16tsp of Great White onto each Coco Coin.
--- Made sure to get the top and sides evenly.
- [20:58]: Gently filled each solo cup with more soil.
--- Completely covered the top of each Coco Coin and made sure to tuck the sides fairly snug with soil.
--- Evened out the top soil. Each Coco Coin is about 1/4-1/2 inch below the top soil.
- [20:59]: Added some BuildASoil Organic Straw Mulch to the top.
--- Using the small straw bits at the bottom of the bag is great for solo cups.
--- Time to water!
- [21:15]: Filled a measuring cup with 2 cups of RO water.
------ Added 1/64tsp of Quillaja Saponaria Extract [60]
------ Added 1/64tsp of Beauveria Bassiana Plus
------ Added 1/16tsp of Horticultural Coconut
------ Added 1/16tsp of Horticultural Aloe
------ Added 1/8tsp of Mycrobe Complete
--- Mixed and poured the solution straight into a spray bottle.
- []: Took the dry soil weight of each pheno before watering,
--- To make waterings easier, marked each clone with A and B.
------ Heady OG BX1 A weighed 237.7g
------ Heady OG BX1 B weighed 244.4g
--- Marked the starting weight on the back of each cup.
--- While on a scale,
--- Gently misted the straw mulch of each cup.
--- Focused on the straw and sprayed as evenly as possible.
--- Misted 5-10 sprays. Let it sit for a minute, then misted again.
--- Repeated this process until each cup weighed at least 300g
--- There was no runoff.
- [21:40]: Took the weight of each pheno after watering,
------ Heady OG BX1 A weighed 300.3g
------ Heady OG BX1 B weighed 305.6g
--- Also marked the wet weight on each cup.
--- Placed each cup on top of the fabric pots on the right side of the tent (under drip trays).
--- Done!
- [21:43]: Back to the propagation dome.
--- Misted the top growth with RO water. Also misted the lid.
--- Then closed all air vents.
--- Placed the spare mother cuttings back on top of the propagation dome (also refreshed the RO water).
--- The clones on the pots seem sort of stressed.
- [21:55]: Covered each clone with a clear solo cup.
--- Misted each cup with distilled water (~2 sprays).
--- Secured each cup with a bit of painters tape.
- [22:19]: Checked the humidifiers.
--- Tanks are still full and no leaks found.
--- Another grow week done!
--- Need to transplant more rooted mother cuttings next week into solo cups.
--- Also need to clean-up the under canopy in the main tent.
--- Onwards to next week Ensign!
[END OF WEEK 17]
Likes
7
Share


@ledgrowers
Follow
got some nute burn from switching to synthetic to organic. organic nutes are stronger than I thought and you only have to water with plain water. things going well wrapping up this harvest next month

Likes
38
Share


@Cariboo_OG
Follow
Utopia Haze is a rare heavily sativa dominant hybrid (90% sativa/10% indica) strain created through back crossing Brazilian Sativa strains. This tasty little bud took home 1st Place for Best Sativa in the 2008 High Times’ Cannabis Cup and for good reason – with its potent 18-22% average THC level and long lasting cerebral effects, Utopia Haze is one powerhouse smoke. The Utopia Haze high comes on soon after you finish your first toke, hitting you with a strong cerebral lift that infuses you with a sense of hazy relaxation.
Type: Feminised/Photoperiod
Cultivation: Indoor/Outdoor
Flowering Time (days): 70-75
Indoor Yield (g): Up to 650
Feminised Outdoor Harvest Month: October
Feminised Outdoor Harvest Month Week: 3rd-4th week
Aroma: Citrus, Woody, Pungent, Mint
Effect: Cerebral Lift, Hazy Relaxation, Sleepy
Welcome Everyone to the Final Entry of my Utopia Haze Grow !
There is so much to discuss ! I have been extremely busy as of late trying to get this Harvest together, but i am happy to have it here for you now !
I Seriously under estimated the amount of time, help from others, and my own necessary skills to pull this off.. and i still kind of screwed it up lol !
But its worth noting i have never actually done this before and trying to document it during....was extremely hard.
It is next to impossible to work an iPhone with rubber gloves on !
First I want to discuss everything step by step so before you jump straight into the comments on how the end product is so small in "quantity"
Rest assured i am happy with its"quality"...and thats all that matters to me because Life is a journey not a destination! and i have learned so much from this grow that I couldn't be any happy even if i messed some things up :)
But at the very least I hope you read through this entry in its entirety with an open mind and focus more on the process, rather than just the outcome!
I ran out of Ice & i was only able to wash three times..(normally I've heard you should go sometimes 5-6 washes)
Preparation is Key & things will be much better next round :)
Photos 1-22
These are pretty self explanatory but for those of you just tuning in now.. this is what happens to a very happy plant when you don't have the necessary tools to monitor key components of growing cannabis.. Ph, as well as EC levels play a very key role in the outcome of your grow lol that being said I was just able to save this plant by purchasing both tools but that doesn't mean the plant didn't suffer because of the prior events.. This was a Huge reason behind me choosing to turn this harvest into what i would consider
"Solventless Hash Rosin" from "Ice water extracted Bubble hash".
Pictures 23
The idea here is the process of using "fresh Frozen Cannabis" this has been discussed many a time online on such sites as instagram and here on grow diaries as well.. I personally have Never tried the process so i decided to try it out and make a judgement for myself..
Video 24
The Cannabis has now been in the freezer for 72 hours making it very well frozen.. as you can tell i struggled getting it all into the 25u Screen Wash Bag. One thing of note i would do differently is i will de-stem my next batch as i also believe this played a part in the amount of plant matter that escaped through the sieves.
Photo/Video's 25-28
The idea here is "ice water Seiving" & especially with the bags that I am using here that are only have screen material on the bottom portion of the bag it is very important to have spaces in-between the screens to allow the water to pass directly through the screens into the bottom bucket with the least amount of resistance.. because the hash is so extremely temperature dependant if it gets warm on the side of the bag.. it will stick there and not make it to the bottom to become use able product..
29
You do not need to use as much Ice as i used here lol... the idea is to keep everything very cold..i certainly achieved that but at the sacrifice of using so much that i ended up grinding product and producing "contaminants" but in the end they are just plant matter that i would be smoking when i rolled up my joint either way so.. I'm not super disappointed..
But it should be noted that what you want to achieve here is a Layering effect where you have the wash bag between two small layers of ice while the "water current" washes the Trichomes away allowing them to be separated by the screens setup below :)
Before Starting the machine you should allow some time (i.e.;10-12minutes pre soak to allow the product to become saturated) before the first cycle.
By video 32 I have just ran out of ice lol..
Video 33-34
Here I have a tip for you.. to separate the screens that you sieve through.. cut 5 gallon buckets to stretch them across nice and tight.. it'll make scooping your Bubble that much easier ! i learned this from the many "Frenchy" videos I have watched :)
Picture 35
Here in lays the problem for most people.. drying your hash without loosing vast amounts of "Terpenes" whilst also stay ever vigilant against mold !
Thanks to all those videos I've watched on youtube.. id like to think this was one of my most successful parts of this process..
Things to Note; Terpenes start to seriously evaporate at temperatures 68F or 20C
you need to stay as cold as possible whilst bringing the Relative Humidity in the space down into the 40-30% to stay away from that nasty mold !
I used my cold storage room in the basement.. with a dehumidifier running to keep the space at 45% RH & staying at a constant 15c.
All while spreading the hash as thin as possible across parchment paper, on top of the white screens with a fan moving air across both sides of the paper.
Pictures 36-38
These are some macros i took in the middle of my drying session I fell in love with the colour.
Yes i know the black spots are plant material but they will get caught when i bag the hash & squish the oil out.
Thing to Note; at this stage it is important to ensure you 'micro plane" the hash down as fine as you can whilst staying weary of the temperature... any "chunks" will hold pockets of moisture.. that lead to potential problems..ie; mold ...
Picture/Video 39-41
Successfully planed bubble hash ready to be bagged and Squished !
Picture 42
Ive decided to follow Pedro.. from Pedros Grow Room and double bag to be on the safe side so i don't have any blow outs.
So thats One 25u bag inside one 160u bag ! :)
Pictures 43
This is almost 3 grams of the bubble hash from above, already melting in the bag.. this is where i ran into trouble again lol things started getting to warm in the house and i was only able to get one of the three squish's i did on video :( things started getting sticky.
Picture 44
This is basically just a photo of the equipment I'm using; 3x5 LowTemp Cage in the frame I built myself, with a 20Ton bottle jack.
Something to note here is this is an older Lowtemp model with only a single heating zone which is which i have it closed here heating Both sides of the press :)
As well as the importance of having adequate pressure on your plates.. my rig is very overkill for the size of hash bags..lol
Video 45
Here is the lovely press video.. its didn't quite work the way i wanted either lol my directional folding wasn't quite tight enough for a big "drip" :)
&the Press was set to 65°c
Photo's 46-50 are pretty self explanatory :) I had a blow out.. but still managed to pull an 80% return from the hash once squished...& yes it tasted amazing :)
Was it worth it in the end... that could be debated.. for some..i understand..its not your thing, but for those of us that are interested in making our own concentrates.. free from Solvents...
I wouldn't make it any other way :)
If even ONE of you reading this diary finds it helpful to reference for ANYTHING.....even if its "what not to do" ill consider it a success !
Thanks again for tagging along on this garden adventure.. its been one heck of a journey !
Much Love from B.C. Canada,
Until Next time,
Cariboo


Likes
14
Share


@JamieKnolliver
Follow
Habe jetzt dann doch auf den Calcium/Magnesium Mangel reagiert und Biobizz Calmag zum Düngemix hinzugefügt.
Nach 2 Tagen war bereits eine deutliche Veränderung der Pflanzenoberflöche festzustellen.
Muss man mal beobachten wie sich das bei der geringen Dosis verändert.
Man kann wunderbar erkennen wie die Pflanze jetzt anfängt zu blühen.
Es werden nun von Tag zu Tag mehr weiße Härchen und die Pflanze macht einen ordentlichen Schuss.
*edit*
Vielleicht kann mir jemand erklären, warum mein Video, dass in 4K aufgenommen wurde hier gefühlt nur in 360p angezeigt wird?
LG Pascal

Likes
4
Share

@Nargileus
Follow
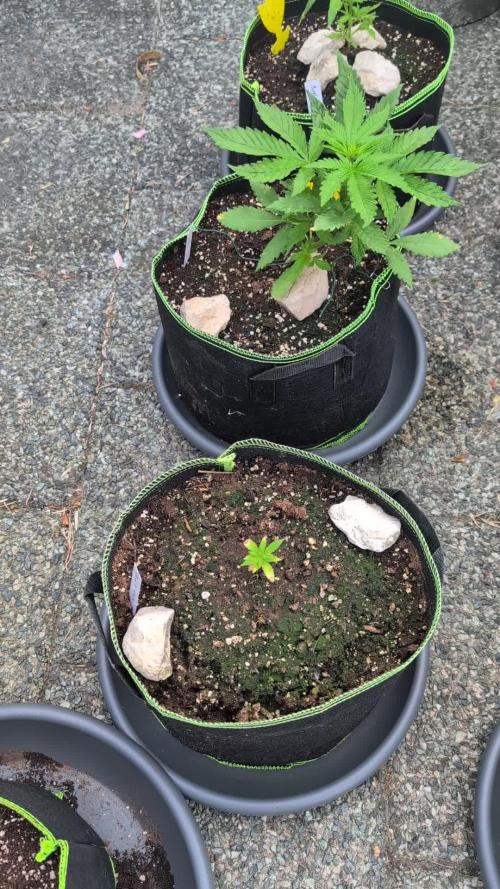
Teilweise war es sehr regnerisch aber den Pflanzen hat es nicht geschadet, die kleine von der ich gedacht habe das sie stirbt fängt langsam an zu wachsen. Normaler weise würde man die beiden kleinen Krüppel ja gegen neue austauschen, aber ich möchte sehen was daraus wird.
Likes
9
Share


@TrialAndErrorGrows
Follow
Week 3 Bloom
I did nothing this week I cleaned and changed the reservoir then sat back and let the timers do the work.
This week everything grew so much. At the beginning of the week I was concerned about nug spacing. A few days later no concern at all lol. This is looking to be a nice grow. 🤞🤞
Likes
1
Share


@Growedbypepper
Follow
Esta planta ha tenido un avance un poco lento para el tiempo que tiene en siendo esta la segunda semana esperemos que pueda desarrollarse lo mejor posible
Likes
9
Share


@RunWithIt
Follow
And the first week of flower begins!
I started this week off by defoliating any and all large fan leaves blocking lower nodes. Also did a little supercropping on BL to get her to spread just a bit more. I raised the light up to 45cm and this will be the final height.
They've been drinking really fast by this point. Definitely going to be very diligent with waterings/feedings until harvest.
Cheers all! This is my most painless grow to date, praying for a nice and smooth wrap-up to this cycle as well.

Likes
119
Share

@Roberts
Follow
Divine indica is growing great. I am topping her today. I also will be removing the 1st node growth as well. Everything is looking really good. She has made it to her own grow space now. She is growing fast and strong. 🤞🏻it continues. Thank you Divine Seeds, and Spider Farmer. 💪🏼🤜🏻🤛🏻🌱🌱🌱
Thank you grow diaries community for the 👇likes👇, follows, comments, and subscriptions on my YouTube channel👇. ❄️🌱🍻
Happy Growing 🌱🌱🌱
https://youtube.com/channel/UCAhN7yRzWLpcaRHhMIQ7X4g

Likes
132
Share


@rhodes68
Follow
1/3/20 Week 8!
Minor defoliation and some canopy leveling, just trying to fit it all in a 4x4 tent. The other grow will finish in a week or so and give em a bit of room.
Just Bloom nuets at avg dose until these get some room, dont really want em larger.
1/9 Ending week with a foliar feed primarily on Tara as she has grown so fast she is flirting with some def.
If I dont get results from the Cal-Mag I will shift to epsom salt in a couple of days.
Considering upping the ppm in lieu of adding cal-mag no signs of overfeeding at all.
Defoliation tomorrow to start week 9


