By continuing to use the website or clicking Accept you consent to our cookies and personal data policy and confirm that you are at least 18 year old. For details please see Privacy Policy and Terms
Accept
Likes
Comments
Share


@pzwags420
Follow
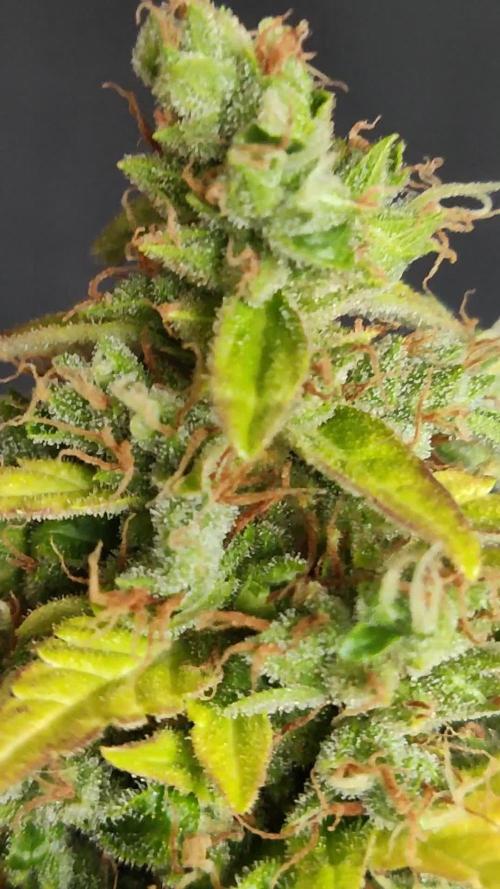
Week 8 has gone well and she is chugging along. She is still putting out new pistils with some turning orange. Calyx's are growing longer and buds are still soft. I'm thinking a min of 10 weeks flowering for her. I removed some leaves on inner canopy to bring some air and light deeper. She is so bushy its hard to even defoliate maybe next time i will remove some more lateral branches... afterremoving the leaves I must have come incontact with a pollen sack as where I defoliated all seemed to be polinated over night and are making seeds :( I will cut my losses and harvest while seeds are still small.

Likes
38
Share


@Cariboo_OG
Follow
Utopia Haze is a rare heavily sativa dominant hybrid (90% sativa/10% indica) strain created through back crossing Brazilian Sativa strains. This tasty little bud took home 1st Place for Best Sativa in the 2008 High Times’ Cannabis Cup and for good reason – with its potent 18-22% average THC level and long lasting cerebral effects, Utopia Haze is one powerhouse smoke. The Utopia Haze high comes on soon after you finish your first toke, hitting you with a strong cerebral lift that infuses you with a sense of hazy relaxation.
Type: Feminised/Photoperiod
Cultivation: Indoor/Outdoor
Flowering Time (days): 70-75
Indoor Yield (g): Up to 650
Feminised Outdoor Harvest Month: October
Feminised Outdoor Harvest Month Week: 3rd-4th week
Aroma: Citrus, Woody, Pungent, Mint
Effect: Cerebral Lift, Hazy Relaxation, Sleepy
Welcome Everyone to the Final Entry of my Utopia Haze Grow !
There is so much to discuss ! I have been extremely busy as of late trying to get this Harvest together, but i am happy to have it here for you now !
I Seriously under estimated the amount of time, help from others, and my own necessary skills to pull this off.. and i still kind of screwed it up lol !
But its worth noting i have never actually done this before and trying to document it during....was extremely hard.
It is next to impossible to work an iPhone with rubber gloves on !
First I want to discuss everything step by step so before you jump straight into the comments on how the end product is so small in "quantity"
Rest assured i am happy with its"quality"...and thats all that matters to me because Life is a journey not a destination! and i have learned so much from this grow that I couldn't be any happy even if i messed some things up :)
But at the very least I hope you read through this entry in its entirety with an open mind and focus more on the process, rather than just the outcome!
I ran out of Ice & i was only able to wash three times..(normally I've heard you should go sometimes 5-6 washes)
Preparation is Key & things will be much better next round :)
Photos 1-22
These are pretty self explanatory but for those of you just tuning in now.. this is what happens to a very happy plant when you don't have the necessary tools to monitor key components of growing cannabis.. Ph, as well as EC levels play a very key role in the outcome of your grow lol that being said I was just able to save this plant by purchasing both tools but that doesn't mean the plant didn't suffer because of the prior events.. This was a Huge reason behind me choosing to turn this harvest into what i would consider
"Solventless Hash Rosin" from "Ice water extracted Bubble hash".
Pictures 23
The idea here is the process of using "fresh Frozen Cannabis" this has been discussed many a time online on such sites as instagram and here on grow diaries as well.. I personally have Never tried the process so i decided to try it out and make a judgement for myself..
Video 24
The Cannabis has now been in the freezer for 72 hours making it very well frozen.. as you can tell i struggled getting it all into the 25u Screen Wash Bag. One thing of note i would do differently is i will de-stem my next batch as i also believe this played a part in the amount of plant matter that escaped through the sieves.
Photo/Video's 25-28
The idea here is "ice water Seiving" & especially with the bags that I am using here that are only have screen material on the bottom portion of the bag it is very important to have spaces in-between the screens to allow the water to pass directly through the screens into the bottom bucket with the least amount of resistance.. because the hash is so extremely temperature dependant if it gets warm on the side of the bag.. it will stick there and not make it to the bottom to become use able product..
29
You do not need to use as much Ice as i used here lol... the idea is to keep everything very cold..i certainly achieved that but at the sacrifice of using so much that i ended up grinding product and producing "contaminants" but in the end they are just plant matter that i would be smoking when i rolled up my joint either way so.. I'm not super disappointed..
But it should be noted that what you want to achieve here is a Layering effect where you have the wash bag between two small layers of ice while the "water current" washes the Trichomes away allowing them to be separated by the screens setup below :)
Before Starting the machine you should allow some time (i.e.;10-12minutes pre soak to allow the product to become saturated) before the first cycle.
By video 32 I have just ran out of ice lol..
Video 33-34
Here I have a tip for you.. to separate the screens that you sieve through.. cut 5 gallon buckets to stretch them across nice and tight.. it'll make scooping your Bubble that much easier ! i learned this from the many "Frenchy" videos I have watched :)
Picture 35
Here in lays the problem for most people.. drying your hash without loosing vast amounts of "Terpenes" whilst also stay ever vigilant against mold !
Thanks to all those videos I've watched on youtube.. id like to think this was one of my most successful parts of this process..
Things to Note; Terpenes start to seriously evaporate at temperatures 68F or 20C
you need to stay as cold as possible whilst bringing the Relative Humidity in the space down into the 40-30% to stay away from that nasty mold !
I used my cold storage room in the basement.. with a dehumidifier running to keep the space at 45% RH & staying at a constant 15c.
All while spreading the hash as thin as possible across parchment paper, on top of the white screens with a fan moving air across both sides of the paper.
Pictures 36-38
These are some macros i took in the middle of my drying session I fell in love with the colour.
Yes i know the black spots are plant material but they will get caught when i bag the hash & squish the oil out.
Thing to Note; at this stage it is important to ensure you 'micro plane" the hash down as fine as you can whilst staying weary of the temperature... any "chunks" will hold pockets of moisture.. that lead to potential problems..ie; mold ...
Picture/Video 39-41
Successfully planed bubble hash ready to be bagged and Squished !
Picture 42
Ive decided to follow Pedro.. from Pedros Grow Room and double bag to be on the safe side so i don't have any blow outs.
So thats One 25u bag inside one 160u bag ! :)
Pictures 43
This is almost 3 grams of the bubble hash from above, already melting in the bag.. this is where i ran into trouble again lol things started getting to warm in the house and i was only able to get one of the three squish's i did on video :( things started getting sticky.
Picture 44
This is basically just a photo of the equipment I'm using; 3x5 LowTemp Cage in the frame I built myself, with a 20Ton bottle jack.
Something to note here is this is an older Lowtemp model with only a single heating zone which is which i have it closed here heating Both sides of the press :)
As well as the importance of having adequate pressure on your plates.. my rig is very overkill for the size of hash bags..lol
Video 45
Here is the lovely press video.. its didn't quite work the way i wanted either lol my directional folding wasn't quite tight enough for a big "drip" :)
&the Press was set to 65°c
Photo's 46-50 are pretty self explanatory :) I had a blow out.. but still managed to pull an 80% return from the hash once squished...& yes it tasted amazing :)
Was it worth it in the end... that could be debated.. for some..i understand..its not your thing, but for those of us that are interested in making our own concentrates.. free from Solvents...
I wouldn't make it any other way :)
If even ONE of you reading this diary finds it helpful to reference for ANYTHING.....even if its "what not to do" ill consider it a success !
Thanks again for tagging along on this garden adventure.. its been one heck of a journey !
Much Love from B.C. Canada,
Until Next time,
Cariboo

Likes
2
Share


@theicyeffect
Follow
A diary dedicated to the rest of my special girls. Check out my profile to see the Gorilla Glue up close (she will still appear here from time to time).
Germinated them directly in the soil with natural sunlight, achieving a 100% success rate.
All came out the soil with remarkably thick stems already, excited to see how these old school genetics will behave.
Lots of growth during their first week of life, reaching the end of it with 2 pairs of leaves each. We surely got some sturdy girls here.
Sunset Sherbet had some damage from struggling to hatch and is now slowly recovering, I’m sure she’ll catch up with time. Nothing good nutrition and proper lighting won’t fix.
Bruce Banner turned out to be incredibly big for her age, never grown a seedling like her! You can tell she’s already finding her germination vase too small. Making a statement with her presence.
Biscotti Mintz also looking big and very healthy.
Let’s watch them grow and see what they’ve got 🌱💪


Likes
10
Share


@Cocogrow1234
Follow
Week 7 flower : I defoliated a little just to give bud sights more light .
Started flush on 6 1/2 weeks I’m just giving plain water and ph to about 6.0 . Watering everyday to about 20-30% run off and the ec of the run off is 1.0ec gonna be flushing everyday for next 1-2 weeks .
Processing
Likes
52
Share


@CBD_Sweden
Follow
Strain Name: Stilton Special F1
Genetic heritage - Sour Livers F3 x Northern Cheese Haze F3
Strain behaviour - Stilton grows well from the off, and develops into a stout but branchy specimine that leads to a fine yield of awesome flowers. She's not too stretchy but also is sizeable enough with good growth, to train and shape to your liking. Flowers develop pretty fast and grow to a good size, it may to advised to clear out some undergrowth and if needs be a very gentle defoliation mid-way through the grow, although leaf tucking may suffice well enough.The end product is of top shelf quality and she doesn't lack in yield either.Give your garden, nose, and body a treat and be sure to indulge in a slice of Stilton this year, You won't regret it.
Size - 50 - 70 cm
Structure - Medium height but bushy
Flower Density - 9/10
Indica/Sativa - 65/35
Cycle Time - 65 to 70 days from sprout
Yield - 90 to 140 grams as a single plant
Best Method for overall high yield - 9-12 per 1,2m x 1,2m sq in 10-15 Liter pots (Soil)
Aroma - Very strong, Cheesey/fruity/sour/spicey/ with a dash of coffee.
Taste - Dank berries
Effect - Good hybrid powerful but balanced effect
Medicinal Benefits - TBA
Best Grown - Indoor/Greenhouse
Cannabinoids - TBA
Extract information - Ideal extract candidate - High in resin, oil and terps.
--------------------------------------------------------------------------------------------------
2017-10-16. Week 8 day 54 from germination.
She is 41 cm tall and very leafy. She have around 30 bud tops and i hope she will start to produce big buds now and stop growing leafs like crazy.
I start to give max dose of nutes now.

Processing
Likes
7
Share


@Kushizlez
Follow
Day 31 - 38
(Day 32) I’m going to lower the humidity in the room to 55-60.
Still no bananas but I’m still quite worried about #3 fully popping and ruining my whole crop. Since there is a good chance it’s going to herm, I’m going to give it with a small feeding today and watch it like a hawk this week.
I think the boost actually made a decent difference in #5 from last week. I’m seeing slightly fatter main colas but that could just be from less topping/smaller plant or less nitrogen. I’ve decided to push my luck and give a boost to each plant. These things just aren’t filling out like they should. They look like they are on day 23 not 33. I’m going to top dress 3 tablespoons of 1-4-2 Destiny launch and later tonight I’m going to water in a low strength feeding of 0-0-15 kelp extract.
I’m going to give a final heaping tablespoon of nature’s pride bloom to #5 so it can stretch to the end.
I’m also going to lower the lights by a few inches. The tallest cola is now about 13 inches away and the rest of the canopy is at about 18–24. If I see signs of light stress I’ll raise it back up but I’m sure it could use the extra light on the lowers.
(Day 33) I’ve been reading that bigger plants just take longer to mature and that’s probably why my plant hasn’t fully filled out or is about a week behind. I still could have done a better job defoliating some of the smaller larf branches on the bottom which just robs the good branches of energy. The more I think about it, the more I think I did a very poor job of defoliating the middle canopy. I’m still seeing lots of larf and small buds on the inside not getting much light. I’m still really worried about herms after finding that branch so I don’t want to stress them anymore. Removing suckers now is pointless. I missed my window of opportunity and now I have to deal with it.
I’m going to slide an old DVD player underneath #6 to bring it up to canopy level. It’s lower buds are definitely not getting enough light.
(Day 34) Ever since lowering the light, the canopy has gotten a few degrees warmer.
I’ve noticed the buds don’t feel as sticky on top compared to the lower tucked branches that feel almost wet with resin. Outdoor weed grown in my climate will never reach the temperature where it degrades resin luckily.
(Day 36) The buds are definitely swelling but not to the degree I want. Call me picky but I prefer my nugs as chunky as possible. I’m seeing lots of pistils but not much nug matter. Ive heard too many pistils can be caused by the overuse of alfalfa, kelp and seaweed extracts because of the natural PGR’s in them. I’m definitely going to reduce the amount of that stuff I use next round. I hope I’m just wrong and this tent is going to really fatten up this week but I have my doubts.
(Day 37) A purple fade is starting on the underside of every plant except the bush who still is super dark green still. Last watering I got a nice amount of runoff so I’m just going to leave her until the end. I’m seeing a bit of yellowing on #5. I’m going to give it one final full strength feeding plus some rock dust and oyster shell tomorrow and that’s a wrap for nutrients. I might as well hit everything else with a final low strength 0-0-15 too.
(Day 38) I’m amazed at how much this stuff smells compared to my last round. It smells very earthy and floral with a hint of pine. Definitely not that gassy smelling pine but more of a sweet pine.


Likes
5
Share


@GrowLegend
Follow
Bien aquí esta el día esperado la cosecha, es mi primer cultivo y considero que lo logre. En muchos medios de lectura y en especial en vídeos mencionan que no puedes esperar mucho es tu primer cultivo. En mi caso es falso y lo demuestro ya que si aprendes, investigas por cuenta y lees lo suficiente, obtendrás un alto porcentaje de que los resultados se den. Muy contento con mi plantas y sus tonos morados. Puntos a mejorar tener una carpa de cultivo y por su puesto un extractor de humedad para que baje la humedad preferiblemente a 45 grados
Vendrán mejores contenidos y cosechas mas abundantes. Gracias a todos por su vistas y comentarios. Saludos y bendiciones!

Likes
2
Share


@Ninjabuds
Follow
Bubble og man these ladies loved being topped they were not growing the fastest before topping but after getting topped they have really been stretching out they very much have a scrog potential the branchs bend easily and have good distance between nodes to work with
The day has come and it's time to flip these ladies to flower. I was planning on letting them go untill Friday and let the smaller ones grow just a bit more but they will be fine. I have the eternity cup contest in mind and I'm thinking timing so I need to get these lady done and out my tent lol. This past week I turned the light up alot getting them ready to flower they have grown a bunch inhavendone lst maybe 5 it 6 times on the branchs and they arw nit bendy anymore that will help durring flower.


Likes
5
Share

@SkunkyDog420
Follow
Hallo zusammen 🤙.
Habe sie heute geerntet.
Wir hören uns in 3 Wochen mit dem Erntebericht.


Likes
Comments
Share


Likes
39
Share


@Silverback_Guerilla
Follow
11/9:
The first Blackberry (Halle Berry) is dry now and beginning to cure....will probably sample it tomorrow.😋
The next 5 that I harvested are drying in a dark room at 75f with 60% RH and minimal airflow.👍
The colas of the remaining 11 plants are now within 9 inches of the QB's....MAXIMUM PAR!
I've increased UVB exposure by an additional hour a day. I've got the portable AC on high and blowing across their tops, which is keeping the temp just below 80f on them...they should be just fine..👌
11/13:
I harvested the purple Wedding Cheesecake and all three Lemon Pies today.
11/15:
I flushed the last two orange sherbets for the second time, but with only a few gallons each...I flushed the last two wedding cheesecakes, and the 3 x gorilla cookies with 8 gallons each.

Likes
Comments
Share


Likes
9
Share


@masterofsmeagol
Follow
6/22 Some pictures didn't upload but that's probably a good thing. As long as the video went up its good. I need to take less pictures. I'm glad I watered the plants in the back with a premixed gallon last night as we didnt get nearly the rain I thought we would. It's small showers throughout the day. The plants are getting enormous. A couple have revegged. Mostly the 10th planet. The others aren't anywhere near as impacted. Boy are some of these stalks thick. I chose to keep a couple plants that could be grown naturally without topping or fimming. I like to see the structure of the tree bit with humidity like this 98%rh it's easy to get botrytis. That's why it's good sometimes to have multiple bid sites so your proverbial eggs aren't all in one basket. But you do end up with a massive cola. I think that mk ultra with the big fan leavescis just going to be one giant bud. That's what it's looking like. Oh and today is the summer solstice. Longest day of the year.
6/23 WATERED EVERYTHING. USED FIVE AND A HALF GALLONS. EVERYTHING GOT AT LEAST A HALF GALLON. Despite the rain we got and the bags still having some heft I decided to water. It's 80 at 9am. It's supposed to he in the upper 90's today and coukd break 100° tomorrow. I hate that the grow bags are black. That's way to hot for the plants. I should find some empty soil bags and wrap the black fabric for a couple days. A sunscreen might help but I doubt much. We'll see how it goes.
6/24 It's 90° at 9am. It's supposed to break 100° amd stay there a while. Up to 106°. Plants looked awesome this morning. I wasn't sure what I'd find. Today is the worst of the days. If it didn't break 100 yesterday it was damn close all day and the girls look GREAT. I WATERED AGAIN TODAY. I USED EITHER 5.5 OR 6.5 GALLONS TO WATER THE GARDEN. It was nice cool well water too so they should like that. Branches are getting longer and I'm training as the get bigger. I need to put up the trellis but I'm not doing it in this heat.
EDIT: 90° @ 6PM WENT OVER AND AS PREDICTED THE TWO TENS WERE DROOPING. IM WONDERING IF THEY WILL BE ABLE TO FINISH IM THOSE TENS. LAST YEAR I HAD ONE THAT WAS HUGE IN A TEN BUT IT JUST DEVELOPED INDIVIDUAL CALYXS WITHPUT CONNECTING. CHECK IT OUT ON LAST YEARS DIARY. IF THATS THE CASE I SHOULD KIGHT DEP THEM BECAUSE THEYRE GETTING BIG. I WATERED THE TWO TENS WITH ABOUT A HALF GALLON AND I USED WHAT WAS LEFT OF THAT COLD WELL WATER ON THE 10TH PLANET IN THE 30. SHITS LIGHTER THAN USUAL BUT LOOKING PRETTY GOOD. THE REST CAN WAIT UNTIL THE MORNING FOR THEIR WATERING. TOMORROW TOPS OUT AT 85° WHICH WILL BE MUCH BETTER. IM LOVING MY STRAIN CHOICES RIGHT NOW.


Processing
Likes
7
Share


@SybDarret
Follow
I'm kinda late on the update, week 11 finished on sunday 4, now is feb 9th.
Last time i gave them nutrients was on sunday jan 28th, and i cut them down on feb 6th. almost a week and a half of flush.
Each plant yielded 65g of wet buds (i forgot to take wet weight photography), i will update the harvest when they are done drying and before curing.
Stay alert 😉
Likes
15
Share


Likes
17
Share


@Naujas
Follow
it's amazing, this growth looks much better than my first attempt, my decision was to put a smaller pot and change the light - the girl really liked it, FastBuds goriilla cookies with a small space manage perfectly:).
Likes
5
Share

@Ninjabuds
Follow
My gas tax plant is looking absolutely incredible right now. It's got these massive buds that are super dense and have this awesome dark color to the leaves. I'm so excited to see how it turns out when it's finally ready to be harvested. I've been checking the height, the thickness of the stem, and the density of the buds to get an idea of how much longer I have to wait. I think I might start flushing it soon.
The past few weeks have been so beautiful, watching the plants grow and change. It's amazing how something so small and fragile can turn into something so strong and vibrant. Now that they're getting ready to bloom, it feels a little bittersweet. I'm so excited to see the finished product, but I'll definitely miss having them around while they're growing.