By continuing to use the website or clicking Accept you consent to our cookies and personal data policy and confirm that you are at least 18 year old. For details please see Privacy Policy and Terms
Accept
Likes
Comments
Share


@420DeepGrow
Follow
Gracias al equipo de Zamnesia, Marshydro, XpertNutrients y Trolmaster sin ellos esto no sería posible.
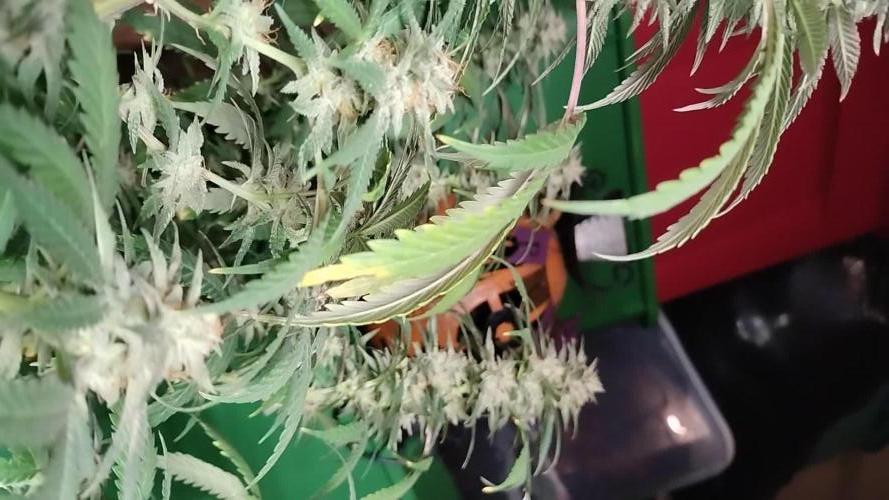
💐🍁 Frosted Guava:
La Frosted Guava es una cepa índica dominante y súper resinosa, que es un cruce de la Guava y la Frosted Skywalker. Con unas características de cultivo muy versátiles, un aroma exótico y afrutado, y un subidón relajante y lúcido, la Frosted Guava es ideal para cualquier plantación de marihuana.
🌻🚀 Consigue aqui tus semillas:
Código Descuento 20%: ZAMMIGD2023
💡TS-3000 + TS-1000: se usaran dos de las lámparas de la serie TS de Marshydro, para cubrir todas las necesidades de las plantas durante el ciclo de cultivo, uso las dos lámparas en floracion para llegar a toda la carpa de 1.50 x 1.50 x 1.80.
https://marshydro.eu/products/mars-hydro-ts-3000-led-grow-light/
🏠 : Marshydro 1.50 x 1.50 x 1.80, carpa 100% estanca con ventanas laterales para llegar a todos los lugares durante el grow
https://marshydro.eu/products/diy-150x150x200cm-grow-tent-kit
🌬️💨 Marshydro 6inch + filtro carbon para evitar olores indeseables.
https://marshydro.eu/products/ifresh-smart-6inch-filter-kits/
🍣🍦🌴 Xpert Nutrients es una empresa especializada en la producción y comercialización de fertilizantes líquidos y tierras, que garantizan excelentes cosechas y un crecimiento activo para sus plantas durante todas las fases de cultivo.
Consigue aqui tus Nutrientes:
https://xpertnutrients.com/es/shop/
💻 Trolmaster Tent-X TCS-1 como controlador de luz, optimiza tu cultivo con la última tecnología del mercado, desde donde puedes controlar todos los parametros.
https://www.trolmaster.com/Products/Details/TCS-1
📆 Semana 4:
Aparecieron un monton de erizos esta semana, el temporal ha hecho algo de mella en la carpa al bajar las temperaturas aunque todo sigue correcto.
Continuamos con las dosis de nutrientes recomendadas por el fabricante.

Likes
12
Share


@Aleks555
Follow
Day 100. The Opium plant from Divine Seeds is doing absolutely fantastic! Over this time, it has shown amazing results, and I’m very pleased with how it's developing. I've been giving it maximum care, paying attention to every aspect of the grow.
As for the nutrients, I’ve been using Xpert Nutrients throughout the entire cycle, and the results speak for themselves. These nutrients truly help the plant reach its full potential. I've noticed that the buds have become denser over the past weeks, and the aroma has intensified.
We’ve also pruned some leaves to improve light penetration to the lower branches and possibly enhance the flowering potential. Big thanks to Xpert Nutrients for their products—they continue to impress!


Likes
27
Share


@adam_pawloski87
Follow
First off I just want to say for some reason it’s not letting me change the right temperatures on my diaries ! Each time when I put it in they stay at 50. My day air stays 75 degrees an , night degrees is 70 !
Today is day 58 for all these ladies! This week has been really great ! Girls really progressed a lot , especially for one the Forbiddin Runtz, looks like is gonna finish up in a week or 2 ! Other then that they are coming along well! Keep those eyes peeled for next week! Cheers😶🌫️💨💨💨💨

Likes
21
Share


@JuicyFruit
Follow
Day 55 - 18/11/19
i still think another 1-2 weeks for this one, getting a jewelers loupe for the beginning of week 9 so i can tell exactly where were at in terms of harvest :) anyone got any thoughts on this little plant? have a look at the photos and videos and let me know in the comments below :) oh and i finally nailed what this strains smell is - tropical hubba bubba gum with cheese :'D
Day 59 - 22/11/19
Got my jewelers loupe 2 days ago and ive been having a look at them. its pretty hard to see for a newbie grower. ive looked at harvest guides online and seen pictures of clear, cloudy and amber trichomes. mine look mostly cloudy (60%) and slightly glassy (40%) with barely any ambers. i may be wrong but the reason i think its cloudy is that it looks white against the leaves instead of see through or like glass. so going on this for my first trichome inspection im gonna harvest in the middle of next week.
Smell is getting strong enough to stink out a room, still that tropical cheese smell, although its just so pungent it lingers in the rooms after bringing it out of the tent to inspect it. smell isnt a problem if you put it back in the tent and spray some air freshener stuff in the next room. the carbon filter is doing its job exactly as described along with the fan.
The fan leaves started to get yellow patches and sugar leaves starting to curl. and a friend thinks its nearing the end of its life.
I flushed yesterday and will flush again today to drain out any excess salts and nutes.
Thanks for following along.
im excited for week 9!
Happy Growing!

Likes
18
Share


@Chucky324
Follow
Hello. This is the end of week 8 and the beginning of week 9 of flowering.
This is the start of flushing for these lovely plants. I'll flower these plants to 10 weeks. I also like a few days of dark just before harvest.
There's still food left in the medium, so the plants won't starve. I've found measuring the runoff that the first flush is around 750 ppm and the second flush is around 450 ppm and the third flush is around 250 ppm. The plants use up most of the food in the pots and have pulled alot from their leaves. Then it's time to harvest the very clean buds. There is no chemical taste if you flush and you get nice white ash when smoked.
I got to say - look at the differences in the plants, wow, looks like 4 different strains. They all smell similar but look quite different. That is a common question on the questions page, why do my plants look so different from the same strain.
Keep growing straight.
Chuck.


Likes
3
Share


@RunicKevin58675
Follow
These two plants have given me the experience and the desire to do even better!
Next genetics I thought I would bring another pure Indica...


Likes
2
Share


@Saintvicious
Follow
She's unstoppable. Looks like we are about to be in pre flower. It's show time.
Likes
4
Share


@Ninjabuds
Follow
A decent growing little plant. I think at this point in flower it doesn’t like 18hours a day of light. The other auto gorilla cookies loves that much light so this plant has to deal.
Likes
59
Share


@GrimbolTheDruid
Follow
So, sad day friends. I got spider mites and had to throw all my plants out. This is what I think happened:
About 2-3 weeks ago I noticed some freckling on the lower leaves. I looked at it and thought it might be a cal/mag issue so I added cal/mag that week and went about my business. I saw it about a week later and it wasn''t getting any better so I added more cal/mag. This continued for about 2-3 weeks until I finally took off a leaf and examined it under my microscope. I saw little bugs crawling everywhere and my stomach just dropped. My fiance did some quick research while I was panic ripping leaves off (see pictures) and she correctly diagnosed it as spider mites.
I debated with myself and my close friend and ultimately I decided to throw all the plants in my tent away. I know that there are a lot of people who will say that there are things I could have done to make it to harvest but what it came down to is the people I take care of and personal pride. I consider myself a caregiver and I give away product for free that I am not going to use to my family and close friends. I thought to myself "Would you smoke this?" and when my answer was "ehhh, I don''t know", I thought about how it would feel giving it away and immediately made the decision to destroy them. I take an immense amount of pride in my product and this hobby and if I am not going to stand behind it I would rather just start over. I grow from my heart (shout out to the Grow From Your Heart Podcast!) to help people and make sure my family is not getting unsafe product from sketchy people. To spray pesticides in flower that may hurt people and have little bug carcasses in there just goes against that in every way and is just wrong in my opinion if you are giving it away to others. If you are the only one smoking it then it is one thing to take that risk but not with your patients. I want my medicine to help people, not create or exacerbate health issues.
It is also important to note that the mites had moved from my flower tent into my veg space and took over my auto berry as well. Damn things are crafty and fast.
So that is why I made the decision to destroy them all after 3 months of res changes, pruning, and manifolding on a slow vegging strain. Feel free to chime in with your opinion but I do not and will not regret my decision. I threw out my new clones, mother plant, and auto berry I had on my veg side as well. Shout out to all the other growers out there that do the right thing by their patients. Caregivers > Cash croppers.
For anyone curious, I removed everything from my tent and scrubbed it all with a 20% bleach/water solution. All equipment has been wiped down and stored in the garage away from any organic materials. I will give them until tomorrow (2 days) to air out and dry and then I will wipe it down again with bleach and wait another 2 days. Hopefully that will make sure everything is dead and will not come back next grow. That next grow should start in about a week.
It sucks but sometimes it happens and you gotta be ready for it. Lesson learned. Never bring outdoor plants into your indoor garden even if it is after just a day or two. A bunch of people on here and Reddit warned me and I did not listen. Now I have learned the hard way and it feels like when your parents "told you so" haha.
Thanks to everyone who stopped by along the way. Stay tuned for a new grow coming soon. It is going to be some cool new limited edition Mephisto Illuminautos. I am pretty excited.
Good luck out there and always grow from your heart folks.
-Grim

Likes
8
Share


@Timbo_Growz
Follow
10th December
Increased the EC to 2.75…the plant is looking healthy so far and developed the first Trichomes 🤩

Likes
11
Share


Likes
74
Share


@AsNoriu
Follow
Day 92. First of 3 girls down. Amazing, super productive strain !!! Loved that girl a lot !
Others still to come...
Day 101. #1 is jared and #2 is chopped, busy day !
Day 111. #2 is Jared. Only Monster girl left. She is still pushing in ex dry tent.
Day 125. Last girl is down !
Day 135. 240 g of nugs from her !!!! My record breaker by a mile !
Happy Growing !!!


Likes
13
Share


@Robeeriegenetics
Follow
I went ahead and transferred this week I also decided to start up my out door project things are looking good clones are Adapting well to new systems
Likes
12
Share


@Pablo_Chacon
Follow
The ladies are giving all the signs that they are ready to be harvested. Leafs yellowing. Most hairs are now dark. Under the microscope it looks good. Been flushing for a week now. As I still see some under developed I will let it run another week before harvest. Looking forward to this!
Likes
102
Share


@Hashy
Follow
This was my 1st photoperiod grow on growdiaries and I'm glad I tried these Fast flowering photoperiods for it. Big thanks to Heather and the Fastbuds team. I have grown the Gorilla Cookies auto before so this photoperiod fast version has something to live up to. She grew way taller then i was expecting, hence the many bends and breaks. To be honest she was great to grow and the favourite plant of the grow. Because this grow was going so good I decided to switch back to photoperiods for the next few grows i just wish i had left her in veg for 1 more week.
Total dry weight for the grow, decent buds=136g
Light power
Total= 200.43Kw
18hrs for 28 days = 504hrs
12hrs for 67 days = 804hrs
Total hours for lights= 1308hrs
200.43÷1308=0.153Kw/hr average.
Average 153w/hr
Total g/W=0.89g/W
Power used for grow=508.78Kw @0.30p =£152.63
Each gram cost £1.12
The buds have been curing for nearly 2 weeks so I haven't had a sample yet. There will be more pictures added once I try the buds and write up a smoke review but for now I'll just leave a video of the grow and a picture.
Thanks to all who have viewed my diaries and a big thanks to all that posted likes and comments, it's much appreciated.
Likes
20
Share

@AestheticGenetix
Follow
7/15/25 I think she may be getting close to the end. Day 42 as of today and I see 1 or 2 amber trichomes on the top buds.
Gave her the last feeding of this cycle. 2tsp of Bloom booster 1 tsp of microbe charge and 1 tsp of uprising foundation


Likes
1
Share


@Dabcik
Follow
Le zerberry crescono copiosamente
Continua la crescita lenta delle pink poochie e di una delle due happy ending
Ho toppato le 3 zerberry al 5º internodo

