By continuing to use the website or clicking Accept you consent to our cookies and personal data policy and confirm that you are at least 18 year old. For details please see Privacy Policy and Terms
Accept
Likes
Comments
Share


@Mosquito_Haarlem
Follow
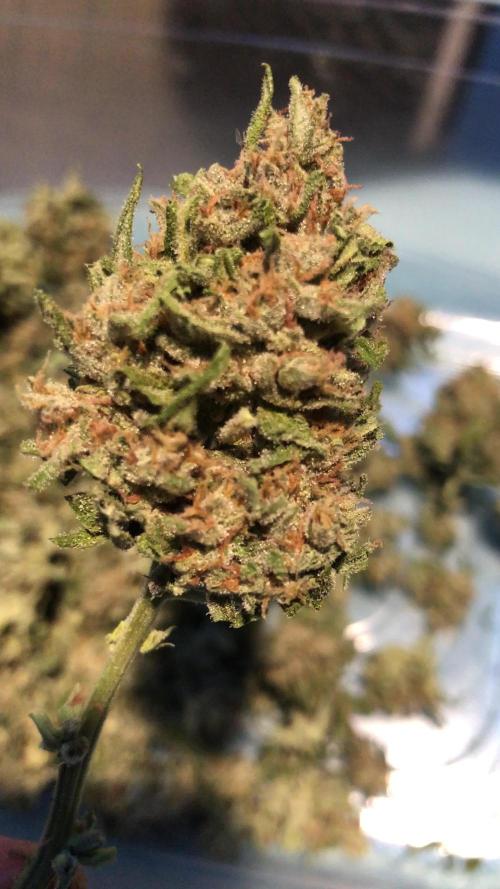
Almost ready.
Look at the main bud 🤩
I will update fresh photos throughout the week.

Likes
4
Share


@Ledros
Follow
Day 8 (2020-05-17): G14 is looking a bit lopsided with its weird conjoined twin leaf, but the second set is growing opposite so hopefully it will balance itself out. I spent some time today getting the grow tent cleaned out and ready to move these two in and am starting to setup the Blumats for 2 gallon fabric pots when I transplant.
Day 9 (2020-05-18): Moved the plants to the tent where they will spend the rest of the grow. Waiting to transplant until roots have established a bit more. They are now under the Kolem 800W (120W actual) LED light, currently running around 35% power. Watered today.
Day 10 (2020-05-19): Transplanted to the 2 gallon fabric pots today and installed the Blumats. Added Drip Clean into the nute mix. Increased the light to 60% due to the increased distance after losing the Solo cups.
Day 11 (2020-05-20): Transplant seems to have taken and saw some nice leaf growth over the last 24 hours. Main stems are noticeably fatter, also. G14 is still looking wacky.
Day 12 (2020-05-21): Not much to report. Things are still looking good and I guess the Blumats are doing there thing? Coco seems plenty moist after 2 days.
Day 13 (2020-05-22): Still trying to dial in Blumats. Coco is starting to dry out.
Day 14 (2020-05-23): Hand watered to get back to optimum moisture and made further Blumat adjustments. By the end of the day it looks things are stable and correct. The G14 seems to be doing fine despite looking a bit weird


Likes
Comments
Share


@609indica60d
Follow
Night & day difference from my first grow, in a GOOD way lol good genetics for sure

Likes
12
Share


@MUZ_Farms
Follow
Done a lot of leaf tucking on this one and now I have flicked lights lad week and this is the result up to now the seed was from a bag of Cali what was 10/10 smoke

Likes
9
Share


@Staffedition
Follow
Привет друзья.
Наше знакомства продолжается с новым сортом автоцветущих растений от Smail_Seeds сорт ORIGINAL AUTO CHEMZKITTLEZ F1 reg.
Сегодня растению 58 дней.
Растение очень хорошо развивается, ни каких сбоев в генетике не наблюдается.
Шишки наливаются😀
Сорт выводим сами.
Смотри мой профиль, у нас всегда есть что то интересное.
Не забудь поставить лайк❤️, если понравилась как прошла неделя
И читайте наш TELEGRAM: https://t.me/smail_seeds
#Smail_Seeds 😀


Likes
3
Share


@Bread_n_Buds
Follow
Our friends at Zamnesia are frenetically active in the search for innovation for their growers and here too we have one of the newest, full of hype, Californian strains Super Boof naturally in an exclusive Zamnesia version.
If you only look at them a week ago it seems unreal, but when the plants start, they go.
In this diary you will find the plant that we will let grow straight, applying only a few techniques that do not involve cutting to preserve its characteristics of speed. After taking the first fertilizers the plant is really very very well at a great pace and we expect great things the internodes are growing very well and we are practically almost in pre-flowering.
You can find the other one in the next diary worked with Topping / Main Lining / Main Folding
The comparison is the salt of the experience.
We have started the Plagron fertilization program, we are in 100% organic configuration, the soil is recycled Promix + 1/3 fresh soil + 10% Perlite + RQS Mycorrhiza Mix (4gr in the mix, 1 gr under the small fiber pot).
We are administering // 1 ml/l of Power Roots - 1 ml/l of Pure Zym - 1 ml/l of Sugar Royal - 3 ml/l of Alga Grow
I have doubts about the compatibility of Pure Zym with mycorrhizae. If in doubt, ask the experts, do not mix too much at random.
https://plagron.com/en
Doubts about Pure Zym / Mycorrhizae compatibility have been dispelled, they can go well together according to Plagron experts. If someone tells you that enzymes eat mycorrhizae, which in principle may seem possible, explain to them that it is not true.
https://www.royalqueenseeds.it/growing/452-easy-roots-mix-di-micorrhize.html
Sample some of Leafy's strain of the year ---- // https://www.zamnesia.io/en/13317-zamnesia-seeds-super-boof.html
Zamnesia Short Description // Here's your chance to grow one of the most sought-after strains of recent years: Super Boof, crowned Leafly's strain of the year 2024, and for good reason. Descended from Black Cherry Punch and Tropicana Cookies, this indica-dominant hybrid (70%) takes the already exceptional characteristics of its predecessors to new heights. Grow it at home to find out for yourself.
You can find the whole world of growing at Zamnesia and much more, take a tour of the site and you will find "all the best that nature has to offer" in various shapes and colors.
The new strains are exceptional and the old ones are no exception... p.s. no Hermaphrodites yet, growers can you say the same?
---- // www.zamnesia.com
Likes
97
Share


@Kitties_and_Colas
Follow
~_~_~_~_~_~_~_~_~_~_~_~_~_~_~_~_~_~_~_~_~_~_~_~_~_~_~_~_~_~_~_~_~_~_~_~_~_~_~_~_~_~_~_~_~_~_~_~_~_~_~_~_~_~_~_~_~_~_~_~_~_~_~_~_~_~_~_~_~_~_~_~_~_~_~_~_~_~_~_~_~_~_❤️💡🌱😽💨
Week 9!! We're soooo close and the smell is unbelievable, its a mix of Trix cereal, soda syrup and a little bit of gas..I'm really going to miss cracking this tent open ...they're still showing signs of overfeeding but we've been water only for 1.5 weeks now and will continue with water only until harvest..
We took clones with the intentions of giving a few away to some local Growmies but we decided to veg out a mother instead..this strain looks to be a keeper and I'd hate to loose it like so many other killer strains we've let go..
Trichomes are mostly cloudy but with another 25-30% still clear. If i had to guess I would say we're about 2 weeks from the chop but time will tell..Thanks as always for dropping by and happy harvests everyone!! ❤️🌱
~_~_~_~_~_~_~_~_~_~_~_~_~_~_~_~_~_~_~_~_~_~_~_~_~_~_~_~_~_~_~_~_~_~_~_~_~_~_~_~_~_~_~_~_~_~_~_~_~_~_~_~_~_~_~_~_~_~_~_~_~_~_~_~_~_~_~_~_~_~_~_~_~_~_~_~_~_~_~_~_~_~_

Likes
1
Share


@EgoDeath
Follow
Really loved this plant and how it grew other then the fox tails, Unfortunately I had to move this weekend and just couldn’t continue growing her and moving at the same time. She still had a good 1-2 weeks left but what is there looks really good will update when she finishes drying.


Likes
2
Share

@MindFlowers68
Follow
I trimmed her after 1 week of drying. A few days sooner than normal but shes at a spot I feel comfortable putting in jars and keeping close eye on so I can keep the flower on the moist end of the dry scale. I smoked some and already very flavorful but a tad harsh. After a week they should be at a decent smokable condition.
Likes
13
Share


@GrowGuy97
Follow
Flower day 10 - Everything is going great so far, currently trying to find a bigger dehumidifier cause RH is staying a little higher than I would like! Thanks for following & happy growing friends!🌱✌️🏼
Flower day 11 - Finally got the last 2 plants from the first run cut down & now these ladies have much more room! Watering tonight with just PH water. Happy growing friends!✌️🏼🌱
Flower day 12- Buds are starting to show, can’t wait to see how different they all look😍😍
Flower day 16 - End of Week 8, all the plants are coming along beautifully! Definitely will not have 10 In my next flower run though the tent is way to packed lol! Thanks for following & happy growing friends!✌️🏼🌱


Likes
8
Share


@Rabidreject
Follow
This week I removed a couple of side branches and did a little defoliation.
Annoyingly I noticed fungus gnats but not too bad and iv grown monstors with them before - they don’t seem to go for the buds and I’ll wash anyway.
Iv started using the COB either 50w or 100w I can’t remember but I dimmed the Mars hydro one in compensation. Iv also turned off the water and will probably leave it off for a good few days until it may kill them? Who knows…
I must admit I am tempted to just chop it now and start again but it’s actually nearly time for the first flower update as I added this one late.
We are getting some stretch now. I pinched the top side branches and tucked one of the fan leaves to give more light to the side node at the bottom. I noticed the one on the side of the extra light was bigger so I turned the pot 180 degrees also.
This was the first one iv not LST’d yet and tbh, at this stage I’m not sure why they tell you not to. Don’t think I’ll get as big of a yield from this than my smoothie but then I have a while to go yet.
Likes
14
Share


@TunaWeed
Follow
trimmed after stopping growth. the plants are doing well, removed the lower branches.

Likes
12
Share


@Kloud9gardenz
Follow
Don't have a lot of time these days to take pics so I'll sum things up. CO2 got outta control and the plants took tf off literally. The video is around middle of week 3, I had to flip at week 4 BC I literally ran out of room and I had to constantly defoliate.

Likes
45
Share


@masterofsmeagol
Follow
I Messed Up A DAY Here. So one of the days is dated wrong. I tried to correct it the best that I could.
7/24 I decided to label this week as flower. It's more like preflower though. GMOs are stretching like crazy. Due to the rain we weren't supposed to get some of my plants are a little over watered. That's why I love the fabric pots. With the winds we get the bags dry out fast. The GMO's would've needed water anyway if we didn't get this storm. Event Horizon seems to be the furthest in flower amd the most over watered. WE'LL get a LITTLE more rain today and tomorrow but then hopfully my bags will dry out. They are heavy as hell right now. Had we not got rain for what seems like forever. Several plants would've needed to be watered if we didn't get this rain. Still the plants are currently overwatered. All the pics and video so far are from this morning after the horrible pounding rain of yesterday. Like I said before, I need to; defoliate for better air flow, add secondary supports or a vertical trellis, considering using a preventative pest application (e.g. BT), LST and spread branches apart and start using nutes.
7/25 Wasn't supposed to rain today. Like .001. It poured this morning and is still raining VERY LIGHTLY at 2:30. We got an inch yesterday. The total for these 3 days was suppised to be under half an inch. Anyway I went over around two and everything looks great! Things are clearly overwatered and heavy but the plants look happy! Most have their leaves out and everything! I love growing in bags because they dry out so quickly! I don't mind watering more. I defoliated one event horizon and the few yellow leaves I coukd see on other plants after shaking them off. The seedling in the 50 is far behind the others in flower and just showed its sex. I'm fairly certain that one is red runtz. Whatever it is is going to flower much later than the rest. It's going to be good if I have couple early finishers. I did a video but I'll have to upload tomorrow. I have a lot of work to do And not just in the garden so I'm hoping I can balance things out and get this stuff done. Caught three TINY inch worms. I'm wondering if me manually hunting has cut the adult population down and I'm just getting fresh born ones? If that's the case I wouldn't need to spray.
7/26 Plants looked pretty great today. I think me manually removing pillars has made a big difference. It's windy out too so it won't take long for those bags to dry out. Which is good because what wad supposed to be a half inch of rain turned into 3 straight days of rain. I'll be back over to work on the garden today and I'll update then.
7/27 Plants are looking pretty good. Good weather ahead and the bags are starting to lose weight. Found a pillar wrapped in a dead interior leaf all wrapped up. Found a couple more early this morning amd killed them. I did some slight leafing on some plants. I don't like doing that outdoors but since these are monster cropped they have far to many leaves. Airflow is improved. I'm not seeing any nutrient deficiencies yet. Plants are a vibrant healthy dark green. Soon I'll add a base nute like big bloom or ancient amber (I think that's the one, it's applicable to big bloom). I cam see some plants trying to start flowering and I've got one (in the 50) that has just shown sex. Hopfully this will give me some time between harvests. I'll update as I go along.
DAD CALLED IN THE AFTERNOON AND SAID HE THOUGHT A PLANT MIGHT BE STARTING TO DROOP. IT WAS MY GMO CANARY THAT GETS HIT ON ALMOST THREE FULL SIDES BY WIND (ONLY ONE PLANT). I CHECKED THE WEIGHT AND IT WAS LIGHT. IT WAS DROOPING TOO. I WATERED THAT ONE PLANT WITH A GALLON AND WATCHED IT PERK BACK UP. I CHECKED THE WEIGHT ON THE OTHER PLANTS AND LIKE I THOUGHT THEY WERE STILL HEAVY. I PUT MY FINGER IN THE SOIL AND IT CAME AWWY COVERED IN DIRT. MY SEEDLING IN THE 10 WAS KINDA LIGHT SO I GAVE THAT HALF A GALLON. I USED THE OTHER HALF AS "A CUP OF KINDNESS" ON THE PLANTS THAT SEEMED LIGHTEST TO CARRY THEM OVER. I PROBABLY SHOULDVE WAITED BUT I DOUBT IT MATTERS. ILL CHECK IN THE MORNING. I ASSUME ILL HAVE TO WATER THEN OR AT NIGHT. ILL GO BY THE WEIGHT. THE CANARY WILL NEED TO BE ON A SEPERATE SCHEDULE. THATS FOR SURE. Went back over at 6:30 and plants looked better than they have in a long time bags still have some weight. With the sunny weather we are going to have these plants will keep exploding in growth. Found one pillar but I wasn't there long. Seriously considering a spray of BT in the near future.
EDIT: UNFORTUNATELY MY SPIDEY SENSE STARTING TINGLING AROUND NOON. MY ANXIETY WONT LET ME IGNORE IT (IM NOW EMBRACING IT) AND I HAD TO CUT OFF A CONVERSATION WITH MY WIFE TO GO TO THE GARDEN. I IMMEDIATELY SAW THAT ONE OF MY GMOS WAS STARTING TO DROOP. NOT LIKE BEFORE BUT IF I HAD BRUSHED IT OFF AND LEFT IT FOR FOUR MORE HOURS IN THE 90° SUN IT WOULD'VE BEEN. I GAVE THE GMO'S (BESIDES THE ONE I GOT YESTERDAY EACH A GALLON. I DIDNT WANT TO WATER DURING THE DAY BUT THIS WAS MY BEST OPTION. I GAVE THE TOASTED TOFFY A GALLON AND THE 2 EVENT HORIZONS EACH GOT HALF A GALLON, AS WELL AS THE SHERB PIE WHICH GOT HALF A GALLON. I DECIDED TO DO THIS BECAUSE SOME PLANTS USE MORE WATER THAN OTHERS. BEFORE ACTUALLY GOING OVER I CONSULTED MY PREVIOS DIARIES. I HAD THIS SANE PROBLEM LAST YEAR ON THE SAME WEEK OF THE MONTH! THATS WHAT MADE ME TRUST MY INTUITION FULLY. I LEARNED FROM THE MISTAKE OF LAST YEAR. THINGS ARE GOING GOOD. IM STARTING NUTES SOON AND I NEED TO SPEAY FOR BT BUT DONT KNOW IF IT WILL BE TONIGHT.
7/29 Apparently my intuition worked out well. Plants looked great this morning. I may feed today. I defoliated a bit and watered the 10g with a half gallon and gave another half gallon to the gmo on the end that dries out fastest and that I didn't water yesterday. I think I've got the watering down. Now I need to start nutes and spray bt. Need to wait for the rain first though. Suppised to get minor showers the next couple days. I'm gonna try to get the trellis up too.
WENT BACK A LITTPE AFTER FOUR. HUMiDITY WAS 100% AND IT WAS RAINING VERY LIGHTLY. I MEAN AS LITTLE AS IT CAN POSSIBLY RAIN. ALMOST LIKE WHAT IT FEELS LIKE WITH THOSE MISTING FANS IF YOU STAND BACK A WAYS. I DIDN'T WATER. PLANTS WERE LOOKING GREAT! I DID SOME DEFOLIATION AND CAN TELL I NEED TO START NUTES. I CAN SEE SOME SLIGHT DEFICIENCIES IN BIG OLDER LEAVES. SOME SMALL INTERIOR LEAVES YELLOWED. NOT MANY. GRANTED THEY ARE STARTING TO FLOWER. I'LL PLAN ON FEEDING TOMORROW. THE NEXT FEW DAYS IS SUPPISED TO BE SHOWERS. I DOUBT IT WILL GIVE MY BIG GIRLS ALL THEY NEED BUT IT WILL BE A GOOD START. I DID A VIDEO BUT ITS RATHER LONG SO I CANT UPLOAD IT HERE. ITS COOL WATCHING HOW DIFFERENT THE DIFFERENT STRAINS GROW. STILL HAVE A BUNCH OF SHIT TO DO. IT WILL GET DONE THIS WEEK.
7/30 I held off watering today due to a supposed storm and rain we were supposed to be getting. I had early doctors appointments. I got back around 11 and the bags seemed light. After consulting last years diary I saw that I am underwatering. The root system weighs a lot! We haven't got the hundredths of an inch of rain but we got some sun. It's over cast now. I was there working for a few hours. I watered most a gallon. All the gmo's got a gallon. I gave the two event horizons about two thirds a gallon. About the same with the toasted toffy and the sherb pie. About 3/4 of a gallon as they seemed to have a little weight left. Looking at last years diary there were plants I was giving two gallons at a time in a 20 gal bag so I've been u Der watering a bit. I've caught it now and adjusted. I'm not losing leaves at the pace I have in the past. Even though some are in flower. I think I'm getting better. I fed for the first time today. Each plant got 1.75 pints. Except the 10gallon which got half the powerade bottle and the 5gal which got a qtr. By the time I left the plants were standing up nice and tall and looking amazing. Now I just need to apply bt and secondary supports.
7/31 Another eight day week. I'll have to do six days next week. Everything looked amazing this morning. I'm seeing less pest damage. Watering and feeding was the right move. Now I just have a little rearranging to do, add supports and spray if I decide to.

Likes
Comments
Share


@german_growing
Follow
Really nonflexibal cells - breaks very easylie when low stress trained with Bud Clips
But she recovered every stem break and growing healthy and vigorously
Likes
4
Share


@Dmars
Follow
11/22 Day 31 from flip. Today is the first day that I took a tape measure from the lights to the topmost part of the canopy and I haven’t seen a change. I’ll check again tomorrow but I’m really hoping the stretch is finally done. I still have about 10 inches of space between the lights and canopy so I think I’ll be ok with that. I took the chance to do what is hopefully a near final defoliation of a few leaves and some smaller sucker branches that won’t amount to much. Everything still looks super healthy, no red anywhere on any stems and no discoloration on the leaves. Everything is spot on. Light adjusted to 840 PAR / 36.3 DLI.
11/25 Day 34 from flip. I made some adjustments to my nute mix to be more firmly at 1.3 EC, which means I’ve added some additional nutes into the mix. I also tested runoff EC and discovered things were spiking a bit more than I’d like. So I mixed up a few batches of my new mix and I’ve been feeding every few hours to flush things out a little bit. I’ve brought it down from 1.9 to 1.5 so far after this. I may finally need to break down and set up some timers to feed multiple times throughout the day. Obviously once a day is not getting done right now.
11/26 Day 35 from flip. I finally got the timer hooked up to my pump to begin automatic watering. For now, I have it set to water at noon for a minute when the lights come on, a 2 minute pause to let that settle, and then 30 seconds more to make sure both are fully saturated. The second fertigation event will be at 6:00 for 45 seconds, and then right before lights off another 45 seconds. I’ll have to keep an eye on it to see if I need to adjust any more for now. I haven’t adjusted the lights since last time, but the latest reading is 885 PAR / 38.2 DLI at the highest point of the canopy. It’ll stay there for now.
