By continuing to use the website or clicking Accept you consent to our cookies and personal data policy and confirm that you are at least 18 year old. For details please see Privacy Policy and Terms
Accept
Likes
Comments
Share


@mikheil007
Follow
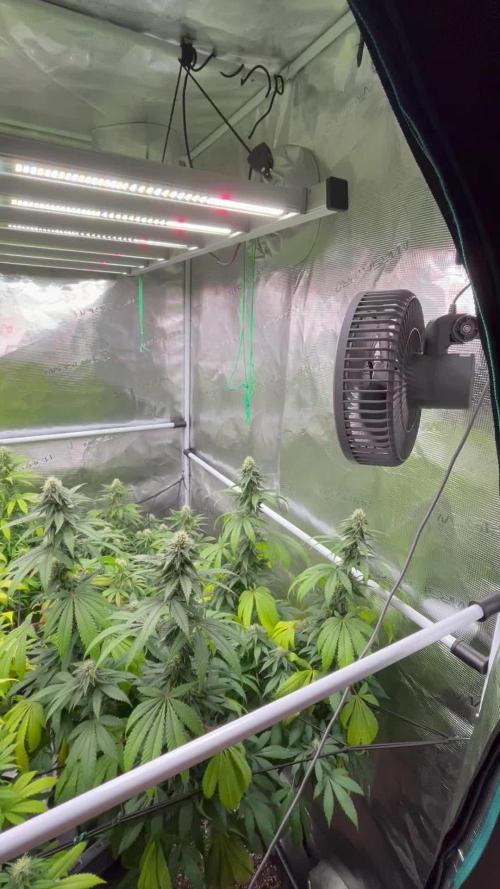
In my opinion it's last week for Girl Scout Cookies Auto and for Power Plant Auto tilll harvest, how do you think?? Vanilla Latte Auto is on it's 3rd week of flowering period and is very strong and beautifull plant


Likes
29
Share


@Wrongholn519
Follow
This is really the day when I am cutting the plants down. I don't want to fill out the harvest section until I have all the info needed to do it. I find the way it is set up on here to be kind of silly...
Today is day 95 since these girls popped and stuck their heads out of the soil. I'm blown away with the size of these plants considering their age.
I'm going to contribute the majority of this success to the CO2 gas I use. I filled out my tank 4 times for a total of 100 dollars .. the 4th tank I bought is still full and I'll be able to use it on my next grow.
These buds and colas are extremely dense and packed with resin. They are giving off a really deep and complex smell. Kind of like a fruity earth mixed with skunk.
I plan on drying at temperatures between 62 and 68 deg. fahrenheit with humidity about 55%. Once the smaller branches snap completely and the buds don't come off 'stringy' then I will move on to the next step of curing. For this I use Grove bags and boveda humidity packs (62% RH).
I'm expecting at least 8 oz off of each plant and I do intend to press some with my resin press

Likes
8
Share


@Huntress007
Follow
This beautiful lady is doing well! She is flowering beautifully and strong 💪! Doubling up on her flower nutrients!

Likes
4
Share


@AestheticGenetix
Follow
7/1/25 already very thick main colas. Does well with drought and humidity and heat. Very strong genetics. Doesnt seem to be finicky or stressed easy.
Side note though, She is one that shows cal mag def fairly easily if not given.
Likes
23
Share


@Wazowskid
Follow
Leaves started to grow bigger so definitely the 10€ light bulb is working, nevertheless I'm expecting to be much slower than what it should take to an autoflower to grow.

Likes
55
Share


@pifflestikkz
Follow
Day 43
14/06/24 Friday
So today was the day for cloning 🤩
I've kept it basic, taken 4 sides as clones.
I've started their own diary now 👇💚
https://growdiaries.woodroom.tel/diaries/214698-divine-seeds-black-opium-grow-journal-by-pifflestikkz
I haven't exactly mainlined as I have far to much going on ATM. But, I have taken the principle, kept my mains, stripped back and topped all.
Resulted back to tie down LST.
Hoping she recovers quickly so we can flip on the 8 week mark🙌
Day 44
15/06/24 Saturday
Feed today 6.4
Day 47
18/06/24
Water today pH 6.4
Fully recovered from her massacre 💚
Since cloning and topping, she has started re development again 💪
Pushing herself out and up again 🙌
Day49
20/06/21 Thursday
Feed today pH 6.25
Did it outside,
Picture update 🤩
Likes
1
Share

@DibbyDab
Follow
Watering once every 3 days, with small amount of run off. Cuttings doing well, set up for a separate grow in the 2x2 tent. Plan is to cross these two 🤞

Likes
31
Share


@TheHighentist
Follow
3/7 Water day*
1125ml total pr plant. Upped the Bloom and Bio heaven
-Temp 25-27day/22-24night
-51%RH (2+-)
4/7
-Temp 25-27day/22-24night
-51%RH (2+-)
5/7
-Temp 25-27day/22-24night
-51%RH (2+-)
6/7
-Temp 25-27day/22-24night
-51%RH (2+-)
7/7
-Temp 25-27day/22-24night
-51%RH (2+-)
8/7
-Temp 25-27day/22-24night
-51%RH (2+-)
9/8
-Temp 25-27day/22-24night
-51%RH (2+-)
Processing
Likes
Comments
Share


Likes
32
Share


@IslandTerps
Follow
Strain: Fast Buds – FrostBanger
Grow Type: Indoor
Pot Size: 5 Gallon
Medium: Coco and Perlite
Nutrient Line: Athena
Week 11 Update – Harvest
Chop day for FrostBanger! This girl had such a wild structure short but stacked, and her trichome coverage definitely lived up to her name. I took her down and hung her to dry; really looking forward to sampling her once she’s properly cured.
She might not have been the tallest in the tent, but she held her own with some seriously frosty buds. Can’t wait to see how the final product smokes.
Watering
Final week watering: 1.2–1.5L prior to chop.
Indoor Climate Conditions (Drying)
Day Temperature: 20–22°C
Night Temperature: 17–18°C
Humidity: 55–60%
See y’all next week for the dry/cure update!
And don’t forget to use my discount code ISLANDT for 15% off your next order at Fast Buds!
Likes
17
Share


@CanadianFillmore
Follow
Welcome growfessors to Growfessor theatre! We have 10 plants in the 4x8, under the brightest lights in SacVegas!
Day 1, week 1 of flowering, flip mode!!
5 Mandarin dreams, 2 Green Crack, 2 LSD and 1 Divine storm round out the grow lineup.
Lights are two custom built Samsung strip lights, LM561's, each one powered by HLG-480-48A driver's.
Thanks for stopping by, tune in next week for another episode of growfessor theatre! 👽🌳💚


Likes
111
Share


@Teamdirtbag2
Follow
I have transplanted into Dutch buckets. Filled with perlite. And all are now in the Greenhouse. Doing great. These are watered 4 times a day for 1 minute.
She is doing great after the transplant.

Likes
1
Share


@tigerbomb
Follow
forse potrei ancora dargli un piccolo boost di fert se mancano altre 3 settimane ma non saprei


Likes
45
Share


@tresplantes
Follow
All at all Everything went Perfect Taste and Effekt are super nice
very Late small strech in flower like week 5 she Streiches 20cm Never saw that
Very nice Cross there Form ripper Seeds cant say nothing about the Stability because i only popped one seed but that one usually is a keeper will try them again anytime soon

Likes
41
Share


@BOMbolenath
Follow
First week of flowering. The plant will stretch, so i adjusted the LED dimmer to 100%. Did a good defoliation too. Doing good, very healthy big plant. It grew a lot of ramifications.


Likes
17
Share


@m0use
Follow
This was a fun project that was a few years in the making and a year later to see if they would last a season for this upload to happen. Before any of this I would bike aorund town grabbing up all the old Ikea solid pine bed slats that I could find and storing them in the basement. I have a lot of wood down there, any size worked as long as I have enough of them. The hot days to find them were the first and last of the months because that's when people where moving in/out. I also kept an eye on the free section on local online classifieds as well. The entire purpose of this was to recycle as much off the streets as I could before buying anything to finalize the project. In the end I only bought sealer, screws and some takeaway/beers. All the wood was 100% free and salvaged off the streets of Toronto saving it from the dumpster bin.
After collecting all the slats for about 2 years I was playing aorund with them on how I wanted to make this work. I had previously done a little project like this before but I messed it up and the boxes where crap. did not last longer then 2 seasons, they where thin and shallow as well could not grow much of anything in them. I Was talking to my friend who is renovating their house and we brainstormed some ideas on the boxes, I found some designs I liked online and said lets make something like this out of what I have here. We tossed out a few of the design features when looking at them as it would have been wasted wood and extra work not needed. If I had more wood them maybe it could have been an option but simple was the name of the game. They taught me what I needed to know like how the miter saw and sander worked, plus all the other tools I was using. They did help out with a table saw and creating the triangle support joints in the corners, They used some pine left overs they had while making a staircase indoors. I did not feel up to the task of using a table saw given all the relatives I know who have lost a finger to them.
In the end we decided the design would be three boards high and take an alternating pattern on corners. layer one short, layer 2 long, layer 3 short. Went with a galvanized and painted deck screw so it can take the weathering. Ran into some problems like making everything level as some of the boards were warped and other ones had undesired aspects like knots and tacky sticker goo I could not remove. So I used them for the base that will not been seen so much. Clamped everything down and called it a day.
Once it was all done and over with, I then brought them back home from my buddies work garage and started to seal them. I went with a boiled linseed oil as its a food safe option should the wood degrade into the soil I will plant in them. I will need to reapply it to the boxes year after year but the main coat is the most important one and I put it on 3 layers with a good dry in between coats. the inside of the boxes that where coated did not degrade at all as the sun did not hit them so it will not need a new coat just the outside. Overall the end result was very impressive for myself, I've never taken a woodworking class ever and It was a near perfect outcome for me. Heavy Duty Planter Boxes for all my gardening needs. I made a last min decision to add in a plastic liner to preserve the wood even longer and stapled that into the frame. it has held up quite well and may need replacing end of 2nd or 3rd year out in the sun. Used a thick moisture wrap plastic with UV protectors in its formula.
Lets see what I can grow in them this year!
m0use's haus of projects - garden box edition