By continuing to use the website or clicking Accept you consent to our cookies and personal data policy and confirm that you are at least 18 year old. For details please see Privacy Policy and Terms
Accept
Likes
Comments
Share


@GrapevineGrower2
Follow
Another straightforward week in the grow room. All three Phenos continue to look fine with good leaf color. I've been working on this super soil recipe for three grows now. I learn a little more with each attempt and come to find this particular blend in larger 7 gallon grow bags IMHO is passing the eye test. All three are in stretch, so I'll continue to keep an eye out over the next 2-3 weeks. In the 3x3, I have manage height. No additional feedings just watered ph'd between 5.8 and 6.2. I do water at top as well as bottom (wicking). These girls are already beginning to exhibit a loud smell. Just bought a new carbon filter, which I will swap out today. This closes out the week. Thanks for stopping by.


Likes
82
Share


@UnorthadoxDude
Follow
Hello growmies! Welcome to week six of An Epsilon Adventure! Massive thanks to both Shogun and Royal Queen Seeds for sponsoring this grow!
So here we are at week six and every one of these girls are at a slightly different stage, it is quite fascinating to watch them develop one after the other.
Today I made the last adjustment to the light possible. I removed the adjustable hangers and affixed a carabiner which I tightly tied to the top of the tent bar. There is about 1.5 inches of space between the top of the shade and the tallest part of the roof of the tent. Plant 1 is already taller than this, and it looks like plant 6 and maybe even plant 5 are going to join it. It's a madness. I am sure you have already looked at the photos but just in case you do what I do and read the diary first...
Here is my assessment at the beginning of week 6:
Plant 1:
Height: 1st (137cm) - what can I say about this ridiculous plant? Day 36... 137cm tall. I have had to raise the light to as high as it is physically possibly to raise it and it's still not high enough. She is done stretching now, she may add 3-5cm over the next week or so but I don't expect more than that, so her top of her main cola going to have to develop above the level of the light. Nothing I can really do, nothing wise anyway. What a monster plant.
Maturation: 4th - early into flower - bud sites developing, pistils just starting to explode.
Plant 2:
Height: 4th (111cm) - this plant has been there or there abouts as the tallest plant for most of the grow, but she has topped out at 111cm. She will gain some during flower but not much more than a few centimetres. Very impressive plant, loads of bud sites, really big strong secondary branches. This one is going to be colas galore.
Maturation: 3rd - well into flower - all white pistils
Plant 3:
Height: 6th (95cm) For some brief days the tallest plant in the room, she peaked early and is now the "shortest" at "only" 95cm for this "50-70cm" strain. She is utterly dwarfed by four of her five sisters in just about every department, being quite a bit smaller even than plant 4 (although I have removed the most lower nodes from this plant). Compared with her sisters she is almost a runt... except that she is 25cm taller than the strain top-end average and matches the maximal height of the previous tallest Epsilon F1 plant I am aware of. It's not that she is small, actually she's pretty big for an Epsilon F1, it's just that the rest of the girls are on another level altogether. Plants 1, 5 and 6 are all absolute beasts.
Maturation: 1st - well into flower - first shades of brown in some pistils.
Plant 4:
Height: 5th (98cm) although only 3cm taller than plant 3, overall she is a much larger plant. Her secondary nodes are the same height as plant 3.
Maturation: 2nd - well into flower - all white pistils
Plant 5:
Height: 3rd (113cm) - one of the two thick/short girls who have grown at a similar pace all along - she is further ahead than plant 6 but not by much and I think she will probably exceed 120cm this week, though I do not think she will outgrow plant 1 or 6.
Maturation: 5th - early into flower - bud sites developing.
Plant 6:
Height: 2nd (120cm) - my predictions were correct about this girl and her continued growth. I now think she might actually outgrow plant 1, which is quite worrying.
Maturation: 6th - early into flower - bud sites forming - by far the least mature plant of the six.
###
Week 6 Day 2 23:00 30/7
Photographed. Raised the light. Rotated the plants. Inspected, measured and reported on each plant.
###
Week 6 Day 3 23:00 31/7
It has not escaped my attention that the plants that are more advanced into flower have darkened and have some burnt tips. I need to flush them and lay off the base nutes a bit. These plants are just growing and maturing so quickly that I cannot keep up.
###
Week 6 Day 5 02:30 2/8
Fertigated 3l of nutrient mix, without either COCO A or B.
###
Week 6 Day 6 01:30 3/8
photographed
---
Thanks for reading growmies! 👊
==========
Tent: 120cm x 120cm x 180cm
Light: 600w HID Elite Dual Spectrum HPS + Angel Wing Reflector
Air: 5" duct fan system with carbon filter ~300 m3/hour + RAM 9" floor fan + 4" intake fan
Pots: Air Pruner Fabric Pots 30l - UGro XL Coco + horticultural grade perlite (~20%)
Seeds supplied by Royal Queen Seeds https://www.royalqueenseeds.com
Nutrients supplied by Shogun Fertilisers https://www.shogunfertilisers.com/en
==========

Likes
4
Share


@QixxGrows
Follow
Day22: As said in Week3, I will not keep this perspective for the whole grow, as it doesn't really show the size of the plant. But it gives a nice view of how to top leaves grow :) The flashes that you see in the video is the humidifier. It pumps out vapour every hour for 15mins. So basically a quarter of each second of the video will be when the humidifier runs.
Day23: I changed it, as I wanted to see the size as well.
Day24 - Day28: Happy, healthy growth.

Likes
14
Share


@Rock_n_Roll_Randy
Follow
THE VIDEO INTRO SAYS THE 5X5 GROW TENT BUT I FUCKED UP AND IT SHOULD BE THE 8X8 GROW TENT
FOR EVERYTHING MARS HYDRO VISIT:
www.mars-hydro.com
www.marshydroled.ca
PROMO CODE: rocknroll
VISIT THE ALIEXPRESS STORE:
@marshydro_aliexpress
Instagram: @marshydropenny
https://youtube.com/channel/UChU5ZWwNi-DvnO3oWVU3ceA
(NEW) STRIVE NUTRIENTS 💪
Thanks for taking the time to read and check out my diary🤜🤛
FC-E6500 LED GROW LIGHT:
FC-E6500 grow light with 3978pcs OSRAM BridgeLux Diodes & Moso Driver, market-leading PPF 2.7 µmol/J, Max 2.5g yield/watt with 30% higher Average PPE, more cost-effective when compared to same style type lights. Only consumes 650W, perfectly cover 5x5ft (personal), 4x4ft (commercial) grow space. Innovative Precise Uniform Lighting-Built-in removable bars interval & dimmability enable the exact & dynamic PPFD control over each of the plant growing stages, FC-E6500 detachable bars deliverSuperior Heat Dissipation: Real Aluminum heatsink together with 6 slim profile passive cooled bars (THINNER & LARGER surface) and detachable Meanwell Driver, create less heat. save 50% hydro than other old grow lights! Driver can be mounted remotely on the side of a grow tent/rack or on an adjacent wall to remove heat from grow space. Full Spectrum UV IR LED: With Yield Max spectrum (660nm Osram enhanced Deep Red,2800k-5000k,730-740nm IR,380-410nm UV LEDs), Average PPFD the FC-E6500 LED grow lamp enables cultivators to produce BIG FAT Dense Buds, perfect for full-cycle hydroponic, soil, grow tent/grow room.
Dimmable Commercial Grow Light: Cost-efficient, easy dimming & daisy chain With a max up to 20 lights, IP65 Waterproof, master light easily controls the rest. Perfect for commercial & home horticulture.
FC4800 LED GROW LIGHT:
GET THE MAX FROM MARS👍: Welcome one of the newest members of the Mars Hydro family🤜🤛🤘. The Mars Hydro FC 4800 480W LED Grow Light can accommodate up to a 4' x 4' area for flowering. It has OVER 2000 LED chips consisting of the best selling Samsung LM301B diodes which has a Luminous Efficacy of: 220 lm/W
0.2 W, 3 V mid power,
Osram 660nm Diodes, Infrared light and UV LIGHT👍. It boasts the incredible efficiency of 2.8 µmol/J, maximum 2.5gram yield per watt with 30% higher Average PPFD. This High-intensity spectrum is beneficial for plants at all stages - from veg to bloom, and creates Big dense Buds👍. achieve 50% higher yields & quality compared with the old lights! Only consumes 480W for 4x4ft personal grows, and 3x3ft for commerical grow. It comes with a dimmer and daisy chain function with a maximum of up to 15 lights, the master light controls the rest👍. Wide 6-bar design offers even & wide canopy coverage and can maximizes your grow space. slim 180° FOLDABLE DESIGN... YES I SAID FOLDABLE🤘🤣 , making it compact and easy to install, it's IP65 WATERPROOF and will give you no worries while growing in a humid environment and makes it a flexible high performance commercial grow light for enormous SUPER FROSTY yields.😛😛😛. MARS GETS EM FROSTY BOYS👍
AWESOME HEAT DISSIPATION: The Low energy consumption FC4800 growing light has 6 passive-cooled bars and an aluminum heat-sink a removable driver you can upgrade later or have it outside your tent. with zero noise you can save up to 50% in your electricity bill compared to HID's or HPS lights!
It also has a removable driver so you can upgrade it in the future or have it outside your grow space for better heat control in your growroom👍
UPGRADED FULL SPECTRUM: Yield Max Spectrum with enhanced red (Top-Bin Samsung 3000k-5000knm, Osram 660nm Deep Red), speed up blooming & fruiting, perfectly suited for full-cycle growing. The FC4800 LED grow lamp was born for Big Buds, perfect for commercial, grow tent, grow room, hydroponics, and all soil grows.👍
THE BEST SAMSUNG DIODES: THE FC4800 has Top Bin genuine Samsung Osram Diodes, combined with remarkable 2.8 µmol/J Efficacy, 30% higher Average PPFD, 50% less energy consumption, to maximize your yields. They give you a TRUSTED 3 years warranty 100% Satisfactory guaranteed!!!
TSW2000 LED GROW LIGHT:
INCREASE YIELD AND CROP QUALITY WITH MARS HYDRO LED GROW LIGHTS: NEWEST SMD LED technology provides the highest PAR/LUMEN output (1122umol@18") and can make you get 30% higher yield compared to OLD blurple led lights. Max 2.5g yield per wattage and achieve maximum quality and quantity, much better than traditional HPS grow systems
LOW ENERGY CONSUMPTION LED GROW LIGHT: Consuming only 300W true output with 684 LEDS! It saves up to 50% energy than other led grow lights. Perfect for 3.5x3.5ft bloom stage, 4x4ft veg stage. Over 90% light energy can be absorbed by plants, it will have higher intensity in a MARS HYDRO grow tent with diamond design mylar, or by crossing over using multiple TSW2000
HIGH EFFICIENCY FULL SPECTRUM INDOOR GROW: 3000K 5000K and IR 660nm 760nm RED, makes it close to natural light, highly engineered to provide improved growing performance for plants at all stages of growing, rapid plant response from seed to flower; Uniform and wide-beam light distribution for your plant's optimal growth
8x8 1680D GROW TENT
The MARS HYDRO 8x8 Grow Tent interior is made of a unique diamond design mylar which is highly reflective. (Other companies mylar and reflective rate is as low as 50%, and it won't provide efficient light. They use thick 1680D oxford canvas, and being double stitched, it is tear proof and perfect for locking in the light. Their grow tent keeps 100% of the light inside the tent and helps your plants absorb more light. EXTRA-THICK material means No light leaks or rips at all.👍
Strong Stable metal corner adapters and poles are the trustful supporters of the tent. It's very sturdy, neither rusting or paint flaking off. quick and easy tool-free setup. They use heavy-duty metal zippers, with double layer black lining, by far the best on the market which creates a light-proof seal.
The Easy observation windows are made by double layers of cloth. Observe the growing conditions of your plants without opening the tent and avoid disturbing your plants. The observation windows also serves to dissipate heat and ventilate the air.
The tent includes 2 removable waterproof floor trays to hold soil and water. The removable tray can be taken out to wash easily.
They guarantee the grow tents are easy to install even if you've never done something like this before. Clear Instructions and no tools needed! They also offer 30-day unconditional refunds for quality problems. Just contact their friendly 24 hours customer service 👍
Likes
17
Share


@TightNugs
Follow
Flush day.
48 hour flush in filtered water ph 6.
Trichs 90% cloudy 10% amber
Harvest report and photos next week,
Happy growing Nugz 🤞🏴🍁
🍁🍁🍁
Breeder-Fast buds LSD-25 auto x2
🍁🍁🍁
Light-Voost VST 120 veg,VST 240 flower
https://voost.com/
7.5%discount over £200 Code-TightNugs
🍁🍁🍁
Seedbanks-Garden of green and Expert seeds
https://gardenofgreenseedbank.com/

Likes
113
Share


@PEAKYPLANTERS
Follow
my experience with these strains has not been one of the best .... in the last few weeks there has been a sharp increase in temperatures making things very difficult ...
very slow growth for coockies considering that in the same tent I had 3 other autoflows that had been ready for a few weeks.
discrete power .... almost light ... lighter flowers inside the buds ...
ABUNDANT HARVESTS FOR ALL OF YOU ... FRIENDS
PEAKYPLANTERS GREETS YOU

Likes
1
Share


@Flowers_labs_extracs
Follow
Buenas en esta la primera semana desde su germinación las vemos estupendamente, hemos pasado a abonar desde la primera semana con Power rotts para empezar hacer un sistema radicular muy bueno


Likes
38
Share


@Cariboo_OG
Follow
Utopia Haze is a rare heavily sativa dominant hybrid (90% sativa/10% indica) strain created through back crossing Brazilian Sativa strains. This tasty little bud took home 1st Place for Best Sativa in the 2008 High Times’ Cannabis Cup and for good reason – with its potent 18-22% average THC level and long lasting cerebral effects, Utopia Haze is one powerhouse smoke. The Utopia Haze high comes on soon after you finish your first toke, hitting you with a strong cerebral lift that infuses you with a sense of hazy relaxation.
Type: Feminised/Photoperiod
Cultivation: Indoor/Outdoor
Flowering Time (days): 70-75
Indoor Yield (g): Up to 650
Feminised Outdoor Harvest Month: October
Feminised Outdoor Harvest Month Week: 3rd-4th week
Aroma: Citrus, Woody, Pungent, Mint
Effect: Cerebral Lift, Hazy Relaxation, Sleepy
Welcome Everyone to the Final Entry of my Utopia Haze Grow !
There is so much to discuss ! I have been extremely busy as of late trying to get this Harvest together, but i am happy to have it here for you now !
I Seriously under estimated the amount of time, help from others, and my own necessary skills to pull this off.. and i still kind of screwed it up lol !
But its worth noting i have never actually done this before and trying to document it during....was extremely hard.
It is next to impossible to work an iPhone with rubber gloves on !
First I want to discuss everything step by step so before you jump straight into the comments on how the end product is so small in "quantity"
Rest assured i am happy with its"quality"...and thats all that matters to me because Life is a journey not a destination! and i have learned so much from this grow that I couldn't be any happy even if i messed some things up :)
But at the very least I hope you read through this entry in its entirety with an open mind and focus more on the process, rather than just the outcome!
I ran out of Ice & i was only able to wash three times..(normally I've heard you should go sometimes 5-6 washes)
Preparation is Key & things will be much better next round :)
Photos 1-22
These are pretty self explanatory but for those of you just tuning in now.. this is what happens to a very happy plant when you don't have the necessary tools to monitor key components of growing cannabis.. Ph, as well as EC levels play a very key role in the outcome of your grow lol that being said I was just able to save this plant by purchasing both tools but that doesn't mean the plant didn't suffer because of the prior events.. This was a Huge reason behind me choosing to turn this harvest into what i would consider
"Solventless Hash Rosin" from "Ice water extracted Bubble hash".
Pictures 23
The idea here is the process of using "fresh Frozen Cannabis" this has been discussed many a time online on such sites as instagram and here on grow diaries as well.. I personally have Never tried the process so i decided to try it out and make a judgement for myself..
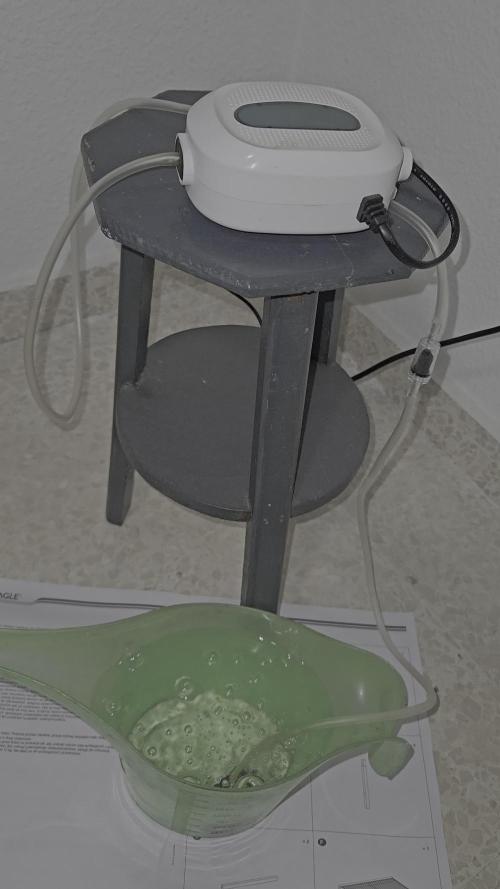
Video 24
The Cannabis has now been in the freezer for 72 hours making it very well frozen.. as you can tell i struggled getting it all into the 25u Screen Wash Bag. One thing of note i would do differently is i will de-stem my next batch as i also believe this played a part in the amount of plant matter that escaped through the sieves.
Photo/Video's 25-28
The idea here is "ice water Seiving" & especially with the bags that I am using here that are only have screen material on the bottom portion of the bag it is very important to have spaces in-between the screens to allow the water to pass directly through the screens into the bottom bucket with the least amount of resistance.. because the hash is so extremely temperature dependant if it gets warm on the side of the bag.. it will stick there and not make it to the bottom to become use able product..
29
You do not need to use as much Ice as i used here lol... the idea is to keep everything very cold..i certainly achieved that but at the sacrifice of using so much that i ended up grinding product and producing "contaminants" but in the end they are just plant matter that i would be smoking when i rolled up my joint either way so.. I'm not super disappointed..
But it should be noted that what you want to achieve here is a Layering effect where you have the wash bag between two small layers of ice while the "water current" washes the Trichomes away allowing them to be separated by the screens setup below :)
Before Starting the machine you should allow some time (i.e.;10-12minutes pre soak to allow the product to become saturated) before the first cycle.
By video 32 I have just ran out of ice lol..
Video 33-34
Here I have a tip for you.. to separate the screens that you sieve through.. cut 5 gallon buckets to stretch them across nice and tight.. it'll make scooping your Bubble that much easier ! i learned this from the many "Frenchy" videos I have watched :)
Picture 35
Here in lays the problem for most people.. drying your hash without loosing vast amounts of "Terpenes" whilst also stay ever vigilant against mold !
Thanks to all those videos I've watched on youtube.. id like to think this was one of my most successful parts of this process..
Things to Note; Terpenes start to seriously evaporate at temperatures 68F or 20C
you need to stay as cold as possible whilst bringing the Relative Humidity in the space down into the 40-30% to stay away from that nasty mold !
I used my cold storage room in the basement.. with a dehumidifier running to keep the space at 45% RH & staying at a constant 15c.
All while spreading the hash as thin as possible across parchment paper, on top of the white screens with a fan moving air across both sides of the paper.
Pictures 36-38
These are some macros i took in the middle of my drying session I fell in love with the colour.
Yes i know the black spots are plant material but they will get caught when i bag the hash & squish the oil out.
Thing to Note; at this stage it is important to ensure you 'micro plane" the hash down as fine as you can whilst staying weary of the temperature... any "chunks" will hold pockets of moisture.. that lead to potential problems..ie; mold ...
Picture/Video 39-41
Successfully planed bubble hash ready to be bagged and Squished !
Picture 42
Ive decided to follow Pedro.. from Pedros Grow Room and double bag to be on the safe side so i don't have any blow outs.
So thats One 25u bag inside one 160u bag ! :)
Pictures 43
This is almost 3 grams of the bubble hash from above, already melting in the bag.. this is where i ran into trouble again lol things started getting to warm in the house and i was only able to get one of the three squish's i did on video :( things started getting sticky.
Picture 44
This is basically just a photo of the equipment I'm using; 3x5 LowTemp Cage in the frame I built myself, with a 20Ton bottle jack.
Something to note here is this is an older Lowtemp model with only a single heating zone which is which i have it closed here heating Both sides of the press :)
As well as the importance of having adequate pressure on your plates.. my rig is very overkill for the size of hash bags..lol
Video 45
Here is the lovely press video.. its didn't quite work the way i wanted either lol my directional folding wasn't quite tight enough for a big "drip" :)
&the Press was set to 65°c
Photo's 46-50 are pretty self explanatory :) I had a blow out.. but still managed to pull an 80% return from the hash once squished...& yes it tasted amazing :)
Was it worth it in the end... that could be debated.. for some..i understand..its not your thing, but for those of us that are interested in making our own concentrates.. free from Solvents...
I wouldn't make it any other way :)
If even ONE of you reading this diary finds it helpful to reference for ANYTHING.....even if its "what not to do" ill consider it a success !
Thanks again for tagging along on this garden adventure.. its been one heck of a journey !
Much Love from B.C. Canada,
Until Next time,
Cariboo

Likes
22
Share


@Chucky324
Follow
Hello. I'm starting my Dos Si Dos #33 diary here.
These clones have been growing in the veg tent all summer. I had stuff growing in the greenhouse all summer and it gets really hot in that cement room in the middle of summer, so I shut down that grow room till now. I got it up and running last week but I was a little embarrassed to make a diary starting last week because I had treated the clones badly and they looked rather leafless. They look much better this week, so I'll start.
I would like to start playing around with making feminized seeds. So, I need some extra clones to spray to make the feminized males. I've read about it, now it's time to try. Some of these clones I take will be turned to males next year.
I gave some clones to my friend Jerry for his summer crop. I was over to his house the first week in October, to take pictures of his plants. Some of the lower plants that were not getting sun anymore were just starting to show some powdery mildew on some of the big fan leaves, so he decided to cut them down. He did a real good job on growing them this year. I think he said he was going to cut the big bud off the ends of the branches and let the smaller buds fatten up, under cover, in the sun, on the deck.
This is the strongest plant I grow. It gets me pretty baked with 5 or 6 tokes. It grows on the taller side, so I'll make lots of tops to slow the growth down. And it tastes like fruity ice cream!!! Yummy!!!
The other plants in the room are Amnesia Lemon by Barney, Pink Kush the original clone I found 27 years ago, Nova OG by Anesia Seeds, Sweet Sensations by Sweet Seeds, The White (Whitey) by Dr Greenthumb.
I will put in next week more Fat Freddie's Cat cartoons and I have some more puzzles to finish off that puzzle book. Then when that's finished, I'll put in some Fabulous Furry Freak Brothers cartoons.
Man, the spiders are getting big around here. We've had 1 mm of rain in 3 months and it's very warm for this time of year, so they are getting big!!!
Keep Growing Straight. Chuck.
Likes
31
Share


@Mr_ZAF_Budz
Follow
Hello Ladies and Gentlemen😎
So my grow is coming closer to an end and so far it has not been so bad for a winter grow.
As of 3 days ago I completed the partial harvests to the LSD-25, Gorilla Cookies and the Girl Scout Cookies. The late blooming Gorilla Glue will go for another 2-3 weeks and the six shooter should get the chop next week marking 13 weeks since breaking ground.
I trimmed some of the 1st half of the partial harvest last night and the Gorilla Cookies seemed to have preformed well with nice sticky dense buds.
I hope you all enjoy the diary entry and happy growing ✌️🏼

Likes
48
Share


@pifflestikkz
Follow
Day 106
14/10/24 Monday
Her colours are really coming through now 🤩
Nearing her end now, possibly another week after this ✌️💚
Picture and video update 📸💚
Day 108
Day 58 flower now 🗓️✅
16/10/24 Wednesday
De-chlorinated tap water with flawless finish to pH 6.2.
She really is starting to mature, weight on her buds is increasing. Trichomes now forming cloudy
Picture and video update 📸
Day 109
Day 59 Flower
17/10/24 Thursday
Nothing to update - she is just maturing now, picture and video update 📸💚
Day 110
18/10/24 Friday
Allowing her today, then Saturday she will be 24 hrs dark 🌑 and chop Sunday.
She is incredible, black and purple buds, leaves to match, coated, I mean sugar laced looking like tony Montana ❄️ sneezed on my grow, she is glistening with trichomes, seeing some amber's now.
Will upload pictures at harvest now
Day 111
19/10/24 Saturday
Here we go 😍 time for the dark side 😈🌑 I do 24hrs for my autos, I find they start wilting after this for me.
I'll update Sunday before the

Likes
11
Share


@evAq22
Follow
Guys I wish I could tell you something about the grow. But honestly I'm just letting my plants do their thing... I mean it's living soil it's like set and forget.
08.05.2025
Trimmed the cover crop


Likes
9
Share

@OrionSparkles
Follow
Already set to 12/12 photoperiod; I have watered several times, aerating the water beforehand, and will continue like this until flowering begins. I also performed FIM pruning.👍
Likes
9
Share


@Gardengobblin
Follow
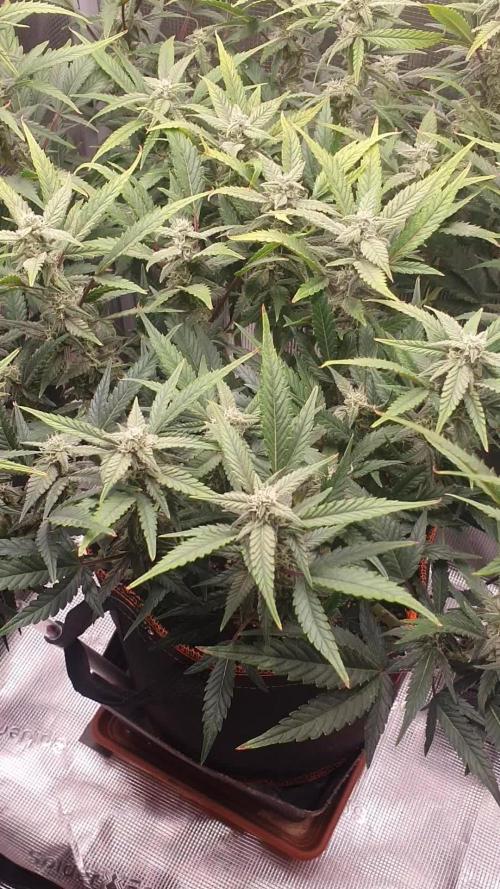
Les fleure son bien.compact et bien givré . Les arome d'agrumes son très forte av3c une légère différence entre les trois . Plus tropical sur 2 des 3 pheno.
J'ai eu la chance d'avoir 3 pheno different . Une bien bourgogne , une avec des touche mauve et roser et la derniere plus verte avec un peut de violet.
Bien hâte à la fin du séchage pour goûter. Cela fait 6 jour quelle son couper
Likes
49
Share

@Kirsten
Follow
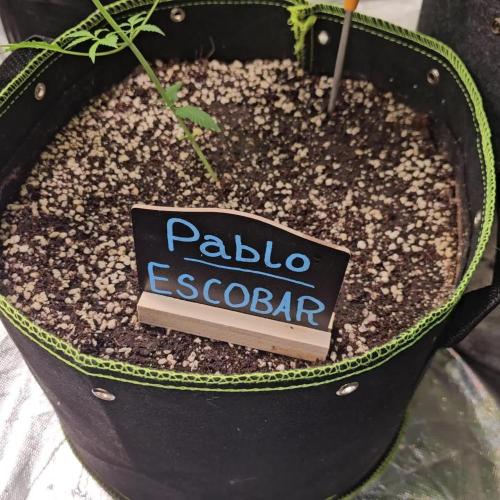
So this week, the Pablo Escobar has grown in height. The leaves are still looking a little bit light yellow, rather than green and we will see how things are going. I have moved the light away from the plant as some of my other plants were getting very tall and needed adjusting.
I have only been given the plant some Trace by Ecothrive for nutrients as the soil that I used has already been amended to provide the nutrients. The plant is still looking fairly yellow. I did not want to add any extra stress by overloading nutrients as well.
I will have to straighten out the stalk. By staking it, as it has grown leaning to one side.
This week, I watered 2 l of dechlorinated water containing ecotrive trace.
Thank you for checking out this week's diary, and hanging out in the comments 💚 🙌 🌱 😊 🍃

Likes
33
Share


@Mrs_Larimar
Follow
Friday March, 5th
I cleaned alittle the Bottom area.
Girl looks wonderful and first Flowers are to see.
she smells heavy gassy and green. My Boy likes to sniff on her ( and chew alittle)
I really have to pay attention to keep the Tent close
