By continuing to use the website or clicking Accept you consent to our cookies and personal data policy and confirm that you are at least 18 year old. For details please see Privacy Policy and Terms
Accept
Likes
Comments
Share


@oregonian
Follow
Yellowsticky traps capture hundreds of thrips. She is just beginning to become a girrrrl.

Likes
33
Share


@Hawkbo
Follow
The MC3 is a real beast I wish I gave it some support its packin on weight down the stretch probably gunna be one I hang onto and run another couple rounds. The MC4 is slower Im actually still giving that one light feeds but also has potential I'll see how that shapes out and I'll have to run MC6 again since I tossed it. MC2 is the big one it always throws down this might be the best run I've had with it yet.
Started the flush on most of these last week. Everything has been steady all around. Going to start taking them down a few at a time over the next week or 2 some will go longer than others so they'll come down 3 or 4 at a time.
REMEMBER , IF YOUR SHOPPING FOR GEAR YOU CAN USE THE CODE “BANGDANG” FOR 10% OFF YOUR ENTIRE PURCHASE FROM ANY OF THE FOLLOWING COMPANIES.
@greenbuzzliquids
@rainscience_growbags
@gorilla_grow_tent
@growlightscience.led
*****Gorilla grow tent discounts extend to all companies affiliated with grow strong industries which include..*****
@super.closet
Lotus Nutrients
Kind LED grow lights

Likes
17
Share


@Bushbanker4
Follow
Thanks for all of your replies to my questions.
I will be slowly upping the bloombastic 0.1ml every other feed until we get to 1ml.
3rd July. I done a light defoliate around the base of the plant, a few small bud sites removed that were tiny and 6/7 leaves that were dieing from the bottom to free up space around the soil.
Day 44, lowered nutrition to nearly half.

Likes
55
Share


@pifflestikkz
Follow
Day 113
23/08/24 Friday
Big feed today using de-chlorinated tap water pH 6 with Plagron products.
Day 115
25/08/24 Sunday
De-chlorinated tap water pH 6 today only.
Day 117
27/08/24 Tuesday
Feed again today using de-chlorinated tap water pH 6.
Day 119
29/08/24 Thursday
De-chlorinated tap water pH 6 only today.
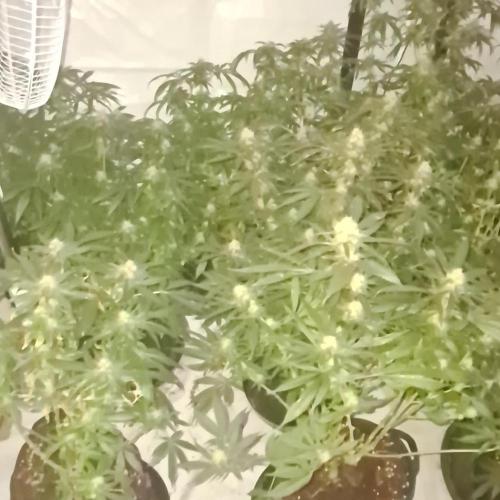
Picture and video update of her filling the Scrog, and now stacking 💪 🤤💚

Likes
67
Share


@AwfulBuddy
Follow
week 4 bloom started!
stable pH, always around 6
The girls are well asking for a lot of nutes, every day the EC level drops by 0.2 but even more, cleaned the tank and filled it with new nutes
Now I follow the ADV table with an addition🤣
Sensi Bloom A and B 5mL instead of 4mL💣📈
last slight defoliation, I did not want to do it but they are really tight in there, I only take off the minimum, hope the girls explode this week🍀🍀🍀
Any feedback is welcome, criticism, advice, everything is needed here 💥
Update:
3 days later EC from 3.0 to 2.6
pH 6.0
Seems all good 🤞🍀


Likes
8
Share


@dreamLife
Follow
Sigue creciendo bien, súper frondosa, semana a semana se le van quitando las hojitas que tapan los brotes y se amarran las ramas mas grandes al contenedor.


Likes
5
Share


@GaizkaDinafem
Follow
Just a couple of weeks to harvest ✊✊✊!!! The smell is increasingly hypnotic… The genetics are going perfect!! Thank you Dinafem 😍!!

Likes
4
Share


@Jahrulez
Follow
Im so fucking hyped on her and shes going Great... as the time im Wirting this im sure shrees already grown 1cm agian.
Fucking hyped. Everything lookin nice !!!

Likes
Comments
Share


Likes
6
Share

@Phatlad187
Follow
Week 6 on flush now sticky wasbi as been growing good got a bit of nut burn but they are on flush now and the smell is stronge and nuggets feel dence and soild
@growerchoice
@SHOGUN dragon force 4ml/l for 1 week then pure water for 1 week

Likes
3
Share


@Passx
Follow
The branches of the plant are getting stronger, so strong that i had to bend them again. I started to feed them with the easy bloom fertiliser by rqs, dissolved in 5 liters of water.
Likes
17
Share


@EXZELENS
Follow
Bud wet weight : 168,1g of trimmed medium to big sized buds
25,4g of tiny tiny buds/larfs = 193.5 grams of trimmed wet buds.
Details on genetics and smoke report above.
This, as my first grow, is way more than I ever expected it to be. I haven´t had that much fun and enthusiasm in a very very long time.
I can´t even explain the feeling it is to harvest your own cannabis, but I know most of you know what I´m talking about haha.
It was really nice to practice LST, even tho it was SO HARD, ´cause I didn´t had barely any space to work since I used a hard pot and did not fill nearly half the size of it and the walls of the pot were really high. It was even difficult to water without dropping water on the lower buds.
I haven´t learnt much about defoliation tho, I feel I need to study a little more about the phases you should or should not do it.
Also, I discovered thrips are a pain in the ass. I had 2 tough weeks dealing with thrips, but in the end it was alright.
I don´t have any humidity control device, which I intend to buy for the next grows.
Growdiaries was really helpful for me, it kept me motivated everyday (not that I wouldn´t have had it anyways), the Grow Questions are REALLY useful and all the community is awesome. Thanks to all people that helped me here on GD during this first grow!
To conclude it: I am really happy and satisfied with how the grow turned out. They look incredible, it almost feels like I can´t believe it still.
Peace.
UPDATES:
07/10 : The buds are now dry and already in curing jars, one of them with a Boveda 58% humidity pack.
The total grams of the dry buds are: 41.4g (medium to big sized buds)
4.1g (tiny buds) = 45.5 grams!
I´m really happy with the results, I thought it would be around 30g so yeah, that´s a really good surprise!
In 2 weeks I´ll be back to update the smoke report.
Thanks so much for reading! Peace.
09/10 : I managed to fit everything in the same container with some space between them, so now every bud is with the Boveda pack.
14/10: It´s been a week and the smell improved, it still smells a little like hay/plant ( even tho it´s not too dry neither too wet ).
21/10: Now it´s been two weeks and even tho the smell isn´t anymore hay, it´s a lot herbal. I really think the aroma can get better, but the taste is already good enough for me. The smoke report has been done and in case I have something to add, I´ll report here.
Thank you so much for reading! Peace.
Likes
8
Share


@Skinnytalls420
Follow
Day 17-12/05/22 all looking good now giving biobizz grow and there flying!!!!
Day 20-15/05/22 all looking good!!!!

Likes
47
Share


@420DeepGrow
Follow
Sorprendido por la noticia de mi primera colaboracion con MarsHydro 😊🙏 y muy sorprendido tambien por el envio de las semillas por parte de 420FastBuds.
La marca numero uno en focos 💡, carpas de cultivo ⛺️, extractores 🌬️ y demás aparatos que necesitas para tu cultivo.
Para esta aventura arrancaremos con 💡Mars Hydro TS 1000 Full Spectrum LED Grow Light 150W Regulable y 1 semilla autofloreciente a un ciclo de 20/4.
Verdaderos 150w con este TS1000, la mejor luz de cultivo LED para principiantes.
Ofrece una luz adecuada para 2-4 plantas 🌱. Su precio razonable, la marcada mejora del rendimiento y el control variable de la producción la hacen amigable para los nuevos cultivadores. Todo un tesoro para cualquier cultivador que este comenzando.
Usaremos para esta aventura una carpa de 60x60x90, MarsHydro una carpa para los más exigentes.Con una solapa de cremallera mejorada, dobles cremalleras de metal con forro,reflectante diamante tipo Mylar, postes de metal para una estructura mas solida, no se puede pedir nada mas.
Garantizando una respuesta en solo 24 horas tanto si has usado antes la marca como si no.
Que decir de 420FastBuds, uno de los mejores bancos de semillas a nivel muendial. Si quieres una Auto de verdad, esta es tu cepa.
Wedding Glue auto:
Perfecta para concentrados.
Una enorme cantidad de resina la hace ideal para aquellos que buscan los mayores rendimientos en extracciones.
Auto súper productiva. ¡Esta variedad puede producir hasta 550gr/m2 en 70 días!
¡Entre las más fuertes del 2022! Una autofloreciente potente con un 26% de THC.
Terpenos ideales para los golosos. Un delicioso sabor a vainilla dulce que te deja la boca agua.
Perfectamente equilibrado. Un efecto bien equilibrado adecuado para uso diurno y nocturno.
💡 MarsHydro TS1000:
https://www.amazon.com/gp/product/B07PLY1WKK
⛺️ 60 x 60 x 90 MarsHydro:
https://www.amazon.com/dp/B081PN2QDN/
🌻 Wedding Glue Auto:
https://2fast4buds.com/es/seeds/wedding-glue-auto
Etapa de floracion ya que noto las primeras preflores, es increíblemente rapida, MarsHydro hace buen trabajo también, estoy muy sorprendido.
Solo le aqplique en la estapa de crecimiento agua con un PH6.5 y humus de lombriz.
📅 Dia 29: Riego con nutrientes EC 800
📅 Dia 30: Descanso
📅 Dia 31: Riego con nutrientes EC 450
📅 Dia 32: Descanso
📅 Dia 33: Descanso
📅 Dia 34: Riego con nutrientes EC 600
📅 Dia 35: Descanso
Likes
7
Share


@OwlGang_Uk
Follow
Week 1 - Solid Foundation. Just Sowed Up Some Gorilla Glue Auto From Fast Buds. The Girls Are Looking Nice And Healthy For Their First Week In Seedling Stage.
Likes
16
Share


@eldruida_lamota
Follow
Que pasa familia, vamos con la segunda semana de floración, ya se están empezando a formar las flores poco a poco, aporte big bud y bud candy para empezar a fomentar la floración, añadí algo más en el micro y el bloom, y lo están notando , tienen muy buen color estos clones, están siendo robustos, igual algo pequeños podría esperar algún día más a pasar el periodo de floración pero lo importante es empezar hacer proyectos.
Voy regando cada 2 días, poca cantidad de agua no me estoy sobrepasando y controlando el ph en cada riego.
Hasta aquí todo, iremos viendo cómo van progresando, buenooos humooos 💨💨


Likes
143
Share


@SwissKush
Follow
Day 78 - FloraKleen Day 1
a. she is finished, will flush with FloraKleen for 48 hours then harvest
b. very ripe, every pistil is brown, and there are a few amber trichomes creeping into the middle and top buds
c. the smell is amazing, absolutely the best smell from any plant I have grown
d. uploaded final video
Day 79 - FloraKleen Day 2
a. in darkness, will harvest tomorrow
b. the buds are so full of oil and resin, they are very heavy/ripe
Day 80 - Harvest - Drying Day 1
a. hanging up the large limbs only, no whole plant, trunk is too large
b. buds are oily and sticky very strong smell
Day 81 - Drying Day 2
a. RH 50% temperatures 20 degrees
Day 83 - Drying Day 4
a. RH 45% temperatures 20 degrees
b. the buds are drying very nicely, the sugar leafs are completely covered in trichomes
Day 84 - Drying Day 5
a. the buds are drying nicely
b. RH 45% temperatures 20 degrees
Day 85 - Drying Day 6
a. smell is incredible
b. temperatures steady 20 degrees, 45-50% RH
Likes
5
Share


@Ensign420
Follow
Greetings fellow growers 🖖 and welcome to my first grow ever. This adventure actually started several months ago when I decided to stop buying flower from dispensaries and just grow my own bud. How hard can it be!?
This is actually my second seed of this strain. The first bean sadly died due to over watering (sorry girl, RIP). I was literally watering the cube to the point where water was dripping from the bottom, then heavily sprayed the humidity dome and tray with the vents completely closed. Everyday. Multiple times. I never let the dome or try dry out. So after about 8 days of not sprouting, there was a funky smell of rot. So that was that.
Later I learned that rockwool retains a lot of water and can easily drown seeds. So a wet/dry cycle is best for rockwool germination.
So even after hours of researching and digging through forums and tutorial videos, I was still under prepared for this journey. Did not consider how delicate the germination phase is. Oh well. Lesson learned. Reset and try again!
I hope everyone is safe and stoned during this corona crisis. Just like everyone else in the world, I want this pandemic to be over with. But in the meantime, let's grow some weed! 🖖
[START OF WEEK 01]
Day 01 - Monday - 08/03/20 - Total Days: 001
-----------------------------------
- [0830]: Light Schedule: 24Hrs/0
--- Soaked cube in 5.5 PH water for 10 min. Did not shake water out.
--- NO NUTES! Only PH'd down to control the PH levels.
--- Did not use the default hole (way too deep).
--- Flipped cube upside down and made a shallow hole for the seed (less than 0.25" deep).
--- Placed seed in and pinched hole close. No additional water added.
--- Sprayed the tray and dome with straight water (5.5 PH).
--- Vents are cracked opened a for ventilation (about 1/4 opened each).
--- Distance between the light and tray was 53"
--- AC was set to 80 °F
--- Exhaust fan was set to 86 °F
--- Room average temp was at 85 °F
--- Dome humidity was at 85-99% when sprayed.
--- Allowing to completely dry before respraying.
- [2200]: Dome and tray were completely dry! Sprayed only tray and dome with more water.
Day 02 - Tuesday - 08/04/20 - Total Days: 002
-----------------------------------
- [0845]: Sprayed dome and tray in the morning. Everything was dry.
--- Hoping for the best!
- [2130]: Everything was dry again, so sprayed dome and tray at night along with a light spray on the cube.
Day 03 - Wednesday - 08/05/20 - Total Days: 003
-----------------------------------
- [0830]: Everything was dry again. Resprayed dome and tray. Slightly sprayed cube.
- [2125]: Hooo damn!! She popped! Am little stub is visible! Resprayed dome and tray again.
--- Still going 24/0 for lights.
- [+0033]: Just checked up on her and I swear she grew a bit taller! Getting excited!
Day 04 - Thursday - 08/06/20 - Total Days: 004
-----------------------------------
- [0845]: Wow! Went from a little stub to fully sprouted overnight! Everything was pretty dry again so resprayed dome and tray.
- [2200]: Tap root is visible! Over 1" long too! Just resprayed dome and tray again.
-- Going to prep for hydroton transplant tomorrow!
Day 05 - Friday - 08/07/20 - Total Days: 005
-----------------------------------
- [0930]: She keeps growing!
-- Added a bit of CalMag to the spray bottle (8 drops to 650ml of distilled water). Resprayed dome and tray. Water was at a 5.4 PH with 141 PPM.
- [1045]: Prepped the bubble bucket with 4.5gal of water. Water is high enough to reach about 0.25" above the bottom of the net pot.
--- Added 3 drops of Superthrive
--- Added 3.5ml of CaliMagic
--- Added 2ml Hydroguard
--- Then PH'd down to 5.6
--- Solution Strengh: 120 PPM
--- Water chiller is set to 20 °C
- [1100]: Transplant time!
--- Filled the net basket 1/3 with hydroton. When placed in the bucket, air bubbles are not visible, but are slightly below the surface (slight digging will reveal the water/bubbles below).
--- Removed plastic on rockwool cube and placed in basket, then filled around and covered with hydroton. Making sure to block any light from passing through the net pot and into the nutrient solution.
--- Covered with a half-bottle dome sprayed with the CalMag water from earlier.
--- Hoping for the best!
- [1300]: Raised Bucket 5" higher. Now light distance is 48" to top of bucket.
- [1820]: Lowered tent exhaust temp to 76 °F
--- Lowered AC to 75 °F
--- Raised bucket even higher so light distance is 30" to top of bucket.
- [2300]: Looking good!
--- Sprayed dome and surrounding hydroton with more CalMag water.
--- Attached timer to light! So new 18 Hrs On/6 Hrs Off light schedule.
--- Lights On: [1600] (4pm)
--- Lights Off: [+1000] (10am the next day)
--- Decided to go with lights on during the evening/night and off during the later mornings/afternoon (the hottest part of the day) to see if temps can be controlled better.
--- Please survive girl!
Day 06 - Saturday - 08/08/20 - Total Days: 006
-----------------------------------
- [0800]: Everything was dry. Resprayed hydroton and dome.
- [2000]: Here first night cycle seemed to go well! Get'n taller!
--- Dry again. Removed the dome.
--- PH went up to 6.5 so PH'd down to 5.7
--- Ran the top feed drip ring for a bout a minute to wet the hydroton and rockwool with the nutient solution.
---Too scared to leave the top feed on 24hrs (I don't want over water her and cause dampening-off). Will let dry before re-watering.
- [2100]: After closer inspection, I think she's looking a bit yellow.
--- Decided to add a bit of grow nutes to the bubbler solution.
--- Added 2ml of Sensi Grow A
--- Added 2ml of Sensi Grow B
--- Solution strength after adding more nutes: 176 PPM
--- PH went up to 6
--- I hope that the extra chelating properties of the 'PH Perfect' solution is enough of a buffer for proper nutrient uptake.
Day 07 - Sunday - 08/09/20 - Total Days: 007
-----------------------------------
- [0800]: Water dropped a bit (mostly due to evaporation) so solution strength was at 190.
--- Checked PH again. Was still at 6, so PH'd down to 5.4
--- Ran the top feed for a minute to wet the hydroton a bit.
- [0915]: Since she's looking perky but still a bit yellow. So decided to up the nutrient concentration even more before lights out.
--- Added 2ml more of Sensi Grow A
--- Added 2ml more of Sensi Grow B
--- Solution strength after adding more nutes: 199 PPM
--- PH went up to 5.8
- [1700]: Checked nutrients.
--- PH: 5.9
--- Solution strength: 202 PPM
--- Added 4ml of Voodoo Juice
--- Added 4ml of B-52
--- PH after adding more nutes: 5.9
--- Solution strength after adding more nutes: 238 PPM
- [2130]: Decided to make a new foliar spray to address the continued yellowing.
--- Started with 500ml of distilled water.
--- Added 3 drops of CaliMagic
--- Added 3 drops of Sensi Grow A
--- Added 3 drops of Sensi Grow B
--- Added 3 drops of B-52
--- Added 1 drop of Superthrive
--- Solution strength: 164 PPM
--- PH was at 5.9 and did not adjust.
--- Gave her one spray.
--- Also sprayed the surrounding hydroton.
[END OF WEEK 01]
