


By continuing to use the website or clicking Accept you consent to our cookies and personal data policy and confirm that you are at least 18 year old. For details please see Privacy Policy and Terms
Accept
Likes
Comments
Share


@HippyHemulen
Follow
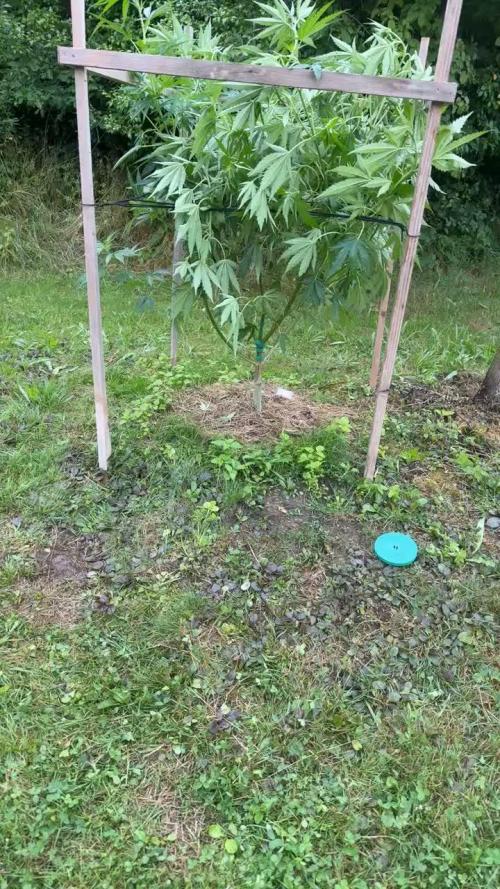
Girl is looking healthy and i transfered moss pellet when i saw root coming at bottom in 11L pot with Biobizz All-mix and about 5-10% coco with clay pebble drainage at bottom. Used mychorizza too in transplant hole to help roots growing at start. Pretty sunny days with little bit rain almost every day but little bit too cold this week. 13-15C at days and few night dropped 4C otherwise 8-10C.
Day 1: Started counting veg at 24.5.
Day 4: Transfered moss pellet in 11L pot.


Likes
6
Share


@ReggaeShark_420
Follow
Day 92 for this girl. Sorrie for the late update, had a little vacation. One thing about this girl is the heat is too much for he. A hps light with 30 degrees outside everyday gets tuff to bring it down. But she is going on well strong, wil be cutting her sycle short because no one wil be home this december. Next wil start the flush then hope she does well till then🔥 sofar, looking good by surviving the conditions

Processing
Likes
28
Share


@TheFoxFarmer
Follow
Surf Purp Week 6 Flower
The last week before flush. All nutrients apart from PK and sugars have been stopped. This brought the ppm/EC down, plus Remo Bloom was reduced slightly now they're not so hungry. With that being said I'm still using a lot more with this line than I'm used to. Only because the remo nutrients feeding chart lists them so strong, which I'm already a lot lower than. In future I'll try reducing them and see how they cope and perform, but that's just part of dialing it in to your own specific set up.
Now that they're close to flush they're starting to get slightly more pale, with #2 and #4 showing some purpling too. This is because they are slowly coming to the end of their cycle, so they no longer need heavy feedings and are now eating less and beginning to cannibilise. They're all very frosty and giving off an insane amount of smell. At this point I'm more or less certain that #4 is a keeper, with the most unique terpene profile out of the 4 females. It smells like rotting candy/fruit with a lot of gas ⛽ it's also a close call between #1&2, as they're very similar to each other yet so different to #4. These two have the sweetest, most pungent smell of blueberries but with very slight differences between them that could change more throughout flush (and even after drying and curing). The keeper from these two will more than likely be decided after drying and curing.
One or two of the main cola's on #4 are way too close to the light, with one top bud showing clear signs of burning. When you look closely, parts of the burns are brown as you would expect, and others are bleached white. These are both from heat and light damage, and aren't ideal. But, it's only the one bud on one plant so I'm not going to stress over it. In fact, she's smelling that incredible that you wouldn't even know!
Thanks for following and happy growing!
🦊
Likes
18
Share


@Chronicbastard
Follow
I have been really Busey with work so I missed last week.not really much to say though. There wasn't much stretch with these girls and only one is growing normal.the genetics are all over the place.i have been growing in pretty optimal conditions beside have 40 percent humidy through out my house.they all do look pretty nice though. I can probably squeeze 5 zips out of 4 of them.

Processing
Likes
14
Share


@SunshineBud
Follow
Wow this week has been crazy, I think the LST I did on plant 4 really helped spread it out... I'm at a loss as to how to treat plant 1, 2, and 3. 3 is still kickin, she little but she's growin buds! Some Log entries...
1/28: Fed with week 7 noots, trimmed a few dead leaves and did some LST on #4 tryin to get all buds on same program.
1/31: Watered with sledgehammer flush later on at night.

Likes
16
Share


@ZzTooRightOGzZ
Follow
Just feeding it at the moment.
Still not to sure if it's male or female yet.
She is female 😁.


Likes
7
Share


@Breadboard_Johnson
Follow
Bubba Kush Pre 98 is an easy plant to grow. She gave me no hassles or worries even in a warmer climate than she would like.
The leaves are a dark green color naturally.
Yield wasnt much, I am waiting for buds to dry and cure to provide the dried weight.
I did not feed them any nutrients.
The one got so dense that I had to move it indoors to avoid bud rot - im almost convinced it was an autoflower and they made a mistake at the seedbank because it was short and flowered out of nowhere.
Outdoor buds were sundried - to lower THC for novice and paranoid smokers, I tried the smoke and it was a very pleasant high - removed anxiety, stress, overthinking, and relaxed my body. Perfect.

Likes
5
Share


Likes
1
Share


Likes
19
Share


@TheRealBBrown
Follow
This being my first time growing auto's, I didn't know what to expect. Out of the gates they grew rapidly, last week they seemed to slow a bit and started to flower. Plant #1 seems to be growing slightly faster than #2, but not by much. The SOG on each of these spans 18'' x 18''. I have trained these girls much more than I normally do, and am very happy I did so. I have looked around at other diary's that have ran these GSC and I am anxious to see what this week brings!


Likes
23
Share


@Weedy_Shepherd
Follow
Buds have all developed and fattened up nicely will start to flush these bad boys later on in the coming weeks prior to the great chop!! I've been smoking the f2's leafs for a while and can honestly say I'm really happy with the flavour profile and resin production.. Am thinking of reveging 1 to keep the genetics alive 😀😀😀 T-14 days 🎉🎉🎉
Just chopped everything down due to space and had a little spyder mite issue at the end.. In all 54 days in flower was a decent amount of time!! Will wait for the final dry w8 and report back!!


Likes
Comments
Share


@Cultivandomedicinanatural
Follow
En esta semana ya cortamos algunas de las pequeñas que tenemos fotografiadas arriba. Ahora subiré sus cosechas y el resto de las pequeñas empezamos a regarlas sólo con agua, pure zym y Sugar royal de nuestros amigos de Plagron para que den el último estrujón y pasarlas por peluquería. Es una auténtica pasada los resultados de estas preciosidades 😍😍😍😎😎😎😋😋😊😊
Processing
Likes
5
Share


@Ensign420
Follow
Week 02 Introduction
This week has been a bit of a struggle. Had my first experience dealing with slime and brown algae. But I think adding enzymes and increasing the beneficial bacteria helped to fix the issue. Also experienced nutrient burn for the first time. My nutrient solution strength got as high as 671 PPMs. So backed it down to about 430 PPMs during the end-of-week reservoir change. Also cut Hydroguard (expired?), CaliMagic, and Superthrive from this grow. Now she's still stunted, but is starting to recover. Hopefully...
[START OF WEEK 02]
Day 01 - Monday - 08/10/20 - Total Days: 008
-----------------------------------
- [0830]: Still looks a bit yellow. But getting larger!
--- Solution strength was at 248 PPMs.
--- Just topped off with a bit of distilled water
--- PH went up to 6.1 so PH'd down to 5.8
--- Ran the top feed for a bit to wet the hydroton.
- [2130]: She's looking even more yellow now.
--- Even the new leaves are really yellow.
--- Decided to add more base nutes.
--- Added 4ml of Sensi A
--- Added 4ml of Sensi B
--- Now at about
--- Solution Strength went up to 304 PPM.
--- PH was at 6,
--- Also raised the water level a bit more.
--- I really hope it's a nutrient deficiency and not an over-watering issue.
--- Please live!
Day 02 - Tuesday - 08/11/20 - Total Days: 009
-----------------------------------
- [0830]: Looking less droopy. But still yellow.
--- Decided to do a reservoir change.
--- 4.5gal of distilled water
--- 8ml of Sensi Grow A
--- 8ml of Sensi Grow B
--- 8ml of Voodoo Juice
--- 4ml of B-52
--- 4ml of CaliMagic
--- 4ml of Hydroguard
--- 4 drops of Superthrive
--- PH'd down to 5.8
--- Solution strength: 302 PPM
--- Since I didn't want to risk over-watering the rockwool, I did not to do a top feed, may do one tonight after the sleep cycle (lights are still set to go off at 10am and back on at 4pm).
--- As I was doing a reservoir change, I noticed that the tubes and bucket were a bit slimy. Didn't really stink or anything. Is this normal? Maybe due to the Hydroguard and Voodoo Juice?
--- I hope she gets better soon!
- [2215]: Getting larger! But still yellow.
--- Also can see a root growing through the net pot! Tiny little thing but it's there! Will have to start dropping water once more appear.
--- After looking over a few DWC diaries using AN nutes, seems like my solution strength is still too low. Most around this stage average around 500 PPMs with about 4ml per gallon.
--- Top fed for a minute to wet the top of the hydroton.
--- Solution strength went down to 263 PPM.
--- Added 8ml more of Sensi A
--- Added 8ml more of Sensi B
--- Now base nutes are at 16ml for 4.5 gal of water.
--- PPMs went up to 411.
--- Still lower than 500 PPMs, but that's okay.
--- PH was at 6. Not sure if I should adjust PH using AN nutes. So going to not ajdust unless PH goes above 6.1.
Day 03 - Wednesday - 08/12/20 - Total Days: 010
-----------------------------------
- [0830]: Looks like more root growth!
--- She still looks yellow. But leaves are perky.
--- PH was at 6.2 so lowered down to 5.8.
--- Solution strength was at 394 PPMs
--- Since roots are still growing, I decide to lower the water level a bit. Now water level is a bit below the net pot.
- [2200]: Root is getting longer!
--- Slime is returning. Not sure why.
--- Solution strength: 357 PPMs
--- PH: 6.1
--- Decided to add an enzyme along with more beneficial bacteria to hopefully cure the slime.
--- Added 16ml of Sensizym
--- Added 5ml of Hydroguard
--- Added 8ml of Voodoo Juice
--- New solution strength: 430 PPMs
--- New PH: 6.1
--- Top fed for a minute.
--- This slimy residue is really freaking me out! I hope the added enzymes will help eliminate the slime.
--- Going to do a full reservoir sterilization/nutrient change over the weekend. Please survive until then girl!
Day 04 - Thursday - 08/13/20 - Total Days: 011
-----------------------------------
- [0930]: I think the enzymes worked! There is little to no slime now!
--- Although I think the root was also dissolved in the process. It's now just a little stub sticking just below the net pot. The enzyme is also suppose to dissolved dead roots too but guess that root was too weak? Not sure what happened there. But I think the slime is cured!
--- Solution strength went down to 395 PPMs. Decided to add more base nutrients.
--- Added 8ml of Sensi A
--- Added 8ml of Sensi B
--- Added 4ml of B-52
--- Solution strength went up to 598 PPMs.
--- PH was at 6.1
--- As long as the PH is between 5.5 and 6.3, I'm not going to use PH Up or Down. But still will monitor PH levels.
- [1715]: Checked up on her after her nap and shes looking alive but stunted. But no slime!
--- Decided to add some sugars to help maintain the enzymes and beneficial bacteria.
--- Solution strength was at 587 PPMs.
--- PH was at 6.2
--- Added 8ml of Bud Candy
--- Solution strength went up to 671 PPMs.
--- PH also went up to 6.3
--- Lowered water level a bit to hopefully promote more root growth.
--- Top fed for a minute.
--- She is getting bigger, but still looks yellow.
Day 05 - Friday - 08/14/20 - Total Days: 012
-----------------------------------
- [0915]: Leaves look a little burnt on the tips. Still no slime.
--- Going to back off on the PPMs to hopefully fix the nutrient toxicity.
--- Solution strength was at 632 PPMs
--- PH was at 6.3
--- Added/Removed water until PPMs were at 536.
--- PH was still at 6.3
--- Raised water up a bit, then top fed for a minute.
- [2200]: Looking better. Still yellow though.
--- Solution strength: 514 PPMs
--- PH: 6.5
--- Added PH down.
--- New solution strength: 518 PPMs
--- New PH: 5.2
--- PH was kind of high. So decided to PH down. Had to use quite a bit to bring it down. But eventually got it to drop down to 5.3. A little low, but so far, the PH has always gone up so wanted to start it really low.
--- Ran the top feed for a minute to re-saturate the top of the hydroton.
Day 06 - Saturday - 08/15/20 - Total Days: 013
-----------------------------------
- [0830]: She looks stunted. leaves are still yellow.
--- Solution strength: 514 PPMs
--- PH: 5.6
--- Top fed for a minute.
--- Not sure what to do at this point. Going to do another reservoir change soon. Hoping she lives until then.
- [2145]: Looking pretty much the same.
--- A bit of slime has returned. Since I've been diluting the nutrient solution, the enzyme ratio has dropped. So I guess this is expected.
--- Also noticed that slime build up was on the air-stones. Never really checked the stones so not sure how long that has been there. Looks brown too, which can't be good.
--- Going to do an H202 sterilization of the system (minus the net pot) tomorrow so did not add anything.
--- Lowered the water level to below the net pot.
--- Then top fed for a minute.
Day 07 - Sunday - 08/16/20 - Total Days: 014
-----------------------------------
- [0900]: STERILIZATION DAY!
--- Decided to skip today's night cycle for a deep clean.
--- I'm hoping that skipping a night cycle won't be too stressful.
--- Temporarily moved her to a new bucket.
--- Used about a half of gallon of straight distilled water to flush out the net pot.
--- Drained the system and wiped up all the brown sludge. Also removed the air stones and cleaned up all the goo.
--- Filled the system with 2 gallons of distilled water and at least 30ml of food grade hydrogen peroxide (35% strength).
--- Yea its a lot, but since I'm not going to sterilize the system overnight, I went with a really high doseage. Basically I kept adding until I started to see little bubbles start to form.
--- Then I ran the water pump.
- [0915]: Boiled the air stones in tap water for about 10 min. Then reconnected them to the airlines.
--- I let the air stones and hose soak in the sterilization solution for about 5 minutes so the peroxide can absorb into the stones. Then ran the air stone to help mix and agitate the solution.
--- Occasionally, I'd repeat the process of turning the air pump off for a few minutes to let the stones soak.
- [1000]: Covered the top two row of holes of the net pot with some aluminum tape. Hopefully this solves the light leaking in through the hydroton.
- [1200]: Used an old toothbrush and scrubbed the pump clean. Then drained the system.
--- Refilled with more distilled water and peroxide. Again added a lot.
--- Ran system again to sterilize even more.
- [1530]: Drained the system and refilled with distilled water to rinse.
--- Ran the system for a few minutes, then drained and rinsed again.
--- Did this a few more times over about an hour.
- [1630]: Added 4 gallons of fresh distilled water.
--- Added 15ml Sensi Grow A
--- Added 15ml Sensi Grow B
--- Added 12ml of B-52
--- Added 16ml of Voodoo Juice
--- Added 16ml Sensizym
--- Solution strength was at 430 PPMs
--- PH was at 5.6
--- I was going to add Hydroguard, but I think the bottle is expired. Since 2017 or 2018!? I think Hydroguard is good for up to 2 years from the date on the bottle or 6 months after opening. So not going to use from now on. I wonder if this could have contributed to the slime build up.
--- Also removed the CaliMagic and Superthrive too. Going to only use AN products to eliminate the chance of incompatible nutrients.
--- Placed her back in the bucket and top fed for a minute.
--- Here's hoping for the best. Going to let it ride until morning! Please feel better!
[END OF WEEK 02]

Likes
7
Share


@TerpyOG
Follow
This week I did a fair amount of work on my grow.
I did a bit of defoliation and spent some time tying down branches to shape the canopy.
My goal is to get buds growing wall to wall! I can't wait to see the results of my efforts.
Likes
53
Share

@Mrs_Larimar
Follow
2025-03-21
i had a wonderful Time at Spannabis
i met old and new friends
my Girls were "alone at home"
No Problem here- because of the automatic watering system from Autopots
and the control of VPD , light , and heating with the growbase from Growcontrol
Today i installed the Airpump system for the Autopot, and let it run for an hour
the instllation was supereasy and took me 10 minutes
Girls were doubeling in size ( horizontal and vertical, and most of them showing Flowers( Preflowers)
looking fresh and happy- having already
9- fingered Leaves.
xxxxxxxxxxxxxxxxxxxxxxxxxxxxxxxxxxxxxxxxxxxxxxxxxxxxxxxxxxxxxxxxxxxxxxxxxxxxxxxxxxxxxxxxxxxxxxxxxxxxxxxxx
Growing Environment Setup & Specifications
Lighting System
Model: Sanlight EVO 5-150
Quantity: Up to 5 units
Power Output: 320W per unit
Maximum Total Output: 1600W
Environmental Control
Management Unit: Growcontrol Growbase Pro
Humidity Management:
Dedicated Humidifier
Dedicated Dehumidifier
Temperature Control:
Primary: System-controlled
Secondary: Additional Radiator for supplemental heating
Air Management
Air Circulation: 2x Stand Fans
Air Extraction: Exhaust Fan with Filter System
Irrigation System
Primary: Autopot XXL Pot System
Water Storage: Flexi Tank
Root Zone Aeration:
Airdomes
Dedicated Air Pump
Growing Medium
Type: TERRA PRETA MJ-Mix
Nutrients
System: BIOTABS
Method: "Just Add Water" Strategy
Type: Organic-based feeding
BREEDER INFO:
Toffee Pudding Auto is an extremely potent autoflowering strain that delivers high yields and a great potency together with a wonderful taste. We selected from a large number of Anesia Scout Cookies plants for flavor and THC-content and finally crossed the best phenotypes with a selected Banana MAC and only added a hint of Ruderalis genetics in the next breeding steps to maintain the autoflowering properties. Toffee Pudding Auto forms round sparkling buds that have a very high resin production. The buds exude a wonderfully sweet and exotic aroma during the flowering period that will have you already dreaming of the harvest. After the harvest has dried, the rock-hard, glittering nuggets give off an intoxicating smell of caramel and bananas. Her smooth, creamy smoke lingers on the palate long after the exhale, reminiscent of a fresh caramel cookie with a fruity dressing. In addition to its great potency, the strain is characterized by its short cycle time and high yields. With a THC level of 26%, Toffee Pudding Auto is one of the strongest autoflowering strains on the market. This automatic indica-dominant strain produces a full-body high and is the perfect choice for unwinding in the evening or chilling in the sun. The high offers hard-hitting indica effects that can induce some couch-lock, especially in less experienced smokers. With her, you can enjoy a feel-good high for hours. Growing Toffee Pudding Auto Toffee Pudding Auto is very easy to grow making it a good choice for novice growers. But even experienced growers will be amazed by her stable character and huge yields. The journey from germination to harvest takes only 60-65 days and produces exceptionally good results both indoors and outdoors. The plants reach an average height of 80-120 cm and are suitable for a SoG. Toffee Pudding Auto grows perfectly on all substrates, but her enormous terpene profile can best develop in organic cultivation. She offers you everything you would expect from a modern autoflowering strain: strong and healthy growth, high resistance to pests and diseases and of course extremely potent yields of up to 550g per sqm or 230g per plant outdoors. Therapeutic effects Toffee Pudding Auto provides different therapeutic effects which include pain reduction, muscle relaxation, sleep support and also brings positive feelings.


