By continuing to use the website or clicking Accept you consent to our cookies and personal data policy and confirm that you are at least 18 year old. For details please see Privacy Policy and Terms
Accept
Likes
Comments
Share


@Naujas
Follow
Well, that day has come, the girl would have been really different if not for the high temperature, strong light, and a huge lack of potassium :( well, everything will be fine next time :) live and learn :) I am satisfied with the result, which is what I need :) got 200 gr of liquid :) gathered a lot of sugar leaf :) they are already in the sweet shop :D I will make an addition!! good growth and success :)

Likes
32
Share


@LSnake
Follow
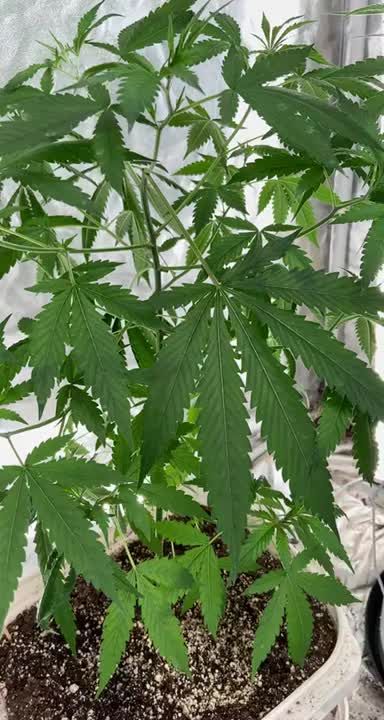
During this first week of vegetative growth, the seedling has slightly stretched more than expected, but this is not a problem since when I transfer it into the larger pot, I will bury the stem. 🌱
I haven't started giving nutrients yet because, as already mentioned, the substrate I use has them for the first few weeks, in fact the leaves seem to me to be a nice bright green. ✔️
I proceeded to mount a small fan on the side of the tent to create recirculation of air and make the stems of the seedlings take some strength. 💨
For now the main tent is occupied by the flowering phase of other plants so for the first few weeks I will leave the seedlings in the closet with smallest led light. 💡
(link below) ⬇️⬇️⬇️
https://www.amazon.it/gp/product/B08P2G1VQW/ref=ppx_yo_dt_b_asin_title_o05_s02?ie=UTF8&th=1

Likes
Comments
Share


@BalconyBoy
Follow
30.06.25 Now it's clear that both plants are in flower mode. The Amnesia is behaving as I wished and developing buds after reaching 1m in hight. The Lemon Kix will remain the short bud on a stick I hoped to avoid by replacing the cream cookies. They received some of the fertilizer Tea their photo companions got, but not much.

Likes
2
Share


@ChiTaN
Follow
The girls are doing great, Wedding Cake seems to be the most mature.Apart from the girl just mentioned, I'm betting the harvest season is about two weeks away.💪


Likes
14
Share


@CannabisCultivate
Follow
Afghan was a beaut and she would have stayed up longer if the rain had let up. The denseness of her buds is what we admire although it is also why she started to rot. The scent of her is strong and mouth watering. Overall we would grow her again outdoors, this was a strange year with the weather and it is unfortunate but we are quite sure every strain would rot just the same. Hopefully next year has a better balance but that is the way it grows outdoors.
As for curing, it was not typical for us at all. First she was washed but Afghan was not trimmed nor was she properly managed, she hung for six days and went in a paper bag for moisture redistribution way to late. Aside from that we had to use a triple beam for an estimated weight and we were unable to get a wet weight so please take the number and outcome lightly. Bone dry does not mean she won’t be enjoyed, she will be made into hash and or edibles.

Likes
6
Share


@russrahl
Follow
Plants are really blowing up! Forgot what day I flipped these girls exactly but I’m guessing there just under 2 weeks into flower now. Cheers 💨

Likes
13
Share


@growlikepros
Follow
This week was the girls last, they were lightly watered with zero nutrients and I carefully monitored humidity levels, insuring a clean finish. Overall I am stoked with the results, the smell is exquisite, sweet and floral, and the buds are fairly dense.

Likes
13
Share

@ILSW_05
Follow
the sweet skunks are doing well
they’ve responded well to the toppings & the clones are rolling strong as well 💪🏼
hoping to get a lot more of these babies going
happy growing friends 🤙🏼

Likes
29
Share


@Damonkey
Follow
Nice to watch growing OS. Kind of slow at first but then really picks up some pace nearing the end. 2 of the plants, the buds I will definitely keep. Really nice fat juicy buds. Smell great and taste great. The high is quite heavy✌️🏻😎✌️🏻And has a rapid onset. Good night-time smoke, if I smoked this during the daytime I’d probably just smoke all day and not move. I’ll press for Rosin in the next few days too , I’ll upload info onto here at a later date.
Again thanks to Barney’s Farm for supply the seeds, you are super generous guys and the rewards of growing are generous too. Thank you thank you thank you. What a great little
string of genes you have to add to your catalog.
I’ll also update a smoke report later when the bud has cured and is ready for real consumption 😍😍😍
Update. The bud really is looking feeling and smelling better every day of the cure, these little nugs gonna be insanely strong. It’s already a knockout smoke, in a month she’ll be rocking 100%
About 25% of the dry bud is awesome quality the rest is still very good

Likes
3
Share


@Willy_Balls
Follow
Some huge colas on two of them. I need to run them again. This strain is a true champion. Yield, looks, resin, terps everything on point. I don’t really mind that she needs some extra time. 9 weeks minimum.
29.09
Cleared runoff.
Full tanks ec 1.6 ph 6.2
Removed one top bud of vf2 and g3 due to botrytis. But addition of particulate filters and uvc lamp seems to have helped a lot. It’s been very humid this time around. Even now in the late stage of flower it’s high 60%


Likes
6
Share


@Magical_Surgeon
Follow
After you found some good sector and clone it you let the mycelium grow and fill almost all the petri dish like I did last week.
So now you're ready to move forward.
Making grain spawn!🍄🍄
For grain you can use Organic Rye Berries, but you can also get away with wheat berries, or brown rice or even corn kernels(which I used myself) !
And you'll need some mason jars or honestly I used some jars that I had home just clean them very well and sterilise before using
Making a grain spawn can be broken down into 6 easy steps.
🍄Hydrate Grain By Soaking
🍄Make Specialized Lids
🍄Simmer, Drain and Dry The Grain
🍄Sterilize
🍄Put your agar in the jar
🍄Colonize
🍄Soak the grain by placing it in a bucket, covering in water, and leaving it for 12 -24 hours. Easy.
🍄Drill 1 hole on top of the lid. Right in the center and cover with a small dab of high temperature silicone sealant, and leave it overnight to dry. And your jars are done. There other diff types for different methods like liquid culture etc. But I'm just going roughly through what Ive done.
🍄The next step is to simmer the grains on the stove. This will thoroughly hydrate the grains, and will soften them to make them easier for the mushroom mycelium to consume.
Cook soaked grain on the stove for about 15 minutes. You don’t want to cook it too long, because eventually all the grain will crack and you’ll get some mushy grain spawn. We don't want that. 🧐After the grains have simmered on a low boil, you’ll need to drain them off. What I did is I drop them in the sink with the drain cover on. The grains will drain over an hour or so, after which you can go ahead and fill your jars.
🍄Once your jars are filled, they need to be sterilised.This kills off all the other nasty contaminants in the grain cover the lids in tinfoil (to prevent water dripping into the lid) and then just pressure sterilise them for about 90 minutes at 15 psi.
🍄After that let them cool down. Get your SAB, wipe down the walls with some alcohol wipes and place the jars inside. And wait untill they will be warm to the touch... not hot and painful 😤patience is key. Bring in your plates that had been stored by you in a dark place. And what u have to do is sterilise your scalpel and just accurately and efficiently decide your mycelium into about 10 pieces and quickly place them in your jar. And complete for every jar u make. You have to be very quick. The more you keep you're jar and your agar plates lids open the more cans they will get contaminated. There certain technics you can see online..
🍄Ones you're done close all your jars lids tight and Jake your jar so the mycelium pieces will mix around the jar and place them in the dark place to colonize. And just keep waiting... 😅 Untill the mycelium will conquer your grain. Keep your eyes on the jars, any weird smells or colour during the waiting time.. because that would mean you got a contamination going on. Oh yeah and when about 55% of your jar is filled with mycilium shake the sh*t out of it so it will break the mycilium inside and make spread more faster.
Likes
14
Share


@MasterKush714
Follow
Yoooo!!! What's brackin fam!!! Update!!!
Soo! She stretched almost an inch in 6 days maybe more it's truly amazing and this cropsalt stuff is no joke I'll literally challenge anyone to use it by direction and not see why it's the best!!! PERIOD!!
other then that she is drinking alot more and eating steadily more as well, I am going to cut clones by this week or next and then start that GD foenthe large tent, this girl is fairing really well considering the home conditions I have with her but otherwise she has been absolutely a breeze to grow!!! Thanks for stopping by will update as this week goes on thanks!!!

Likes
31
Share


@Canna96
Follow
Hey now, hope everyone is having a great weekend! The Strawberry Banana Auto from Fastbuds is starting to smell very good and starting to stack up nicely. She is only 26 inches tall but I feel like her colas are going to be quite thick. I did a light defoliation this morning and took off all the LST tie downs. She is looking super healthy and loving this Medic Grow Spectrum X.
I currently have the Spectrum X running at 100% power and also integrating the UV/IR bars for 75 minutes just prior to lights off. I am super happy with this light so far, she puts out impressive PAR, and runs fairly cool. The only thing I would change is to add a timer just for the UV/IR bars, and allow the main light to be run on a timer.
I will probably do one last light defoliation in the next couple of days and that will be about it other than keeping the reservoir full and in the correct PH range. The tomatoes outside are absolutely loving the runoff from these autos, as that is all they have had to drink since they were about 3 weeks old.
Thanks for stopping by, Stay Safe and Blaze On!!! 💪
Website: https://medicgrow.com/
https://growdiaries.woodroom.tel/grower/medicgrowled

Likes
226
Share


@HighTV
Follow
| 📅 Week 2 | Days 8 - 14
| 💡 562w 📏38' |
| 🌡️️🌞 81 - 84 |
| 🌡️️🌑 77 - 80 |
11/16 Reservoir swap with a fresh batch of nutrients with Hydro-guard+Cali-mag PH'ed at 5.7. Raised the wattage to 562w and the light by a few inches.
11/17 PHed reservoir water to 5.8 PH and readjusted the air-tubes to make access easier.
11/18 Water added and PHed at 5.6. More Hydro-ton was added to the net-pots of plants that are ready.
11/19 Reservoir PHed at 5.8 for each plant. The temperatures are a little high from the wattage increase in the light so I raised the light more to reduce it.
11/20 Plants are looking healthy! Reservoirs PHed to 5.6 and water was added. Back right plant has genetic instability's but we're going to give her a chance for science.
11/21 PHed the water targeting 5.9. Started pulling the intake to reduce temperatures outside as the weather gets colder outside.
11/22 Added water the reservoir and PH adjusted to 5.8. Added the upper fans to the tent for increased air circulation.
Overall this week was fantastic and I'm looking forward to the lapse going on from here! The plants are healthy despite one plant showing genetic issues the rest are looking great so far. The growth this week was explosive and I suspect this next week is going to be just as so. Hopefully I will find a solution to the lines in the time-lapse caused by increasing the wattage such as a lens or something.
Please feel free to leave any questions below 😎
Likes
9
Share


@Cultivators_Dream
Follow
2/20 Day 38: Well guys shes definitely growing like a bush really rounded and growing really slow but good. Her color is awesome and she is already smelling a bit 😍. I truly love Gelato so I'm stoked to try this lady out and am excited to see how she looks. 🔥 Thinking I'm gonna veg her for another 4 weeks then flip her but will be playing by 👂. Stay lit folks and come back for more updates
Likes
22
Share


@TightNugs
Follow
Lovely colours coming and packing on the weight.
17 days since first pistils,flowering fast.
No issues so far 🤞🍁
Processing
Likes
5
Share


@Sugahmama
Follow
Thanks for all the Help and experience you growers share with us 🤝
It is a big help for me!!
Never thought growing your own medicine will be that hard cause you never know how the plant will act. But Overall I love it!
Hope you guys enjoy my first Rollercoaster ride with this Grow!
Happy Grow to you all!
Switched to a 250W HID for constant temperature.
Likes
12
Share


@Kakui
Follow
Por lejos este ha sido mi mejor cultivo hasta ahora, han sido los cogollos más grandes, densos y llenos de tricomas que he cultivado, comparado con el cultivo anterior en el que usé el mismo tipo de planta, está vez fue muy superior. Los motivos de la mejora pueden ser varios, incluidos más luz, ya que en el cultivo anterior solo tuve 480w, ahora fueron 720w, también usé tutores y palitos de madera para crear una estructura firme en algunas plantas, y fueron estás mismas las que tuvieron los cogollos más grandes, así que lo usaré en todas las plantas del siguiente cultivo. Además el tiempo de cultivo se redujo de 4 meses a 3 meses y medio, aprox. Ahora solo queda esperar unas 2 semanas para el secado y ver cuánto fue la cosecha total en gramos secos, la anterior fue de 635 gramos secos, está yo creo que por lo menos rondará los 700 gramos secos, incluso puede que me sorprenda y sea mucho más.


Likes
33
Share


@Caukygrow
Follow
I harvested 226 grams of dried and trimmed bud plus a bunch of trim and popcorn buds that I didn’t weigh. Definitely had it's ups and downs with my pet rabbit eating one of my plants in the first few weeks :( One of my girls also didn't make it to the end, I must of overfed her at one point and the stress was too much. This amount of buds though will keep me and my friends happy for a long time though!
Thank you to all those that helped with making my first grow a success!
I certainly learned a lot & can't wait to do it all again - for now I've been enjoying smoking the buds and making edibles :D
It took me a few hours to trim all the buds. I didn't measure the wet weight of the plant as I hung the whole thing up to dry as soon as the lights came off. The roots were plentiful and healthy. Even my girlfriend tried smoking with me for the first time ever and she loved it!!!