By continuing to use the website or clicking Accept you consent to our cookies and personal data policy and confirm that you are at least 18 year old. For details please see Privacy Policy and Terms
Accept
Likes
Comments
Share


@SackShopG
Follow
I did a 5 day flush and 5 days of 24 hour light before harvest. Dried for 16 days with 60% humidity

Likes
25
Share


@XperencdGmanXG
Follow
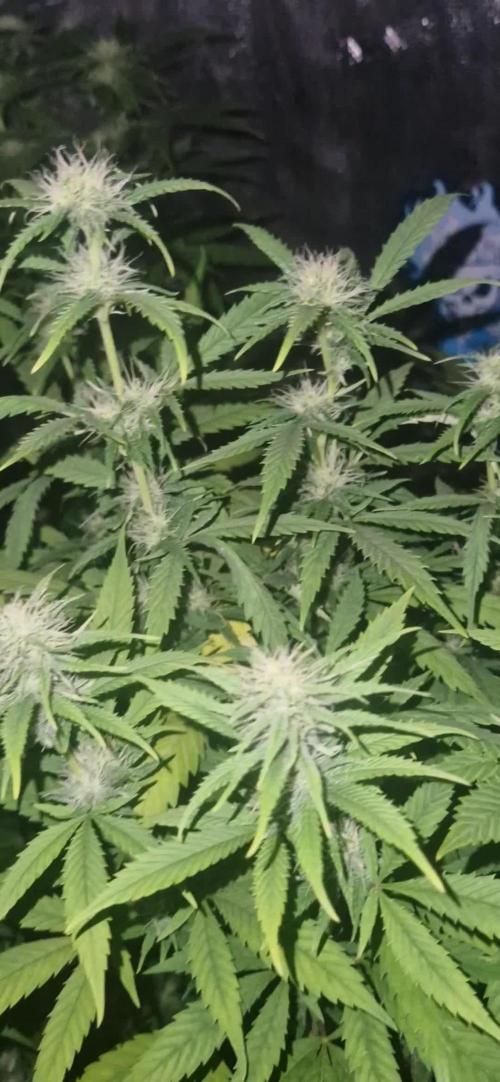
Major issues with calcium def for no reason and a weird re veg, and the utter lack of mould resistance. Plant was tall and buds are huge and dense, let's hope the taste is phenomenal.

Likes
22
Share


@BruWeed
Follow
☘️29/12 - empieza su octava semana en Etapa de Floración.
☘️Por el momento se encuentra bien, los cogollos engordaron un poco más.
☘️La semana que viene le voy agregar Top Wash asi empiezo con su lavado de raiz.
☘️En dos o tres semanas ya la voy a podar.
☘️En estos dias seguire subiendo mas imágenes.

Likes
5
Share


@Bluethum94
Follow
Slow week not much going on made a tea at the end of the week using root organic player pack looking forward to seeing how they react to it
Likes
38
Share


@Cariboo_OG
Follow
Utopia Haze is a rare heavily sativa dominant hybrid (90% sativa/10% indica) strain created through back crossing Brazilian Sativa strains. This tasty little bud took home 1st Place for Best Sativa in the 2008 High Times’ Cannabis Cup and for good reason – with its potent 18-22% average THC level and long lasting cerebral effects, Utopia Haze is one powerhouse smoke. The Utopia Haze high comes on soon after you finish your first toke, hitting you with a strong cerebral lift that infuses you with a sense of hazy relaxation.
Type: Feminised/Photoperiod
Cultivation: Indoor/Outdoor
Flowering Time (days): 70-75
Indoor Yield (g): Up to 650
Feminised Outdoor Harvest Month: October
Feminised Outdoor Harvest Month Week: 3rd-4th week
Aroma: Citrus, Woody, Pungent, Mint
Effect: Cerebral Lift, Hazy Relaxation, Sleepy
Welcome Everyone to the Final Entry of my Utopia Haze Grow !
There is so much to discuss ! I have been extremely busy as of late trying to get this Harvest together, but i am happy to have it here for you now !
I Seriously under estimated the amount of time, help from others, and my own necessary skills to pull this off.. and i still kind of screwed it up lol !
But its worth noting i have never actually done this before and trying to document it during....was extremely hard.
It is next to impossible to work an iPhone with rubber gloves on !
First I want to discuss everything step by step so before you jump straight into the comments on how the end product is so small in "quantity"
Rest assured i am happy with its"quality"...and thats all that matters to me because Life is a journey not a destination! and i have learned so much from this grow that I couldn't be any happy even if i messed some things up :)
But at the very least I hope you read through this entry in its entirety with an open mind and focus more on the process, rather than just the outcome!
I ran out of Ice & i was only able to wash three times..(normally I've heard you should go sometimes 5-6 washes)
Preparation is Key & things will be much better next round :)
Photos 1-22
These are pretty self explanatory but for those of you just tuning in now.. this is what happens to a very happy plant when you don't have the necessary tools to monitor key components of growing cannabis.. Ph, as well as EC levels play a very key role in the outcome of your grow lol that being said I was just able to save this plant by purchasing both tools but that doesn't mean the plant didn't suffer because of the prior events.. This was a Huge reason behind me choosing to turn this harvest into what i would consider
"Solventless Hash Rosin" from "Ice water extracted Bubble hash".
Pictures 23
The idea here is the process of using "fresh Frozen Cannabis" this has been discussed many a time online on such sites as instagram and here on grow diaries as well.. I personally have Never tried the process so i decided to try it out and make a judgement for myself..
Video 24
The Cannabis has now been in the freezer for 72 hours making it very well frozen.. as you can tell i struggled getting it all into the 25u Screen Wash Bag. One thing of note i would do differently is i will de-stem my next batch as i also believe this played a part in the amount of plant matter that escaped through the sieves.
Photo/Video's 25-28
The idea here is "ice water Seiving" & especially with the bags that I am using here that are only have screen material on the bottom portion of the bag it is very important to have spaces in-between the screens to allow the water to pass directly through the screens into the bottom bucket with the least amount of resistance.. because the hash is so extremely temperature dependant if it gets warm on the side of the bag.. it will stick there and not make it to the bottom to become use able product..
29
You do not need to use as much Ice as i used here lol... the idea is to keep everything very cold..i certainly achieved that but at the sacrifice of using so much that i ended up grinding product and producing "contaminants" but in the end they are just plant matter that i would be smoking when i rolled up my joint either way so.. I'm not super disappointed..
But it should be noted that what you want to achieve here is a Layering effect where you have the wash bag between two small layers of ice while the "water current" washes the Trichomes away allowing them to be separated by the screens setup below :)
Before Starting the machine you should allow some time (i.e.;10-12minutes pre soak to allow the product to become saturated) before the first cycle.
By video 32 I have just ran out of ice lol..
Video 33-34
Here I have a tip for you.. to separate the screens that you sieve through.. cut 5 gallon buckets to stretch them across nice and tight.. it'll make scooping your Bubble that much easier ! i learned this from the many "Frenchy" videos I have watched :)
Picture 35
Here in lays the problem for most people.. drying your hash without loosing vast amounts of "Terpenes" whilst also stay ever vigilant against mold !
Thanks to all those videos I've watched on youtube.. id like to think this was one of my most successful parts of this process..
Things to Note; Terpenes start to seriously evaporate at temperatures 68F or 20C
you need to stay as cold as possible whilst bringing the Relative Humidity in the space down into the 40-30% to stay away from that nasty mold !
I used my cold storage room in the basement.. with a dehumidifier running to keep the space at 45% RH & staying at a constant 15c.
All while spreading the hash as thin as possible across parchment paper, on top of the white screens with a fan moving air across both sides of the paper.
Pictures 36-38
These are some macros i took in the middle of my drying session I fell in love with the colour.
Yes i know the black spots are plant material but they will get caught when i bag the hash & squish the oil out.
Thing to Note; at this stage it is important to ensure you 'micro plane" the hash down as fine as you can whilst staying weary of the temperature... any "chunks" will hold pockets of moisture.. that lead to potential problems..ie; mold ...
Picture/Video 39-41
Successfully planed bubble hash ready to be bagged and Squished !
Picture 42
Ive decided to follow Pedro.. from Pedros Grow Room and double bag to be on the safe side so i don't have any blow outs.
So thats One 25u bag inside one 160u bag ! :)
Pictures 43
This is almost 3 grams of the bubble hash from above, already melting in the bag.. this is where i ran into trouble again lol things started getting to warm in the house and i was only able to get one of the three squish's i did on video :( things started getting sticky.
Picture 44
This is basically just a photo of the equipment I'm using; 3x5 LowTemp Cage in the frame I built myself, with a 20Ton bottle jack.
Something to note here is this is an older Lowtemp model with only a single heating zone which is which i have it closed here heating Both sides of the press :)
As well as the importance of having adequate pressure on your plates.. my rig is very overkill for the size of hash bags..lol
Video 45
Here is the lovely press video.. its didn't quite work the way i wanted either lol my directional folding wasn't quite tight enough for a big "drip" :)
&the Press was set to 65°c
Photo's 46-50 are pretty self explanatory :) I had a blow out.. but still managed to pull an 80% return from the hash once squished...& yes it tasted amazing :)
Was it worth it in the end... that could be debated.. for some..i understand..its not your thing, but for those of us that are interested in making our own concentrates.. free from Solvents...
I wouldn't make it any other way :)
If even ONE of you reading this diary finds it helpful to reference for ANYTHING.....even if its "what not to do" ill consider it a success !
Thanks again for tagging along on this garden adventure.. its been one heck of a journey !
Much Love from B.C. Canada,
Until Next time,
Cariboo

Likes
19
Share


@Smokwiri
Follow
Welcome to the 5th week of my mutilated magic mango
When i dropped one of my diy led's on the center of the plant, it looked like i was going to top it, it was nearly topped and the recovery from it took very much time.
The amount of flowers is very low, but trichomes all over the place
besides that i can feel the breath of the cops in my neck
So i decided to cut a bud in advance, when i get caught i already have tasted what i have grown
Only watering this week, leaves look very healthy, but a little bit dark to me, plant is happy though, leaves are upwards all the time.
I forgot to mention, this autoflower gets 12 hours of light with white light, with a couple of other photoperiod plants, after those 12 hours i put it under smaller blurple light, it's a 12V 50W COB, driven at 25 watt for extra lighting, the last 2 weeks i have been doing this, untill i see it's nearly time to finish, then back to 12/12.
The smell at week 3 of bloom was very fruity, it had the same smell as a good green mango, no difference.
But since she matured, the smell changed to the "trichome"smell, same smell like any other "white weed"
It has a kind of dark but light skunky smell too, which easily can be grown without filter if you don't grow many.
Likes
32
Share


@GrowingTime
Follow
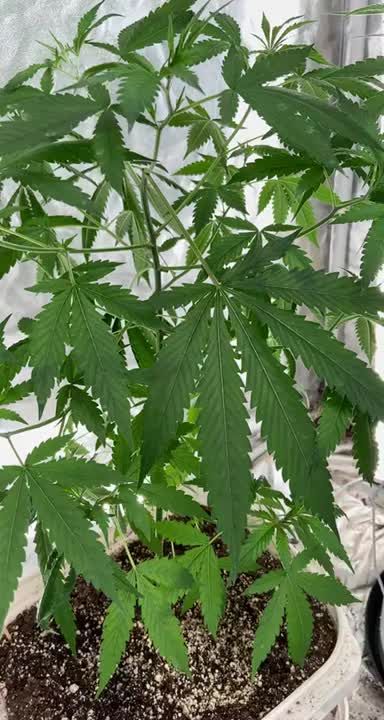
here we are guys in the middle of week 8.
the grow has been pretty good lately, just messed up some refilling but corrected immediately.
as you can see from the pictures i did some mild defoliation to expose the lower buds.
what do you guys think?
to be honest I am pretty proud of the grow the girl looks beautiful.
I am thinking about getting a 600w led and probably a bigger tent (100x100x200, 3"x3"x6")
as always guys, advices are always welcomed
keep growing 👍

Likes
Comments
Share

@Olduffybastard88
Follow
Little video showing you around the garden at the start you can see the flowering phenos at the end youll see my vegging phenos waiting in line for space in thr flower tent


Likes
7
Share


@Organic_LarF
Follow
High GD community,
Week 8
She aint big, but its all bud.
Im very pleasantly surprised by the outcome of this lady.
She does have almost the same size of top cola as her bigger sissters in the tent.
Thats it for the week,
Grow safe buds
🙏🍀🍀🍀🙏

Likes
13
Share

@ILSW_05
Follow
the sweet skunks are doing well
they’ve responded well to the toppings & the clones are rolling strong as well 💪🏼
hoping to get a lot more of these babies going
happy growing friends 🤙🏼

Likes
37
Share


@GreenHouseLab
Follow
This one is a wrap… Hang Dry for as long as possible and well be testing later 🚀🚀🚀
GHL
Likes
12
Share


Likes
112
Share


@Dunk_Junk
Follow
Week 10 done and dusted!!!
She is as monsterous as ever 😂
Flowering going well! She is drinking an absurd amount! Probably 3 litres a day easy.
I look forward to harvesting her tent-mates in the coming weeks so she can be spread out a bit better.
I am pretty sure if she was grown alone, she would have filled up the entire tent. She is a prodigious grower!!
Likes
56
Share


@Master_weeda
Follow
Bonjour à tous les padawans et maîtres jedis
Jour77 arrosage avec 2 litres d'eau ph6.3
Day80 j'ajoute en griffant la terre 3 grammes de feeding biobloom et arrosage avec 2 litres d'eau ph6.3
Ce sera mon dernier engraissage je commence mon rinçage la semaine prochaine
Jour82 arrosage avec 3 litres d'eau ph6.3

Likes
17
Share


Likes
21
Share


@MaryJaneUSA
Follow
7/31/20 Noticeable growth this week and she started to turn pale, so I had to increase my nutrients to 600 PPM. I’ve also trimmed the fan leaves and started to LST. She is definitely showing some Sativa genes. Otherwise, nothing major to report. I plant to transplant her sometime this week to a 3 gallon-ish pot.

Likes
44
Share


@Roberts
Follow
I am dropping a Casey's Rollex OG by DutchFem Seeds. I lightly scuffed the ends, and dropped it in water. I covered her, and i will plant her in 24 to 48 hours, or as soon as I see a tap root start. Nothing else to report. Thank you DutchFem, and Spider Farmer. 🤜🏻🤛🏻🌱🌱🌱
Update: first seed was a dud, second has been started.
Thank you grow diaries community for the 👇likes👇, follows, comments, and subscriptions on my YouTube channel👇. ❄️🌱🍻
Happy Growing 🌱🌱🌱
https://youtube.com/channel/UCAhN7yRzWLpcaRHhMIQ7X4g


Likes
5
Share


@skaf420
Follow
small side project: Rebegging some branches to preserve this pheno for the future. Hopefully they will root soon.