By continuing to use the website or clicking Accept you consent to our cookies and personal data policy and confirm that you are at least 18 year old. For details please see Privacy Policy and Terms
Accept
Likes
Comments
Share


@Regenwurm
Follow
Die 11 Blütewoche ist erfolgreich abgeschlossen!
Tage der Wachstumsphase = 32 Tage.
Tage der Blütephase = 77 Tage
Wachstum h in Blütewoche 9= 0 cm
Blütenbildung: sehr Hoch
Die Blütenkelche sind Mitten in der Produktion
Der Wasserbedarf der Pflanze reduziert sich.
Diese Woche 5 Tage von 7 gegossen
Mutation 1= strähnige Blüten (wie bei der Dr. Greenspoon öfter mal vorkommt)
Mutation 2 = Gigantismus (doppelt so viele DNA Ketten wie regulär)
Mutation 3 = Sekundäre Blüten an Blättern
2 mal in dieser Woche mit Purolyt Mischung 1:25 besprüht
Lichtstärke: 87 %
Lichtabstand: 36 cm
Std Tag/Nacht: 12/12
Temperatur Tag: 25-26,5 Grad
RLF Tag: 50-55%
Temperatur Nacht: 20-21 grad
RLF Nacht: 45-50 %
VPD Wert: ca. 1.15
PH Wert Wasser/Düngelösung: 6,3
EC Wert: 1,2
Ventilator Oszillation: Stufe 2
Befeuchter: aus
Entfeuchter: mit Steuerung an
Zusätzlicher Entfeuchter: 1 Stk außerhalb vom Zelt im Raum
Bewässerung: 2* Wasser PH 6,6 EC 0,1/ 3 * bewässert mit Dünger mit den o.g. Mengen
Purolyt Besprühung: 2 mal
Controlling: Grow Control
Dünger: Greenbuzz Nutrients
Licht: Pro Emit Vollspektrum
Abluft: EC Carbon Active 750 m3 gesteuert/PrimaKlima 480m3
https://greenbuzznutrients.com/de/
Danke an Greenbuzz
Ihr bekommt 25 % Rabatt bei der Nutzung des Codes auf der GB Homepage
https://greenbuzzliquids.com/de/shop/
Code: GD42025
(Mindestbestellwert 75€)

Likes
15
Share


@Medup75
Follow
Learnt some hard lessons this round! Next time I'm adding dolomitic lime to buffer soil aswell as always pHing from now on! Other than the lockout mid flower and slightly smaller buds as a result I'm happy with my first attempt at a actual tent grow. The buds look dense and frosty and under a scope a few are starting to turn cloudy. Next round is gonna be only three as I'm not comfortable with it being so cramped! I reckon I'll let her go another week with feed the I'll do a two week water only flush!
Happy growing to all ✌️


Likes
11
Share


Likes
15
Share


@Huckleberry39
Follow
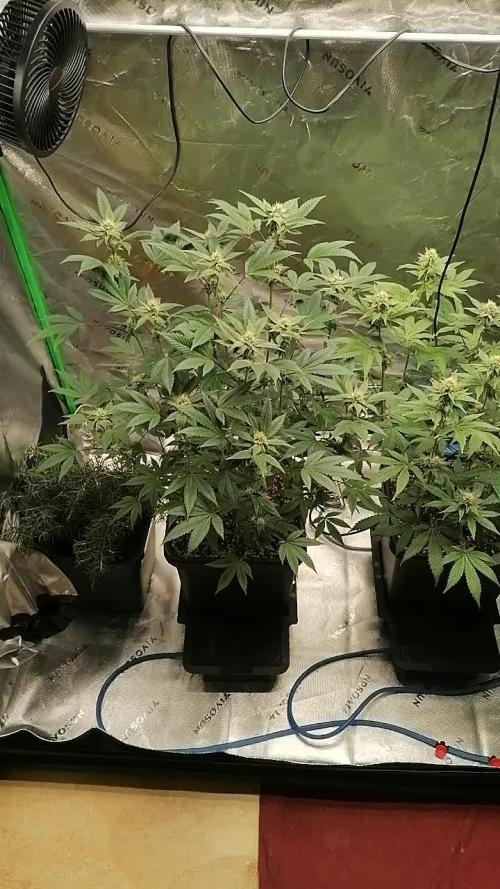
This is the start of week 9 and she is doing GREAT!! Pistols are turning nice and pretty 😍! Buds are fattening nicely, and the thing im most proud of, no sighs of defiency!! She is a very good plant to grow. And is going to give me some very nice smoke!!

Likes
7
Share


@CreatureCreator
Follow
Just getting started on the right foot. Coco and bags sterilized and flushed thoroughly with 0.7EC at 6.0pH solution. Will transplant tomorrow once the coco drains down a bit. Plants look great and excited to push down the accelerator.
4/2 - transplanted into 3 gal and watered in.
4/4 - Reservoir cleaned, sanitized, and online. Switched to tap water (0.3EC) and nutes at 0.8EC for total of 1.1. Ph 5.9. New feed pump installed (no more getting electrocuted when I put my hand in the bucket. YAY!) and 5" watering rings installed. PPFD 550.
4/5 - really quite chuffed. PPFD to 600 and they are looking great. Moved Zoey up 2" to match canopy height.
4/6 - switched Silica Boost to foliar spray at rate of 40ml / gal in RO water, pH to 5.8
Likes
101
Share


@Ferenc
Follow
Day 58, 11th of November 2020:
I set the lamp 15 minutes shorter to switch off earlier so they receive 11:45 of darkness. I would like to imitate the nature when longer nights come with time till the 4th week (when they will receive 13 hours darkness a day 15 minutes minus 4 times = 1hour) so every week 15 min longer darkness for 4 weeks and then back to 12/12 to have bigger buds from the 4th week....
Wao. Well, all good hopefully they will stop growing soon but the strech is not that much thanks for the trainings such as topping and LST....
Pistils are started appearing so they she the sex I think one more week to go and they will settle down concentrating on bud development.
What to say every 2nd day is fertilization with the mix and ratio above now we are waiting.
Anything else? Well just look atbthe pictures and decide what you think. I am pretty sure they look cool LOL.
This Gleato Zamnesia is very promising I really like the smell already she is nice but all of them I mean I am in love with all so. Kalinia Asia is nice and I am so excited for the Sweed Seeds ones the red girls OMG :)

Likes
8
Share

@Brujha77
Follow
Start Woche 5 Blüte.
Scheint ja doch noch etwas dabei rauszukommen nach dem Stress am Anfang.
Hatte echt die Befürchtung das die evtl. Zwittern nach dem hin und her👍

Likes
19
Share


@AutoDevilHQ
Follow
Another Defoliation at the end of stretch this week for the Northern and she's now in full bud mode at end of Week 8.
3-4 left I think before the chop and she's just a happy monster.
Buds forming nicely on't Chemdawg despite a bit of Nutrient Burn on some of the leaves. Skipped a feed last week and replaced with Molasses only just to help her fight off the excess
2nd Chemdawg looks like she will bud from head to toe a fairly straight forward week for all the girls but started to stink and show their flowers nicely.
Head over to www.autobeastmethods.com to find out how you can learn to Maximise your Autoflower. Head to the Forum and say Dr AutoDevil sent you.
Happy Growing Gang
Everyday Growing is a Day Learning
💚😈
www.instagram.com/AutoBeastMethods
Videos of the tent available on my IGTV just too big to upload here they keep crashing.
Likes
3
Share


@Indiemay23
Follow
Tag 15
Mädels gehen in dieWachstumsphase
0,5l Wasser mit einem ph wert von 6,0
Licht bei 45cm Abstand mit 60% veg mod
Automaticflow macht als Substrat Dünger bis jetzt einen guten Eindruck.
Tag 18
Jetzt gehen sie in die Stretch und Wachstums Zeit, meine Lieblingszeit!
Da ich diesen Dünger ( Automaticflow Hybrid Substrat) zum ersten Mal benutze, bin ich gespannt wie er performen wird .
Licht ist jetzt auf max. ( 65w veg mod ) mit 60cm Abstand
Wasser alle 3 Tage 0,5l, ph 6,0

Likes
13
Share


@Janerussel
Follow
The girl suffered from nutrient defiency but now it should be ok.
Flowering week 7 started 12.5.23=>

Likes
23
Share


@nonick123
Follow
Día 34 (27/05) Riego con 750 ml H2O + Regulator 0,15 ml/l + P-Boost 0,5 ml/l + CaMg-Boost 0,25 ml/l + TopBooster 0,2 ml/l - pH 6.2
Día 35 (28/05) Riego 750 ml sólo H2O pH 6.2
Día 36 (29/05) Riego con 750 ml H2O + Regulator 0,15 ml/l + P-Boost 0,5 ml/l + TopBooster 0,2 ml/l - pH 6.2
Día 37 (30/05) Riego 750 ml sólo H2O pH 6.2
Día 38 (31/05) Riego con 750 ml H2O + Regulator 0,15 ml/l + P-Boost 0,5 ml/l + CaMg-Boost 0,25 ml/I +TopBooster 0,2 ml/l - pH 6.2
Día 39 (01/06) Riego 750 ml sólo H2O pH 6.2
Día 40 (02/06) Riego con 750 ml de Té de Compost de Floración
💦Nutrients by Aptus Holland - www.aptus-holland.com
🌱Substrate PRO-MIX HP BACILLUS + MYCORRHIZAE - www.pthorticulture.com/en/products/pro-mix-hp-biostimulant-plus-mycorrhizae

Likes
26
Share


@Susquihanna
Follow
FBA 2025 turned Frostbanger was a fun grow in many ways. First, my friend gifted me the seed and I grew outside while she grew inside. It was fun to watch the plants grow in different settings and different growing methods. If you have been following me, then you know our weather has been crazy here. We have had lows of 50* and highs of 90*. We had a hail storm and lots and lots of rain. Today, I was. forced to take my Frostbanger down. I found a couple of buds rotting and it is supposed to rain for the next 4 days, so this grow has come to an end. But first, true to Frostbanger's description, "Just keep in mind, this strain’s dank, pungent odor is super strong—meaning a carbon filter is a must to mask the aroma in any grow room and she’ll make her presence known when grown outside" and boy did my backyard smell.
Also, just like its name, it is a "trichome-studded beauty." Sticky, sticky, sticky. It also had a nice fruity smell, almost like a cantaloup.
I like to wet trim, so I spent the past 2 days trimming. My wet bud weight is 102.19 ounces. Not A big harvest. Had to throw away some bud rot and I had to take this plant down early --But that is how a hail storm, cold weather, hot weather, Rain and more rain will effect a harvest. I'm happy to be somewhat successful.
FYI: today's weather: It has rained 2.05 inches in the past 24 hours and expecting 1.6 inches in the next 24 hours..
I am pretty proud of Frostbanger's cola as it is 10 inches long and approximately 9 inches around. Wish I could have seen it with 2 more weeks of growth.
I may not have the growing experience of others, but I am super happy with this grow and glad I could enter a contest. It was fun!


Likes
9
Share


@Nachtjasmin
Follow
Ein paar Blätter abgezwickt, die die falschen Stellen beschattet haben. Ansonsten nur gegossen und Erdhaken neu ausgerichtet.
22.11. Die Stigmen werden jetzt immer mehr.
Likes
77
Share


@Ukfarmer420
Follow
Hi guys I hope your all good,
So its been a mad week! Had to have a switch around.
So the mimosa sherberts have been a nightmare but I think I got them back on track, there a good few weeks behind now.
Gelato cakes are doing brilliant! Frosting up lovely and smell amazing, I reckon 4 weeks max left on these 2 autos, then its waiting on the sherbert mimosa to show me some nice buds.
I have 1 blue cheese fem and 2 x dark phoenix vegging in there now. I will repot them when the autos are all done and finished.
Happy growing guys 👌💪💚
Hi guys I just got around to defoliating and tieing back down the sherbert mimosas, its looking like each node is a 40cm long main, I cant wait for these to start producing now.
Happy growing guys.

Likes
27
Share


@RDWCGrowing
Follow
1/20/2023- So much to do pre grow and over the next 16 days, absolute first order of business is that I have to take down my current Grow---TIMBER-- Then I have a list of things I have to get done in order to be ready to start this grow 1 Feb.
With that said
T - 2 days until start 48 hour Flush
T - 2 days until Start 48 hours of Light
T - 4 days until TIMBER!!!
Items that need to be done before 1 Feb 2023
1. I need to clean the tent out
2. I need to clean the equipment- Proper Sanitization between grows in Hydro is a must!!!
3. I need to get the hole in the ceiling above my tent repaired- For my last grow I had a deep sink installed in my grow room, to make Hydroponics a little bit easier and have a water source in the same room. The seals on the pipes they were installing broke and leaked through the ceiling causing some damage all the way across my grow room, I was already weeks into my grow and couldn't risk them working above my tent and it would have been very awkward positon for them to be working in as well, so have to get this done quickly between chop and germination.
4. I have to install my new light- I was using a Vivosun 4000 and for this grow I am switching up to a Spider-farmer SF 7000.
1/20/23- For this upcoming grow I am working with M/F photo seeds so I ordered 4 Sex determination kits. I recieved my my 4 Sex determination testing kits from Rimrock Analytics today. I will be using these to test my plants at week 2 of Veg so that when/if I take clones I know I am taking them off females. As well as I don't want to accidently pollinate my tent during this grow I am looking for big beautiful buds not seeded buds. :-)
1/24/2023- Harvest of current grow- Started at 2:00pm and finshed wet trim and firt batch into the freeze dryer.
1/25/2023- Next batch into the freeze dryer and cleaning all my equipment for this Grow.
T-1 Day until the workers are supposed to be here to fix the hole in the Grow Room.
T-3 days until I instll my new Gorilla Grow Tent and my New Light Spider Farmer SE-7000 for this grow.
T-7 Days until Start of Germination
1/26/2023- Harvest is done ran through the Freeze dryer and dry tim completed.
1/27/2023- Grow Room repairs completed. Hole is gone Letting the paint dry before I install the new tent.
T-2 days until Install the New Gorilla Grow tent and the new Light
T-3 days until I put the hydro equipment in the new tent
T-5 days until Germination
1/29/2023- Day 0- Final Pre Germination activities
Germination Start T-3 days
The paint on the ceiling was dry and it was time to finish prepping for Germination. I got the following items knocked off my list.
New 4X4 Gorilla Grow Tent is up and ready
New Spider Farmer SE-7000 Light is installed- Thanks Moony Grows for the suggestion and for the Code that got me some money off and free shipping (Moonygrows)!! I turned the lights all the way up to max and set the timer to 18/6 0600-0000. I will keep an eye on the temperature and humidity without my plants and see how hot it gets with the new light.
I put my Hydro system back together and put in 40 gallons of water into it, time to monitor for leaks the next few days.
I Setup my cloning machine for Germination Days 3-11
1/30/2023
let me break down the situation, ROOM in the TENT.. Enough said.. No really I tried putting my exhaust system up in the new tent with my new light, The light is so big corner to corner that it really didn't give me enough room for the lights be be raised, with the exahust hanging the buckets my plants are Starting in are 2 and 1/2 feet off the ground, great for plenty of room for roots but not so great for upwards space for the plant to grow. In a 6' 11 tent with the exauhst in side and hanging that only gave me a little over 4 feet of grow room to play with. My last grow if you saw my diary, anyone could tell I was struggling to keep the buds off the lights. No good, Since space was such an issue I was running my carbon filter inside on the ground but It really needed to be up sucking the heat out not shooting the cool out. With that setup I was sucking air through the filter and pushing it out the tent at a bottom exhaust hole cold out. Wasn't doing me any good for my heat. I was hitting temps of up to 85 degrees. I bought a portable AC unit and have been running it in the grow room to try and keep temps below 85 and I have had to lower the power on my lights during grow also not ideal.. With that said a friend of mine MoonyGrows (Check out his diary) took the time to look at my issue send me a picture of my grow tent setup with detailed instructions on how to suck the air out from the top but putting my filter and fan on top of my tent so no room issue and I am sucking the air out from the top where the heat is instead of pushing the air out from the bottom where the cool is... THANK YOU MoonyGrows For taking the time to help me get this straightened out.. Now I have room and I have the exhausts working right and now my temps with everything at 100% are topping out at 80 this dropped the temp by 5 + degrees at 100% max.
T-2 days until Start of Germination
Prepped my seed tray with humidity dome
Prepped my Rapid Rooter plugs. I Used RO water, and I added a few drops of Hydrogen peroxide to Oxygenate the water. I then PH balanced between 5.7-6.0 the same that they will be getting in the Cloning Machine and when they get to thier final grow pod. I perfere the 5.8x range and I hit 5.84 for these rapid rooters. If you want to see a complete video on the process HowWeedGrow has an amzing video that shows step by step how to do it and explains it better than I ever could including how to plant the seeds. Which I will cover when I get to that step on Wed. https://www.howweedgrow.com/how-germinate-weed-seeds-cannabis-rapid-rooters/
1/31/2023
T-1 day until Germination Start
All set and ready have my Rapid Rooter plugs ready to go have my seeds out.. Have my seed tray warming up tonight. Tomorrow morning right into the Rapid Rooter then strait into the tray. I will spray the dome to start the humidity in there.
2/1/2023
Germination Day!!
Let the games begin!
0600am Put the seeds into the Root Riots. And then put the seeded Root Riots into their first home the Seed tray. I have them under the light 24/7. Sprayed the dome
7:30pm Sprayed the Dome to keep humidity going on the dome.
2/2/2023
Day 1 of Germination
Sprayed the Dome in the morning
Sprayed the Dome in the evening
2/3/2023
Day 2 of Germination
Roots are starting to come out the bottom of the root riot plugs and the heads are slowly popping out of Number 4 just below the surface.
Afternoon- Number 4 has popped up
Evening- Number 3 has popped up as well. Happy Dance!!
2/4/2023
Day 3 - Germination
Surprise Surprise Surprise- all 4 have now poked their heads up.. Happy day!! 100% Germination succeeded.
Now major milestone to track is how many are female and how many are male.
I will take look at the roots this afternoon/evening and see if they have enough root to go into the cloning machine for the next 7 days before they go into their Hydro Pods.
Day 3 - Germination - Evening..
Roots looked good and they were tall enough to make it into the cloning machine.
Now that they are all in the cloning machine I have switched the lighting to veg state 18 on 6 off.
2/5/2023
Day 4 - Germination - Morning
All the Ladies (fingers crossed) looking great stretching nicely and look nice and green, Photo synthesis underway....
UPDATE!! After a very interesting POD cast on FSTS by Dr. Bruce Bugsbee from Utah University, I have shifted my lighting to 24 hours on through seedling and then I am going to shift to 20 hours on the rest of Veg.
2/6/2023
Day 5 - Germination
While Checking on my conditions inside the new tent last night, I found that the Humidity was down to 39 Percent. I added an AquaOasis Cool Mist Humidifier, the reason I selected this humidifier is that I needed one that could be turned on and off utilizing my Inkbird Humidity Controller IHC200 that I have my Pro Breeze Dehumidifier currently running with.
Root structures are starting to get there about 1/4 of an inch.
2/7/2023
Day 6 - Germination
Everything seems on track more roots poking out of each today. They are each getting a little taller as well.
Checked in the evening and number 3 was drooping the Root riot plug on the bottome was dry and the roots were not in the water yet. I raised the water just enough that the longest root that was sticking out is now hitting the water.
2/8/2023
Day 7 - Germination
Everything looked good while checking in on them this morning number 3 is now full up and no droop again.
2/9/2023
Day 8 - Germination
T-2 days until Plant into Forever Pods and we start week 1 of Veg .. :-)
Surprising thing to me is that number 1 and 2 were later in popping then 3 and 4 but the roots are growing longer in 1 and 2.
2/10/2023
Day 9 - Germination
Number 1 and Number 2 are definitely ready for transplant today.. Based on how they were yesterday and where they are today I am hoping by tomorrow 3 and 4 are ready. Today they look to me where 1 and 2 did yesterday.. I really hope 3 and 4 catch up by tomorrow since..
T-1 day until transplant to new/ final home for grow.
Need the roots long enough to have some clay down in the basket to keep the root riot out of the water and only roots in the water..
2/11/2023
Day 10 - Germination
Today they got placed in thier forever Home, 7 days from Sprout and 7 days until Week 1 Start.
PPM- 180 this is water out of the Tap
Temp Water: 70.7
Temp Tent: 77
Humidity: 40% I have a humidifier going 24/7 to try and bring this up.. I also have Humidity Domes on each plant.
2/12/2023
Day 11 - Germination
Sprayed the domes, all are looking good.. Nothing much to do at this phase but Keep monitoring the PH level in the system and making sure they have a comfortable home.
T-6 days until Week 1 start
2/13/2023
Day 12 - Germination
Sprayed the domes, They were looking a little yellow today so I moved the light down to assist. Nothing much to do at this phase but Keep monitoring the PH level in the system and making sure they have a comfortable home.
T-5 days until Week 1 start
2/14/2023
Day 13 - Germination
Sprayed the domes, They were looking a little Florissant yellow today, with what looks like slight burn on the tips, I talked with a fellow grower and we agreed that It was probably that I was drowning them, Yes you can drown you plants even in Hydro, but only early on.. :-) It usually happens with the water being too high, which soaks not only the roots but the medium (root Riot plug in this case). I lowered the water from touching the bottom of the pot to about 1" away. This will probably take 3-4 days to resolve. I will continue my daily monitoring.
T-4 days until Week 1 start
2/15/2023
Day 14 - Germination
Sprayed the domes, continue my daily monitoring they look a little darker green instead of lime green now that I lowered the water levels in the system, so I think that I might have resolved the issue but it will take a few days for recovery to happen.
T-3 days until Week 1 start
2/16/2023
Day 15 - Germination
I looked in on them this morning, 3 and 4 look like they are doing well and recovering nicely. Number 1 not so much it has brown spots on the leaves, this very well can still be a side effect of the overwatering but I decide to go ahead and add Nutes earlier than I was planning just incase. I was going to wait until Saturday but I think intervention is necessary now especially after drowning them early on.
I added 1/2 what I am planning on adding for week 1 start. I also think I am going to adjust my chart to add 1/2 2 days after plant from now on. I don't think it would hurt it to have some Nutes to pull from.
.25ml/Gal Calmag = 12.5ml
1ml/gal GH FloraMicro= 50ml
1ml/gal GH FloraGro = 50ml
1ml/gal GH FloraBloom = 50ml
T-2 days until Week 1 start = I will drain the system and start it over on Saturday with Week 1 Nutes.
2/17/2023
Day 16- Germination
I didn't even want to post today after looking in on them this morning, 3 of the 4 are now showing signs of dronwing.. Brown spots on the leaves, the water levels were still too high.. I drained about another inch out of the tanks.. Will see how quick they recover.. I start week 1 tomorrow and will have to ensure my water levels are at least 1" away from the basket on this round.


Likes
11
Share


@johdlong
Follow
I made a time-lapse while I was away for weeks 6-9. I had a helper water, and its interesting to see the plants sway with the watering cycles. Too bad I didn't continue this through flower. Maybe next time.

Likes
11
Share


@Bluemels
Follow
Tag 25: Es geht gut voran mit der Chocolate Haze. Sie streckt sich jetzt schon enorm, so dass ich wohl bald anfangen sie runter zu biegen 💪
Tag 28: Ich beginne die Chocolate Haze zu LST.
Tag 30: Ich beginne mit dem scrog.
Likes
24
Share

@BunnyBud
Follow
I'm very happy with the results, I'm also about to add a dimmable sf1000 for more power. I'll soon introduce microvita topcrop to improve the soil.
==Update Sept. 25==
I added a dimmable sf1000 in addition to the sf1000d, which I set to 80%. We'll see how the plants react. The 221 m3/h extractor is coming soon, adjustable. Temperatures are 27-29 degrees with 58-60% humidity. I currently have a 130 m3/h extractor.