By continuing to use the website or clicking Accept you consent to our cookies and personal data policy and confirm that you are at least 18 year old. For details please see Privacy Policy and Terms
Accept
Likes
Comments
Share


@Nruperti78
Follow
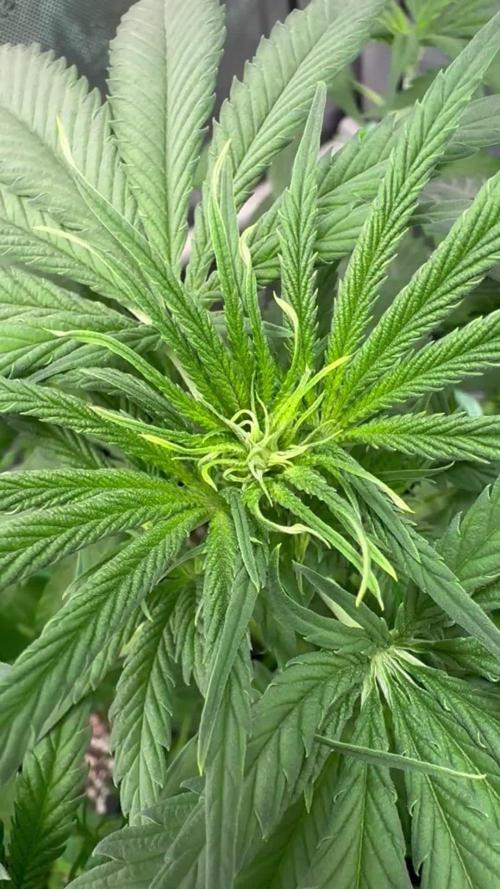
This is the first aerogarden grow I’ve done that I actually had to remove the light and place it in the closet with my other plants. Had a little foxtailing because of that but a great grow otherwise.

Likes
10
Share


@WorldPeas
Follow
Ill start monitoring Trichome colour as of next week. Buds have been fattening up nicely, still look a little airy to me.
Lollipopped half the plant and dried some of the trim out and gave it a taste. Quite tasty but a few weeks to go yet I suspect. I'll leave the trim on the plant still infront of the fan to stop it leeching too much humidity out of the buds.
End of next week is advertised flowering time for this plant. But we'll see how we go.


Likes
4
Share


@AustinRon
Follow
OG 4Q24 Flower Week 9
Orangegasm (Fem) [ IRIE Genetics ]
12/12 @ Bolt (Day 21)
Germination: 20 November 2024
#3A Earliest Harvest Date: 9 February 2025
#3B Latest Harvest Date: 19 February 2025
_________________________________________
Start of Week: [Wed Feb 5, 2024 CR2 4Q24 57:F:8:1]
End of Week: [Tue Feb 11, 2024 CR2 4Q24 63:F:8:7]
OrangeGasm Fertigation:
- MAX: EC: [ 2.4, mS] #Ramping Down
- LightIntensity MAX: [ 850, µMol/m2/s]
______________________________________
OBJECTIVES
- Ramp EC from 2.4 - 1.0
- Start rolling off Primer A&B/Silica Skin to Resin Bloom . . .
__
Wed Feb 5, 2025
OG 4Q24 57:F:8:1
EC: 2.3
Notes:
#5 looks like a 60 day plant, if so - consider Saturday Harvest …
Runoff
- [x] Amount: [ 0.125 , gal]
- [x] EC: [ 4.4 , mS/cm]
- [x] EC∆: [ 2.5 , mS/cm] # Fried Yet? ;-}
Harvest Dehu
- [x] Amount: [ 1.5 , g]
__
Thu Feb 6, 2025
OG 4Q24 58:F:8:2
EC: 2.3
Refresh Reservoir
- [x] Amount: [ 2 , g]
- [x] EC: [ 2.3, mS/cm]
- [x] Primer A&B: [ 31, ml]
- [x] Silica Skin: [ 15 , ml]
__
Fri Feb 7, 2025
OG 4Q24 59:F:8:3
EC: 2.3
__
Sat Feb 8, 2025
OG 4Q24 60:F:8:4
- [x] Disassemble, Clean Reservoir and Pumps, Reassemble
Refresh Reservoir
- [ ] Silica Skin: [ 15 , ml]
- Dropping Silica Skin due to (sparse to medium) granular precipitate
- [x] Amount: [ 6 , g]
- [x] EC: [ 2.1, mS/cm]
- [x] Primer A&B: [ 100, ml]
EC: 2.1
@1900 - Clear Manifold Filter. (Mainline should be cleared on 1845 feed
__
Sun Feb 9, 2025
OG 4Q24 61:F:8:5
- [x] Dilute to EC 2.0
- Flooded Tent, 2 Gallons PLUS of Runoff. Happy Plants.
- Shout Out Shop-vac. ;-}
EC: 2.0
__
Mon Feb 10, 2025
OG 4Q24 62:F:8:6
EC: 1.8
HAND APPLICATION
Prepped One Gallon of 12-8-7-5 @ 1.8 mS/cm w/ PhotoSynthesis Plus, SLF-100
Reclaimed Dehu Water, ~2 Gallons
Refreshed Reservoir, 2 Gallons Rooted Leaf Hydro no Silica Skin, EC: 1.8 mS/cm
Reduced watering to 5 min, then 1 - 1 -1 -1 -1 -1 -1 -1
(It’s not like they’ve been under-fertigated)
__
Tue Feb 11, 2025
OG 4Q24 63:F:8:7
EC: 1.7
- [x] EC: [ 1.7, mS/cm2]
- [x] Refresh Reservoir
- [x] amount: [ 2.5, gal]
Runoff
- [x] Amount: [ 0.5, gal]
- [x] EC: [ 3.6, mS/cm2]
- [x] EC∆: [ 0.9, mS/cm2] # Better than 2.5!
PLANT POSITIONS
3 5 1 7
4 2 6 8

Likes
10
Share

@Latrodectus
Follow
hi everyone ,
I started flushing them this week :/ I know that they would usually need some more weeks but I simply underestimated the spider mites 😒 all my lower buds are covered already and they slowly working their way up ... the beneficial insects (predatory mites ) came to late , I should have ordered them at least 2-3 weeks ago .. from now on I will put some in as prevention the next time I put plants from my garden in my tent.
they smell pretty good so far and I will still get something out of it ... also I safed clones from every plant ;) ... so nothing really lost here but time ^^
I will cut them next week and hope the mites will stay put till then xD
happy growing everyone

Likes
111
Share


@DogDoctorOfficial
Follow
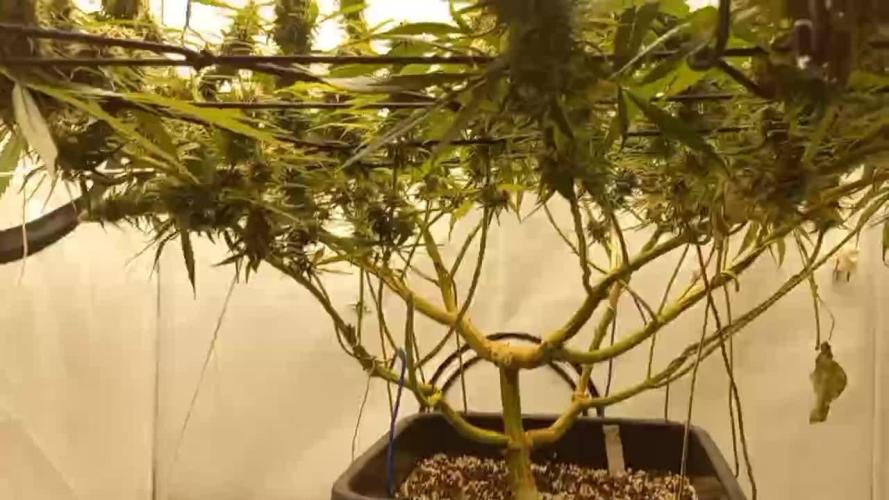
Harvesting An ELEPHANT !!!
And after 118 day from seed and 101 from wen she started her mix veg/flowering process, i cant say for sure but i am starting to believe that this auto world do veg, then veg and flower in conjunction for a wile and only after they a wile they move to a flowering stage completely but thats another post another day lol today was harvest day for this Auto Elephant from SSSC , and let me tel you she is a delight with huge fruits, so big that i normally cut and hang the all plant and for this i did not take the risk of doing that and getting bud rot , better safe than sorry, so what i broke her in smaller peaces and put it all in the rack.
Now not much to do than waiting for it to get around 10/15% humidity and jar with it all.
This one as you guys can see from the video , this is a full covered in trichomes BIG MAMA and touching her is like touching super glue or something lol i was trying to put all the colas in one picture , but is simply just not possible , they all look great so i selected 4 of them for a true back back ground <3
Thank you Super Sativa Seed Club for this opportunity, i fell like a champion no matter what with this 2 Mamas, much respect on the work you guys did on this Elephant
As always thank you all for stoping by for your love and for it all, i fell humble and honored

Likes
299
Share


@Metatronix
Follow
Good day to all my friends and visitors here on GD.
Decided to finally finish this diary, I took my time with his one ;)
Now we cut the second POGP auto plant, the first cut you can find in week 17. The plant from week 17 weighted 660g. wet, this one finished at 1,85kg. wet.
The girls where autoflower but thanks to me starting this grow in cold day temps (14 degree Celsius) the started flower really late, maybe that's also the reason for all my problems with this strain during the grow?!
The two plants where different phenotypes, the smaller one (from Week 17)though small had nice hard flowers, the bigger one as the only plant from four I grew during the growop started foxtailing.
Both of them branched nicely the smell was quite strong and awoul xD like gasoline and something rotten, it smelled so bad i checked a couple times under microscope for any signs of mold in the flower and to my suprise I found nothing.
Thank God later during drying the smell would subdue to a more generic "hazediesel" smell
--------------------------------------------------------------------------------------------------
SE7000 done it's magic with this grow as with all my other grow ops.
For anyone who is interested in obtaining this efficient and affordable light fixture ($ to gram) here's the link:
https://spider-farmer.com/products/spider-farmer-upgraded-se7000-730w-commercial-led-grow-light/
A shout out to SSSC for the gift of genetics: supersativaseedclub.com/
Thank you all for your companionship on this voyage, I hope you enjoyed it at least as much as I did.
Also thank you for this awesome year together here.
Likes
35
Share


@Jef79
Follow
FASTBUDS
GRAPEFRUIT
Sativa/Indica
Grapefruit Autoflowering
56-63 days in flowering
THC: High
CBD: Low
This a great little strain that really is a surprise.. She filled out lovely and gives the nostrils a tickle(she sets my hay-fever off!).. Nice smooth smoke off her and she taste very sweet&sour for me..she dryed up pretty fast in comparison, but the heating has been on a few times this week n may of had a slight impact on that.. Sure she will taste better as wks go on and will put her aside to cure completely now for few wks.. Great strain that I'll definitely grow again

Likes
7
Share


@Nikkov
Follow
Well, another week has passed and the end of the second week has come and the pistils have already shown themselves and I continue watering with top crop bloom, first time testing this fertilizer and I'm only using two of them, top veg and top bloom, next cycle I'm going to use General Hydroponics fertilizers because I have a friend who uses them and he's having great results, I still want to talk to my friends about this strain because I think it hasn't grown as it should, but anyway we're studying to improve ourselves for the next ones, the rest is all experience for the next ones it grows. =D
Likes
10
Share


@Naujas
Follow
The girl looks really good, strong thick branches, which I wanted to bend a little more, but I don't have the space for that :D :D The girl hasn't started to show her flowers yet, but I think that in a few days, it should appear :) good luck to everyone.

Likes
21
Share


@Eponymus29
Follow
Hi everyone, last week was hell... there were a lot of deficiencies going on the plants luckily the nutrients I was waiting for were finally delivered, and after feeding the girls with them just one time I can tell they work just as well as the groundswell soil I'm using from Mother Earth, now my concern for this week is if I should do the next watering with nutrients or pH'd water with calmag or just pH'd water? Also I noticed that I have 2 followers now!! I hope I get more than one female plant so it's not a disappointment... once again thanks for your support and knowledge!
Update week 6 2.0
Well everything went to shit... I think I overstressed most of the plants or maybe I'm suffering of an unbelievable bad luck because after finding one male and one female and following you guys advice I started to check the other plants only to find out that all of them have similar traits to the male one (the one from my grow question), so up to now I'm standing with just one female a bunch of potential males and two little plants that were to little (because I had them in smaller pots al this time) to actually show any preflowers... so now I changed them into bigger pots and hopefully they'll come out as females!! Wish me luck 🙏

Likes
56
Share


@Aedaone
Follow
The temperatures, humidity, height, and watering volume(if measured) in grow conditions are all averaged for the week. The pH is soil pH. Any watering done by me is well water which is 7.6 pH and 50° F. Any listed nutrients are ml/gallon of soil to be spread evenly on top of the soil. The plants are getting just under 13.5 hours of light now. In grow conditions half hours aren't an option, so I'm noting here.
Day 1 we had a high temperature of 83° F with partly cloudy skies. I watered each pot about 5 gallons once.
Day 2 we had a high temperature of 81°F. There was plenty of sun and I watered about 5 gallons per pot. Even though the girls are drinking more, the cool weather, and them rooting through the fabric pots into the soil, has kept me from watering twice a day. The girls cleaned up nice after the fungicide treatment. They look great.
Day 3 we had a high temperature of 78°F. Skies were clear and sunny. I watered about 5 gallons per pot with well water. The air has been a little drier with this cool from and the girls are loving it.
Day 4 we had a high temperature of 77°, clear sunny skies, and humidity at 66%. This weather is very fall like and the plants are loving it. We've got rain in the weekend forecast though. I hope we miss it. I added 100ml of feather meal top dressed they're getting a little hungry for nitrogen.
Day 5 we had a high temperature of 77°. Skies were partly cloudy to mostly sunny. The humidity dropped into the 40%'s today. The plants are loving this weather. I watered about 5 gallons per pot from the well. The girls are getting their trichromes up.
Day 6 we had a high temperature of 86°F. Skies were partly cloudy and we had just a few minutes of very lite rain. I watered about 5 gallons per pot with well water.
Day 7 we had a high temperature of 85°. Skies were cloudy all day. We had a huge thunderstorm with high winds roll through followed by heavy rain most of the day. I added another 100 ml of feather meal top dressed to each pot.
This week was a success. The girls have really swung into flower. Their trichromes are really starting to pop and these flowers are filling out. I'll treat again for powdery mildew tomorrow.
Likes
3
Share


@Unculti_responsable
Follow
Esta semana creció bastante la Jack orange ya tiene bien marcados los nodos y las nuevas ramas, vamos a empezar con podas de bajos y un poco de defolición, cuando las ramas ya esten un poco más grandes vamos a empezar a entrenarla con amarres y cropping!! Vamos a ir viendo las siguientes semanas como vienen!!

Likes
13
Share


@DeepRootsGrowTrees
Follow
DIVINE OG KUSH / DIVINE SEEDS
Week #19 OVERALL
Week #6 FLOWER
This week she's doing good no issues to report buds are getting fatter, she's also getting great trichome coverage. She's got a dank smell coming off her!! Stay Growing!!
Thank you for stopping by and taking a look it's much appreciated!!
THANK YOU DIVINE SEEDS!!
DIVINE OG KUSH / DIVINE SEEDS

Likes
24
Share


@MadeInGermany
Follow
Hey everyone 🤗.
This week you really put your energy into your growth 👍.
They look beautiful, thanks also to the nutrients in Green Buzz Liquids 😍👌.
Next week she will be moved to the flower tent 👍.
I wish you lots of fun with the update, stay healthy and let it grow 😎
You can buy this Strain at
https://www.amsterdamgenetics.com/product/kosher-tangie-kush/
You can buy this Nutrients at
https://greenbuzzliquids.com/
Type:
Kosher Tangie Kush
☝️🏼
Genetics:
Kosher Kush
X
Tangie
👍
Vega lamp:
2 x Todogrow Led
Quantum Board 100 W
💡
Bloom Lamp :
2 x Todogrow Led
Cxb 3590 COB 3500 K 205W
💡💡☝️🏼
Soil :
Canna Coco Professional +
☝️🏼
Fertilizer:
Green Buzz Liquids :
Organic Grow Liquid
Organic Bloom Liquid
Organic more PK
More Roots
Fast Buds
Humic Acid Plus
Growzyme Big Fruits
Clean Fruits
Cal / Mag
Organic Ph - Pulver
☝️🏼🌱
Water:
Osmosis water mixed with normal water (24 hours stale that the chlorine evaporates) to 0.2 - 0.4 EC. Add Cal / Mag 2 ml per l water every 2 waterings . Ph with Organic Ph - Pulver to 5.8 .

Likes
25
Share


@Jessemon1106
Follow
She is doing great. Got a net setup to spread everything out a little better. Still top dressing a 1.5x strength every two weeks. I've cloned a few lower branches and hopefull a few will take.
The smell of this is great it smells so sweet like candy. It taste good as well. Yes I tried a few of the little buds from the ones being cloned. These pics and video are at day 88.

Likes
24
Share


@Cookie_monster12
Follow
Gained some height since last week, bud sites everywhere. Defoliatated a few leaves to allow light in as its really bushy. Upped the nutrients and shes drinking alot more now. Hopefully see some trichromes popping up soon and they fatten up

Likes
14
Share


@CURATI_DA_SOLO
Follow
Hehehe che dire! Pe so che le.foto.si commenti o da sole! L'odore di vaniglia e qualcosa di allucinante! Dopo 14 giorni di lavaggio (10 con flawess finish e 4 solo acqua a 200ppm) ha preso un colore autunnale stupendo! Tra tutte sicuramente salta molto all'occhio....gli ultimi due giorni l'ho lasciata denutrita in modo che capisse che stesse arrivando la sua fine ed oggi ha ricevuto il suo colpo di grazia 😔..... Pulita completamente da ogni tipo di foglia di zucchero il peso complessivo (senza rami e rametti) sono di 334g...molto molto soddisfatto del risultato e del prodotto finale! Pe. Sto che da me adesso fa caldo e non riesco a fare scendere la temperatura di più la sera per darli un colore un po' più violaceo...ma forse era un fenotipo proprio così, ma non mi interessa il colore onesto, l'importante e il risultato finale e sono veramente molto contento! Grazie infinite a fast Buds per l'opportunità che mi dà ogni giorno facendomi coltivare le loro genetiche e spero che questo diario possa essere di aiuto a qualcuno...un altro ringraziamento va sicuramente alla parte più importante del progetto, il pubblico! Tutti voi in parte avete contribuito a ciò motivandomi con i vostri commenti e like! Ringrazio infinitamente tutti quanti di cuore! Ciao a tutti al prossimo progetto! ( A breve💪🏼) 🌱🍄🌈
Likes
19
Share


@HeavyHead
Follow
Great week. Really starting to take off in growth. Onto full strength nutrients and going full power on the lights now :p
Going to start my LST soon possibly this week or early next week.
Will add more pictures and edit as the week goes :)
Likes
48
Share


@xbrico
Follow
D85/FD57 - As per last weeks update, no real change in the SCP. Pistils peaching up so ripening beginning. The Cull of the Cookies has brought down the humidity by 10-15% in the tent so hopefully that will lend itself to saving these girls from "The Cheese"!!! Couple of really decent colas in there so I would be heartbroken binning bud like I did with the cookies!!!
With the work last night culling the Cookies, I was lazy tonight, just did an add back (Didnt clean the ilma out like I do every week). Put in at normal ratio's but as the base water was EC0.7 (Rather than 0.2), the same recipe took me up to 1.5 (I should have adjusted but seeing as I dont know whats out, i'd rather give enough of whats needed and just dilute through the week (even if daily!!!). Expecting water consumption to drop now with the cookies halved in size and now just waiting on the ripening!
Anyway, happy growing all!!! 💪

Likes
32
Share


@Grey_Wolf
Follow
High Level x Peyote Wifi First Run
1 week from germination
11th april 2020
Welcome back to my first attempt at growing out a couple of my little creations 😎
Both Plants are up and doing nicely.
I will feed them today with a Qtr strength mix of Organic Grow Nutrients , That should be enough to keep them happy for now.
That is all I have to report for now so keep safe and I will see you next week with another Update .