By continuing to use the website or clicking Accept you consent to our cookies and personal data policy and confirm that you are at least 18 year old. For details please see Privacy Policy and Terms
Accept
Likes
Comments
Share


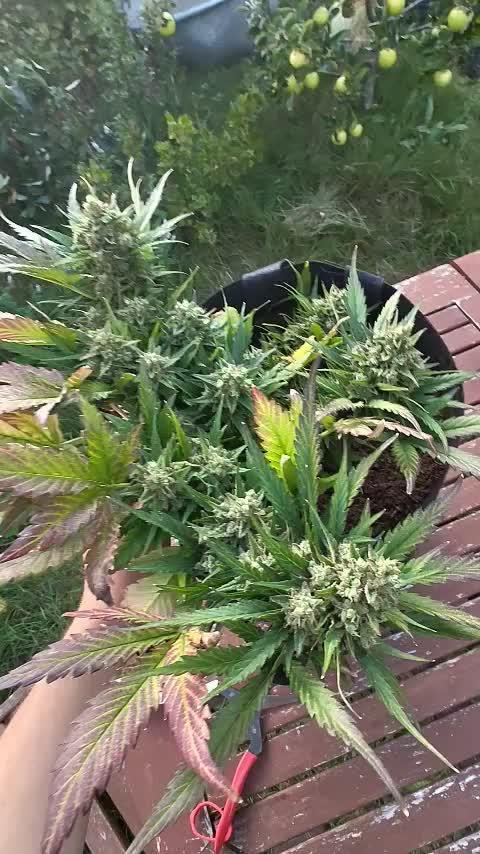
@Jofflepov
Follow
Final stage, nutrition decreases. Branches collapsing under the weight

Likes
14
Share


@Rock_n_Roll_Randy
Follow
EVERYTHING IS HARVESTED NOW AND TRIMMING LIKE A MANIAC. STAY TUNED FOR THE NEXT BIG GROW. THE STRIVE NUTRIENTS IS INSANE.. BEST FERTILIZER PRODUCTS EVER MADE. I USED IT 4 TIMES IN 13 DAYS AT FULL STRENGTH AND THERE IS NO NUTRIENT BURN AT ALL AND THEY EXPLODED. AND I HAD A FEW THAT WERE TURNING YELLOW, I THOUGHT IT WAS ROOTBOUND OR CALMAG DEFICIENCY BUT THE STRIVE NUTRIENTS BROUGHT THEM BACK AND THEY ARE SUPER HEALTHY AGAIN....
ATTENTION GROWERS:::::: YOU MUST TRY STRIVE NUTRIENTS. BY FAR THE BEST FERTILIZER PRODUCTS EVER.. I PROMISE YOU THAT AND IF YOU USE IT YOU WILL NEVER USE ANYTHING ELSE
FOR EVERYTHING MARS HYDRO VISIT:
www.mars-hydro.com
www.marshydroled.ca
PROMO CODE: rocknroll
VISIT THE ALIEXPRESS STORE:
@marshydro_aliexpress
Instagram: @marshydropenny
https://youtube.com/channel/UChU5ZWwNi-DvnO3oWVU3ceA
(NEW) STRIVE NUTRIENTS 💪
https://strivenutrients.com/
Thanks for taking the time to read and check out my diary🤜🤛
FC-E6500 LED GROW LIGHT:
FC-E6500 grow light with 3978pcs OSRAM BridgeLux Diodes & Moso Driver, market-leading PPF 2.7 µmol/J, Max 2.5g yield/watt with 30% higher Average PPE, more cost-effective when compared to same style type lights. Only consumes 650W, perfectly cover 5x5ft (personal), 4x4ft (commercial) grow space. Innovative Precise Uniform Lighting-Built-in removable bars interval & dimmability enable the exact & dynamic PPFD control over each of the plant growing stages, FC-E6500 detachable bars deliverSuperior Heat Dissipation: Real Aluminum heatsink together with 6 slim profile passive cooled bars (THINNER & LARGER surface) and detachable Meanwell Driver, create less heat. save 50% hydro than other old grow lights! Driver can be mounted remotely on the side of a grow tent/rack or on an adjacent wall to remove heat from grow space. Full Spectrum UV IR LED: With Yield Max spectrum (660nm Osram enhanced Deep Red,2800k-5000k,730-740nm IR,380-410nm UV LEDs), Average PPFD the FC-E6500 LED grow lamp enables cultivators to produce BIG FAT Dense Buds, perfect for full-cycle hydroponic, soil, grow tent/grow room.
Dimmable Commercial Grow Light: Cost-efficient, easy dimming & daisy chain With a max up to 20 lights, IP65 Waterproof, master light easily controls the rest. Perfect for commercial & home horticulture.
FC4800 LED GROW LIGHT:
GET THE MAX FROM MARS👍: Welcome one of the newest members of the Mars Hydro family🤜🤛🤘. The Mars Hydro FC 4800 480W LED Grow Light can accommodate up to a 4' x 4' area for flowering. It has OVER 2000 LED chips consisting of the best selling Samsung LM301B diodes which has a Luminous Efficacy of: 220 lm/W
0.2 W, 3 V mid power,
Osram 660nm Diodes, Infrared light and UV LIGHT👍. It boasts the incredible efficiency of 2.8 µmol/J, maximum 2.5gram yield per watt with 30% higher Average PPFD. This High-intensity spectrum is beneficial for plants at all stages - from veg to bloom, and creates Big dense Buds👍. achieve 50% higher yields & quality compared with the old lights! Only consumes 480W for 4x4ft personal grows, and 3x3ft for commerical grow. It comes with a dimmer and daisy chain function with a maximum of up to 15 lights, the master light controls the rest👍. Wide 6-bar design offers even & wide canopy coverage and can maximizes your grow space. slim 180° FOLDABLE DESIGN... YES I SAID FOLDABLE🤘🤣 , making it compact and easy to install, it's IP65 WATERPROOF and will give you no worries while growing in a humid environment and makes it a flexible high performance commercial grow light for enormous SUPER FROSTY yields.😛😛😛. MARS GETS EM FROSTY BOYS👍
AWESOME HEAT DISSIPATION: The Low energy consumption FC4800 growing light has 6 passive-cooled bars and an aluminum heat-sink a removable driver you can upgrade later or have it outside your tent. with zero noise you can save up to 50% in your electricity bill compared to HID's or HPS lights!
It also has a removable driver so you can upgrade it in the future or have it outside your grow space for better heat control in your growroom👍
UPGRADED FULL SPECTRUM: Yield Max Spectrum with enhanced red (Top-Bin Samsung 3000k-5000knm, Osram 660nm Deep Red), speed up blooming & fruiting, perfectly suited for full-cycle growing. The FC4800 LED grow lamp was born for Big Buds, perfect for commercial, grow tent, grow room, hydroponics, and all soil grows.👍
THE BEST SAMSUNG DIODES: THE FC4800 has Top Bin genuine Samsung Osram Diodes, combined with remarkable 2.8 µmol/J Efficacy, 30% higher Average PPFD, 50% less energy consumption, to maximize your yields. They give you a TRUSTED 3 years warranty 100% Satisfactory guaranteed!!!
TSW2000 LED GROW LIGHT:
INCREASE YIELD AND CROP QUALITY WITH MARS HYDRO LED GROW LIGHTS: NEWEST SMD LED technology provides the highest PAR/LUMEN output (1122umol@18") and can make you get 30% higher yield compared to OLD blurple led lights. Max 2.5g yield per wattage and achieve maximum quality and quantity, much better than traditional HPS grow systems
LOW ENERGY CONSUMPTION LED GROW LIGHT: Consuming only 300W true output with 684 LEDS! It saves up to 50% energy than other led grow lights. Perfect for 3.5x3.5ft bloom stage, 4x4ft veg stage. Over 90% light energy can be absorbed by plants, it will have higher intensity in a MARS HYDRO grow tent with diamond design mylar, or by crossing over using multiple TSW2000
HIGH EFFICIENCY FULL SPECTRUM INDOOR GROW: 3000K 5000K and IR 660nm 760nm RED, makes it close to natural light, highly engineered to provide improved growing performance for plants at all stages of growing, rapid plant response from seed to flower; Uniform and wide-beam light distribution for your plant's optimal growth
8x8 1680D GROW TENT
The MARS HYDRO 8x8 Grow Tent interior is made of a unique diamond design mylar which is highly reflective. (Other companies mylar and reflective rate is as low as 50%, and it won't provide efficient light. They use thick 1680D oxford canvas, and being double stitched, it is tear proof and perfect for locking in the light. Their grow tent keeps 100% of the light inside the tent and helps your plants absorb more light. EXTRA-THICK material means No light leaks or rips at all.👍
Strong Stable metal corner adapters and poles are the trustful supporters of the tent. It's very sturdy, neither rusting or paint flaking off. quick and easy tool-free setup. They use heavy-duty metal zippers, with double layer black lining, by far the best on the market which creates a light-proof seal.
The Easy observation windows are made by double layers of cloth. Observe the growing conditions of your plants without opening the tent and avoid disturbing your plants. The observation windows also serves to dissipate heat and ventilate the air.
The tent includes 2 removable waterproof floor trays to hold soil and water. The removable tray can be taken out to wash easily.
They guarantee the grow tents are easy to install even if you've never done something like this before. Clear Instructions and no tools needed! They also offer 30-day unconditional refunds for quality problems. Just contact their friendly 24 hours customer service 👍
Likes
33
Share


@Dapper_Buds
Follow
What’s going on lady’s an gentleman. GSC auto is going on w/8 an is killing in bud production! Had slight cal/mag issue got that fixed using roots organic cal+mag @1.5 tbs in a gallon of water an top feed. Rest of the week she got bottom feed. She is currently closer to the light an getting 49 DLI, RH@55%, Day temp is 81-82 degrees. Night temps is drop to 70-71 degrees. Other then that I’m stoked to see this girl finish she about a week or two out. An sofar just slaying it. That about all for this week Happy growing everyone an happy holidays

Likes
13
Share


@Robeeriegenetics
Follow
First week of flowering in the bag, trying out a new deep voice in my videos does it sound sexy? Let me know in the comments. seeing a little bit of stress on the leaves, but nothing major. The new developing growth is green so everything seems to be going well. I’m gonna give it another week and then I’ll defoliate. So far so good. having a little trouble reversing the wrath rock, candy icy cuts. but I’m not worried. I have backups of the mothers and I have backups of those backups so I’ll definitely still be able to take another shot after seeing the results from this grow ….
Likes
37
Share


@DaddyPrime2
Follow
4/22/2024
Day 29 showing plenty pistils, still in the transition to flower stage. Training may help the plant grow bigger/ longer stems. They can be semi bushy when spread out. Switched nutes to flower bloom from Gaia green
4/26 day 33? Last half of week 5 there has been more of a stretch than there was previous to this. These plants have been mad with a bit of over water and chlorine issues and maybe cal mag
4/27 day 34 end of week 5
The plants both stretched. The one I didn’t train,I can see a visible growth of about double the height, just over this last week.
For it being just a pre flower stretch/transition phase for the auto flowers, I am surprised at how many pistils are on the flower sights. The end of last week, I didn’t feel like there were enough pistils to consider it the beginning of flower, and now at the end of this week, it looks like this should be the end of week 1 flower, but they were still stretching.

Likes
25
Share


@Zurban_Poison
Follow
Hi people.
I think I didn’t feed her a little since she started turning yellow in the middle of flowering. yes it is definitely very beautiful. but it's early. I hope that the buds will still gain mass. Next week she will start to get Overdrive and will definitely gain more weight.


Likes
19
Share


@Island
Follow
Week 4 of vegetative stage -
The routine still the same, plants dont need to be watered by me, because God do it to me, In summer, rain happend in all weeks, my soil humidity is always good and my babies grow much well.
Im liking so much this xperience until now.
They are very healthy, much more them when I grow indoor.
Wind make the LST for my girls.
See u next week, bye! 😁

Processing
Likes
67
Share


@GreenZealand
Follow
This is the week 2!
Well, the plant looks really healthy, and she kept growing up, straight to the light!
Good to see that even after the strange beginning, with the stem crooked, she recover her path!
This week, I'm also planning to start feeding them with some NPK.
Just need to read a little bit more about it and buy nutrients.
Probably I'll try Canna stuff. Anyone know if it's good?


Likes
5
Share

@Ibgrowing
Follow
I have harvested my ladies. The buds are nice and thick. I'll definitly do an update on the drying and curing. I have already done some wet trimming as you can see by the two pictures, first round was just a rough trim, second one a bit more precise.
They are now drying in my garage on a washing line.
Processing
Likes
43
Share


@Jack_Greenstalk
Follow
week 3, at day 21 I started to defoliate. needs more airflow around colas. This is the start of defol, will clean and prune as needed next week. Stretching has slowed and colas are starting to stack. Ran a sort of modified manafold into the scrog. "V" on the left has 15 tops from 4 main stalks, she was topped to 4th node early on. "Blue nemo" was topped to the 3rd node early, she has 18 tops after the week 3 prune of the week lowers who couldnt make it up to the canopy. I left some popcorn buds down low that have began to develop, will throw these in the ice water hash after harvest.

Likes
2
Share


@EyeMKing
Follow
Started the first top dressing of Gaia Green All Purpose and Power Bloom at a 50/50 ratio of 1tbsp/gal each.


Processing
Likes
6
Share


@toaster37
Follow
She seems to be a slow grower. I started a northern lights that's 12 days behind her, and it is growing about 2 weeks faster than this cheese. Wish I knew the breeder.

Likes
13
Share


@DRgreeen
Follow
Esattamente 4 settimana 30/9 i cloni (F2)si stanno riprendendo tutto prosegue prosegue rimangono ancora tutte e 8 nei vasi da 1 lito continuo a nutrite con biobizz è una tantum voodoo
Likes
124
Share


@CRiSPrGrow
Follow
Now it gets interesting! the couskush took to training as well as you can expect and auto to take to 90° bend training, it's bushing out nicely although highly apex dominant. It's pushing out thick leaves and loads of pre flowers and flowers. Sprayed it once with micro and kelp but i eyeballed the micro and it was too much so there's residue everywhere... I'm probably going to have to clean each leaf one by one with a moist paper towel, but that's a problem for future bulbi lol watered it with some co2 and also with a mix of micro and beneficials 2g each of the micro and 5grams each of the spores for 2L of water, of which i only use 1.5L that's three pints. I raised the pot slightly using a bakers tray, getting that airflow in. It's finally getting interesting now, so i'll be doing my best to get some nice pictures in. Comments and suggestions welcome ! drop me a message ! 🚀


Processing
Likes
32
Share


@MadeInGermany
Follow
Hey everyone 😃.
First of all, many thanks to Zamnesia for the support 👏🏼👍.
I'll start germinating next week 😋.
Until then, I wish you all the best 😊 stay healthy 🙏🏻 and let it grow 🍀
Likes
10
Share


@Thehill420
Follow
There all going steady this an aquaponic setup any questions or advise an comments would be appreciated happy growing!!

Likes
14
Share


@Mr_Dior21
Follow
Another slow week. I increased light schedule to 13/11. I’m going to slowly lower the time of light until by the time harvest day comes it’ll have a longer dark period. I’m also going to stop feeding the bottle nutrients my soil is moist still so I gotta wait. I’m predicting a couple ounces this grow.