


By continuing to use the website or clicking Accept you consent to our cookies and personal data policy and confirm that you are at least 18 year old. For details please see Privacy Policy and Terms
Accept
Likes
Comments
Share


@kingcola384
Follow
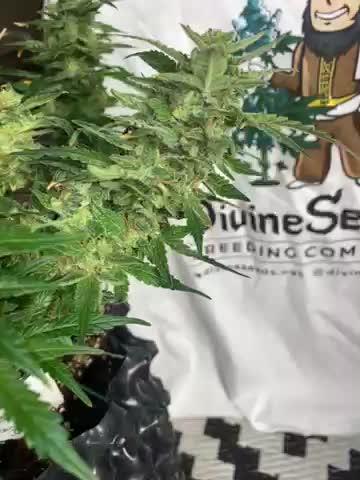
Sorry about not putting information about the grow I hate it. I wish I could just put up videos and pictures but I do try to provide a little information and it's really not much because I'm not doing much I'm amending the soil I'm adding micro nutrients and worm castings and sugars I stopped the Cal Mag pina colada stray is set to go for 9 to 10 weeks gummy bears are set to go for 8 to 9 weeks so we'll look at that three more weeks

Likes
6
Share


@Magical_Surgeon
Follow
After you found some good sector and clone it you let the mycelium grow and fill almost all the petri dish like I did last week.
So now you're ready to move forward.
Making grain spawn!🍄🍄
For grain you can use Organic Rye Berries, but you can also get away with wheat berries, or brown rice or even corn kernels(which I used myself) !
And you'll need some mason jars or honestly I used some jars that I had home just clean them very well and sterilise before using
Making a grain spawn can be broken down into 6 easy steps.
🍄Hydrate Grain By Soaking
🍄Make Specialized Lids
🍄Simmer, Drain and Dry The Grain
🍄Sterilize
🍄Put your agar in the jar
🍄Colonize
🍄Soak the grain by placing it in a bucket, covering in water, and leaving it for 12 -24 hours. Easy.
🍄Drill 1 hole on top of the lid. Right in the center and cover with a small dab of high temperature silicone sealant, and leave it overnight to dry. And your jars are done. There other diff types for different methods like liquid culture etc. But I'm just going roughly through what Ive done.
🍄The next step is to simmer the grains on the stove. This will thoroughly hydrate the grains, and will soften them to make them easier for the mushroom mycelium to consume.
Cook soaked grain on the stove for about 15 minutes. You don’t want to cook it too long, because eventually all the grain will crack and you’ll get some mushy grain spawn. We don't want that. 🧐After the grains have simmered on a low boil, you’ll need to drain them off. What I did is I drop them in the sink with the drain cover on. The grains will drain over an hour or so, after which you can go ahead and fill your jars.
🍄Once your jars are filled, they need to be sterilised.This kills off all the other nasty contaminants in the grain cover the lids in tinfoil (to prevent water dripping into the lid) and then just pressure sterilise them for about 90 minutes at 15 psi.
🍄After that let them cool down. Get your SAB, wipe down the walls with some alcohol wipes and place the jars inside. And wait untill they will be warm to the touch... not hot and painful 😤patience is key. Bring in your plates that had been stored by you in a dark place. And what u have to do is sterilise your scalpel and just accurately and efficiently decide your mycelium into about 10 pieces and quickly place them in your jar. And complete for every jar u make. You have to be very quick. The more you keep you're jar and your agar plates lids open the more cans they will get contaminated. There certain technics you can see online..
🍄Ones you're done close all your jars lids tight and Jake your jar so the mycelium pieces will mix around the jar and place them in the dark place to colonize. And just keep waiting... 😅 Untill the mycelium will conquer your grain. Keep your eyes on the jars, any weird smells or colour during the waiting time.. because that would mean you got a contamination going on. Oh yeah and when about 55% of your jar is filled with mycilium shake the sh*t out of it so it will break the mycilium inside and make spread more faster.
Processing
Likes
12
Share


@GrowGuy97
Follow
Day 14 - 3 out of 5 are growing a little slow/weird, all 5 seem to be growing kinda slow compared to my first run of autos but hopefully everything does good🤞🏼 Happy growing friends🌱✌️🏼
Day 17 - Still have 2 extremely weird looking ones, really hoping they bounce back🙏🏼🤞🏼
Day 18 - 3 out of 5 still going strong, the other 2 havnt changed much!

Likes
97
Share


@Van_Terpen
Follow
LIVING SOIL & TCO
DEMETEARTH SYSTEM
⚡CODE PROMO : VAN-TERPEN420⚡
-15 % + 2 Seeds The High Chameleon 🦎
https://linktr.ee/vanterpen

Processing
Likes
4
Share


@aliengrowETK
Follow
Fiz o transplante pros vaso de 25L e apliquei técnica do main-lining

Likes
2
Share


@C1Alberto
Follow
Muy contento con el la salud de mis plantas el color verde oscuro de las hojas es estupendo...
Y los tallos están adquiriendo un semblante espectacular.


Likes
5
Share


@BandyBuddyBandy
Follow
day 55 trichomes starting to amber so flushing 40l of ro water with 60ml athena cleanse . the plant is smelling insanely fruity will flush for 4-5 days depending on the look of the plant 👊


Likes
22
Share

@SouthGermanGrowGirl
Follow
Week11 now at our first Rapier auto.
He is already very sticky and strong.
Smell is intensive.. Some Lime---Some Candy---Some Gas.
Very hard to explain at the moment.
I will give him 2 more Weeks..
This Week he can do whatever he want.
Next Week i flush him with Amino/Vitamin Water ( PH= 5,7!)
Then comes the Harvest :-)


Processing
Likes
6
Share


@GreenDutch
Follow
This week you realy can see the DIAMONDS glitter.. Did a experiment whit 660NM but the rusults need some more atention before i can tell you about it.

Likes
78
Share


@Basementganja
Follow
Gave her a heavy defoliation! She's growing very strong, and needed a little thinning out!
The defoliation promotes the lower buds growth, by allowing more light penetration!
The defoliation also ensures that airflow throughout the plant is strong!
Likes
7
Share


@Holy_dog_farm
Follow
Very impressed with my first Autoflower growing . Very good quality buds with lot of frost and nice sweet smell.
Likes
8
Share


@GogolaGlue
Follow
Flowering stage started 💖 plant looks healthy 💖 ill start Big Bud from second flowering week 💖 im trying LST and i hope everything will be great 💖

Processing
Likes
29
Share


@BigHomieTreeMan
Follow
**3RD UPDATE** looks like my work pairs off a little. My babies have grown tremendously. Day 12 and I feel pretty good about how things are going
**2ND UPDATE** I ordered smart plug for my outlet where my grow tent is pulling power from. I have my lights automatically turning off for 4 hours everyday from 12-4, while is still in vegatative mode
**UPDATE** so, my grow is coming along fine, but I think it could be better. I’m noticing a lot of week 2s from journals of the same strain, and mine looks either a little behind or a lot behind, depending on soil/soilless. I think my light distance has a lot to play with it. I had my light relatively high, almost 2 and a half feet above my plants. I dropped it down to about about 18 inches, as low as possible, while still covering my grow area. If anyone can provide any advice or opinions, it’d be greatly appreciated. I hope this week will be a lot of growth, fingers crossed.**
So, it’s officially week 2 of my grow. I’m pretty excited! I have 3 Six Shooters growing....all 3 germinated,,,2 are growing and reaching, 1 is a little behind, though I’m not too concerned about her. They all are growing their 2nd pair of leaves, and I don’t expect much activity this week, although I will still try to update daily. I had a great Saturday, wake n bake sesh...then I took some of you guys advice and went to my local hydroponics/garden store....and realized quickly how much I was spending online vs shopping local. On top of that, I got a nice 30 minute lecture from one of the staff about everything. To my surprise, they start seedlings and small plants there too, aside from basil and your other herbs, if you know what I mean. So they have everything a gardener would need! I was told to transport gradual sizes....basically....like I’m planning to use 3 gallon pots right? But, I can’t go from my seedling container to a 3 pot gallon straight like that. It’s bad for the plant and extremely risky. You’ll have to water that whole pot, but with the seedling or small plant only having so many roots, it would end up basically flooding the plant out. So you move up gradually. I’ll get back to that later.
The soil I was using was extremely basic; Lowe’s soil, and vermiculite mix that I blended 2 parts to 1, respectively. It was a good enough medium to sprout my seedlings and get them started, but I knew I needed more. So the guy helping me hooked me up with a 2 cubic feet/15 gallon bag of Fox Farm Happy Frog Potting Soil. I told him I was on a site (ours) where the community is pretty interactive/helpful and how I was concerned about transplanting because of the risks...He shows me this stuff called Myko, which is a root enhancer. He then transplanted a basil seedling to a larger container. Before placing it in the pre-made hole he created, he sprinkled some Myko on the roots AND in the transplanting hole (? I might have made that term up). It promotes root growth and enhances root strength as well, which not only counters transplant shock, but pretty much puts your roots on steroids. I bought a bag of that. When it’s time for flowering, I’ll be using Strawberry Fields potting soil. I went ahead and purchased other containers as well, up to the 3 gallon fabric pots which will be the plants’ final destination.
I told him my water feeding schedule, water every day, water/notes on alternating days. He was a fan of it, and suggested that I go a little further and do my days like this:
FEED, FEED, WATER, and so on. I purchased Cali-Mag to make sure I have enough calcium going on. I went ahead and got a PH kit as well, to make sure my water and nute days are both within 5.5-6.5 pH. I slick felt like I was in high school science/chemistry all over again lol. I went ahead and bought coated metal flower support wires for LST. He did mention doing “supertopping”, but forgot to show me on a plant. Basically, it’s gently bending the main cola back and forth until you can have it bent in a ways to where you can maneuver it under netting/lattice to allow other cola to get equal/adequate energy and/or growth. I’m paraphrasing this shit, so by all means, correct me. I’m just hoping I can help someone else.
I transplanted my plants to GroPro Square 4 x 4 x 3.5 plastic potting containers, and used the Mykos on the roots and soil. I then watered my plants with the water/CaliMag solution, and placed them under the grow lights again. I’ll add pix and vids to my entry shortly.
Likes
8
Share


@ElchichodelaGrasa
Follow
En esta última han pegado un estirón de miedo y ya con la malla puesta a para el día 30 de vida

Likes
2
Share


@QoverQ
Follow
So we came to the end guys, these ladies gonna stay in the dark for 36 hours now and get cut on saturday
Think i made some mistakes with Topping on earlier stage with Cookies and Cream, and also some mistakes with bubba kush on flower stage, its my first grow and i can say it was a nice experience with them strains 😌
Im gonna share the dry weight and more detailed informations about the strains and the nutes ive used as long as its ready 👌


Likes
2
Share


@Mr_nugs_lover_David
Follow
She looks as healthy as can be,super beautiful strain to grow,she's ina super soil full of life in a 15l pot,let's see how she keeps developing.

Likes
88
Share


@ILoVeThiSpLaNt
Follow
Kmintz #1 raccolto giorno 59
Kmintz #2 raccolto giorno 63
Seccato 5giorni appese a testa in giu in ambiente buio 24 gradi e 40% umidità con leggera ventilazione non sui fiori.
Pulito i fiori e messi in barattolo tight vac più bustine boveda 62% e igrometro per monitorare ur.
48h dopo apro barattolo per visualizzare dato igrometro e se troppo alto intorno al 70/75/80% lascio 1/2h aperto se invece intorno a 60/65/70% apro 10minuti ogni giorno per una settimana.
Cercherò di fumare queste due piante il più tardi possibile. Ovvio che qualche canna verrà presa qua e là ma avendo 65gr e 55gr vorrei iniziare a fumarla tra circa 2/3 mesi. Aggiorno diario settimana prossima con foto delle cime e qualche recensione sul gusto.
Grazie per essere passato 😊🖐️