By continuing to use the website or clicking Accept you consent to our cookies and personal data policy and confirm that you are at least 18 year old. For details please see Privacy Policy and Terms
Accept


Likes
36
Share


@brownbae420
Follow
Day 74
- Wiz Stash - Flush with water - 1 week from chop
- Gorilla Cookies - Flush with water - 1 week from chop
- Gummi bears - getting fat - est. 3 weeks from chop
- Vibe: 😜
Day 50 - 3BOG x Samsquanch
- FLOWERING!
- No further LST
- Allowing her to grow
- Vibe: 😎


Likes
12
Share


@thonhash
Follow
Simplemente aplique una PEQUEÑA poda de bajos antes de trasplantar y pasar a floración.
Empezamos la aplicación de enzynabis para crear una buena vida microbiana (también muy útil para evitar excesos o aprovechar cualqier “resto” que contenga nuestro suelo).
También empezamos a regular los watts del led mars hydro ts1000,y a medida q vayan pasando las semanas se irá regulando a mayor potencia, hasta llegar al maximo (150w)

Likes
49
Share


@Roberts
Follow
The Mandarin Squeeze sisters are growing good. The grow room appears to be pest free now. I had neem oil treated the plants twice. I then treated the grow space with ortho home defense. I did not get it on the plants. It appears to have work. Grow diaries is really messed up still, and Is altering my information input on numbers. Hopefully it will be fixed soon. Thank you Spider Farmer, and Terpyz Mutant Genetics. 🤜🏻🤛🏻🌱🌱🌱
Thank you grow diaries community for the 👇likes👇, follows, comments, and subscriptions on my YouTube channel👇.
❄️🌱🍻 Happy Growing 🌱🌱🌱
https://youtube.com/channel/UCAhN7yRzWLpcaRHhMIQ7X4g

Likes
17
Share


@Elpicor
Follow
Happy Easter all over the word, I will share my Italian best aperitif ever.
D51
Eighth week, if they are so beautiful it is also thanks to you! I love this community, I hope to stay there, as long as I don't get arrested...
Anyway...
I wanted to point out that all my doses of nutrients are for a liter and a half of water so as to be even more scrupulous to avoid overfertilizing. I turned off the dimmer, at noon simulating a half day of fire lol i'm crazy. added a reflective film to the base of the room, raised the plants to the same level by placing boxes under the pots, many Thanks @Roberts for encouraging me to look for the boxes, I'm a lazy boy!😇
...a clarification for the most refined minds .... I know very well that the glass is for white wine but it is the only one I have, I take this opportunity to thank my neighbor for giving it to me ;)
D55
Buds fattering


Likes
14
Share


@TeaTime
Follow
One of those pot I’m already doing the flush. Tomorrow I’m going to do the flush with cold water and leave for 2 day in the dark before to cut.
After normal flush, 3 day before I did the flush with cold and ice. And I going to leave for 72 hours in the dark.remember that it’s one of 3 pot of speed + , another pots I’m leaving for one more week .

Likes
37
Share


@GrownwithLED
Follow
After germinating the seeds are transplanted into small pots with soil (see tutorial in VIDEO above). The soil is prepared with water mixed with a little bit of BIO NOVA Roots (0,5 ml/l), which aids the development of the seedling. Transplanting is very easy now, because they have grown a STRAIGHT tap-root while hanging during the SERIOUS' WAY of germination. This straight root allows for easy potting of the seeds. Simply make a little hole in the center of the soil with your pinky finger and carefully place the germinated seed with the white root pointing DOWNWARDS into the hole. Best is to lay it onto one side-wall of the hole with the seed shell right at the surface. Then I push the other side inwards and enclose the whole root with soil. At the end only the top of the seed-shell peeks out of the soil. IT IS VERY IMPORTANT to plant the seeds NOT TO DEEP into the soil. The seedling only needs extra strength to work itself upwards thru the soil and you run the risk of the soil drying out and the seed dying off. When you PLANT THE SEED VERY SHALLOW into the soil (=with the top of the seed-shell still peeking out) your seedling can grow out right away and you have a small plant already 24 hours after putting the seed into the soil.
The small seedling sometimes still has the seed-shell on its 'head', it normally falls off by itself, but sometimes you have to carefully help and take it off with your finger nails. Be careful to NOT clip of the seedling accidentally when you do this!
The seed-shall has an inner lining, which feeds the small seedling when it germinates. This inner lining sometimes gets tangled around the stem of the small seedling after the shell has fallen off. This little skin MUST be taken off the stem right away! Once it dries up, it gets hard and can strangulate the seedling around the stem. In order to avoid this, the skin must be taken off as soon as possible! I show it in the pics above and also made a video about taking off the inner lining of the seed.


Likes
14
Share


@StewartBloom
Follow
Okay so I'm trying something new, since I've gone away from a switch to water for the last week flush I harvested the tops and best smalls and packed the cannatrol full. I'm giving the under growth a bit more time to rippen before I harvest that for the the freezer. If this turns out to be a bad idea I'll not do it again in the future. The last long video is what's left in the tent right now. Let me know if any of you have experience doing this.
Updated with a bunch of pictured of dried and cured. Ended up with 186g of beautiful flower. 72g of untrimmed smalls I'll make into RSO, I have a lot of back and nerve pain and RSO hands down the only thing that brings me actual relive, I'm late to the party on this one but I set a side part of the grow for it now.
I let the under canopy and shorter tops go another 10 days feed at half strength and I'm glad I did, it ripened up nicely and definitely got a lot of color. I forgot to get pictures of that harvest but I will when I pull it from the freezer to wash. My test jar of this washed at 4+% (the last picture). Last update will be results of that wash.
Last update on this one, I added a couple hash/rosin pics at the end. She washed from plant to rosin at 4.03% the terps are musky skunk, sweet pastries, and fresh Linen. I'd definitely grow this one again.
Likes
3
Share


@FarithAriasFajardo
Follow
Bueno, así terminamos la fase de vegetación. Cometimos algunos errores, aunque se pudo solucionar. Cada día aprendiendo mucho y mejorando para que esta nueva etapa sea muy frutuosa. Muy feliz con lo logrado y cómo se ven las bebés hasta ahora. Próxima semana, floración. Vamos con toda en esta siguiente etapa con mucha emoción de ver cómo se estiran y salen sus pistilos, nos vemos la próxima semana con lo que será la primera semana de flora en estas bebés


Likes
8
Share


@julian100614
Follow
Voy a empezar mi segundo diario, una Blueberry de Zamnesia, y con ello irán unos cuantos por delante, ya que estoy germinando unas cuantas semillas.
En esta ocasión estoy usando el Propagator de Zamnesia para la correcta germinación de las pequeñas. Contiene una luz LED de pequeño voltaje 15W para mantener una temperatra constante y un ambiente humedo en el mini-invernadero.
Esta blueberry esta situada en la maceta mas grande del mini-invernadero y esta junto a sus compañeras: 2 Red Poison, 2 m
Mohan Ram, 2 Jack 47 XL, 1 White Widow, 1 Cream Caramel F1, 1 Purple Queen y 1 Nothern Ligth (todas automaticas excepto la Cream Caramel)
Definición:
-Los expertos cultivadores de Zamnesia Seeds han logrado crear una cepa autofloreciente y de fácil cultivo a partir de unos genes clásicos. Aprovechándo lo mejor de la famosa cepa Blueberry, han añadido Ruderalis a la mezcla para crear la Blueberry Automatic. Bendecida con unos genes divinos, la Blueberry Automatic presenta un formato fácil de cultivar, rico, vigoroso y potente; y además fácil de manejar para cultivadores novatos.
Los consumidores de marihuana medicinal se alegrarán de saber que un par de dosis (o más bien caladas) de la Blueberry Automatic es lo único que necesitan para ayudarles a combatir los síntomas del estrés, la ansiedad, el dolor crónico, las migrañas y otros muchos malestares.
Con lo mejor de la Blueberry original, es una erupción volcánica de sabores atractivos, deliciosos aromas y subidones agradables. Vamos, el sueño de cualquier amante del cannabis. La Blueberry Automatic relaja todo el cuerpo, de la cabeza a los pies, lo que la convierte en la elección perfecta para desconectar tras un duro día de trabajo.
Típicamente Blueberry, esta versión autofloreciente presenta todos los rasgos característicos de su predecesora. Su famosa coloración azul claro/morado, junto con el familiar aroma y sabor, rematados por la calidad de su subidón/colocón.
Como la mayoría de las índicas, la Blueberry Automatic crece hasta una altura de alrededor de 75cm y tarda (como término medio) 8-9 semanas desde la siembra hasta la cosecha. Con estos genes tan rápidos, los cultivadores que busquen una nueva incorporación para su cultivo comercial, estarán más que satisfechos.
Teniendo todo esto en cuenta, estoy realmente emocionado de empezar con esta aventura y ver que maravillosa planta crece 😊🌱
Como en todos mis diarios, intentaré hacer un seguimiento continuó para ver las diferencias y cambios que puedan suceder😉
Día 1: Hemos germinando la planta en un mini-invernadero con una luz LED de 20W, con 28°C y una humedad del 60%. Ha crecido bastante bien alcanzando los 3cm
Día 2: La plantula sigue en el mismo invernadero con las mismas condiciones y crece bastante rapido alcanzando los 7cm.
Día 3: Hoy hemos transplantado al armario y a su maceta final. Una maceta de 7L con una mezcla de sustrato de Top Crop Complete Mix y Biobizz Light Mix en una proporción de 70/30.
Todas las maceta tienen 3mg de Micro Vita para protegerla de las plagas.
Hemos regado con 1L de agua con 1ml de Deep Underground de Top Crop (enrraizador) para que empiece a crear el sistema radicular lo mas fuerte posible. La temperatura en el armario es de 30°C con una HR de 60%.
Hemos pasado el período de luz de 24/0 a 18/6.
Tambien hemos enterrado un poco mas la planta para que no salga demasiado espigada dejandola 3cm de la superficie.
El armario tiene incorporado un humificador 🔥
Día 4: La planta tiene buen ritmo y buen color. Hay algun pequeño problema en cuanto a la humedad ya que baja basante porque estoy trabajando con un foco de sodio de 400W en un armario 1x1x2 y ahora mismo las temperaturas en mi ciudad es bastante alta. Este problema lo estoy solucionando con el humidificador que veis en las fotos y con un pulverizador de agua y así subir la HR considerablemente. Por lo demas todo va sobre ruedas 😊👌
Día 5: Sin novedades

Likes
12
Share


@Daviz_42
Follow
Me he quedado un clon para seguir trabajándola y poblándola, ya que como comente antes tiene un terpeno único y una producción buena de flores bonitas con mucho sabor.


Likes
Comments
Share


@elsolo1
Follow
Week 6
Couldn't document week 5 due to a trip and work.
Adjusted light to 100% as it wasn't being affected by too much light
From a past experience I decided to start flower at week 6 due to limited height on growtent
DWC water system working normally shes eating more and more
Increased nutrient week 5, therefore now we're switching to flower nutty
Humidity still at 40%
Likes
6
Share


@SavageGarden
Follow
Another week is over.. last time in week 9 i gave them some nutes for the first time, mix of biobizz grow-bloom-fishmix-calmag. Flowers become bigger and there is a nice odor in the greenhouse.

Likes
12
Share


@Tattooflashandweed
Follow
Another good week, stretch is full on and probably another week or 2. They all got a topdress with compost and wormicompost, insectfrass, basalt, kelp, epsom, and seed meal to keep the worms happy. All in small doses... less is more :-)

Likes
6
Share
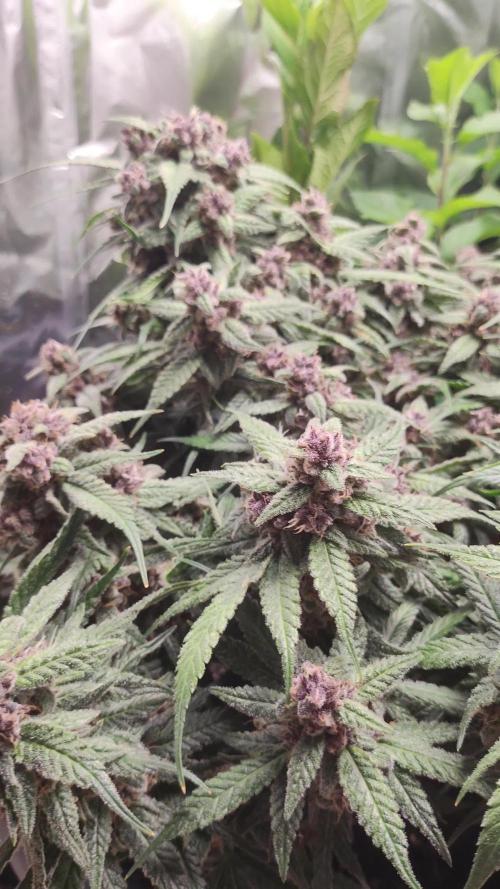

@xMuuy
Follow
Our beauty is looking good, isn't she?
Her buds are thickening and the trichomes getting more of that gorgeous purple color. Some are already cloudy, few (most of them are damaged, probably due to looking at them under our mikroskopic lense too closely) turned amber. Harvest is set to be at week 8 in flower, so it's 2 weeks from now on, but we'll see how she develops by then.
Smell-wise it's pretty bareable right now; we feared that our whole apartment would smell like a huge coffeeshop in amsterdam, but by keeping the door to our "growroom" closed you can hardly smell anything. It's only when touching some frosty leaves while defoliating that you get some of the strain-specific scents, mostly consisting of citrusy aroma with earthy undertones.
Temperature is stable right now; the severe heat wave should be gone for the next weeks and by meagerly opening the door we can adjust the temperatures quite good. Humidity is also pretty solid thanks to our dehumidifier.


Likes
6
Share


@Lordviper28
Follow
All the girls looking good all have bud forming on their tops this strain has been really with no problems at all. All except one has staid short and bushy the one topped stretched up and fanned out real nice

Likes
5
Share


@ChiloteAnonimo
Follow
En un inicio se pensaba dar 4 semanas de vegeta pero por un estrés de agua en la segunda semana se tuvo q dar una semana más de vegeta.
Mañana se me cambiará el ciclo a 12/12 para empezar su flora.

Likes
20
Share


@SecretTreasures
Follow
The ninth week of flowering is now over and the last days of the ladies have begun. The stated 9-10 weeks flowering time is definitely correct. One plant of the Hardcore Zoap was ready a little earlier, but as I want to harvest everything at once, everything is left standing until the majority looks ready. I also preferred to harvest the plants a little more mature than too early. In terms of appearance, I like the Miracle Gushers flowers best, as they have a fine and compact structure. The Banana Creamz seem to be able to develop very thick flowers, whereas the Hardcore Zoap seems to have the lowest yield. I will be able to say more after drying and weighing.
