By continuing to use the website or clicking Accept you consent to our cookies and personal data policy and confirm that you are at least 18 year old. For details please see Privacy Policy and Terms
Accept
Likes
Comments
Share


@Dictator
Follow
The plant has removed all the leaves, the buds should be dried in the dark, at 21 degrees at 50% humidity

Likes
51
Share


@felixthegrower
Follow
Well, it was my first diary here, and I'm really happy to had found this amazing community that is so eager to help!
It gave me the opportunity to win the first giveaway in my life 😂 And it was from RQS! These seeds are in my new grow diary, and I really thankful for all the gift received! A special thank to Pol from the RQS staff!
A special thanks to everyone who watched me grow here, and I hope to contribute with the community more and more!

Likes
49
Share


@masterofsmeagol
Follow
7/25 Did two videos this morning. One where I was only going to water the 3 gallons I had mixed up but it's going to be very hot this week. Didn't want to make the same mistake as last time so I watered everything AT LEAST A GALLON. I need to bump up the volume during these really hot, humid days abd it doesn't get worse then this. Things are getting dusty. Found an inch worm and some minor pest damage. Once it cools down ill spray something. Also noticing small nitrogen deficiency that takes a leaf and moves up the plant a little bit. I'm going to need to start nutes this week. I'll keep this updated. Went back over around one and everything was looking fantastic! Took a few pictures and defoliated a few leaves.
UPDATE: I GOT A MESSAGE FROM DAD SAYING MY PLANTS LOOKED DROOPY. I HADNT MADE IT OVER FOR MY NIGHTLY INSPECTION BUT HAVING WATERED YESTERDAY I WAS THINKIBG OF SKIPPING IT. GOT THERE AND SAW THE FIRST 10TH PLANET DROOPY. ALL THE TENTH PLANETS LOOK RELATIVELY THE SAME BUT ONE OF THEM IS MY "CANARY IM A COAL MINE" AS IT DROOPS WAY BEFORE THE OTHERS. THE TWO BLUE CHEESES IN 20S THAT DRY OUT FASTER GOT TWO GALLONS AS DID MY 10TH PLANET CANARY AND MY BIG BLUE IN THE 50. ITS BEEN 90S AND SUNSHINE AND ITS ONLY GOING TO GET HOTTER. I HAVE THINGS GOING ON IN THE MORNING SO I WONT HE ABLE TO WATER. I NOTICED MORE NITROGEN DEFICIENCY RISING IN THE BLUECHEESE THAT DRINKS ALL THE WATER. OBVIOUSLY ILL NEED TO ADD NUTES SOONER THAB LATER CONSIDERING IM IN FLOWER BUT THE PLANTS ARE STILL A NICE GREEN AMD ONLY LOSING VERY FEW LEAVES. I ACTUALLY SAW A COUPKE BURNT LEAF TIPS ON A COUPKE PLANTS AFTER I WATERED WITH THE KELP ME/YOU. THIS SOIL IS AWESOME. WHAT IS THIS? WEEK 16 AND STILL GOING STRONG. WHEN I DO DECIDE TO START NUTES ILL TEST IT ON THAT BLUE CHEESE THATS FURTHER IN SENESCENCE. I TOOK A QUICK VIDEO ILL UPLOAD TOMORROW.
7/26 Had a bear come around my cage and getting into out bird feeders. Bent the iron shelerds hook all the way to the ground! Getting AMMONIA now to try and keep him away. Bags were heavy this morning but it's going to be really hot again. It'll be on the 90s the next few days so I need to be very careful. After we get through this I'll do an app of BT. Garden looks fantastic!
UPDATE: ANOTHER SCORCHER OF A DAY WENT BACK TO THE GARDEN. NOTHING WAS DROOPING SAVE FOR MY CANARY. THAT AND ANOTHER WERE BONE DRY. THE TWO PLANTS IN THE MIDDLE OF THE CAGE ARE SURROUNDED ON ALL SIDES SO I ASSUME THATS WHY THEY DONT SRY OUT AS QUICK. I GAVE EVERYTHING IN THE GARDEN ONE GALLON EXCEPT THE 10 GALLON PURPLE PUNCH, AND THE TWO IN THE MIDDLE. ONE TENTH PLANET ONE BLUEBERRY CHEESE. I ONLY GAVE THOSE 1/2 TO 3/4 GALLON. THE TWNTH PLANET IN THE MIDDLE IN THE THIRTY LOOKED HAPPY AND WAS STILL HEAVY TOO. I GAVE THAT A HEARTY HALF GALLON AND I WOULDNT EVEN HAVE DONE THAT IF TOMORROW AND FRIDAY WERENT GOING TO BE THE HOTTEST DAYS OF THE WEEK. I DEFOLIATED SOME. I NEED TO DO MORE BUT I HAD TO BEAR PROOF. I SOAKED THE BOTTOM BOARDS OF THE CAGE IN BLEECH. VERY CAREFUL NOT TO GET ANY ON THE PALLETS OR GROW BAGS OR ANYWHERE IT COULD GET TO PLANTS. I TACKED DRIER SHEETS TO THE CAGE. I CUT A COUPLE PILL CASES IN HALF AND SOAKED THEM IN BLEECH AND DROVE THEM IN BY THE WOODS WHERE HE WNTERED AND BY THE FEEDERS HE EMPTIED. PUT UP ANOTHER CAMERA FACING THE OPPOSITE DRECTION SO I CAN SEE HIM NO MATTER WHAT. I WOULD STAY AWAY MR. BEAR.
7/27 Plants are looking FANTASTIC this morning. Soil is still damp this morning and bags are heavy as hell. They look super happy. Obviously my watering situation depends on the weather. Today and tomorrow are supposed to be the hottest days so I wanted to make sure the plants had sufficient water before this. I'll let them dry out totally before watering again. There's another four lined plant big somewhere that sat there and destroyed another leaf. I'm AT LEAST spraying with BT after this heat wave. Supposed to rain a little today with thunderstorms. I haven't got my supports up yet but if i need to I coukd throw my tarps up real quick. Don't think I'll need to though. These are some tough freaking plants and I am super proud of how they've turned out thus far.
UPDATE: WENT BACK OVER AND RE APPLIED BLEECH TO THE RAGS AND ON THE PERIMETER OF MY CAGE. I TACKED A FEW MORE DRYER SHEETS UP. REASON I DID THIS WAS BECAUSE WEVE BEEN GETTING HORRIBLE THUNDER STORMS WITH TORRENTIAL RAIN. THE WEATHER MAN HAD BEEN WRONG SEVERAL TIMES WARNING OF THUNDER STORMS AND WE WOULDNT GET SHIT. THIS TIME IT WAS PRETTY BAD. TOOK A SHORT VIDEO. IT WAS SUPPOSED TO BE THE HOTTEST DAYS TODAY AND TOMORROW. I DIDNT NOTICE ANY BREAKAGE AND I DONT SEE ANY ON MY CAMS. IM SURE ITS NOT THAT MUCH RAIN AND THOSE NAHS WILL DRY OUT SOON. I NEED TO GET MORE PH DOWN AND DECIDE WHAT IT IS IM GOING TO DO FOR NUTES IN FLOWER AND MAKE UP MY MIND.
7/28 Huge thunderstorms all day yesterday and through the night with high wonds. Plants made it through unscathed despite the lack of a trellis. Today is supposed to be the hottest of these days. I think the hear wave ends today. I really need to get my supports up. I'm super lucky to not have had any breaks during the storm. I have a couple of videos I did but I didn't upload them earlier and now that I'm back in the woods I doubt they'll upload now. I'll give it a shot. If not I'll put them up tomorrow. OH! I found that four lined plant bug that had been fucking up my leaves and squished him. Well I hope it was him. If not I killed a sibling at least.
UPDATE: JUST WOW. This morning all drooped over from the storm went over at 4 and its still 90 and they seem to have grown sic inches and jumped forward WAY more into flower. I am amazed. I'll upload a photo or two but I took a video I'll put up tomorrow. Super stoked. Oh and you can give me a red smile face for not using nutes every week @growdiaries but you point out the deficiency then I'll fix it.
7/29 Plants looking fantastic this morning.
UPDATE: PLANNED ON NOT GOING TO THECGROW TOMOGHT SEEING THAT IT HAD RAINED SO HARD AMD THAT WE ARE SUPPOSED TO GET RAIN TONIGHT. I GET THERE AT ABOUT FIVE AND MY CANARY AND A FEWCOTHERS WERE DROOPING! IT WAS IN THE 80S ALL DAY. I GAVE EACH PLANT A GALLON OF WATER. THE GROW BAGS ON THE TEO WORST PLANTS WERE SUBSTANTIALLY LIGHTER THAN THE REST. I HOPE IM NOT OVERWATERING. THE PLANTS SEEMED TO PICK BACK UP AFTER WATERING BUT ILL HAVE TO WAIT UNTIL TOMORROW TO UPLOAD MY PICTURES AND VIDEOS. I NEEDED TO ADD TEMPORARY SUPPORTS TO A COUPLE DIFFERENT PLANTS. IM CERTAINLY GLAD I GOT THE URGE TO GO OVER. WHAT A CHANGE IN A FEW HOURS
7/30 Plants are really growing fast and transitioning quick to flower. We got almost no rain so I'm glad I watered like I was supposed to even though the bags had some heft to them. I'm noticing more pest damage. I'm thinking a bt spray tonight might be beneficial. I'll look through what I've got on hand. I may just give them an application of spinosid but we'll see. I still need to move things and put my supports up. Medical problems have slowed me down.
UPDATE: Went to check the plants around 3 and they looked great. Bags were still heavy and a little bit moist. I think with the added rain some of the plants may have been overwatered. I should have only watered tue bags that felt light. There is only one plant now that looks a little overwatered and even that is looking good. I found some more minor pest damage. Winds were fairly high. I wondered about my trellis netting but it hadn't been sanitized and my plants are very healthy so I decided to wait. I watched them dance like willows in the wind. I know it won't be like that with big ol colas on them but for right now it's working out just fine. Goal for next week is to move the front row back and move things around to better utilize space, possibly spray for pest and add supports for final flowering after I get the plants situated how I want them. If I do it right I may be able to lst some. Also took a 2 minute video but I cant upload until tomorrow.
7/31 I'm wondering about my watering habits. This morning I watered a couple blue cheese and purple punch plants with just a half gallon as they were light and looked drooping. I'm wonderingvif I'm overwatering. Some plants still seem heavy while others are light? I think the plants may have been overwatered due to the torrential rain and my taking less time hand watering. Hopefully I won't come home from this doctors appointment to wilted plants but I really doubt it. 10th planet requires far less water than the two other strains. Even specific phenos require more water and its difficult with the different size containers but im working with what ive got. I need more ph down and I've gotta get these plants supported. These are some massive plants. Store was closed. Dispensary was opened. Showed my buddy the video then it started raining. By the time I got there the plants looked horrible. Everything was droopy but a couple were really bad. A few weren't bad at all. Actually the one in the ten needed it. I think I just need to give more water at a time and document how I water each plant individually. I also need to take into consideration the weather. Hard to do when it's so unpredictable. I'll wait for them to dry out and then I plan to start low doses of big bloom and grow big but I need to wait for them to dry out first. Then next watering they'll get some nutes. It's sunny now so I may go check my plants. I may also put a fan out for a while on the bags. That might help them out.


Likes
2
Share


@KeemBboomin
Follow
Everything is not as accurate as I would like to say, but I wanted you guys to see what I can do
Likes
283
Share


@love_2_grow
Follow
D21 - Start of week three of veg for the second girl, while it is only the start of week two for the first girl as I had to replant her. I will probably do the first topping on the second girl this week but I'll see in a few days where she's at. I gave both girls around one liter of water @ pH 5.9. A bit on the low side as I used too much pH down but it'll be fine for one watering.
D24 - Yesterday I switched my light from the seedlings program to the veg program, and I'm now reading around 500-600 PPFD across the canopy. On the high end for sure, so let's see how the girls handle it.
However, the daytime temp in the tent jumped up to around 30 degrees C after I switched the lights. #tinytentproblems
I also added some support to #1 as she has a relatively thin stem but large leaves, so the oscillating fan keeps knocking her around. The second girl also initially had a slender stem, so I guess it is their genetics. (#1 is 12 cm tall and 15 cm wide, while #2 is 20 cm tall and 35 cm wide.)
I will need to top the second girl this week as she grows a lot each day. I'm considering mainlining her but haven't made up my mind yet.
I gave both girls around one liter of water @ pH 6.5.
D25 - A couple of days ago, switching the lights to the veg program made the cover crop explode and turn into a jungle.
I decided to trim down the red clover to increase the airflow around the girls and reduce water use.
I watered the girls only yesterday, but they were already thirsty again, so I think that the clover was drinking quite a bit as well.
After cutting back the clover, I gave each girl around 1.2-liters of water @ pH 6.5.
D27- Today was the last day in week three of veg for the second girl and the last day in week two for the first girl. I really should have topped the second girl already, so that will need to be done as soon as possible. She is 26 cm tall and 38 cm wide, while the first girl is 13 cm tall and 27 cm wide.
Yesterday, I removed the support from the first girl as her stem had gotten more robust, so it was no longer necessary.
Today, I started brewing compost tea (worm castings, neem meal, kelp meal, biochar, rock dust, algal limestone, bentonite, and molasses) which I will leave overnight and feed to the girls tomorrow.

Likes
10
Share


@eldruida_lamota
Follow
Que pasa familia, vamos con la novena semana de floración de estas Papaya Sherbet feminizadas de fastbuds.
Vamos al lío, de las 3 plantas, me quede con 2 por espacio, siempre pongo alguna semilla de más por si no abriese alguna por no perder ese hueco del indoor.
También se trasplantaron a su maceta definitiva, en este caso de 7 litros que además provocó un shock que también solucione.
El ph se controla en 6.2 , la temperatura la tenemos entre 20/24 grados y la humedad ronda el 50%.
Las flores están bien prietas y sacan unos aromas afrutados bien llamativos, está acabando de madurar pero no veas como se han puesto.
Hasta aquí todo, Buenos humos 💨💨💨.

Likes
5
Share


@Bluethum94
Follow
Got a new light now under mars hydro getting transplanted tonight to bigger pots and 10 are going to 4x8 tent 6 staying in 5x5 going into flower in about 2 weeks
Processing
Likes
15
Share


Likes
28
Share

@eldruida_lamota
Follow
Venga familia que ya viene la cosecha de estas Apple Fritter de ZamnesiaSeeds, que ganas que tenia ya de darles machetazo.
No veas que pinta que tienen estas plantas.
Las flores aparte de prietas se ven bien resinosas.
a sido una genética con la que disfruté mucho cultivarla, es algo complicada cultivarla pero merece la pena si eres cultivador con experiencia no te será problema cosechar.
Agrobeta:
https://www.agrobeta.com/agrobetatiendaonline/36-abonos-canamo
Mars hydro:
Code discount: EL420
https://www.mars-hydro.com/
Hasta aquí es todo , espero que lo disfrutéis, buenos humos 💨💨.


Likes
11
Share


@MELs_Garden
Follow
Semana 4 (del 23 al 29 de abril)
Los espacios para las flores estan preparados, y las flores estan en pleno crecimiento.
25 de abril
Riego con 1.2l x planta
2A + 2B + 1.5 Candy + 1.5 Big Bud + 1 overdrive + 1 B-52 + 0.16 Mammoth P + 2.5 Calmag
Ph 6.1
EC: 1.2
T:20°C
Periódicamente quitamos hojas que vamos viendo tocadas o que estorban.
25 de abril
Los trips siguen ahí, no son muchos y parece que no prosperan demasiado pero estan ahi. Riego foliar con spruzit y tec fort para mantenerlo controlados y hoy esperamos que nos llegue diatomea para erradicarlos del todo.
Quitamos las hojas que vemos que molestan o que son un poco inútiles porque no les da demasiada luz.
Cada día que pasa se ven más flores y más grandes.
• Malas noticias, el medidor de EC se averio y los vores del riego pasado fueron erróneos, pero ya tenemos nueva herramienta y solucionaremos los pequeños problemas causados.
29/4
Riego con 1.1l por planta
2 A + 2 B + 1.5 Big Bud + 1.5 Overdrive + 1.5 Candy + 2 Sensizym
PH 6.1/6.2
EC 1.72/1.8 ms
18/19.8°C
Ayer pusimos varias trampas adesivas azules para trips por si hay alguno que no vaya dando saltos de planta en planta. Hoy realizamos ultimo ( esperemos) riego antiplagas, usaremos 1.5ml•l de aceite de nem y 20g por litro de tierra de diatomea que por lo que dicen es mano de santo.
Esta semana las temperaturas han subido un poco; en encendido oscilan entre 25-27°C, estos últimos días siendo más de 26-28°C.
Todo sobre la marcha, algunas plantas como la bubba parece que se está adelantando porque es bastante rápida 50-55 dias, la Muffin berry ( que la teníamos en 1.2m ) la hemos tenido que doblar 45° para que no se nos vaya de altura. Por lo demás vosotros diréis 😁

Likes
21
Share


Likes
Comments
Share


@ORION1_1
Follow
The growth took off this week! Both plants showing signs of flowering but one is ahead of the other. I'd say there was at least 6 inches of height added over the past 7 days or so. I'd consider this the first week of flower
Likes
4
Share


@IronGrower
Follow
Since my last grow i have a problem with powdery mildew... So on veg. i just spray Sulfur and worked fine... (the smell is terrible....)
now i am in flower and found the mildew again... i try a new mixture:
dry common horsetail
1 onion
1 garlic
cook that for around 1 hour.
Then i flux it 1:5 with water.
The smell is not so bad and just for 2 days. The leaf and flower not change color or smell.
Hopefully it works! i will spray that now every week.
Update:
Flower Day 20
I start with the Top dressing on all Plants. They start to frost.
The powdery mildew spreads :'( i dont know what else i can do?! i spray again!


Likes
31
Share


@Kirsten
Follow
16.6.25:
Today is Harvest Day!
Well this has certainly been a fun one! Really pleased with how she turned out, when I cut her down, it was actually heavy. I'll be interested to see what we yielded here!
I did take all of the fan leaves off and some of the sugar leaves too. Just to make the trimming easier, and also help prevent mould during the drying process.
The trichomes were very hard for me to tell, but they have quite a lot of amber. So I may have grown some sleeping potion. We will soon find out I guess! 😅
I decided to leave the plant longer than I usually would, I did this to see the difference in effects.
This is a low THC strain, so in theory shouldn't produce a couch lock effect. So if it does, it will give me a better idea of the harvest windows.
Some of you helped choose this strain to grow, so if you've followed along, I hope you enjoyed this journey. Thank you, it was a great choice
Will update when I've finished drying, and then the smoke report!
😊💚✌️🌱👌🍃


Likes
15
Share


@Bluemels
Follow
An Tag 42 habe ich alle Haupzweige runtergebogen um mehr Struktur zu schaffen 💪
Tag 46 letzte Entlaubung vor der Blüte 😜
Tag 47: die Triple G hat sich besstens vom ausgeizen erholt! Die übrigen Triebe sind schon deutlich kräftig geworden.
In 2 Tagen schick ich sie in die Blüte 😎
Likes
21
Share


@matthiasbmg
Follow
This week will be the Last week probably, I just flushed them and will not water them any more. I Put the lightcircle down from 20 hours to 18.

Likes
1
Share

@ChitownCannaChica
Follow
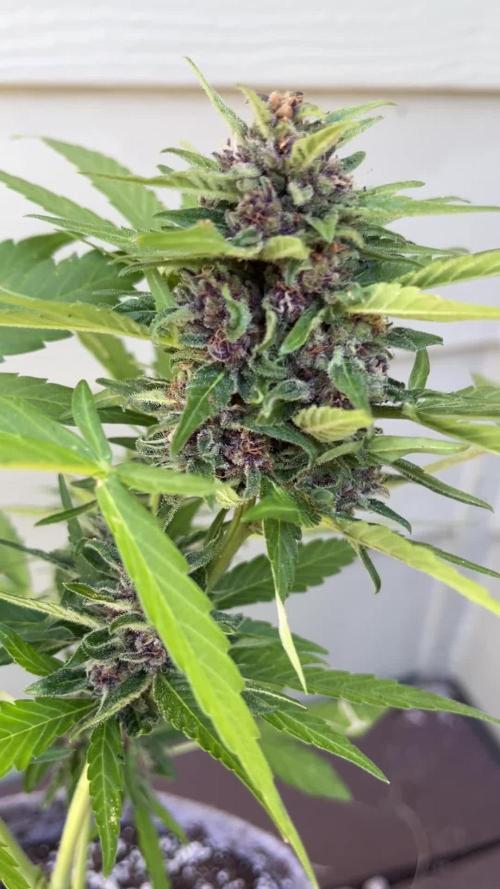
Temps dropped by 10-17 degrees- especially at night. Have not given any nutrients, just hose water. She seems to be doing fine. Ipm weekly and the cold is making her slow down a touch. Other than that, the frost is developing nicely and countering all this plant has been through with the temp swings, bouts of rain, bouts of dryness, wind, sun, no sun, etc- I should get a decent little harvest! Smell is divine! Has these sweet vanilla pine aromas with a deep purple bud. Probably chopping next week!🏻💚
Processing
Likes
16
Share


@Mrg7667
Follow
Officially day 7 of this adventure! Added a couple more cfl
3 of 1,500 lumen 500k and 2 of 800 lumen 500k
Plants are looking si happy and amazing had a little strech problem with a couole but j just added more soil for support and they all look pretty good now! Still have the stragler Chocolate Marshmallow but she looks great!
