


By continuing to use the website or clicking Accept you consent to our cookies and personal data policy and confirm that you are at least 18 year old. For details please see Privacy Policy and Terms
Accept
Likes
Comments
Share


@Mz876
Follow
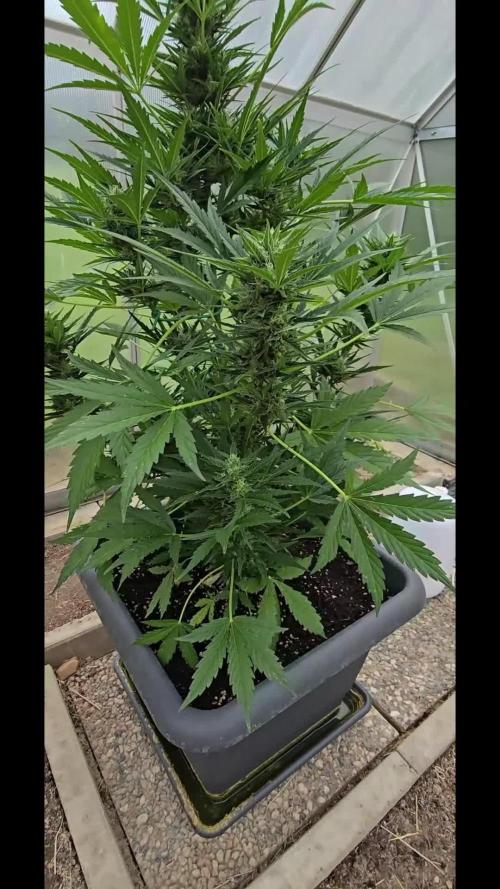
Both Plants are beginning to stretch especially the second plant . I’m guessing they are about to start pre flowering . They’ve been super healthy. I just have a few leaves that go nutrients splashed on them so they’re looking a little burnt. I expected them to start flowering already but I’m not complaining .


Likes
Comments
Share


Likes
28
Share


@PrairieFrostGrow
Follow
*
********* Week 11 - June 20 to 26, 2020 - Days 71 to 77 from germination ***********
*
It is the end of flush week and she went into darkness on Wednesday night, day 75, for two days. Saturday will be harvest day and start and the dry process👍
This week she continued to fill in and she also pushed out more frosty tricombs!! The fade happened this week more and she fed off of more of the nutrients within the plant.....perfect😃......would like a little more even but she was ready based on tricombs. Would like to have seen the lower leaves a little more yellow but its good.
I am feeling very strongly that the big part of the pH issues this run was a change in feed water. I have always used bottled RO water for all my grows, except outdoors, but this grow I switched to tap water. Dechlorinated the water with air stone and gave it 24 hours min before using. Wanted to save some money and tired of lugging bottles downstairs a couple of times a week☹️ This is worked out nicely and a lot more convenient. However, the city must be putting some crap in the water that is causing issues in my media and raises the pH after the watering. Out of the tap it is 8.4pH and 275ppm. Since ppm were not too bad in my opinion I moved forward without filtering the water.......oops🤬🤬🤬 Out of options on what is causing the issue, I switched back to RO water late last week........all the girls are happier!!!! F......missed the cause for weeks. Always learning from this plant and my own mistakes to get better every run😉👍
Also wanted to add a little more stress to girl to help push out some increased resin. I drilled a 5/16” hole into the main stem to cause her stress. I did this rather than trying to break a branch and will see it goes this run. Sterilized a new bit in Alcohol and went for it. They went into darkness about a couple of hours later. Excited to see what happens when she comes out to get chopped😃😃
Not really a lot more to add this week as it was mainly looking at the tricombs and her buds. The pH will impact the harvest but she has been fun to grow and very resilient to pest and bug issues as well as grower curve balls. As always.......nice job Sweet Seeds....... SWS56 is very solid and I look forward to running her again one day. Beautiful little girl and makes me smile😃😃😃
Little more detail......
June 20/20 - Day 71
- Rezin and Liquid Weight @ 2ml/L = 285ppm and 4.0pH
- 8L given to get a good flush....pH still running around 7.4
- Runoff in pots already were 7.9pH and 685ppm.
- after 8L water runoff was 7.4pH and 360ppm.
- she is 20” tall and 24” wide.
- a number of clear tricombs but more becoming cloudy.
June 21/20 - Day 72
- dry out day.
- buds are firming up......squeezed a couple🧐
June 22/20 - Day 73
- Rezin @ 1ml/L = 120ppm and pH the water to 2.7!!!!!!!!!
- Given 2L watering.
- No runoff water and I am good with that as I want the low pH water to stay in the medium.
- her frost levels are really coming out now.....was able to lower tent temps to 75 degrees and 51% humidity......its been raining a bit so damn humidity has been high.
June 23/20 - Day 74
- 2L plain water feed - 80ppm and pH to 2.4!!!!!!
- not excited about these crazy low pH numbers but doing what we can
- her tops are getting more pointy now and ripening nicely
- leaves continue to fade......she is close
- checking tricombs, I think we are done and tomorrow will be her last day so that I can take down on Saturday.
June 24/20 - Day 75
- 2L plain water feed - 80ppm and pH to 3.0
- Going into darkness tonight so this was her last bit of moisture.
- drilled a hole into the stem.....was going to do a couple of holes but not trying this method before I decided to leave it with one hole.
- into darkness tonight
So we finish up the week with her in the dark. Next update will be the harvest!!
Thanks very much for taking the time to review my diary!! Sorry for running behind often on this run.........everyone has had a busy life the last couple of months in the world and its been no different here...........a huge Kudos to all the Growmie‘s that are able to keep up with their diaries on daily basis on GrowDiaries.......its a commitment😃👍👍
Sweet Seeds girls are very solid genetics with great vigour and resilience.......this strain is no different........great job Sweet Seeds🙏

Likes
22
Share


@burnout
Follow
Week 8 of flower. Trichs still mostly cloudy, seeing a couple of amber colors here and there on the bracts.

Likes
13
Share


@Mrs_Larimar
Follow
2022-08-03
Pictures say more than 1000 words.
i really have grown some Plants. but never such one
She looks like an Advertisement- nearly unbelieveable
Iam sure iam growing her next Season again.
we had tough Conditions, heat, hailstorm, heavy rain, Cats and Dogs and Bugs----
they were growing likeChampions-
well done Ganjafarmer- nice Genetics

Likes
4
Share


@Terpio1500
Follow
Week 4
Last week was good gave the last defoliation for day 21. Adding a higher feed for her.
This one got crazy pistil produced & it’s going all the way down the plant it’s the shortest out of the 3 but has the 2nd most pistil producing on it
Check out my IG for more content @therealterpio & check out my other dairies (jungle verde & Gelato Cake)


Likes
54
Share


@Mimi420
Follow
Hi guys!
In the last week I started to train my kushes.In the start of the week i super croped the uper ccola's to stop the grow in the height a litle.After 5 days for recoverin,I put the net in.and starting to filling up the space.
They gettin 3,5l with nutrients every 3-4 days.
I'am amazed othe huge leafs on dutc kush.So far is everything going ok 🙂


Likes
13
Share

@NSABND
Follow
Day57 hot summer day 😎👍🙏
Day58 cloudy and normal temp 😳😵
Day59 cloudy and cold temp 😵😵😕

Likes
44
Share


@Secretflower
Follow
Bonjour à tous.
Le 5 septembre jour 31 pour ma Boy.
Elle grandi doucement, je lui ai fait un Topping et j'ai laissé que 2 étages pour essayer la technique du Mainlining.
Je lui donne 1ml/l de bioroots et j'ai augmenté la dose du biogrow à 1ml/l.
Elle commence à avoir de bonne racines c'est cool.
Voilà c'est tout pour l'instant.
Merci d'être passé me voir, laissez moi un like si le coeur vous en dit.
Peace and Grow for All..🌱🌿🌲

Likes
15
Share


@Viccrazyweed
Follow
Buds keep fattening up more and more, this should be the amazing phenomenon Carl Linneus talked about
Flowers are getting enormous, gross, monster buds, everyone told me i had not enough light, not enough air flow, not enough badabee badaba but honestly i see them right, beautiful and healthy
Please, SUGGEST ME anything you can think about and ill try to improve it


Likes
14
Share


@AndrewC
Follow
So this is the Tear Down week. The timing of it makes it so i will need to the harvest flag in a few days when I can weight and test the plants.
I have included the Cleaning, and Cutting and some Root Porn.
I will make the harvest post in about 4-5 days, when I can trim these plants. There is a lot of Plant here. I got way more than I was expecting. I don't have a scale that measure this amount of plant, without taking like 10 measurements and then adding them together. So I will just be posting the dry weight. I will post the wet weight as dry weight * 1.65.
Autopots: Wow, what a great product. I have been blown away by how well and how easy it was to work with them. They really did solve the watering issues. Excellent product. If you are a beginner, start with Autopots.
-= Lessons Learnt =-
- Overdrive the air to your Autopots. In my control plant, I used a small rectangle air stone (instead of a standard air dome). This lead to root rot and some other issues, it also put significantly less air into the water. The root rot, give the material for the Brown Algae to grow. Using a huge Air-disc-Air-Stone would be an excellent combo to mix in with the air dome itself. Something like this: https://www.amazon.ca/Pawfly-Diffuser-Suction-Hydroponics-Aquarium/dp/B01MY3AQ33 at the bottom and the air-dome on top of it, will be what I do with my next experiment.
- Air stone in the reservoir. I had two instances where algae grew into the res. An air stone would have helped. It would have also helped my control plant get less root rot. Given the amount that the air-domes and air sources got engulfed, having the water have more o2 in it would have only been beneficial.
- Don't grow 6 plants in a 4x4. Since my control plant was about 1/8th the size of the others, I think I could have grown 5 in the shape of a 5 (on a 6 sided dice)⚄ This placement would give a much more spaced canopy for airflow and more importantly light. The sides of some of the plants were lighter green and produced larf due to lack of light penetration.
- This tent was on 19-5 schedule. This worked out very well for this strain. After every lights on, they were in the praying position, so this strain was able to recover in that 5hrs off. If I had more seeds, I would run these again, and try 20-4. I think this strain could handle it. All for all, I think I'm going to 19-5 as my default timing. This kept up a solid DLI.
- Staring at .9EC (really .7 EC cause my water here is .2 EC) Then bumping up at .1 a week, until 1.6EC worked out VERY well. I experimented on this crop all the way up to 1.9EC, which burnt the tips of this plant. I think if I did this strain again, I would do 1.6EC until 3-4 weeks left then crank it to 1.9. It did plump them up when I went to 1.9, however it left them looking rough. Bulk was added though.
- Sticking to 6.0PH for all of veg, and 2 weeks into flower worked great. The plant had solid and consistent color and leaf shape . The plant's did get hurt, due to some issues (as noted on the weeks). I switched to 6.5 PH in the last 3-4 weeks and it helped them recover, and plump up noticeably.
-VPD. The #1 thing I focused on was VPD. I keep it .9kpa range, as best as humanly possible. It was honestly, HUGELY noticeable compared to my other grows. I know truly understand the value of properly dialed in VPD. This is the one lesson that will stick with me forever.
- Super-cropping: On the plants I give the chiropractic treatment too, had much thicker stems as much larger channel internally. I did this treatment to 4 of the 6, and the 4 that had it done has larger buds and recovered from defoliation faster.
TLDR; VPD is king. Super-cropping is worth the time. Keeping PH and EC dialed in were all wins. Autopots kick ass.
Likes
17
Share


@Marrocko
Follow
Buenas cultivadores esta semana crecieron bastante su aspecto es bastante bueno buen color e las veo con mucha fuerza, continuó el calor sin poder hacer gran cosa hasta el fin de mes que pueda comprar un ventilador ou algo para evitar las temperaturas altas tube unos días gracias al calor las hojas apuntaban hacia arriba con la sierra un poquito enrollada pero bueno no sé quanto daño les pude haber hecho aparentan buena salud y fuerza... Soy novato y busco cada día comprender y mejorar espero que ustedes me digan vuestra opinión. Gracias ✌️🏼peace smoke a joint and fly 😎


Likes
2
Share


@KEVS_BEST
Follow
Woche 6 - Übergang zur Blütephase und erste Herausforderungen
Die sechste Woche markierte den Übergang von der Vegetations- in die Blütephase. Bis zum Wochenende wurde weiterhin der Terra Vega Dünger verwendet, mit einem Verhältnis von 30 ml pro 10 Liter Wasser. Am Samstag, dem ersten Tag der Blütephase, wurde jedoch deutlich, dass ein Wechsel auf den Blütedünger nötig war. Leider führte die verspätete Umstellung auf die Canna Terra Bloom Linie zu einem leichten Nährstoffmangel, der sich in den ersten Tagen der Blüte zeigte. Anfang der ersten vollen Blütewoche wurde dies korrigiert, indem vollständig auf Canna Bloom umgestellt wurde.
Die pH- und EC-Werte blieben stabil und optimal eingestellt. Die Temperaturen stiegen minimal an, blieben jedoch bei angenehmen 26 Grad. Mit Beginn der Blütephase startete der sogenannte Stretch, und die Pflanzen legten beeindruckende 2,5 cm pro Tag zu.
Während dieser Woche wurden die ersten unteren Blätter entfernt – ein leichtes Lollipopping, um die Energie auf die oberen Bereiche zu konzentrieren. Die entfernten Blätter wurden getrocknet und sogar laminiert, um den Fortschritt dieses besonderen Grows festzuhalten. Es wurden ebenfalls einige kleinere Zweige und Blätter im unteren Bereich entfernt, um die Belüftung zu verbessern. Das eigentliche, umfassendere Lollipopping wird jedoch erst in zwei bis drei Wochen erfolgen.
Trotz des anfänglichen Mangels aufgrund der zu späten Umstellung des Düngers blieben die Pflanzen insgesamt kräftig, gesund und wuchsen konstant weiter. Der Übergang in die Blütephase verlief somit erfolgreich, und die Pflanzen zeigten weiterhin ihr beeindruckendes Potenzial.
ENGLISH
Week 6 - Transition to Flowering and Initial Challenges
The sixth week marked the transition from the vegetative to the flowering phase. Until the weekend, the Terra Vega fertilizer was still used at a ratio of 30 ml per 10 liters of water. On Saturday, the first day of flowering, it became clear that switching to the flowering fertilizer was necessary. Unfortunately, the late transition to the Canna Terra Bloom line caused a slight nutrient deficiency that appeared in the first few days of flowering. This was corrected at the beginning of the first full flowering week by fully switching to Canna Bloom.
The pH and EC levels remained stable and optimally adjusted. Temperatures increased slightly but stayed at a comfortable 26 degrees. With the start of the flowering phase, the stretch began, with the plants growing an impressive 2.5 cm per day.
During this week, the first lower leaves were removed—a light lollipopping to focus the energy on the upper parts. The removed leaves were dried and even laminated to document the progress of this unique grow. Some smaller branches and leaves were also removed from the lower areas to improve ventilation. However, the main lollipopping will take place in about two to three weeks.
Despite the initial deficiency due to the late fertilizer switch, the plants remained overall strong, healthy, and continued to grow beautifully. The transition to the flowering phase was successful, and the plants continued to showcase their impressive potential.

Likes
218
Share


@DevilsBud
Follow
Week 9 of Critical RQS
Day 57 FLUSH WEEK!!!!!
I have decided to flush the critical.
Normally the critical needs 7 to 9 weeks of flowering and on week 9 . I don't see a lot of white pistils anymore and tricomes are all cloudy and some ambers it's going to be a exiting week.
Day 58
Flush the plants and run off had a lot of nutrients in it so have to flush for quit a bit
Day 59
Drying the soil out some and then do big flush again hopefully i will get those nutrients out other then that critical is looking awesome 🤘🏻😎🤘🏻
Day 60
Flush them again today and getting the nutrients out of the soil I probably have flush at least for a week i had bin a bit lazy checking with EC meter and now i have to deal with it i don't like to be inconsistent but is was a bizzy week
Day 61
Sunday rest day nothing going on 🤘🏻
Also want to thank everybody for the comments likes etc you know who you all are 👍🏻😍👍🏻
visit www.marshydro.eu
for your best gear and use the PROMO CODE: DEVILSBUD
Fully marshydro supported Setup:
Marshydro GT100X100X180
Marshydro Ts 1000 LED lamp
soil :Plagron batmix
Nutrients :Advanced Nutrients
Advanced Nutrients pH Perfect Bloom
Advanced Nutrients pH Perfect grow
Advanced Nutrients pH Perfect micro
Advanced Nutrients B-52
Advanced Nutrients Voodoo Juice
Advanced Nutrients Rhino Skin
Advanced Nutrients Big bud
Advanced Nutrients Bud candy
Advanced Nutrients Overdrive
Advanced Nutrients flawless finish
Advanced Nutrients Sensizym
BioBizz - Calmag
Mars Hydro tent handy info
Lock All Light Inside: MARS HYDRO Grow Tent Interior is made of diamond mylar. Non-toxic to the environment, no harm to plants. High-quality 1680D canvas being double stitched, (ALL OTHERS BRAND grow tent is 601D canvas) which is tear-proof for perfect light locking, No light leaks or rips at all.
Durability Grow Tent :Stable Metal corner adapters and poles are the trustful supporters of the tent. No rusting nor paint-falling. Quick easy tool-free installation. Carries strong heavy-duty SBS zippers, double layer lining to create a light-proof seal.
Easy Observation of your Plants: Special peek👀 window made by double layers of cloths. Observe the growing conditions of your plants without opening the tent and avoid disturbing plants. The peek window also serves to dissipate heat and ventilate air.
Removable Tray Keep Clean: The package includes a removable waterproof floor tray to hold soil and fallen leaves. The tray can be taken out easily to wash. Removable and water-proof cleaning easy.
Good Ventilation&Fast Assembly: Circular double-sleeved vent holes with adjustable nylon strap for air circulation by exhaust fan, ducting, carbon filter, or reflector. Better allows proper light, heat, and airflow. Quick tool-free installation. Reinforced by a sturdy metal frame to ensure security and stability, supports up to 140lb. Perfectly safeguard your plants to thrive even in winter.
Likes
23
Share


@BedroomGrower
Follow
Day 44: This afternoon I received the Air Pot and then I immediately mounted one and put in the soil a seed of Amnesia Haze Automatic of the Royal Queen bringing the total of the plants to 15: 8 Gorilla + 1 that has yet to germinate, 4 Cheese (2 large and 2 small) and an Amnesia Haze Auto all from Royal Queen Seeds + 1 x LSA Lemon Haze. At the moment I moved the small Lemon Haze under the new LED + CFL setup to provide a greater amount of direct light. Then under the 600w HPS lamp there are 12 plants and in the grow room 3, the Lemon Haze + 1 Gorilla and 1 Amnesia awaiting germination. However, I decided to leave the grow room open. The crops are close and I connected all three lamps to a single timer with cycle 19/5. Also with this system the plants in the grow room will receive more air and therefore more oxygen, carbon dioxide etc. and a small amount of light coming from the HPS lamp.
Day 48: The six Gorillas in advanced bloom have stopped growing in height and have started to form larger gems. The final height of the 8 Gorillas is about 150 centimeters for 3 specimens, and 120 centimeters for the remaining 5 plants of which 2 are in late flowering. The production of numerous sugar leafs is also a sign that the final flowering phase has begun. I think I can collect the first cola in two or three weeks. The sweet smell of resin in this phase begins to become more intense. In this session I photographed the plants one by one before placing them in the final position. In this last position I have rebuilt all the plants, including the two Big Cheese.
Likes
6
Share


@Finsfan
Follow
I planted this into its final container.. I did some light defoliation this week to expose all the bud sites in hopes they fatten up and then to frosty mcnuggets.. never really Defoliate autos but trying something new...
At that point of putting on its weight so I jumped the nutes up a bit more.
Had some slight light burn during veg and early flower.. brand new hlg blackbird.. I justvput it up to 70% at about 24 inches away.. 60% was too much during veg so kinda touch and go but keeping an eye on her.

Likes
7
Share


@UrbanBoer
Follow
I cannot wait for the harvest to begin… dam… this plant is doing the thing that make the pots to be done[South African Phrase], she has shot up, during my absence it’s like it was getting watered with nutrients and water mixture, and all she was getting was water. next week hopefully I’ll find the measuring tape and measure the height of this beautiful plant, my eyes cannot believe my labour, it’s fruits are becoming unbelievable, I hope that the bud is going to be big and juicy, I want to nothing but to smoke the best.