By continuing to use the website or clicking Accept you consent to our cookies and personal data policy and confirm that you are at least 18 year old. For details please see Privacy Policy and Terms
Accept


Likes
39
Share


@DjDaveAtHome
Follow
Timing seems about right. The current flowering plants are finishing so these will be in flower within two weeks. From all that I've learned this grow (being my first DWC), I plan on carrying on with a combination of organics and synthetics. Along with GHE products below, I'll be using the organics right along side. Mainly for the microbes and fungi.
I plan on keeping my water about 1-2" below the basket with heavier pumps. Will be using the EcoPlus Eco Air 4 Four Outlet air pump divided into 2 buckets/2 air stones and using the 2 Marina 200 Air pumps for clones. That will more than double the airflow to the roots.
When I change the res and even when I transfer over to the larger flower DWC bucket (3 gal - 5 gal) I'll be keeping a litre of the veg solution to add to the fresh new res, thus 'inoculating' it with the already stable microbial and fungal environment that it's been used to. As well, I'll continue with Hygrozyme on a 'maintenance' dosage when changing the res and adding a liter of the microbial and fungal tea listed below as well as a dose of Tarantula from Advanced Nutrients. Adding organic Alaskan veg and bloom fertilizer (some 'Fulvic acid' as well, like seaweed liquid. Plants uptake Fulvic better than Humic. Root fungi eat the Humic and poop out Fulvic!) in 'moderation' to help bring PH back down and feed microbes and fungi. Once the plants start really stacking, I'll add more synthetics to compensate and to lower PH. The organics can really mess with the EC so I'm not going to be freaking about high levels. Found that it didn't effect the plants health that much if at all.
Dinamed Plus from Dinafem Seeds (1) and Blueberry Headband (1)from Humboldt Seeds.
https://www.dinafem.org/en/dinamed-cbd-plus/
https://www.humboldtseeds.net/en/blueberry-headband/
Lighting
https://www.horticulturelightinggroup.ca/products/260w-qb-v2-led-kit
DWC Nutients
https://generalhydroponics.com/floraseries
FloraGro 1 ml/l
FloraBloom .5 ml/l
FloraMicro 1 ml/l
Diamond Nectar: N/A
https://generalhydroponics.com/diamond-nectar
Cal Mag: 2 ml/l
https://generalhydroponics.com/calimagic
SuperThrive: .5 ml/l
https://superthrive.com/
https://hylineproducts.com/products/hygrozyme/#one
Grozyme: 2.5 ml/ltr
Tarantula
https://www.advancednutrients.com/products/tarantula/
Epsom salts
Root Rot Tea
8 liters RO water
5 ml (1 tsp) organic sulphur free molasses
5 ml Alaskan Organic grow fertilizer (or something comparable)
5 ml Alaskan bloom fertilizer (or something comparable)
5 ml Seaweed or kelp fertilizer
Handful of composted horse pucky
Worm castings, sea soil, Gaia General Purpose and Bat Guano Phosphate optional
* add after brewing
2-4 ml Advanced Nutrients Tarantula


Likes
Comments
Share


@Alejangrow
Follow
Moved these girls in to the flower room so now they are under 600 watts of hps. towering above every other strain I've grown so far these girls loved vegging for 8 weeks. I did a light defoliation of lower most branches because light wasnt reaching through the canopy well & these girls shouldnt mind it at all. Really looking forward to seeing how these ladies fill up a room. 😉🌿


Processing
Likes
14
Share


@DUBDOLLASIGN100
Follow
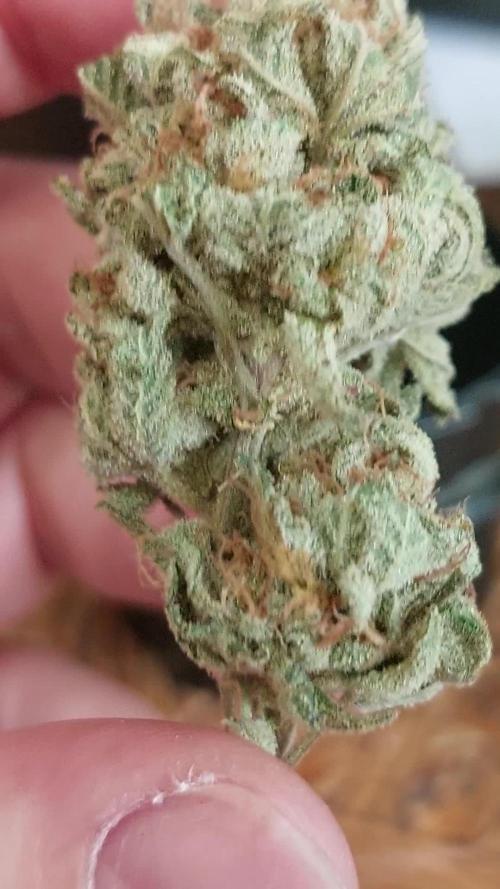
Flowering well with that potent smell this OG will be some fire🔥🔥4 weeks outdoor today from a 5 week indoor veg.
Likes
12
Share


@NorthEuropeanGrower
Follow
Finally two of them started to flower. (Northern Lights and White Widow)
All seems to be stoped from growing taller.
Whats you expectations for this no money grow? Am I gonna have something in the end? And is it possible that the Wite Widow can be harvested in august?


Likes
4
Share


@TheSurfBud
Follow
Nice sweet smell... could say what strain it is because its from sweetseeds sweet auto mix 10 pk of the best..
Definitely going to enjoy this one ...
Grow went well and fast 62 days flat...


Likes
2
Share


@ao_grows1978
Follow
Week 4 in the books. She started throwing pistils this week. Cruising along and handling the training like a champ. She's drinking about a cup of water daily and her roots are thriving in the runoff caught in the 2nd cup, which gets dumped before each new watering. Strong structure and starting to get a little smell. She smelled like celery leaves up to this point. I've raised her closer to the light to increase light intensity.
Likes
35
Share


@Hiroots420
Follow
Impecable cosecha de Sweet Cheese, se llenó todo el espacio de secado de buenas cabezas, próximamente actualizaré números finales de cantidades pero hasta el momento se lo ve muy prometedor.

Likes
17
Share


@CanadianFillmore
Follow
Another successful harvest of this strain. However under the FC3000 light, frosty trichomes appeared like never before. I can barely wait to find out the dry weight and smoke test of this lady in 7 days.


Processing
Likes
7
Share


@Cannibalgardens
Follow
This lady is chugging along chasing the strain next to her and has been having a bit of a hard time against this slowed growth.. I've tried less water but still it hasn't really helped yet will watch and wait for that explosion.. cheers
Likes
14
Share


@Momgrowsthechronic
Follow
So it’s the end of Week 5, Day 35 for the Sweet Seeds Gorilla Girl XL auto flowering grow. I have come to the conclusion that these four plants are not going to be XL after their pre-flower stretch. Overall the plants are healthy but the prolonged low humidity and temperatures have robbed them of the vigorous growth documented in my previous Sweet Seeds diary (Cream Mandarine XL Autos). I am disappointed that this will most likely be an XS harvest but a tiny quantity of quality bud is better than nothing. I gave them their first feeding of GHE FloraNova Grow fertilizer at a rate of 1.25 ml/gallon and this is 1/4 of a full dose that would be given to a photosensitive strain. I am still watering every fourth day at a rate of 2.8 litres per plant or 0.7 of a litre per plant per day. I will only be using the fertilizer every other watering or every eight days. That’s about it for this update and on to…
Mom’s Tip for Week #5- To Tuck or Take? The when, where, why and how to defoliate Autoflowers successfully…. Lets start with some basic Biology- Photosynthesis is the process by which green plants take in sunlight, water and Carbon Dioxide and transform it into energy in the form of sugars that feed the plant and make it grow. So essentially, every fan leaf on your plant is a solar panel collecting light and therefore valuable in it’s own right. I always try to tuck my leaves if possible before considering removal as my plants need all the energy they can get to power through until harvest. But sometimes tucking isn’t enough or just isn’t an option anymore so here are my suggestions for taking the fan leaves from your Cannabis plants if needed.
When- defoliating Autos can be done anytime throughout the grow although it’s generally not done within the first 3-4 weeks. The plants are usually quite small and those early weeks are valuable growing time that these plants simply can’t afford to miss. This is when I find leaf tucking to be most valuable, allowing the plants to keep what few solar panels they have while also allowing the grower to position the leaves so that they are out of the way. I personally find that I defoliate my plants the most over the final 3-4 weeks of the grow as foliage is dying off on it’s own by that point and a few less leaves at harvest time is always a good thing! Of course anytime you see dead/dying or diseased foliage, it should be removed as needed throughout the grow.
Where- defoliating Autos is a delicate balance due to their small size and short lifespan. If my plants are healthy, thriving and tucking is no longer an option, I will only remove fan leaves if they are covering/blocking new growth or potential bud sites. As the plants age and the foliage begins to die off naturally, I tend to remove the oldest, lowest growth first working my way up the plant as needed until harvest.
Why- defoliating Autos is done for a few basic reasons but only as an extreme in my garden when all else fails. Removing certain large leaves will allow more light into the lower portion of the plant’s canopy reaching young branches or potential bud sites. As the plants age, it also helps with increasing airflow around your swelling buds thus reducing your risks for mold and fungi in humid grow environments. Removing any and all dead/dying or diseased foliage is absolutely necessary in keeping your plants healthy and the grow room clean and pest free.
How- defoliating Autos is simple if you keep it simple. Only remove what you absolutely have to and use a sterilized set of sharp pruners for a clean, controlled cut. As the plants age and the foliage begins to die off naturally, just wait. What doesn’t fall off on it’s own will snap off with a simple twist of the leaf’s stem. If the leaves don’t come off with ease, they’re just not quite ready yet so be patient.
Be mindful that removing the solar panels from your Cannabis plants is always risky business but Autoflowers are even more challenging in their own way. Smaller plants with a lower leaf to bud ratio and a short lifespan means less room for error so paying close attention to the when, where, why and how is crucial for successfully defoliating Autoflowers. Tuck if you can, only take what you absolutely have to and of course- never take more than 25% of your plant’s overall foliage at one time as this can be devastating or deadly to even the healthiest of plants. Allow your plants to take the lead and they will show you which leaves are ready to go- at what time, all on their own just as nature intended.
Likes
Comments
Share

@deseed_uy
Follow
Llegó la cosecha, salió poco por factores climaticos pero muy buena calidad y exquisito a pesar del poco lavado. Muy contenta con el resultado iremos mejorando
Likes
111
Share


@Teamdirtbag2
Follow
This Girl has caught up to her sisters. And is looking great. We need some fast growth. So I may have to clean under her skirt, so as to give her some extra momentum skywards. Funny thing is later down the road I will be in a battle to keep her low.

Likes
18
Share


@Bread_n_Buds
Follow
Our Do si Dos F1 Hybrid Autoflowering from Zamnesia are in great shape at the moment, they had a bit of a hesitant start but now they are in line or even better than others. They have done so well this last week (I love when they start like a rocket after having fueled up with fertilizers) that we have already reached the good internode for topping autoflowering plants which if you want to do it guys it should be anticipated as much as possible as I explain below. The other one will fly away straight to preserve the main cola which is the main dilemma of topping. The first question you have to ask yourself when topping is, Are you ready to give up the main cola?
Applied Techniques - Given the numerous requests from growers, we decided to show you what happens when applying topping + Lst to autoflowering plants. It is very important to anticipate it as much as possible, autoflowering plants go into flowering at about the 5th intenod, you have to anticipate that moment to give the plant the chance to vegetate as much as possible. In general, when you see that there are two good lateral branches you can do topping, they will go into veg as much as possible and you will have a split plant, I have seen very beautiful results, especially in warm periods in which the plant tends to vegetate a lot, in winter we could have a bit of dwarfism but with a lot of resin for sure.
So I cleaned everything and cut at the top leaving only the main growth line, called Main Lining, the florets will be lowered during growth and the plant will eventually be like "split" in the main line with the various branches.
On photoperiodic plants, however, we will do topping repeatedly, which is not recommended with autoflowering plants so as not to lengthen the times of plants born to finish in 10 weeks too much.
The second week (including a few days of germination) we gave Power Roots 1 ml/l, Pure Zym 1 ml/l, Sugar Royal 1 ml/l, Alga Grow 3 ml/l -
Plagron nutrients are available at Zamnesia in convenient pack formats for all growing styles. I used this one with a simple search you can find the other products.
---- https://www.zamnesia.io/it/12119-plagron-top-grow-box-100-naturale.html
Try a seed of this variety that drives us crazy...
---- https://www.zamnesia.io/en/10664-zamnesia-seeds-do-si-dos-f1-automatic.html
Description Zamnesia // From the team at Zamnesia Seeds comes Do-Si-Dos F1 Automatic. Using consistent and reliable F1 genetics, this strain is not only incredibly easy to grow, but also offers potent and delicious buds. The plants remain small and offer a reliable growing experience that everyone will enjoy.
Growbox and Air System - Secret Jardin DS120w + fans + exhaust fans and DF16 filters kit ---- https://www.secretjardin.com
All the best that mother nature has to offer is at ----www.zamnesia.com

Likes
4
Share


@L8bloomr1008
Follow
Waiting on buds to start swelling. Have a few rust spots on a couple of leaves. Nothing too major, may need to recalibrate my PH pen before next feeding. Starting to get a little more pungent of a smell. Sweet and earthy in the whole tent so far.


Likes
5
Share


@alafmalaf
Follow
This week was all upgrades and preparing for a 2 week vacation where my gf would need to take care of the plants but that would end to almost killing all of them lol stay tuned.