


By continuing to use the website or clicking Accept you consent to our cookies and personal data policy and confirm that you are at least 18 year old. For details please see Privacy Policy and Terms
Accept


Likes
12
Share


@Bored
Follow
This is the first day of week 4. I decided against any form or training or topping and decided to focus on watering and getting nutrients correct for this first grow. Being it’s a tent grow, I can essentially grow when I choose now anyway.
Touching the plant leaves the soft but pleasant smell on your fingers that we all know and love.
I’ve also drilled more holes in the bottom of the pot and do get some runoff when I water now.
Considering switching to 12/12 in a weeks time.


Likes
13
Share


@Arkain_Jenetics
Follow
Everything is going good. Some are showing some sort of deficiency . Lowered lights a little bit. Going to start watering every other day. One of the critical thunder autos is like 8 inches tall lol definitely breeding her.


Likes
57
Share


@LockDownGrow
Follow
Finally at the swelling stage and growing out nicely , this lady has been a joy too grow , no decency's what so ever , she really did stretch in here flower stage going from the size of the Zkittlz plant into a plentiful branched beast she is today stacked with bud sites and let me tell you she smells absolutely amazing !
her buds look frostie already and are starting too swell lovely and there are plenty of them too ,

Likes
84
Share


@Doc_Homegrow
Follow
I trained her pretty much in the last week with LST. I also constantly trim her leafs and cut off fan-leafes to improve the airflow and to let the lower branches get more light.
Update 18.04.2024:
Yesterday I cut off a few fan-leafes. I want to improve the airflow and I hope that the plant got more energy for growing branches because of that (I thought it would might work like lollipopping). I also turned the pot because one twig is significantly smaller than the others and I want even branches.

Likes
7
Share


@delta_420
Follow
Started off germinating the Grapefruit and taproots showing at 05/06, planted directly into an Eazyplug cube w/10 L fabric pot + Freedom Farms seed starter. Red clovers were germinated the same time and thrown directly into the soil mix, those germinated and sprouted within ~7days for Nitrogen fixation into the soil.
Had a G13 Labs Berry Auto which unfortunately has gone up to day 11 now with incredibly slow growth, might have been error on my part with a bit too much water + humidity. Sadly had to pull the small girl out since there was evidence of stress + damping off as the root j-rooted and then died after trying to correct this minor issue. Don't think I'll buy G13 seeds soon considering the Grapefruit had 0 issues despite germination being slightly slower than the Berry.
The giant mycelium bag is a Co2 generator with some Shiitake mushroom culture pre-inoculated and colonized. Broke the substrate up a bit by squeezing the bag today so the mycelium fruit has more space to colonize in. :)

Likes
20
Share


@eldruida_lamota
Follow
Vamos familia, aquí traigo la 4 semana de crecimiento de estas Lava Cake de Zamnesia.
Y es que vaya ritmo y que sanas que se ven hasta ahora no me puedo quejar.
Todas están en macetas de 7 litros y el sustrato es plagron.
Añadimos flash root, tucan ,gold Joker y la base de crecimiento de Agrobeta , (Blue line).
Os comento que tengo un descuento y para que compréis en la web de Zamnesia de un 20%, el código es ZAMMIGD2023
The discount 20% and the code is ZAMMIGD2023
https://www.zamnesia.com/
Agrobeta:
https://www.agrobeta.com/agrobetatiendaonline/36-abonos-canamo
Mars hydro:
Code discount: EL420
https://www.mars-hydro.com/
Espero que lo disfrutéis, buenos humos 💨💨
Likes
38
Share


@Green_Mountains
Follow
Another good week!! I defoliated the smaller of the 2 plants mid-week... I think she is doing very fine.
A small hiccup with the feed that same night. Only a few leaves are showing any sign on nutrient burn. I went ahead and fed them again today.
I plan on watering them in a day or two... they were very thirsty this afternoon!! So, I definitely need to up the watering. I've still been feeding 3 quarts twice a week.
Otherwise, all seems to be going well!!
They are frosting up very nicely!! So exciting!!
Peace!!
Update for grow question: @The8thChevron thanks!!! I pulled them and will hope for the best for now. So close to the finish line. If I see more trouble brewing I will pull the plant. I don't know how to answer directly to you on the grow question.... Thanks again!!
Likes
1
Share

@Trichoma
Follow
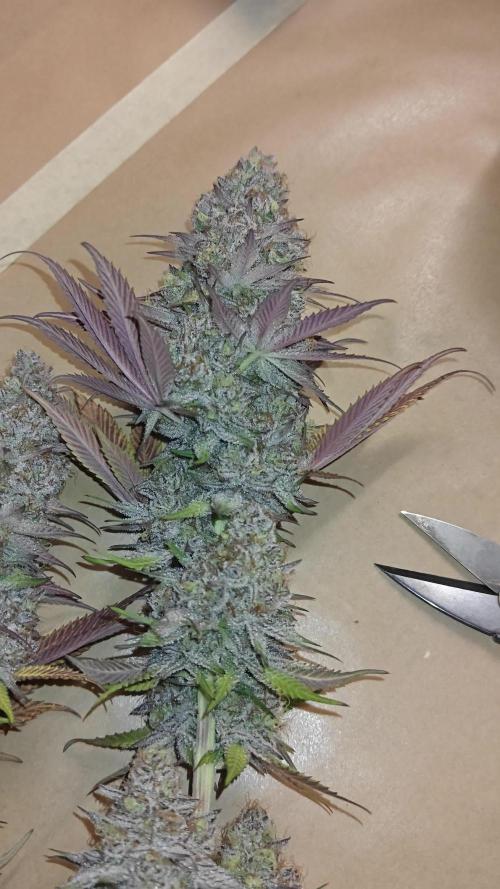
The buds weren’t the biggest I’ve grown, but this is hands down one of the stickiest strains I’ve ever cultivated. They’re absolutely drenched in trichomes and have a dense, heavy structure.
This run produced two distinct phenos: the middle plant had a more indica-like structure with chunky, compact buds, while the others leaned toward a sativa-dominant, airier build. One of the highlights of this grow was the range of colors the plants showed off during flowering—super eye-catching.
Trimming was a breeze too, thanks to a nice balance of sugar leaves that made the job quick and clean compared to some other strains.
I’m storing the buds in a stainless steel, airtight container without using Boveda or similar humidity packs. Thanks to the DryFerm bags, the humidity has been holding steady at 61% RH, so there’s no need for extra regulation.


Processing
Likes
62
Share


@DudeGrowsWeed
Follow
February 14, 2019 update:
I rearranged the plants to get better airflow. In the video I mentioned that I thought I saw what might be spider mites. After closer inspection, I don't think its spider mites but more likely a combination of left over damage from the fungus gnats that came in with my wife's plant a few weeks ago (now gone) as well as ph fluctuations. But I like getting airflow on the plants themselves anyway, I just wish the oscillation worked on the fan I have now. I'll buy a new fan or two with oscillation soon. Also I failed to mention it in the video but there is also a ceiling fan blowing down on the plants.
Overall, I'm very happy. The DinaMed CBD+ has taken the lead in the bud development category, Nice fat buds that are very dense. Sticky and stinky as hell too. She is supposed to be somewhere in the teens for CBD percentage and less than 1% THC. I'm hoping she either comes in below 0.3% or has well over 1%. I'm allowed to submit for testing 3 weeks before harvest. I'm going to cut a mid level branch and submit for testing next weekend.
My other DinaFem strain, Critical +, is doing great too! She's in the lead with the most trichome development. Her buds are coming along great also! Not super fat, at least not yet, but great shape, color, density and have I mentioned the trichome development yet? 👍 This one is supposed to have mild CBD, low single digits, but high THC. I'm looking forward to smoking this one!
Next up I'll talk about my Cream & Cheese CBD+ from Seedsman. She's in the lead with just overall looking awesome!!! The buds are long and super healthy looking with tons of leaves along the branches and I've defoliated a few times. The remaining leaves don't seem to be blocking much because most branches are bent over due to the weight of the buds! She is supposed to be in the 20's with BOTH THC and CBD. I'm looking forward to smoking this one also! 💪
That leaves the 3 Cherry Hemp plants. They are the smallest 3 plants in the room, but are all looking very good as well. They look like they are in the lead with possibly being ready to harvest earliest. I'm seeing the most amount of darkened and curled in hairs on these 3. The largest/oldest of the 3 is starting to show fading on the leaves. She may be ready in the next week or two. I'm waiting to start seeing some amber trichomes, so far they are still all white. These are supposed to be around 16% CBD and less than 0.3% THC. I'll be taking these in for testing soon and will be using these strictly for making CBD products - Salves, Oils, Capsules, etc... I'll keep you posted on this.
This week I fed MegaCrop and Cal-Mag Pro (both by Greenleaf Nutrients). I fed according to their feeding schedule for late bloom. I think I'm going to stick with Greenleaf Nutrients for the duration of this grow rather than changing it up as I have been. Its super easy stuff to work with. 👍

Likes
65
Share


@MadeInGermany
Follow
Flowering day 18
since time change
to 12 / 12 h
Hey guys :-)
The ladies have recovered well from the cold thanks to the heating mat and have developed beautifully 👍.
During the check today I saw that despite spraying neem oil 3 times, there are still a few trips :-( .
Now I've ordered nematodes again specifically against trips for leaf and substrate.
I will use that immediately 👍.
Watering was done twice this week, each time with 1.3 l (nutrients see table above)
Next week I will remove the lowermost shoots so that the energy goes into the upper buds.
Fresh osmosis water was mixed with tap water and put into the 100 liter tank so that the water can stand and I'll have enough next week :-)
Otherwise everything was cleaned.
Have fun and stay healthy 💚🙏🏻
👇🏼👇🏼👇🏼👇🏼👇🏼👇🏼👇🏼👇🏼👇🏼👇🏼👇🏼👇🏼
You can buy this Nutrients at :
https://greenbuzzliquids.com/en/shop/
With the discount code: Made_in_Germany you get a discount of 15% on all products from an order value of 100 euros.
👇🏼👇🏼👇🏼👇🏼👇🏼👇🏼👇🏼👇🏼👇🏼👇🏼👇🏼👇🏼
You can buy this strain at :
https://www.barneysfarm.com/dr-grinspoon-5
Water 💧 💧💧
Osmosis water mixed with normal water (24 hours stale that the chlorine evaporates) to 0.2 EC. Add Cal / Mag to 0.4 Ec Ph with Organic Ph - to 5.8 - 6.5
MadeInGermany


Likes
48
Share


@TheCannaProphet
Follow
~ WEDDING CHEESECAKE FAST FLOWER by FastBuds ~
Well fam, here we go again with another epic strain from FastBuds Fast Flowering stable. After having such tremendous success growing their Gorilla Cookies Fast Flower outdoors last year, I've decided to run another of their fast flowering strains outdoors this year... Wedding Cheesecake Fast Flower!
The best description of this awesome cultivar comes directly from my friends at FastBuds which is as follows:
"A delight for the mind and body: Wedding Cheesecake FF (Fast-Flowering) is a delicious strain that offers XXL yields in a 7-8 weeks flowering cycle. This terpene powerhouse produces loads and loads of mouth-watering vanilla-creamy-cookie-scented terps with hints of citrus and cinnamon. In addition to its delicious aromas, this variety grows very well in both indoor and outdoor setups, yielding up to 650 g/m2 without extra maintenance, making it the ideal strain for beginners as it allows you to maximize yields while minimizing work. This super-fast feminized photoperiod version offers upbeat and energetic yet deeply relaxing effects that are perfect for consumers looking for a heavily focused, motivating, and creative high. It’s the ideal strain for those needing that extra energy boost to start a busy day on the right foot.
Wedding Cheesecake FF boasts chunky, large-sized buds with a thick layer of silvery-white resin and bright orange hairs scattered all over: that just screams ‘quality’. The lime-green flowers sparkle with an array of hues ranging from dark to light green, to magenta and purple, and reek of a delicious aroma that’ll remind you of fresh store-bought cheesecake.
This is an XXL hybrid that grows extremely tall in height, reaching up to 3m with one huge main cola and multiple long side branches that can withstand enormous yields of up to 650 g/m2 with ease. Wedding Cheesecake FF is extremely resilient to the elements and can be grown in almost every climate as long as you’ve got the space and basics covered, making her an excellent choice for those looking for large-scale harvests with a quick turnaround time without much effort."
____________________________________________________________________________________________________________________________________________________________________________________________________________________________________________________________________________________________________________________________________________________________
The Setup:
This is going to be an outdoor grow, but I have started the Wedding Cheesecake FF indoors as our weather is still too cold to put her outside (nighttime temp's dipping regularly into the 30's℉).
The plan is simple... let her grow inside under a 19/5 light schedule until the nighttime temperatures stay above the mid 40's℉, at which point she'll be moved outside and transplanted into the soil which I have already setup and inoculated with beneficial microbes, and then let the fun begin!🤪💚
____________________________________________________________________________________________________________________________________________________________________________________________________________________________________________________________________________________________________________________________________________________________
Weekly Updates:
4/4- Here we go into the second week of life for the FastBuds Wedding Cheesecake FF, and she's doing really well!
All I'm doing right now is making sure that her medium remains moist, watering only when necessary. I'm checking her root development daily and she will be ready to transplant outdoors any day now!
4/6- Today is TRANSPLANT DAY! I moved the Wedding Cheesecake FF outside to her prearranged 'new home' which I had previously prepped by adding some Coco/Perlite into the soil to improve the texture and drainage. I then pre-amended the soil with Gaia Green 4-4-4 All Purpose slow release dry amendment along with 3g of Wiggle Worm castings, 2 cups of ground Alfalfa and 1/4 cup of Extreme Gardening's MYCOS. After which, I kept the soil moist to allow the microbial colony to populate for a week.
To transplant, I first made a hole then placed a Solo cup in it to make sure that the depth was adequate, then packed the medium up against the cup firmly which leaves a nice Solo cup shaped hole in the ground. I then wet the inside of the hole that I formed and coated the hole with Extreme Gardening's MYCOS root enhancer, after which I removed the Wedding Cheesecake FF from her Solo cup and placed her snugly into her new home! After planting her in the ground all that was left to do was lightly water her in... Let the fun begin!🤪
4/8- The Wedding Cheesecake FF from FastBuds is doing extremely well in her new environment. To be quite honest I was slightly hesitant to place her outside this early as we are only getting approximately 13 or so hours of sunlight daily. Based on my experience last year growing a Gorilla Cookies FF, which was placed outside at a similar time and did extremely well, I went ahead with the transplant, confident that she would be just fine.
4/11- I'm watering around every 2-3 days right now using water straight from my well through a garden hose... super simple! I do not worry about PH as long as the water isn't chlorinated and is good enough for me to drink, it's good enough for my plants and the microbial colony in the soil will adjust the PH to where they need it and at the same time provide the nutrients that the plant requires... again, nice and simple.
Well there goes two weeks for this little lady. The next coming weeks should see an increase in size and vigor as long as the weather cooperates... fingers crossed!🤞
Thank you for checking out my diary, your positive comments and support make it all worthwhile! 💚Growers Love!💚😎🙏
Likes
6
Share


@Naujas
Follow
My house is full of sweet chocolate and fruit aroma:) her flowers are full of shiny trichomes :) the girl only bloomed for 57 days, but she is already ready, maybe her flowering sped up in my grow box, high temperature 33°, because of that under my arm my light was set to 85%. From the first days, the girl showed fast and healthy growth:) I made a timelapse video, but unfortunately due to problems with the SD memory card, it takes 3-4 days at the end of the video, besides, my tent is too small for that :D I also made bubble hash from sugar leaves myself :) I tried Zamnesia seeds for the first time - I hope that someday this seed bank will offer me its products to try again :) thank you all. you were together :) good luck with the growing.
Likes
164
Share


@Silky_smooth
Follow
At the start of week 8 she is still doing amazing and looking very healty and lush green the little nuggets are fatning up nicely and smelling very tasty cant put my finger on it what the smell is but its like a certain brand of bubblegum very sweet
Day 51 drinking 33cl a day that’s a lot for such a little thing but she takes it in 3 times feeding her at 6 in the morning 5 in the afternoon and 11 at night like a little baby that needs her bottle in time
Some of the outer leaves are colouring a little but hey she is half way her flowercycle so i expected her to start showing Some kind of signs that fall is starting to kick in
Day 53 split her stem on top of her flux knob to increasse thc and budproduction to the fullest potential and binded a soft bendie arround it so she does not split further then neccesary🙏🙏
To all contestants the end dates is moved to 31 december due to Some unexpected and unnormal wheather factors with Some of the contestants Some of them have to unfortunatly start over so to give every one a fair chance final date is 31 DECEMBER!!! Or 14weeks as maximum growcycle
Everybody gets that?!🙄🤣🤣
Not many people know about this trick, but I’m sharing it with you today. Have you ever heard of splitting the stem of your plant?
No? Well, did you know this will force your plants to create heavier and denser buds? And it also increases THC production up to 20%!
The purpose of stem splitting is to disturb the flow of nutrients and water right at the base of the stem.
This will cause the plant to start producing more trichomes which means heavier and denser buds with higher THC levels.
Make sure to read my article How to split the stem to increase THC levels after I tell you how to do this in 3 easy steps.
How to split the stem in 3 easy steps:
Step 1 Tie the stem with a rope or cable tie right at the base. Tie a second rope or cable tie a couple inches above that.
Step 2 Take a very sharp knife and cut from the top tie to the bottom tie. There should be one vertical cut that is a few inches in length.
Step 3 The knife should remain inside until you have a pencil or chopsticks to replace it with. This is to keep both sides of the marijuana plant from touching each other.
Splitting the stem causes stress on the plant and forces it to create more trichomes.
Trichomes serve as protectors of the marijuana plants. Specifically against pests, diseases, low temperatures and wind.
Because of this protective feature, more trichomes are produced during times of stress. Take advantage of this special feature and read this article about splitting the stem and many more secret tricks to grow huge buds and increase your yield
Processing
Likes
5
Share


@Ensign420
Follow
Week 02 Introduction
This week has been a bit of a struggle. Had my first experience dealing with slime and brown algae. But I think adding enzymes and increasing the beneficial bacteria helped to fix the issue. Also experienced nutrient burn for the first time. My nutrient solution strength got as high as 671 PPMs. So backed it down to about 430 PPMs during the end-of-week reservoir change. Also cut Hydroguard (expired?), CaliMagic, and Superthrive from this grow. Now she's still stunted, but is starting to recover. Hopefully...
[START OF WEEK 02]
Day 01 - Monday - 08/10/20 - Total Days: 008
-----------------------------------
- [0830]: Still looks a bit yellow. But getting larger!
--- Solution strength was at 248 PPMs.
--- Just topped off with a bit of distilled water
--- PH went up to 6.1 so PH'd down to 5.8
--- Ran the top feed for a bit to wet the hydroton.
- [2130]: She's looking even more yellow now.
--- Even the new leaves are really yellow.
--- Decided to add more base nutes.
--- Added 4ml of Sensi A
--- Added 4ml of Sensi B
--- Now at about
--- Solution Strength went up to 304 PPM.
--- PH was at 6,
--- Also raised the water level a bit more.
--- I really hope it's a nutrient deficiency and not an over-watering issue.
--- Please live!
Day 02 - Tuesday - 08/11/20 - Total Days: 009
-----------------------------------
- [0830]: Looking less droopy. But still yellow.
--- Decided to do a reservoir change.
--- 4.5gal of distilled water
--- 8ml of Sensi Grow A
--- 8ml of Sensi Grow B
--- 8ml of Voodoo Juice
--- 4ml of B-52
--- 4ml of CaliMagic
--- 4ml of Hydroguard
--- 4 drops of Superthrive
--- PH'd down to 5.8
--- Solution strength: 302 PPM
--- Since I didn't want to risk over-watering the rockwool, I did not to do a top feed, may do one tonight after the sleep cycle (lights are still set to go off at 10am and back on at 4pm).
--- As I was doing a reservoir change, I noticed that the tubes and bucket were a bit slimy. Didn't really stink or anything. Is this normal? Maybe due to the Hydroguard and Voodoo Juice?
--- I hope she gets better soon!
- [2215]: Getting larger! But still yellow.
--- Also can see a root growing through the net pot! Tiny little thing but it's there! Will have to start dropping water once more appear.
--- After looking over a few DWC diaries using AN nutes, seems like my solution strength is still too low. Most around this stage average around 500 PPMs with about 4ml per gallon.
--- Top fed for a minute to wet the top of the hydroton.
--- Solution strength went down to 263 PPM.
--- Added 8ml more of Sensi A
--- Added 8ml more of Sensi B
--- Now base nutes are at 16ml for 4.5 gal of water.
--- PPMs went up to 411.
--- Still lower than 500 PPMs, but that's okay.
--- PH was at 6. Not sure if I should adjust PH using AN nutes. So going to not ajdust unless PH goes above 6.1.
Day 03 - Wednesday - 08/12/20 - Total Days: 010
-----------------------------------
- [0830]: Looks like more root growth!
--- She still looks yellow. But leaves are perky.
--- PH was at 6.2 so lowered down to 5.8.
--- Solution strength was at 394 PPMs
--- Since roots are still growing, I decide to lower the water level a bit. Now water level is a bit below the net pot.
- [2200]: Root is getting longer!
--- Slime is returning. Not sure why.
--- Solution strength: 357 PPMs
--- PH: 6.1
--- Decided to add an enzyme along with more beneficial bacteria to hopefully cure the slime.
--- Added 16ml of Sensizym
--- Added 5ml of Hydroguard
--- Added 8ml of Voodoo Juice
--- New solution strength: 430 PPMs
--- New PH: 6.1
--- Top fed for a minute.
--- This slimy residue is really freaking me out! I hope the added enzymes will help eliminate the slime.
--- Going to do a full reservoir sterilization/nutrient change over the weekend. Please survive until then girl!
Day 04 - Thursday - 08/13/20 - Total Days: 011
-----------------------------------
- [0930]: I think the enzymes worked! There is little to no slime now!
--- Although I think the root was also dissolved in the process. It's now just a little stub sticking just below the net pot. The enzyme is also suppose to dissolved dead roots too but guess that root was too weak? Not sure what happened there. But I think the slime is cured!
--- Solution strength went down to 395 PPMs. Decided to add more base nutrients.
--- Added 8ml of Sensi A
--- Added 8ml of Sensi B
--- Added 4ml of B-52
--- Solution strength went up to 598 PPMs.
--- PH was at 6.1
--- As long as the PH is between 5.5 and 6.3, I'm not going to use PH Up or Down. But still will monitor PH levels.
- [1715]: Checked up on her after her nap and shes looking alive but stunted. But no slime!
--- Decided to add some sugars to help maintain the enzymes and beneficial bacteria.
--- Solution strength was at 587 PPMs.
--- PH was at 6.2
--- Added 8ml of Bud Candy
--- Solution strength went up to 671 PPMs.
--- PH also went up to 6.3
--- Lowered water level a bit to hopefully promote more root growth.
--- Top fed for a minute.
--- She is getting bigger, but still looks yellow.
Day 05 - Friday - 08/14/20 - Total Days: 012
-----------------------------------
- [0915]: Leaves look a little burnt on the tips. Still no slime.
--- Going to back off on the PPMs to hopefully fix the nutrient toxicity.
--- Solution strength was at 632 PPMs
--- PH was at 6.3
--- Added/Removed water until PPMs were at 536.
--- PH was still at 6.3
--- Raised water up a bit, then top fed for a minute.
- [2200]: Looking better. Still yellow though.
--- Solution strength: 514 PPMs
--- PH: 6.5
--- Added PH down.
--- New solution strength: 518 PPMs
--- New PH: 5.2
--- PH was kind of high. So decided to PH down. Had to use quite a bit to bring it down. But eventually got it to drop down to 5.3. A little low, but so far, the PH has always gone up so wanted to start it really low.
--- Ran the top feed for a minute to re-saturate the top of the hydroton.
Day 06 - Saturday - 08/15/20 - Total Days: 013
-----------------------------------
- [0830]: She looks stunted. leaves are still yellow.
--- Solution strength: 514 PPMs
--- PH: 5.6
--- Top fed for a minute.
--- Not sure what to do at this point. Going to do another reservoir change soon. Hoping she lives until then.
- [2145]: Looking pretty much the same.
--- A bit of slime has returned. Since I've been diluting the nutrient solution, the enzyme ratio has dropped. So I guess this is expected.
--- Also noticed that slime build up was on the air-stones. Never really checked the stones so not sure how long that has been there. Looks brown too, which can't be good.
--- Going to do an H202 sterilization of the system (minus the net pot) tomorrow so did not add anything.
--- Lowered the water level to below the net pot.
--- Then top fed for a minute.
Day 07 - Sunday - 08/16/20 - Total Days: 014
-----------------------------------
- [0900]: STERILIZATION DAY!
--- Decided to skip today's night cycle for a deep clean.
--- I'm hoping that skipping a night cycle won't be too stressful.
--- Temporarily moved her to a new bucket.
--- Used about a half of gallon of straight distilled water to flush out the net pot.
--- Drained the system and wiped up all the brown sludge. Also removed the air stones and cleaned up all the goo.
--- Filled the system with 2 gallons of distilled water and at least 30ml of food grade hydrogen peroxide (35% strength).
--- Yea its a lot, but since I'm not going to sterilize the system overnight, I went with a really high doseage. Basically I kept adding until I started to see little bubbles start to form.
--- Then I ran the water pump.
- [0915]: Boiled the air stones in tap water for about 10 min. Then reconnected them to the airlines.
--- I let the air stones and hose soak in the sterilization solution for about 5 minutes so the peroxide can absorb into the stones. Then ran the air stone to help mix and agitate the solution.
--- Occasionally, I'd repeat the process of turning the air pump off for a few minutes to let the stones soak.
- [1000]: Covered the top two row of holes of the net pot with some aluminum tape. Hopefully this solves the light leaking in through the hydroton.
- [1200]: Used an old toothbrush and scrubbed the pump clean. Then drained the system.
--- Refilled with more distilled water and peroxide. Again added a lot.
--- Ran system again to sterilize even more.
- [1530]: Drained the system and refilled with distilled water to rinse.
--- Ran the system for a few minutes, then drained and rinsed again.
--- Did this a few more times over about an hour.
- [1630]: Added 4 gallons of fresh distilled water.
--- Added 15ml Sensi Grow A
--- Added 15ml Sensi Grow B
--- Added 12ml of B-52
--- Added 16ml of Voodoo Juice
--- Added 16ml Sensizym
--- Solution strength was at 430 PPMs
--- PH was at 5.6
--- I was going to add Hydroguard, but I think the bottle is expired. Since 2017 or 2018!? I think Hydroguard is good for up to 2 years from the date on the bottle or 6 months after opening. So not going to use from now on. I wonder if this could have contributed to the slime build up.
--- Also removed the CaliMagic and Superthrive too. Going to only use AN products to eliminate the chance of incompatible nutrients.
--- Placed her back in the bucket and top fed for a minute.
--- Here's hoping for the best. Going to let it ride until morning! Please feel better!
[END OF WEEK 02]

Likes
47
Share

@MadeInGermany
Follow
Info:
Unfortunately, I had to find out that my account is used for fake pages in social media.
I am only active here on growdiaries.
I am not on facebook instagram twitter etc All accounts except this one are fake.
Have fun with the update.
Flowering day 2
since time change
to 12/12 h.
Hey everyone :-).
Yesterday it was put into bloom and can now develop beautifully 👍😃.
In the next few days I will remove the bottom shoots and add 2 g GHSC Powder Feeding Bio Bloom per l cocos.
Of course, cuttings were cut into the flower before moving 👍.
I wish you a lot of fun with the update.
Stay healthy 🙏🏻
You can buy this Strain at :
https://www.exoticseed.eu/
Type:
Herz Og
☝️🏼
Genetics:
Larry OG X Kosher Kush
Indica 60 % / Sativa 40 %
👍
Vega lamp:
2 x Todogrow Led
Quantum Board 100 W
💡
Bloom Lamp :
2 x Todogrow Led
Cxb 3590 COB 3500 K 205W
💡💡☝️🏼
Soil :
Canna Coco Professional +
☝️🏼
Fertilizer:
Green House Powder Feeding
☝️🏼🌱
Water:
Osmosis water mixed with normal water (24 hours stale that the chlorine evaporates) to 0.2 EC. Add Cal / Mag to 0.4 Ec Ph with Organic Ph - to 5.5 - 5.8 .
