By continuing to use the website or clicking Accept you consent to our cookies and personal data policy and confirm that you are at least 18 year old. For details please see Privacy Policy and Terms
Accept
Likes
Comments
Share


@hannabis420
Follow
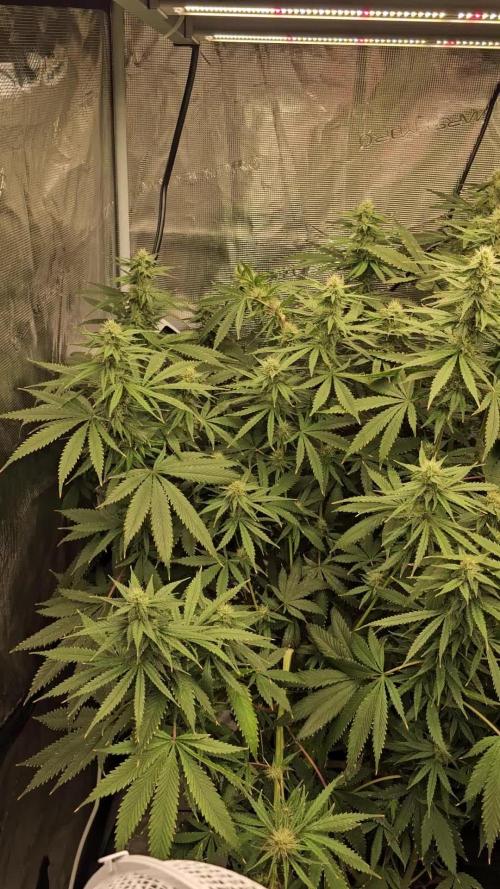
1/9 start of week 12 flushed with 7.1 ph water, defoliation throughout the week
1/15 second flush with 7.4 ph water looking to harvest next week :) trichomes are milky/some amber

Likes
98
Share


@DogDoctorOfficial
Follow
I love growing its a big passion of mine , and the fact that GD exists makes everything so much better, one can interact with others and enjoy and learn from each others. Thank you all growers love and keep them green <3 <3 <3


Likes
16
Share


@Symbiosis_420
Follow
About this diary>
So I've made it to the end! This baby didnt die on me! This diary was half a record for myself, to keep improving and contrasting against my future grows in and out of this wonderful platform (growdiaries), and half a tutorial for other noobs like me. That's why I wrote somewhat long explanations about some of the things I myself found confusing during this and last grow. I also repeated myself, but again mostly because I was trying to learn while doing. I got some help from other growers in the community, which was very nice, and different from trying to figuring out everything by oneself. This girl stretched a lot! from about 30 cm at the end of flower to about 90 cm before harvest, it survived nutrient burn, an accident were I dropped something heavy on her on flower, accidentally chopping a branch during LST and spider mites. However, still yielded nicely. I cant imagine what these genetics could become in the hands of a master grower!!
About the growing conditions>
The idea of the grow was, not only to learn how to grow a somewhat long flowering strain (6 week veg, 10 weeks flower) but also doing it very cheaply. I think the most expensive thing I bought was the seed from RQS. I built my own light fixture (from 4x 4.00CAD COBs from aliexpress), some cardboard, wire, sticks, tape and aluminum foil. I also used dollar store nutrients (like 15% of a 15-15-15 veg mix, and a 15-30-15 flowering mix). I timed this strain to finish a few weeks before the temperature really starts dropping outside, and was always able to keep it around 20-29C without any air conditioner/heater.
About growing amnesia haze>
I harvested this plant on the early side, but I found it a challenge not to harvest earlier! Since many weeks ago the delicious smell has been filling the room and some parts of the house... Plus, its a long wait... However, I think it was very well rewarded :)
As I said, the high is creative, giggly, energetic and uplifting, at least from the premature samples we got. I will update this once the real deal is dry and cured :)
About the harvest>
Well in terms of numbers, I will update this when the weed is done drying, but I can do an estimate right now... each sample I took weighted about 1.45g wet, and dried to a 25% of that (0.35 g each)... It means that what I weighted from the harvest (412.86g + a bunch of trim) would probably weight about 100g when dry... Let's see how it goes in a week or two :)

Likes
39
Share


@Hazecat_420
Follow
Todo bien, seguimos. Próxima semana se cambia el fotoperiodo, se aplicará una defoliación para evitar posibles plagas
Likes
24
Share


@TerpTurtle
Follow
-getting loud in here.
-Pruned some smaller branches I've missed & defoliation
Video transitions are 7 days apart week 1-4 flower (7,14,21,28 from flip to 12/12)


Processing
Likes
27
Share


@Fifty5ive
Follow
Flowering started:
Saturday I switched the nutrients in the reservoir to flowering specifications after installing the SCROG and giving a massive trimming.
After the final lights out Saturday, 3pm which was an extended session, I switched the timers to come on again Sunday on a period of 8pm to 8am (12 hours).
The photos added today are from This morning after the first 12 hour period before the first lights our for 12.
*fingers crossed*
Likes
20
Share


@DeepRootsGrowTrees
Follow
KRITIC AUTO by KANNABIA
Week #14 Overall
Week #11 Flower
She's got one more week before harvest. She's a beautiful plant with her orange and shades of purple in her frosty buds and her danky smell! Stay Growing!!
Kannabia.com KRITIC AUTO

Likes
1
Share

@TheBulldozerSicily
Follow
Continuano a crescere a vista d'occhio, l'unica cosa che vedo poco è la resina, sicuramente perché le temperature sono alte e lei invece sviluppa con temperature piu fresca, proverò ad aggiungere del ghiaccio nella vasca dell'acqua per fare scendere un po la temperatura e rinfrescare l'apparato

Likes
2
Share


@Belivitez
Follow
Harvest for top buds which are already done ❤️ smell is strong sour/fruit/sweet. The rest of the plants i will leave in tent to be ready for harvest in few days...
I will leave sugar leaves on for few days and then do the trimm work. Buds are rock hard and covered with trichomes!
Likes
12
Share


@Kommandant666
Follow
They were super easy to grow but took ill very quickly and didn't bounce back all that well but no great impact on the harvest, I'm still really happy with what's on the scales and I learned plenty from this round.

Likes
1
Share


@nonick123
Follow
🚀 4 clones de Blueberry Pie F1 Fast seleccionados por @stacksfarmsltd - https://www.instagram.com/stacksfarmsltd
🚀 Breeding by @seedsmangenetics - https://www.seedsman.com/eu-en/blueberry-pie-f1-fast-feminised-seeds-sman-blpi-fast-fem
💦 BioTabs 15% DISCOUNT code "GDBT420" biotabs.nl/en/shop/ @biotabs_official
🌱Substrate PRO-MIX HP BACILLUS + MYCORRHIZAE @promixmitch @promixgrowers_unfiltered
💡2 x Mars Hydro FC1500 EVO Led Grow Light (2024 NEW FC 1500-EVO Samsung LM301H 150W LED) - https://marshydro.eu/products/fc1500-evo-led-grow-lights/ - https://www.amazon.de/dp/B0CSSGN5D8?ref=myi_title_dp

Likes
220
Share


@CRiSPrGrow
Follow
These had a pretty good life. I actually only fed NPK the one time . Germinated them in a Zambeza propagator, i really recommend getting one of those propagators, they're reusable and really take the heat off those first days when you're sweating. Pooped them into their plugs they sprouted out strong, germinated 5 kept 3. transplanted them no problem. Veged these for 4 weeks, then they shot up. during veg they stretched out a bit early on i should have been giving some specialised micro i had on had but for some reason on the other i didnt. They needed extra support for their first three weeks, so i decided to LST them around week 2. Two camping hooks one anchor for the main stem and one to keep the plant down. Once i dialed in my lamp to plant distance they benefitted by slowing down on the stretch a bit. they all took to LST extremely well, bushing out and creating an nice even canopy. They pushedout these thick indica leaves, one of my plants was a lighter colored leaf pheno, the vertafort one. The Six Shooter genetic really stretches, if just off the top of my head it seems that the plants quadrupled in size over an 8 week period, completely eclipsing their neighbours and creating a thick dense canopy throwing shade down below. Each turned into a bush with three or more mains sticking out the top by week 6. IThe results start to look real pro around week 8. Before that though I hadn't been defoliating. This and simple lack of light means that I had loads of undevellopped colas. If I'm honest I should have tried to harvest in stages but by colas. Anyway these kind of grew like a gorilla glue but with much different and much better flower structure. The plants started pushing out flowers and pistils and preflowers etc early, but then took a while to gear up towards towards getting fat. The flower branch out in a spiral pattern up and down the main and secondary colas evenly, creating this misssile shaped colas, but they branch out once sometimes twice, which means less branch to nug ratio than a gorrilla glue by a full multiple. They started smelling like lemons around the time they were fattening up. Then they started getting buff, really little by little, what did rippen rippened evenly. Some colas was basically waste especially the colas stuck on the sides of the tent and some of the colas where for some reason or another there was no light there due to the dense canopy. Truly a BEAST OF A PLANT, HIGH POTENTIAL, great BRANCHING, if you look carefully each plant has more than a dozen colas,
Timed it so the harvest was on a day the plants were chock full for plain water after ten day's worth of additive aided flushing. hung to dry slowly in the tent, got it around 55RH inside the buds over 12 days then trimmed and jarred in miron glass with boveda 62. The trim was a great experience, took a while but not that long because the flowers were so nice in the way they are. you do have to trim every sugar leaf one by one though if you're doing it by hand, broke these sizzors that @Mrs_Larimar sent me because of the resin lol. so I pull these plants out my tent and I just kinda look at them and they're basically dark green because of all the sugar leafs, i'm thinking to myself "shit i messed up this isnt even that frosty". well, what i found out is every time i clipped one of those trademark long sugar leafs off it revealed absolutely resious white frost. That's what can keep someone motivated. ! Once jared, if there's boveda in your jar, you dont really need to burp it daily, or even weekly i just let it sit there, obviously i've been smoking it and following the cure, let me tell you this one needs longer to cure than you're used to maybe, at least two more weeks of cure after a slow dry. Four weeks after the chop , it's a strong weed !
Didn't smell all that loud, but I have a 1300M3/H exhaust so... i'm not surprised. I will say though that my neihbour said she could smell weed even when I wasnt home and she could smell weed in the corridor, from the times I was trimming and basically every time I open my jar. Gonna need a new carbon filter for the next grow. I retired my lightbulb too. Hard to put my finger on the taste because the smoke is so smooth, and when i saw GD had a tag for Woody, i knew right away this was that taste i felt. I will say this though, cure this correctly, dont rush, dry it real slow, then cure it, citrussy tastes, usually those will evaporate, leaving this distinguished terpene heavy hitter much better tasting. So what can i tell you, this weed is white weed, so frosty. Bag appeal is great too, this strain pushes out pistills like no other, maybe even more than the gorilla glue. that means this is a chill weed right? One of the phenos I grew had more pistils than the other two. Mr. B's did, but i dont know if you can really tell from the close ups, i'll try to put some more pictures up. I got two maybe three phenotypes in terms of taste. Mr. B’s is much pine-ier than the others, and when the joint goes out and you light it again, it’s even more piney … I’m actually really happy about that reminds me of white rhino from the east coast back in the day but way piney-ier than that even. When you smoke the other phenos the smell is incense and the taste is really really smooth & woody. Sometimes I find different after tastes on the exhale like coffee, pepper, and maybe sweet/fruity sometimes too depends on the pheno I'm toking on. It is LOUD THOUGH, always have a spare filter on hand IT’S NOT WORTH IT get it !
Well at the end of my first grow, i'd like to quickly review all of Bulbi's own :
Bulbi"s Own Early VegMicro: Fine green powder with calcium and all the rare metals in it. I didnt use it ! Damn, next time I'll amend my soil with it like i did this time on the FBT1
Bulbi's Own Cal Mag : Organic fine white powder with calcium and magnesium, i used it in the feed and sometimes as a spray. I didnt know how much to put in because these things dont come with instructions so i ended up putting 1/4 doses most of time. The correct amount should have been 2.5G/L.
Bulbi's Own Flower Micro : Organic fine beige powder that I used mixed in with the sulfur. I think this one's a keeper, really helped my plants make it through the stress of bottom feeding and all that heat.
Bulbi's Own Mag Sulfur : Organic fine red powder that I used mixed in with the Flower Micro I used this one in my spray too , to great effect, in my opinion
Bulbi's Own Beneficials Trio : This was the base beneficials mix I had, you need to put 7.5 to 15g/l , watch out for clumps, use at the night fall, or when still dark.
Bulbi's Own Anti Afid : I threw it in there i think just in time to protect my plants when I intentionally overwatered when I went on my trip. There were some white flies that emerged, because... well that's what they do isnt it. but there were just a few of them and they ended up flying around wierdly, and within four days, no more white flies, didnt even use yellow sticky tape ! You mix this one with the trio for even more effect. I used these in a spray I think , also.
Bulbi's own Anti-Worm : This one is more directed against larvae, and can be combined with the base trio. I was weary of using it, but I'm glad i did to give my soil matrix that full spectrum of biological protection.
Bulbi's own Humic Acid : This one i loved, looking back I'm regretful not having used it more. the dry humic acid is a great experience, the quality of it was impressive, clumps would seperated into more clumps ad infitum the feed slowly turning completely ink black. definituely using this once a week from now on
Bulbi's own Amino Acids : this one is just amino acids, maybe next time I'll use it at the same time as the humic acid, but I'm not 100% on that. What i did do was spray the top layer of the soil with amino acids when I accidently ran into some issues from spraying kelp all over the place. So in that sense it's an absolute life saver and a must to have on hand.
Bulbi's Own Kelp Extract Concentrate. Loved this one too haha, so thick, and green, check out the video of when i pour it lol. Worked great, raises the pH some so be careful, i used this one as a sprat aswell to get those plant growth hormones pumping during the seeding and veg stage.
Bulbi's Own CO2 : well part of what I set out to do was to test the CO2 theory. Like roots do absorb CO2 but at a lower efficiency than leaves say 15% vs. 85% the theory being enriching your water or feed with CO2 would ultimately benefit the plant. So i enriched water with these ceramic based co2 tablets, because CO2 is a soluble gas, it stays in water. Then i fed the plants in this manner in the feed and also as a spray. The idea behind that was that co2 enriched water would come in direct contact with the plant allowing for absorption of some quantity of CO2 through the leafs. Someone explained to me that these are actually old school techniques. Well I know i started late and didnt follow a regular schedule like i wished for but the plants didn t die, or show any immediate negative upon innoculation, so what can I say? I'm doing this again, perhaps. Only problem is that these things are really a pain to pH correctly
General Hydroponics Dry pH Down : GREAT PRODUCT, hard to find but amazing – not registed on GD for some reason
I still have to make my bubble hash so any advice welcome ! 🚀


Likes
7
Share


@DrewbieDoobieNoobie
Follow
the ladies can drink at least the 4 big girls can. the 2 smaller ones are coming along and of the 2 there is 1 runt of the litter. but it should be oj as well maybe make hash of the smaller 2 we will see.
it is getting a little hot and humid in the tent. time to add some CO2 and turn on the dehumidifier to bring it back to 45 % RH during flower. enjoy the time lapse.
see ya next week.


Likes
7
Share


@ghostgrowerz
Follow
3 Ciclo - Green Tiger - Craazy Seeds (BSF) - https://www.crazyseeds.shop/shop/produto.php?id=38ab2e762664b54d5e3d70cb21e25b2a4276b3c3
Genética: (Early Skunk x Skunk) x Skunk P90
1 - Na decima segunda semana, realizei uma rega com bloom em 6,2 de ph
2 - Infelizmente meu medidor de PH estragou, já faz uns dias que o PH aparece bem abaixo que o normal, por isso acredito que atrasou os buds engordarem 😭
OBS: Utilizo medidor de ph digital, comprei os saches para regulagem do calibrador, mas não estava calibrando corretamente. Após trocar a pilha melhorou a fixação do PH, e após deixar por algumas horas o eletrodo sob agua oxigenada V10, o calibrador voltar a ler PHs mais altos, antes ao colocar na água aparecia 5,5. Agora retornou a 7,5 a 8 que é o correto do PH da minha cidade. Eu estava colocando PH UP então acredito que o PH da terra deve estar nas alturas, vou medir o run off nos proximos dias e realizar um flush para neutralizar o PH da terra em 6,2
Equipamentos/Acessórios:
Quantum Board Quattro https://www.armariogrow.com.br/quantum-board-quattro
Grow: Flora: Estufa Probox Basic 60 60x60x160
Vaso: Air Pot 10 L
Termo Higrômetro: AcuRite
Umidificador: Difusor De Ar Elétrico Umidificador
👻👻

Likes
16
Share


@Right2Flower
Follow
Day 100 - All ladies looking good at this point in the grow. Noemi's pistil hairs have mostly all curled up and turned amber in color. Also her trichomes are starting to appear amber in color. Will flush her pot with about 5 gallons of pH'd water soon. Natalia's pistils are about half curled up/amber and half white. Her buds still appear to be packing on trichomes and weight.
Likes
6
Share


@SleepHuntMadScience
Follow
Training again. I spread out all side branches so the plant will now collect about 4 square metres of sun. It looks pretty crazy with central branches 6 ft up and side branches flat to each side. Did some defoliation as well. Still very healthy but I had to go through carefully to remove some annoying inch worms.
Likes
69
Share

@nonick123
Follow
Cosecha
Reporte de Peso húmedo & Peso Seco de LemonPaya by FastBuds!
⚖️ Total peso húmedo 186
⚖️ Total peso seco TBD
💦Pérdida de H2O durante el proceso de secado TBD
🎨Colores
Un color verde claro brillante!
👃Olores
💐Floración Papaya (predominante) con un toque (potente) de delicioso limón
🏜️ Secado TBD
🍗 Curado TBD
🍽️Sabor
A definir cuando esté bien curada en el reporte de humo
Variedad
💪Resistencia
Resistente 9/10! - Floración detenida por 10 días por el bloqueo de nutrientes que se ha presentado en la mayoría de plantas de este ciclo.
Pero ella se recuperó muy bien y ha hecho unos cogollos densos al final de floración!
🏋️♂️Entrenamiento:
Se ha adaptado bien al topping (en 2 ocasiones), supercropping y LST!
Una crack!
🌱Vegetativo:
Un vegetativo sin incidencias, con una bonita estructura!
Ya en vegetativo al frotar las ramas, se desprendía olor a Papaya 😍
💐 Floración:
Cogollos muy densos a pesar del bloqueo de nutrientes que superó sin problemas en 10 días!
El olor a Papaya y fondo de limón es impresionante!
Genética:
Estupendo trabajo de breeding de FastBuds!
👨⚖️Conclusión:
Una cepa deliciosa a plantar una vez en la vida! Muy interesante el perfil de Papaya y Limón!
Processing
Likes
14
Share


