


By continuing to use the website or clicking Accept you consent to our cookies and personal data policy and confirm that you are at least 18 year old. For details please see Privacy Policy and Terms
Accept

The Lazy Beginner
Follow

Arcana Nox (M-7 sett)
Primitiae Genetics

Humus Lombrico Vermiculite
Humus Lom

Soil for flowering plants Soil
Campo Sana

Perlite
No brand
Outdoor
Room Type
Transplantation
weeks 2
LST
weeks 5-6
Flushing
weeks 8
6 L
Pot Size
0.5 L
Watering
Start at Harvest
G
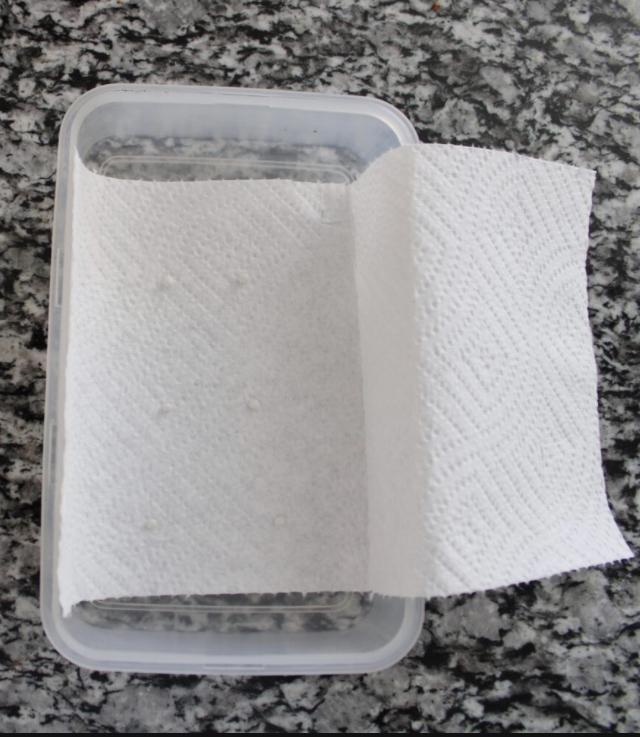
Germination1mo ago

ItalianDesertBalcony Not exactly sure about the start date, didn’t take a photo. Transplanted 7-11 data later ¯_(ツ)_/¯
Guess: July 2nd/4th germ date in paper towel
likes
comments
Share
Used method
Paper Towel
Germination Method
2
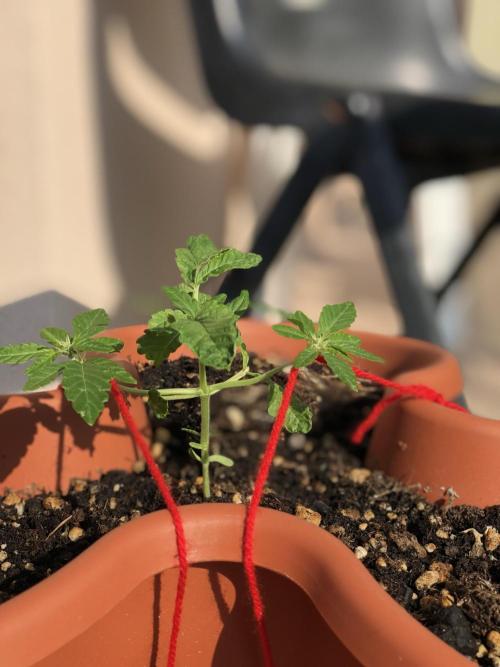
Week 2. Vegetation1mo ago
7 hrs
Light Schedule
29 °C
Day Air Temp
7.5
pH
No Smell
Smell
60 %
Air Humidity
24 °C
Night Air Temp
6 L
Pot Size
0.5 L
Watering Volume
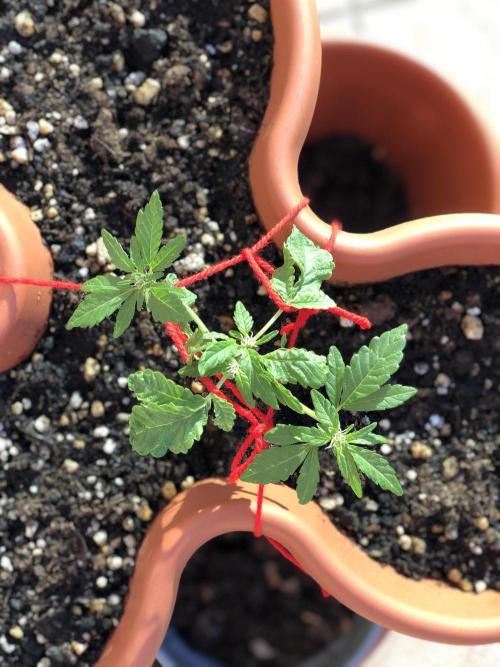
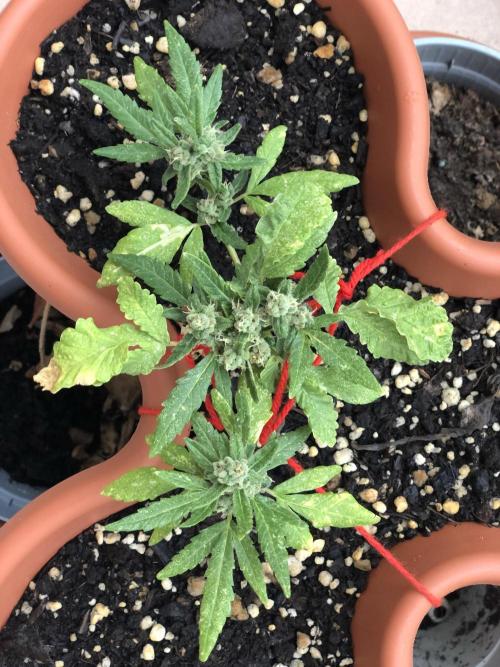
ItalianDesertBalcony Transplanted into 6L oddly shaped pot; AI Recommended 55% soil for flowering plants, 20% humus for plants, 25% perlite
likes
comments
Share
Used techniques
Transplantation
Technique
3
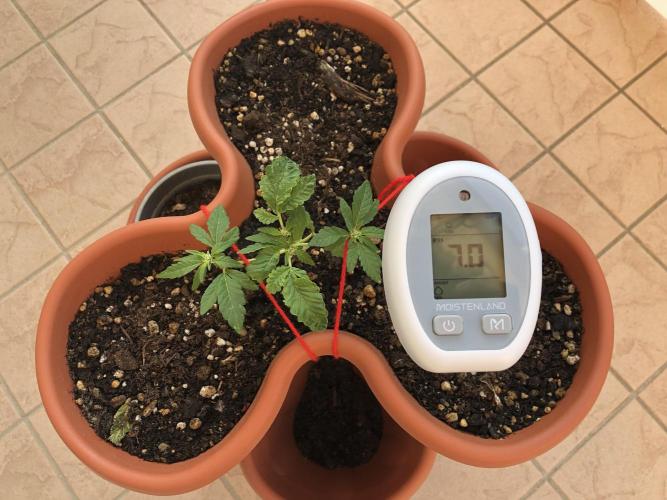
Week 3. Vegetation1mo ago

6 cm
Height
7 hrs
Light Schedule
32 °C
Day Air Temp
8.0
pH
No Smell
Smell
60 %
Air Humidity
29 °C
Night Air Temp
6 L
Pot Size
1 L
Watering Volume
ItalianDesertBalcony My water is really high in calcium; I think it’s raising the PH, the plant is showing signs of stress, 2 leaves yellowing and wilting. Super stunted growth probably due to transplant shock.
Also haven’t been feeding her anything. She’s just living off the humus lombrico from my original DIY soil mix.
likes
comments
Share
4
Week 4. Vegetation1mo ago

10 cm
Height
7 hrs
Light Schedule
27 °C
Day Air Temp
9.0
pH
No Smell
Smell
60 %
Air Humidity
29 °C
Night Air Temp
6 L
Pot Size
1 L
Watering Volume
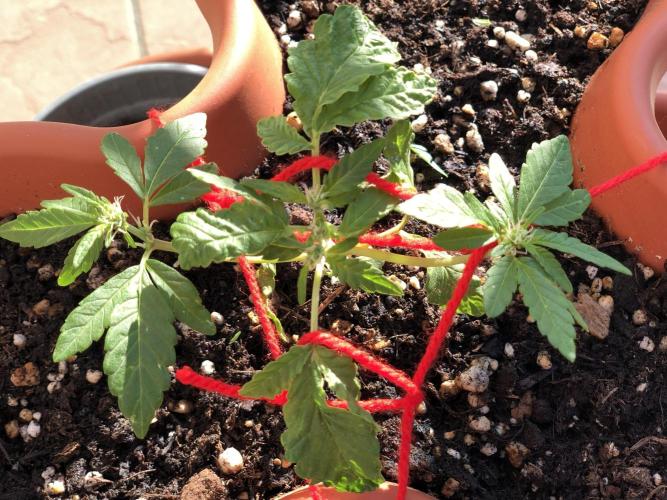
ItalianDesertBalcony Switched to distilled water to try and flush the excess calcium. Started LST. Ordered fertilizer, PH down and Cal/Mag supplements because my water has too much calcium and distilled water will not have any minerals. Advice welcome. It’s probably a miracle that she is alive, however, I did ask the guy at my local grow store to give me the easiest, most robust autoflowering for my first attempt.
1 like
comments
Share
5
Week 5. Flowering1mo ago
10 cm
Height
10 hrs
Light Schedule
27 °C
Day Air Temp
7.0
pH
No Smell
Smell
60 %
Air Humidity
29 °C
Night Air Temp
6 L
Pot Size
0.5 L
Watering Volume
Nutrients 2
Bloom
4 mll
CalMag sup
3 mll
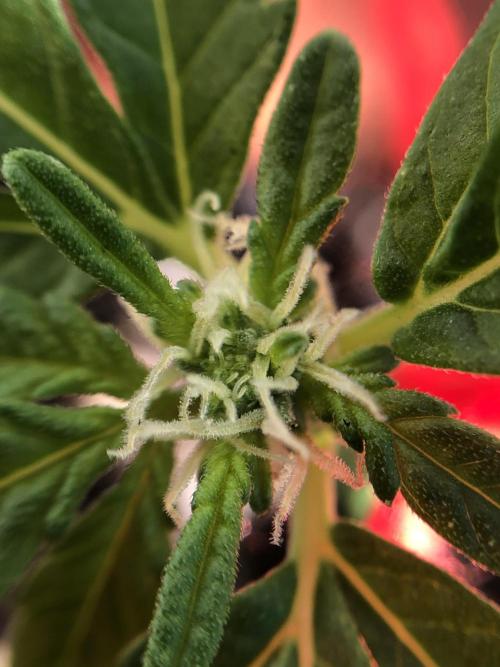
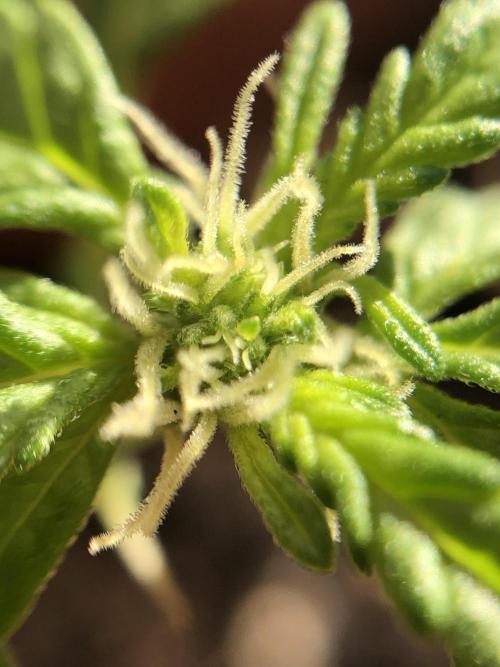
ItalianDesertBalcony So, thinking this is the first day of week5, but I’m not sure.
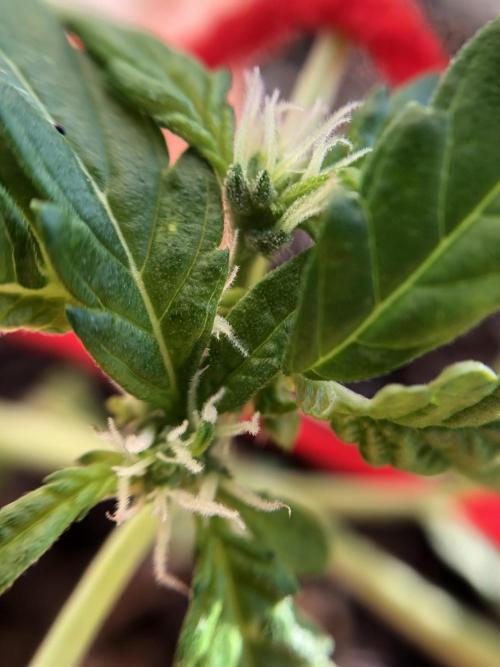
📢🗣️ I think this is ‘flowering’ but I’m not sure; comments to help me define ‘flowering’ would be appreciated, please judge my photos and let me know!
📢🗣️ I made a video of my PH reader and a photo. Comments with help for that would also be appreciated, is the PH really over 9 (my readers max) due to calcium buildup up, or is the humus lombrico giving a false reading?
500 ml distilled water (still trying to flush high calcium buildup from the local water).
When the fertilizers arrive I’ll start giving her food:
9/8 200 ml bloom, 60 ml CalMag sup
10/8 250 ml filtered tap water
Moved her to a different balcony that gets a little less morning sunlight 🌅 but a lot more afternoon sunlight ☀️
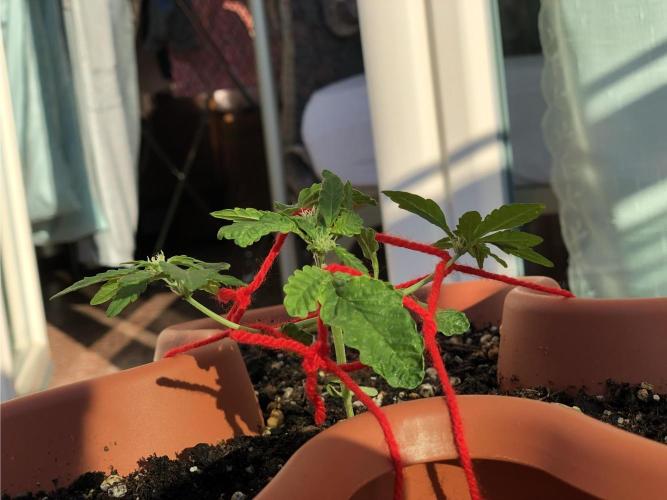
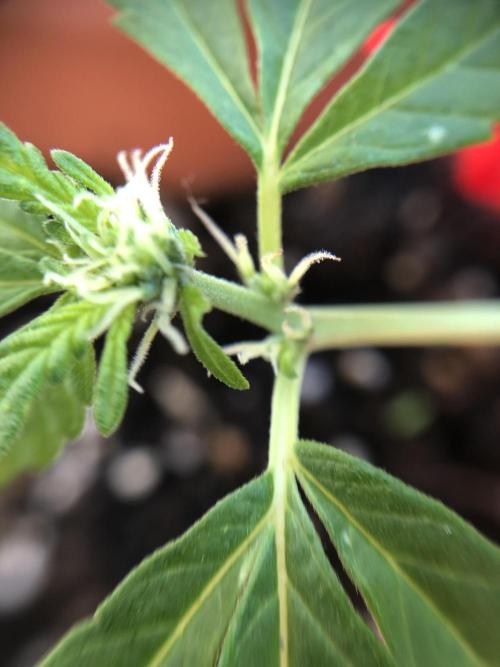
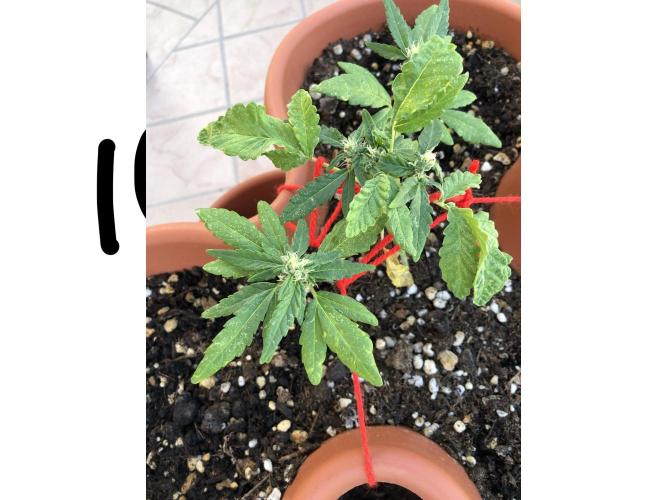
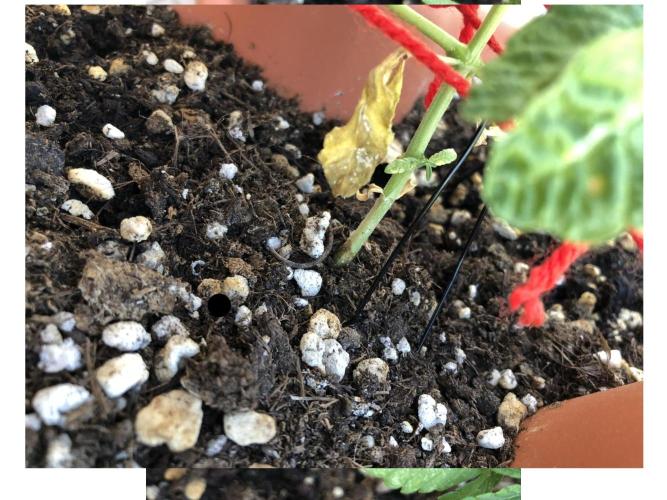
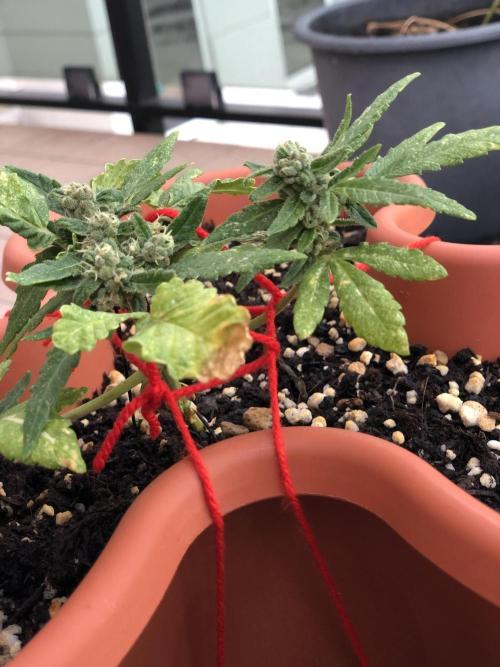
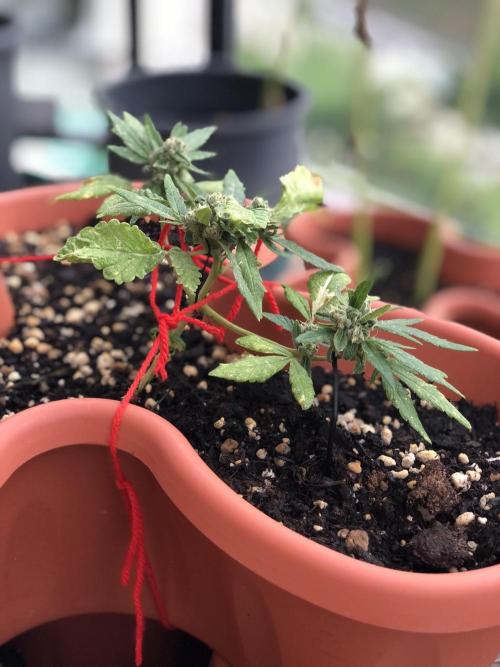
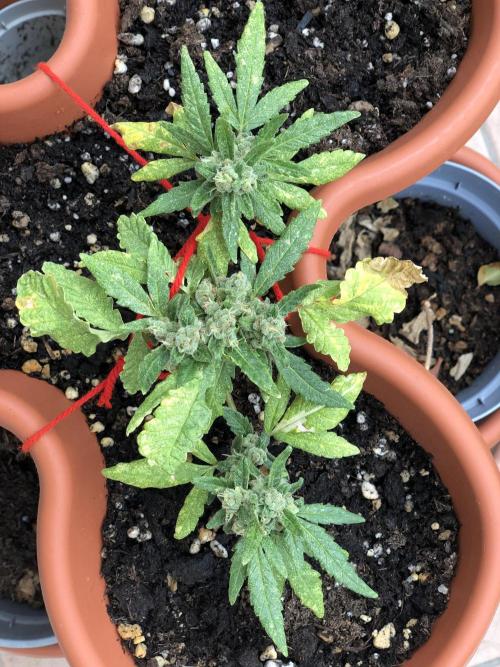
Tightened the first two LST yarns, added 2 more and discovered 2 more bud sites!
likes
comments
Share
Used techniques
LST
Technique
6
Week 6. Flowering19d ago


10 cm
Height
7 hrs
Light Schedule
27 °C
Day Air Temp
7.0
pH
Weak
Smell
60 %
Air Humidity
29 °C
Night Air Temp
6 L
Pot Size
0.5 L
Watering Volume
Nutrients 2
Bloom
4 mll
CalMag sup
3 mll
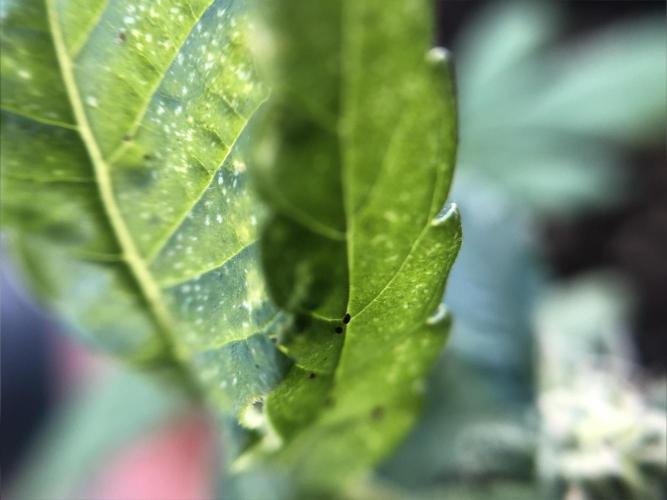
ItalianDesertBalcony So, tiny spider mites have shown up, I blame the mojito mint plant that I bought that came with them before I knew how to regocnize the signs. 🙄
Anywho, continuing with a little fertilizer and cal/mag supplement.
This will be a complete fail for my first attempt, but I’m going to see it through to the end just for the sake of learning every stage from germination to harvest.
2 likes
2 comments
Share
Used techniques
LST
Technique
7
Week 7. Flowering10d ago
10 cm
Height
6 hrs
Light Schedule
27 °C
Day Air Temp
7.0
pH
Weak
Smell
60 %
Air Humidity
21 °C
Solution Temp
29 °C
Night Air Temp
6 L
Pot Size
0.5 L
Watering Volume
Nutrients 2
Bloom
4 mll
CalMag sup
3 mll
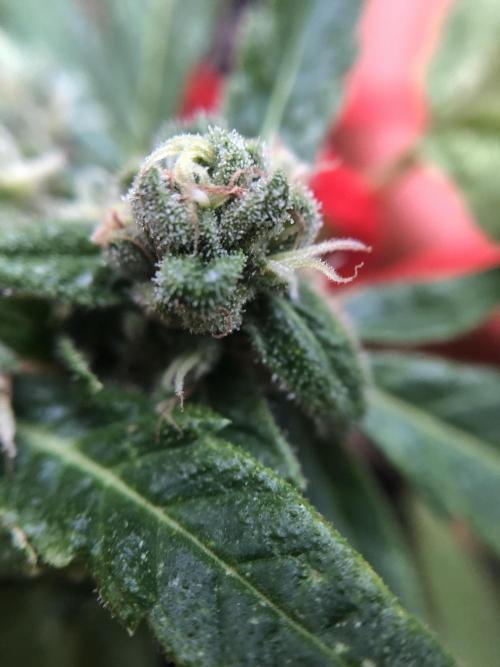
ItalianDesertBalcony Terrible storm on 23/8. Survived.
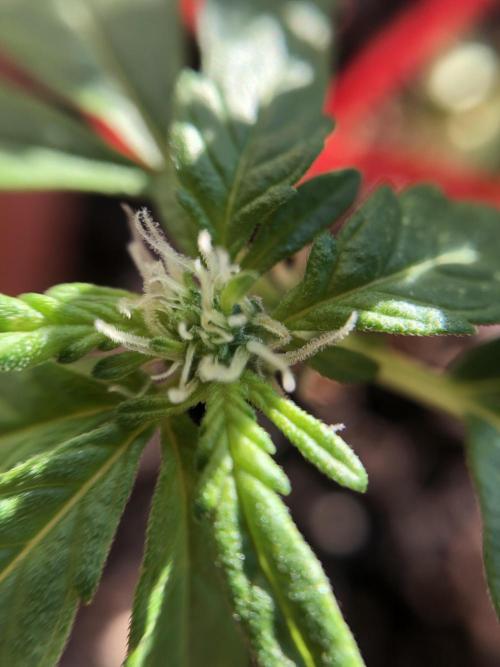
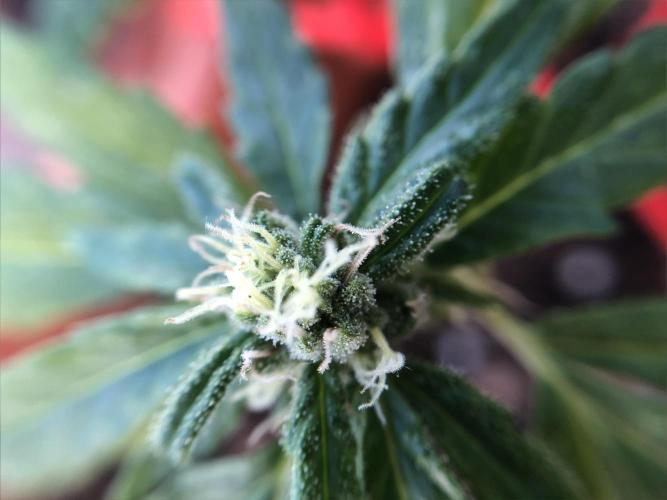
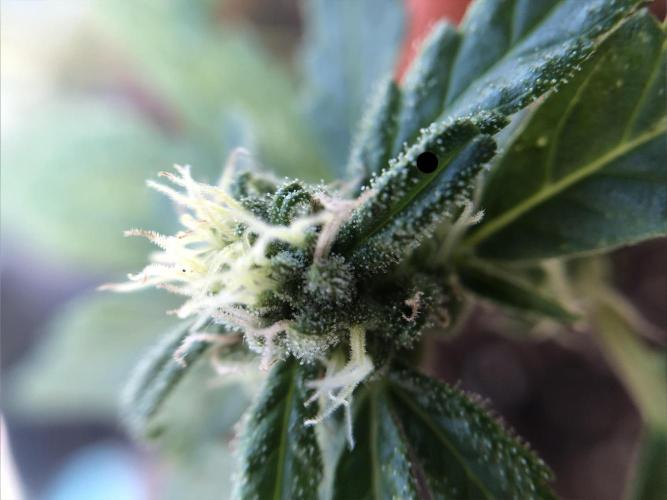
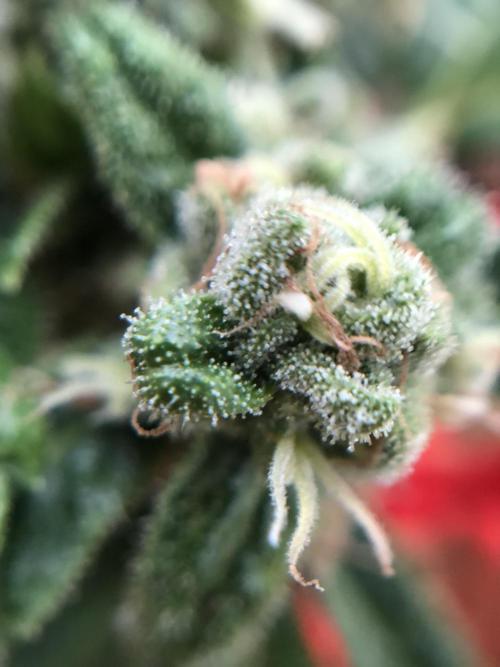
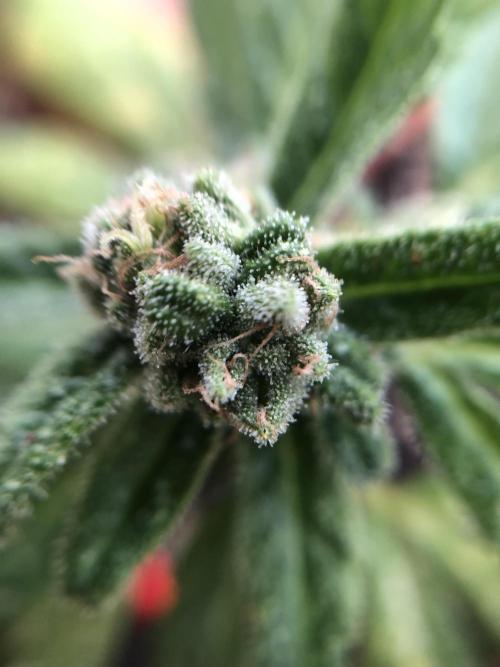
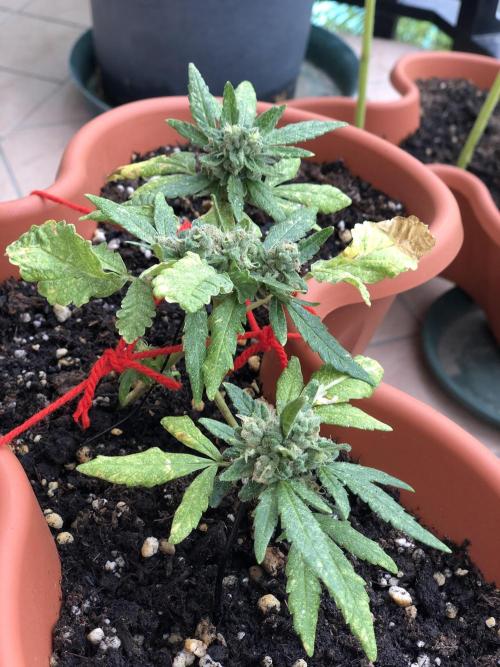
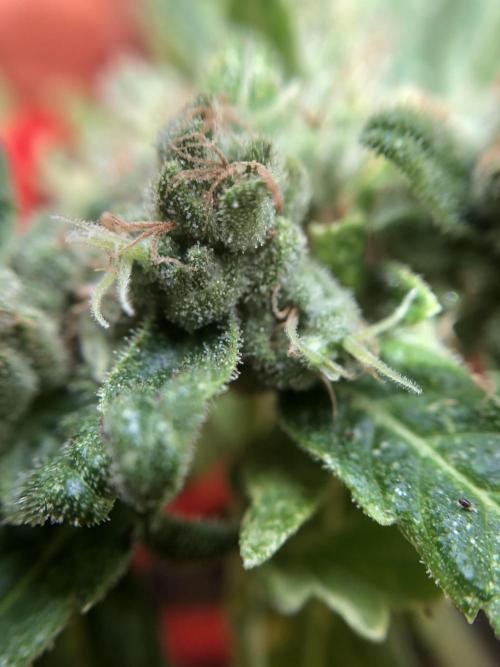
Buds look beautiful, despite spider mites (I think). Leaves are not doing great but buds seem unaffected and growing more than I could have hoped, over all I’m happy with my first attempt, if it’s even smokable I’ll be ecstatic.
1 like
comments
Share
8
Week 8. Flowering5d ago
10 cm
Height
6 hrs
Light Schedule
27 °C
Day Air Temp
7.0
pH
Weak
Smell
60 %
Air Humidity
21 °C
Solution Temp
29 °C
Night Air Temp
6 L
Pot Size
0.5 L
Watering Volume
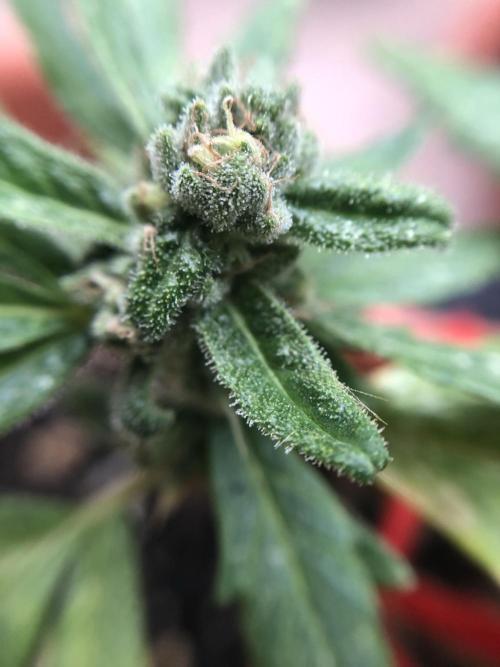
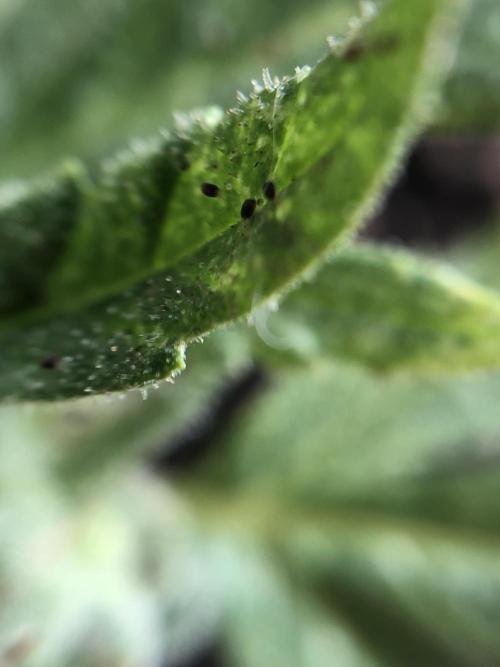
ItalianDesertBalcony There’s microscopic bugs crawling on my buds! Going to post a grow question about them.
No more nutrients, she’s definitely getting close, so let’s use plain water and hope for the best in the next week or two.
1 like
comments
Share
Used techniques
Flushing
Technique
9
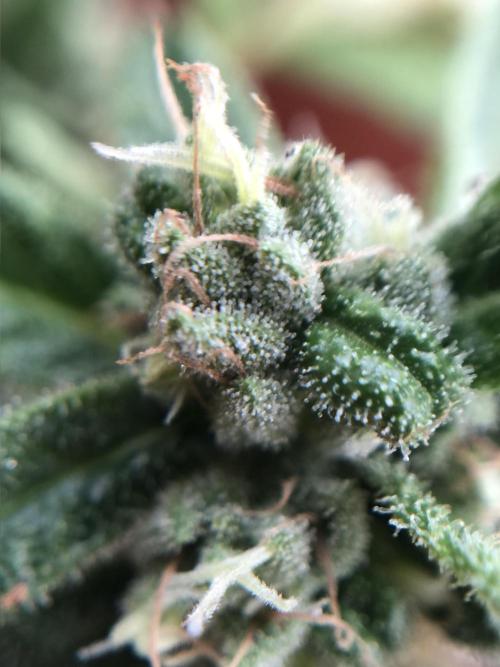
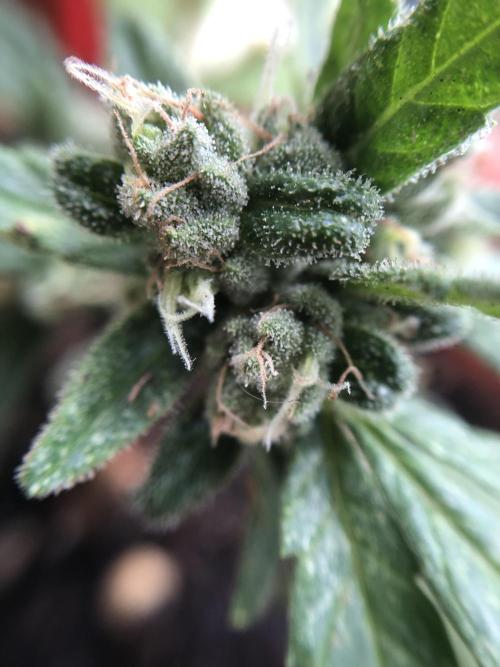
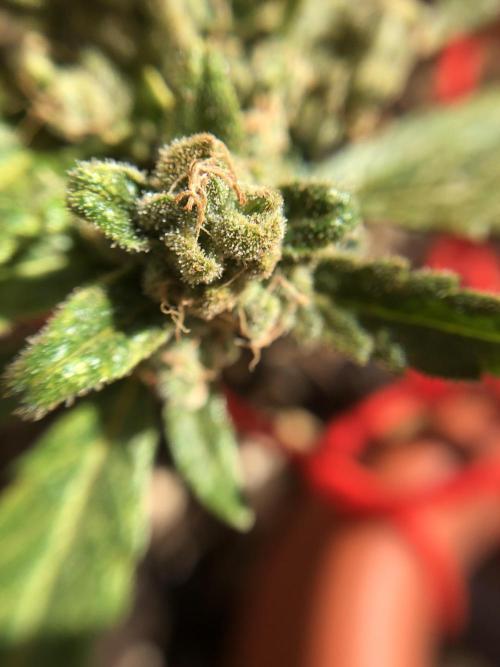
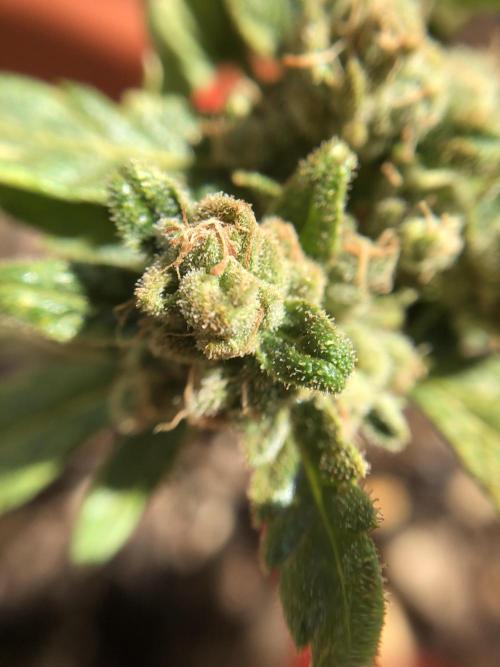
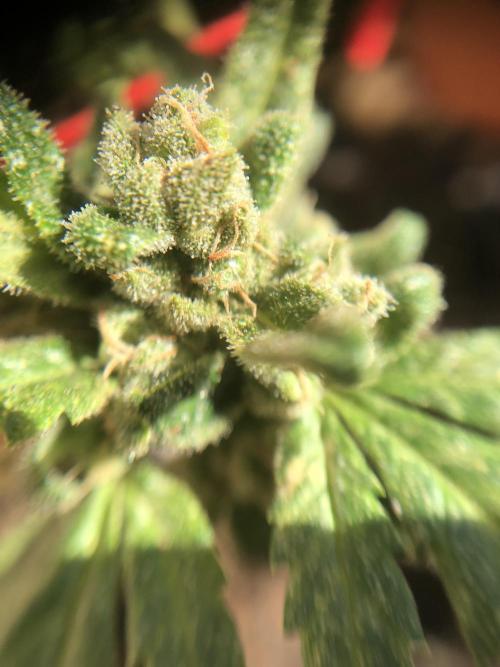
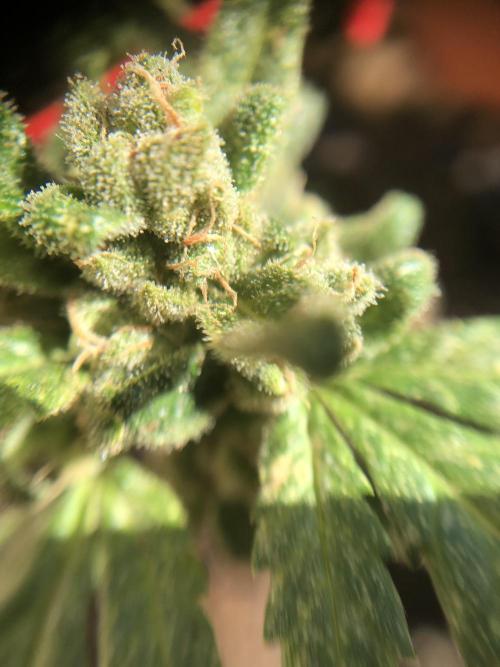
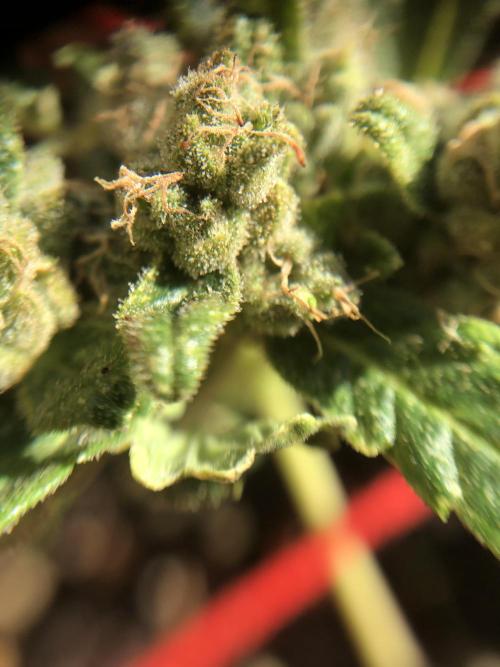
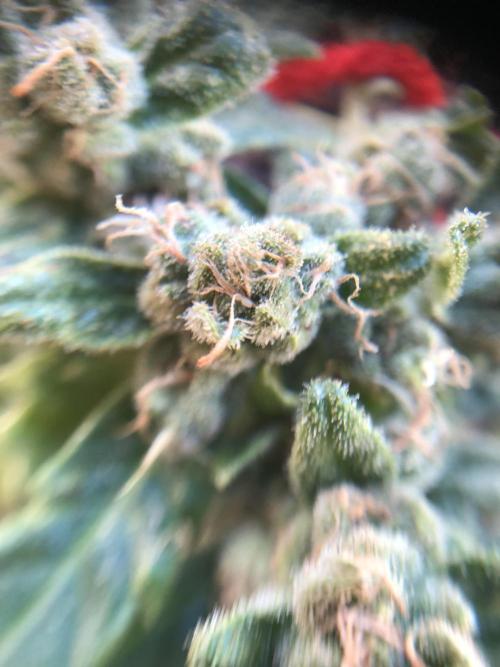
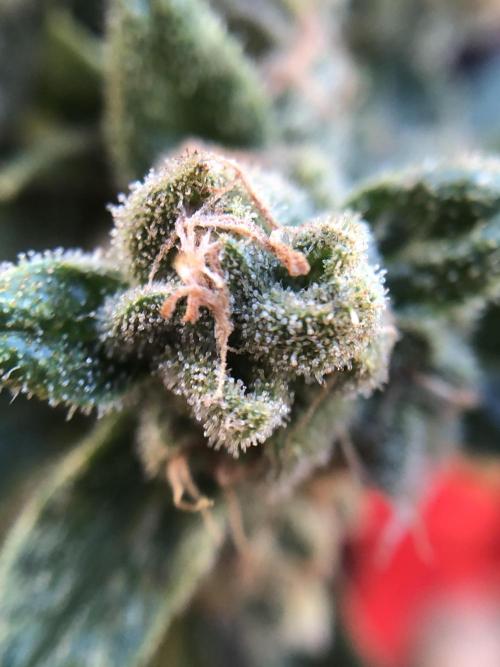
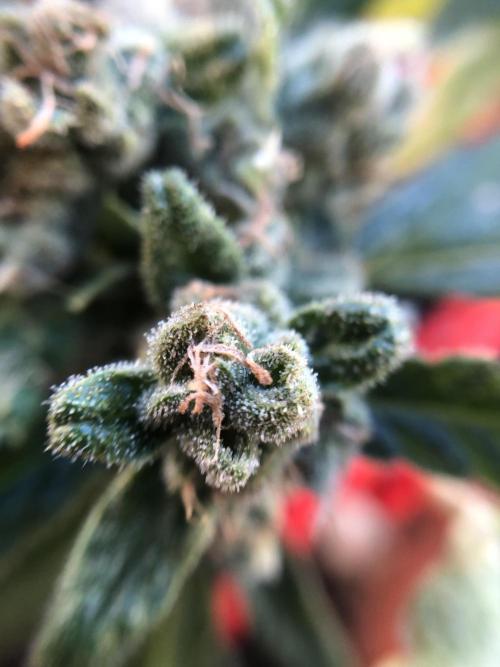
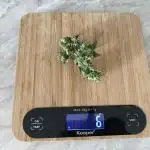
Week 9. Harvest21h ago
Happy Harvest Day!

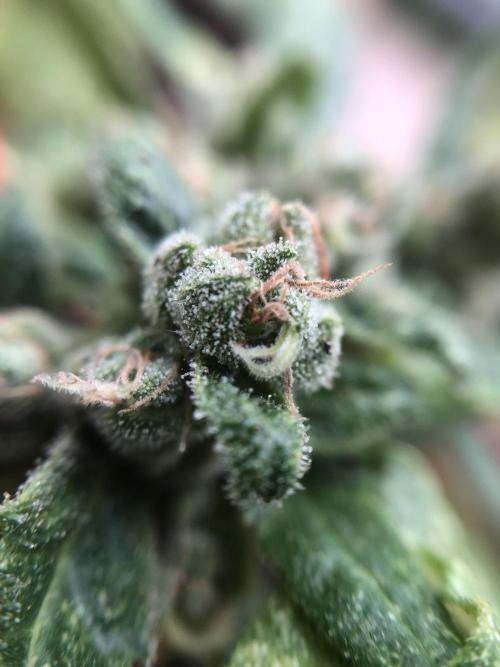
8/10
Rated
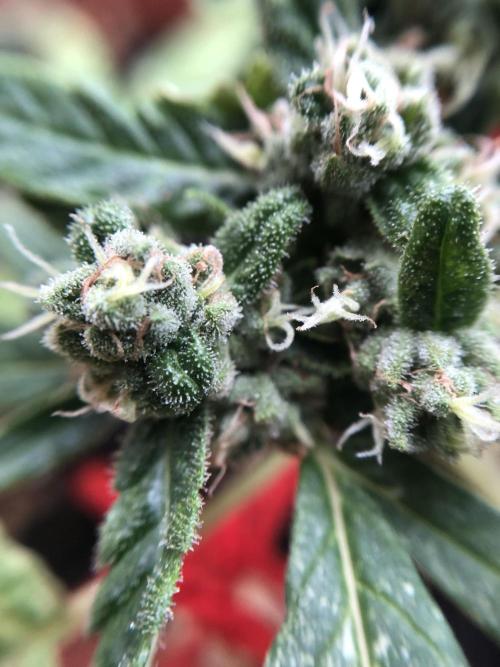
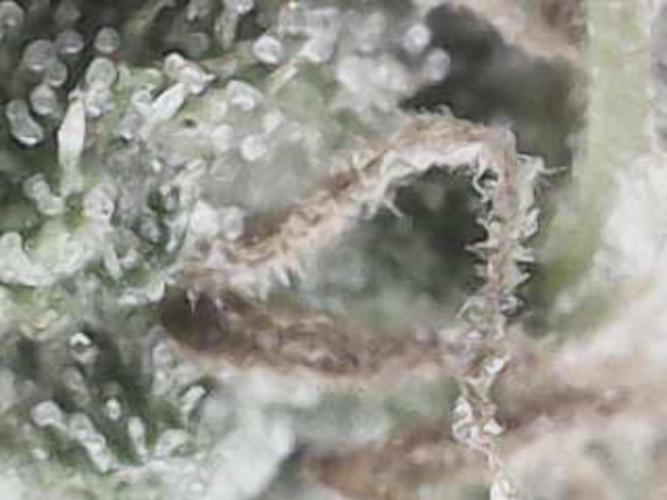
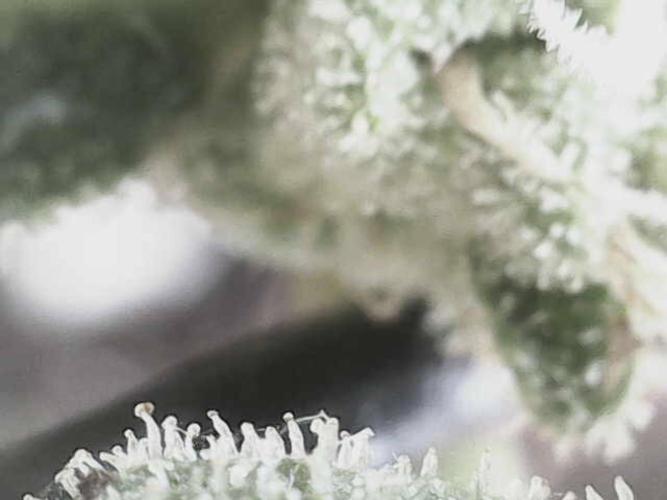
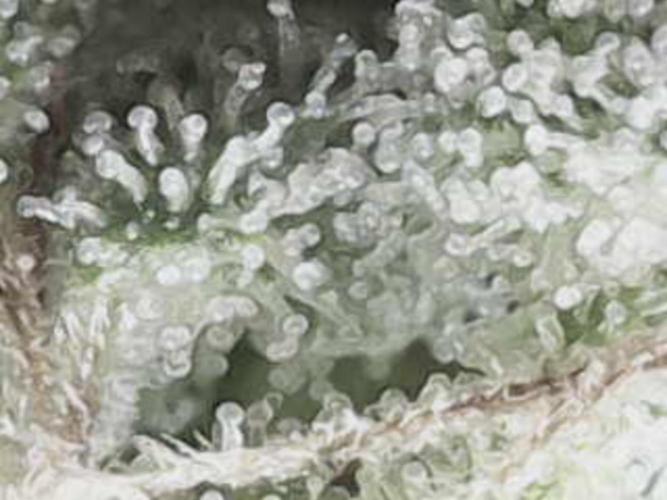
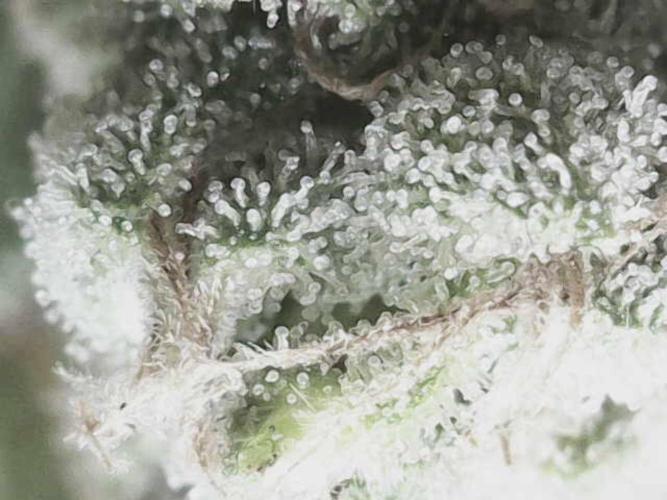
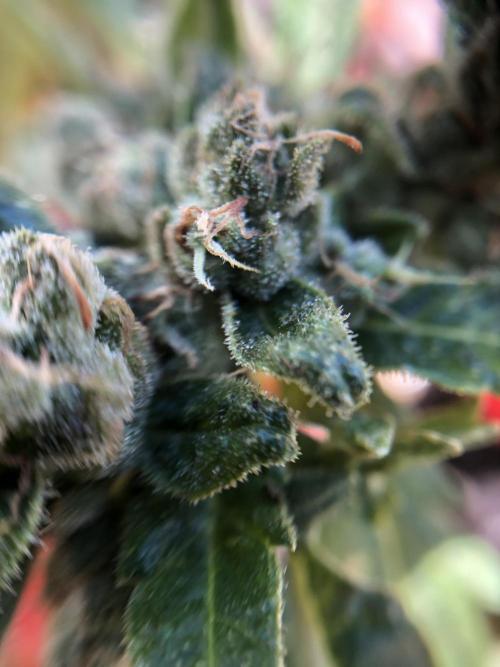
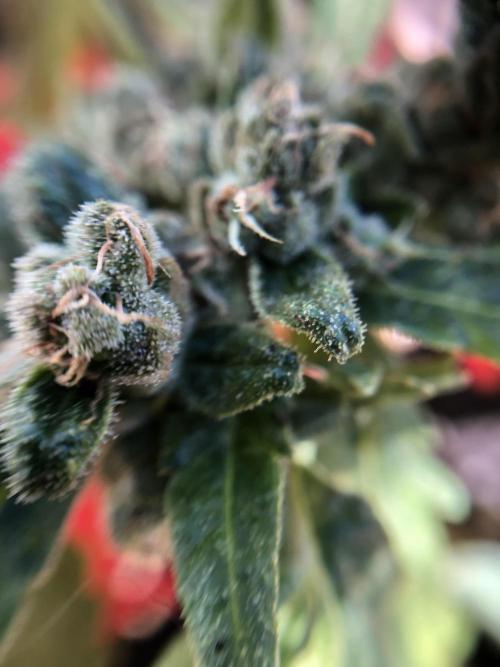
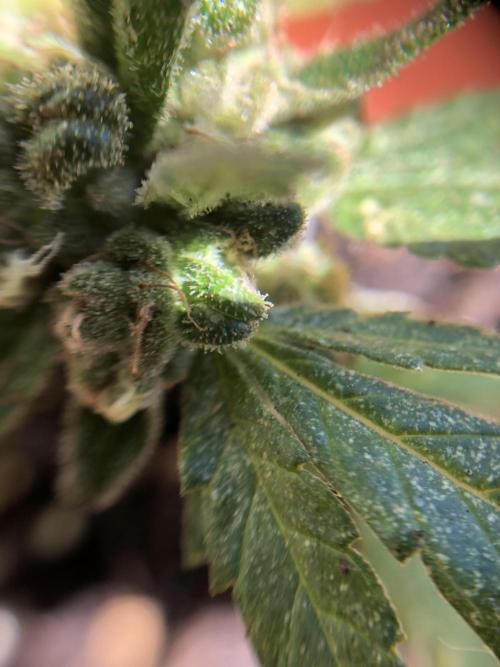
9/2 cut off the biggest buds, left one tiny baby just to see if she’ll grow. When I asked questions, some said she wasn’t close to ready, another said she was ready don’t wait another second. The day I cut her was because one of these pictures looked like all the trichomes had turned amber. Maybe it was all the trichomes on a sugar leave, maybe it was the lighting, who knows. It this is my first time growing so I have to build my experience. Please comment with opinions or advice based on the photos and we’ll see how she smokes up soon!
If I can get just one good high and watch a movie I’ll be ecstatic.
I feel bad giving a strain score because I’m not experienced enough to do that, so let’s compromise with an 8 to ensure fairness. If she smokes up well, I’ll bump it to a 9.
3 branches, washed in lemon/baking soda, hung up to dry. She’s in an antique wardrobe (only the best for my baby) in a dark bedroom I don’t use, there’s a fan near the door to the wardrobe blowing against the wall and a dehumidifier (the room was around 70%), the door to the wardrobe is open a crack for airflow.
Please comment to give me corrections to this guide, otherwise I’m following chatGPT advice:
Step-by-Step Guide to Drying Cannabis (for Smoking)
GOAL:
To slowly remove moisture from the buds without degrading cannabinoids (like THC) or terpenes (which give flavor/aroma).
What You’ll Need:
* A dark room or closet
* String, drying rack, or hangers
* Scissors (for final trim if needed)
* Hygrometer (optional but helpful – monitors humidity)
* Fan (indirect airflow only)
* Dehumidifier/humidifier (optional, for climate control)
Total Time: 7–14 days [day 1 = 9/2; day 7 = 9/9; day 14 = 9/16]
???? Step 1: Initial Prep (Right After Harvest)
* Trim large fan leaves (optional: trim sugar leaves too if you want faster drying)
* Hang whole branches or individual buds upside down using string, wire, or drying racks
* Keep some stem on to make hanging easier
Time: Same day as harvest
️ Step 2: Set Up Drying Environment
* Temperature: 60–70°F (15–21°C)
* Humidity: 50–60% RH
* Airflow: Gentle, indirect airflow to prevent mold
* Darkness: Keep the room dark to preserve THC
Tip: Use a fan pointed at a wall, not directly at buds.
Maintain this for the entire drying period.
Step 3: Monitor for Doneness (Day 5–10+) [day 5 = 9/7]
Start checking around day 5–7:
Ready to cure when:
* Small stems snap (not bend)
* Buds feel dry to the touch, but not brittle
* Outer parts are dry, but inner parts still have slight moisture
Typical drying time:
* 7 days in dry climates
* 10–14 days in humid areas or for thicker buds
Tip: Don’t rush drying — slow is smooth, smooth is tasty.
Common Mistakes to Avoid
* Don’t dry in too much heat or light (kills THC & terpenes)
* Don’t dry too fast — harsh smoke
* Don’t dry too slow — risk of mold
What’s Next? Curing
Once drying is complete, buds should be moved into jars for curing (another essential step for best smoke quality). Want a step-by-step curing guide too?
Let me know and I’ll lay it out just as clearly.
Awesome — curing is just as important as drying. Done right, it will dramatically improve your cannabis: smoother smoke, stronger aroma, better potency, and longer shelf life.
️ Step-by-Step Cannabis Curing Guide
What You’ll Need:
* Glass mason jars (wide-mouth, quart-size is ideal)
* Hygrometer (mini ones fit inside jars — optional but very helpful)
* Dark, cool storage space
* Patience
Total Time: 2–4 weeks minimum (up to 8+ weeks for top quality) [day 1 = TBA]
Step 1: Check Dryness One Last Time
Before curing, buds must be dry enough — if they're too wet, they’ll mold in the jar.
Do this:
* Bend the small stems. If they snap, you’re good.
* Buds should feel dry on the outside but still a little spongy inside.
Too wet? Leave them to dry another 1–2 days.
???? Step 2: Jar It Up
* Loosely fill glass jars about 70–75% full
* Don’t pack too tight — buds need air circulation
* Optionally, put a mini hygrometer in each jar to monitor humidity
Time: Same day you finish drying
Step 3: “Burp” the Jars (First 1–2 Weeks)
This releases moisture and refreshes air inside the jar.
Days 1–7:
* Open jars for 5–10 minutes, once or twice daily
* Gently shake or rotate buds to avoid flat spots or mold
Days 8–14:
* Burp jars once every other day
Humidity Goal:
58–62% RH inside the jar = perfect curing range
If you don’t have a hygrometer:
* Buds feel dry but still slightly springy = good
* If they feel too wet or sticky → leave jar open longer or go back to drying for a day
Step 4: Long-Term Curing (Optional but Recommended)
After 2–3 weeks, buds are smokable — but:
* 4–6 weeks = much better flavor/smoothness
* 8+ weeks = max terpene development for connoisseur quality
During long-term curing:
* Burp once a week
* Store jars in a dark, cool place (60–70°F / 15–21°C)
Signs Something's Wrong:
* Ammonia smell = mold/mildew — buds too wet, open jar ASAP
* Harsh smoke = probably dried or cured too fast
When Is It Ready to Smoke?
Anytime after 2 weeks, but peak flavor, aroma, and potency hit around 4–8 weeks.
You’ll know it’s ready when:
* Buds break apart easily but aren’t dry/dusty
* Smell is strong and pleasant
* Smoke is smooth and flavorful
Show more
Translate
Spent 51 days
Ger Veg Flo Har
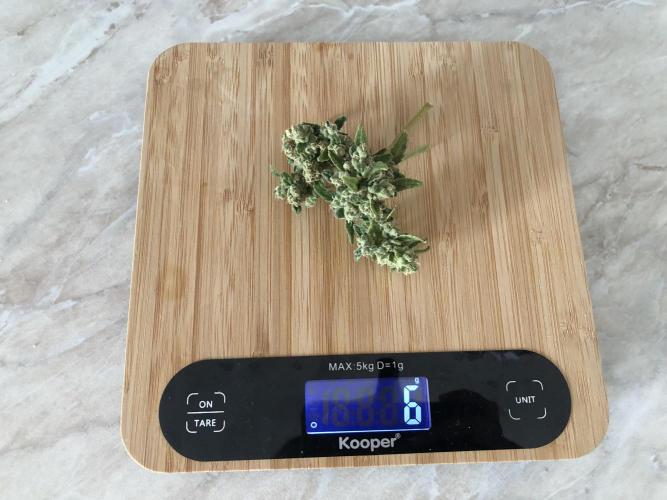
6 g
Bud wet weight per plant
1
Plants
Hard
Difficulty
Height
Day air temperature
Air humidity
PH
Light schedule
Solution temperature
Night air temperature
Pot size

ItalianDesertBalcony Day 1 harvest = 9/2
Day 5 harvest = 9/7
Day 7 = 9/9
…
Day 14 = 9/16
Curing day 1 = TBA
Not really sure what this comment is for 🤷🏻♀️
Constructive feedback in a kind tone about my first diary is welcome
1 like
comments
Share
2 comments
Sort by
popularity
popularity
newest
oldest

TruTraTricommentedweek 617d ago
Stay strong 😀
likes

ItalianDesertBalconycommented14d ago
@TruTraTri, thanks!
likes

the end.
Enjoying this diary? Follow for more updates!
Prefer the old Diary view?
Go back to the old Diary view